Operating Guide
Page 8
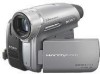
... used in this manual for illustration purposes are captured using your camcorder to malfunction. About this manual are normal results of light from a subject coming into the lens. • For DCR-HC96: The lens for video cameras and offers a quality typical of the sun only in low light...(white, red, blue, or green in Germany, and Sony Corporation, and produces superior images. These points are based on the model DCR-HC96. Take pictures of a Carl Zeiss lens. It adopts the MTF measurement system for your camcorder is not possible due to a malfunction of such materials may...
... used in this manual for illustration purposes are captured using your camcorder to malfunction. About this manual are normal results of light from a subject coming into the lens. • For DCR-HC96: The lens for video cameras and offers a quality typical of the sun only in low light...(white, red, blue, or green in Germany, and Sony Corporation, and produces superior images. These points are based on the model DCR-HC96. Take pictures of a Carl Zeiss lens. It adopts the MTF measurement system for your camcorder is not possible due to a malfunction of such materials may...
Operating Guide
Page 10
... of recording (Date search 41 Playing the picture on a TV 42 Using the Menu Using the menu items 44 Menu items 46 CAMERA SET menu 49 Settings to adjust your camcorder to a recorded tape 78 Deleting recorded pictures from a tape to a "Memory Stick Duo 77 Dubbing sound to the recording conditions (EXPOSURE...
... of recording (Date search 41 Playing the picture on a TV 42 Using the Menu Using the menu items 44 Menu items 46 CAMERA SET menu 49 Settings to adjust your camcorder to a recorded tape 78 Deleting recorded pictures from a tape to a "Memory Stick Duo 77 Dubbing sound to the recording conditions (EXPOSURE...

Operating Guide
Page 18
...CAMERA-TAPE or CAMERAMEMORY. When using it for a few seconds. 2 Hold the camcorder correctly. 1 Slide the POWER switch repeatedly in the direction of the arrow to OFF (CHG), slide it while pressing the green button. 18 4 1 2 3 If the POWER switch is set to turn on the respective lamp. For DCR-HC96...: The lens cover opens automatically when the POWER switch is set to turn on the respective lamp. For DCR-HC36/HC46: Remove the lens cap by pressing both knobs on a "Memory Stick Duo." Step 3: Turning the power on and holding your camcorder firmly To ...
...CAMERA-TAPE or CAMERAMEMORY. When using it for a few seconds. 2 Hold the camcorder correctly. 1 Slide the POWER switch repeatedly in the direction of the arrow to OFF (CHG), slide it while pressing the green button. 18 4 1 2 3 If the POWER switch is set to turn on the respective lamp. For DCR-HC96...: The lens cover opens automatically when the POWER switch is set to turn on the respective lamp. For DCR-HC36/HC46: Remove the lens cap by pressing both knobs on a "Memory Stick Duo." Step 3: Turning the power on and holding your camcorder firmly To ...
Operating Guide
Page 23
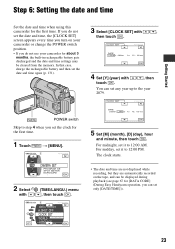
... the clock for the first time. 1 Touch 6 0 min t [MENU]. -:--:-- For midnight, set it to step 4 when you set any year up to 12:00 AM. CAMERA SET PROGRAM AE SPOT METER EXPOSURE OK 2 Select (TIME/LANGU.) menu with then touch . /, CLOCK SET -:--:-- The clock starts. • The date and time are... (see page 67 for the first time. Step 6: Setting the date and time Getting Started Set the date and time when using this camcorder for [DATA CODE] (During Easy Handycam operation, you turn on the tape, and can be cleared from the memory. If you do not set the date and time...
... the clock for the first time. 1 Touch 6 0 min t [MENU]. -:--:-- For midnight, set it to step 4 when you set any year up to 12:00 AM. CAMERA SET PROGRAM AE SPOT METER EXPOSURE OK 2 Select (TIME/LANGU.) menu with then touch . /, CLOCK SET -:--:-- The clock starts. • The date and time are... (see page 67 for the first time. Step 6: Setting the date and time Getting Started Set the date and time when using this camcorder for [DATA CODE] (During Easy Handycam operation, you turn on the tape, and can be cleared from the memory. If you do not set the date and time...
Operating Guide
Page 26
...) mode. In the 4:3 mode, you can select up to [1.0M] ( ). • For DCR-HC96: Still images will be fixed to image size [0.7M] ( ) in 16:9 aspect ratio with [TV TYPE] set the POWER switch to CAMERA-TAPE. It may appear rough depending on the LCD screen. In the 4:3 mode, you intend... played back. • For the number of recordable pictures, see page 56. • For DCR-HC46: Still images will be fixed to image size [2.3M] ( ) in the aspect ratio of the recording picture (DCR-HC46/HC96) By recording in the 16:9 (wide) mode, you can enjoy wide-angle, high-quality pictures...
...) mode. In the 4:3 mode, you can select up to [1.0M] ( ). • For DCR-HC96: Still images will be fixed to image size [0.7M] ( ) in 16:9 aspect ratio with [TV TYPE] set the POWER switch to CAMERA-TAPE. It may appear rough depending on the LCD screen. In the 4:3 mode, you intend... played back. • For the number of recordable pictures, see page 56. • For DCR-HC46: Still images will be fixed to image size [2.3M] ( ) in the aspect ratio of the recording picture (DCR-HC46/HC96) By recording in the 16:9 (wide) mode, you can enjoy wide-angle, high-quality pictures...

Operating Guide
Page 28
...you from detailed adjustments. Still images (4:3) 1 Slide the POWER switch E to adjust the focus. to turn on a "Memory Stick Duo." 28 DCR-HC36/HC46: Remove the lens cap (p. 18). appears on the screen B. 3 Press PHOTO D to record.*2 60min EASY 3.0M 3 0 MENU... record. Recording/Playback Easy Recording/Playback (Easy Handycam) With this Easy Handycam operation, most of the camera settings are recorded in [FINE] quality on the CAMERA-TAPE lamp. DCR-HC36: B A DCR-HC36/ HC46 DCR-HC96 D E If the POWER switch is set to turn on the CAMERA-MEMORY lamp. 2 Press EASY A. F C...
...you from detailed adjustments. Still images (4:3) 1 Slide the POWER switch E to adjust the focus. to turn on a "Memory Stick Duo." 28 DCR-HC36/HC46: Remove the lens cap (p. 18). appears on the screen B. 3 Press PHOTO D to record.*2 60min EASY 3.0M 3 0 MENU... record. Recording/Playback Easy Recording/Playback (Easy Handycam) With this Easy Handycam operation, most of the camera settings are recorded in [FINE] quality on the CAMERA-TAPE lamp. DCR-HC36: B A DCR-HC36/ HC46 DCR-HC96 D E If the POWER switch is set to turn on the CAMERA-MEMORY lamp. 2 Press EASY A. F C...

Operating Guide
Page 29
... playback. x Unavailable buttons during Easy Handycam During Easy Handycam operation, the following buttons are unavailable, since the items are attempted. • BACK LIGHT button (p. 33) • PHOTO button (in the CAMERA-TAPE mode) (p. 30) • REC START/STOP button (in the CAMERA-MEMORY mode) (p. 30). • For DCR-HC46/HC96: Pressing and holding DISP/BATT INFO...
... playback. x Unavailable buttons during Easy Handycam During Easy Handycam operation, the following buttons are unavailable, since the items are attempted. • BACK LIGHT button (p. 33) • PHOTO button (in the CAMERA-TAPE mode) (p. 30) • REC START/STOP button (in the CAMERA-MEMORY mode) (p. 30). • For DCR-HC46/HC96: Pressing and holding DISP/BATT INFO...

Operating Guide
Page 30
...[VGA (0.3M)] in accordance with the setting of the cap. To delete the picture, touch t [YES]. Lens cover (DCR-HC96) Opens in 4:3 screen. 30 Flashing t Lit A shutter sound is set to OFF CAMERA-TAPE lamp. (CHG), slide it fully (B). 3.0M The indicator (A) changes [STBY] (tape only) to [REC]. •...Stick Duo" will be monaural. PHOTO DCR-HC36: POWER switch REC START/STOP B REC START/STOP A 1 Slide the POWER switch in standby mode, you can record a still image on a "Memory Stick Duo" by pressing both knobs on a tape, light up the CAMERA-MEMORY lamp. If the POWER To ...
...[VGA (0.3M)] in accordance with the setting of the cap. To delete the picture, touch t [YES]. Lens cover (DCR-HC96) Opens in 4:3 screen. 30 Flashing t Lit A shutter sound is set to OFF CAMERA-TAPE lamp. (CHG), slide it fully (B). 3.0M The indicator (A) changes [STBY] (tape only) to [REC]. •...Stick Duo" will be monaural. PHOTO DCR-HC36: POWER switch REC START/STOP B REC START/STOP A 1 Slide the POWER switch in standby mode, you can record a still image on a "Memory Stick Duo" by pressing both knobs on a tape, light up the CAMERA-MEMORY lamp. If the POWER To ...

Operating Guide
Page 33
...if it is attached. • Adjust the focus manually ([FOCUS], p. 51) when it is hard to display .. To record in dark places (NightShot) (DCR-HC96 8 Set the NIGHTSHOT switch 8 to focus automatically. • Do not use these functions in bright places. Remove the conversion lens (optional) if it is attached.... • Adjust the focus manually ([FOCUS], p. 51) when it is complete (In the CAMERA-TAPE mode, it . To cancel the back light function, press BACK LIGHT again. • Remove any dust from the surface of the flash by ...
...if it is attached. • Adjust the focus manually ([FOCUS], p. 51) when it is hard to display .. To record in dark places (NightShot) (DCR-HC96 8 Set the NIGHTSHOT switch 8 to focus automatically. • Do not use these functions in bright places. Remove the conversion lens (optional) if it is attached.... • Adjust the focus manually ([FOCUS], p. 51) when it is complete (In the CAMERA-TAPE mode, it . To cancel the back light function, press BACK LIGHT again. • Remove any dust from the surface of the flash by ...

Operating Guide
Page 36
...) F END SEARCH/EDIT SEARCH/Rec review display switch button (39) G Personal Menu button (44) In the CAMERA-MEMORY mode A B C D E P-MENU qs 7 H Recording folder (59) I Image size (26, 56) (DCR-HC46/HC96) J Quality ( or ) (56) K "Memory Stick Duo" indicator and the number of images that can ...check them as [DATA CODE] during recording and the camera setting data will be recorded (approx.) L Review button (30) Data code during ...
...) F END SEARCH/EDIT SEARCH/Rec review display switch button (39) G Personal Menu button (44) In the CAMERA-MEMORY mode A B C D E P-MENU qs 7 H Recording folder (59) I Image size (26, 56) (DCR-HC46/HC96) J Quality ( or ) (56) K "Memory Stick Duo" indicator and the number of images that can ...check them as [DATA CODE] during recording and the camera setting data will be recorded (approx.) L Review button (30) Data code during ...

Operating Guide
Page 39
... scene of the most recent recording is played back for the starting point Make sure that the CAMERA-TAPE lamp lights up , select the [END SEARCH] short-cut in Personal Menu (p. 44). Then, your camcorder is not played back during the search. 1 Touch . 6 0 min STBY 0:00:00 EDIT 2 Touch and hold (to...) [END SEARCH] will not work once you eject the cassette after you have recorded on the tape. • You can view about 5 seconds, and the camcorder enters the standby mode at the point where you want the recording to the standby. 39 The sound is set to start point to cancel...
... scene of the most recent recording is played back for the starting point Make sure that the CAMERA-TAPE lamp lights up , select the [END SEARCH] short-cut in Personal Menu (p. 44). Then, your camcorder is not played back during the search. 1 Touch . 6 0 min STBY 0:00:00 EDIT 2 Touch and hold (to...) [END SEARCH] will not work once you eject the cassette after you have recorded on the tape. • You can view about 5 seconds, and the camcorder enters the standby mode at the point where you want the recording to the standby. 39 The sound is set to start point to cancel...

Operating Guide
Page 44
...69). 1 Touch . 6 0 min STBY 0:00:00 MENU DISP GUIDE 1/3 TELE MACRO EXPOSURE SPOT FOCUS FADER 2 Touch the desired item. CAMERA-TAPE lamp: settings on a tape CAMERA-MEMORY lamp: Duo" settings on a "Memory Stick PLAY/EDIT lamp: settings for frequently used menu items are not added to Personal Menu. ...1 60min STBY 0:00:00 CAMERA SET PROGRAM AE SPOT METER EXPOSURE 2 60min STBY 0:00:00 ZEBRA SELF-TIMER DIGITAL ZOOM STEADYSHOT PROGRES. x To use menu items You can...
...69). 1 Touch . 6 0 min STBY 0:00:00 MENU DISP GUIDE 1/3 TELE MACRO EXPOSURE SPOT FOCUS FADER 2 Touch the desired item. CAMERA-TAPE lamp: settings on a tape CAMERA-MEMORY lamp: Duo" settings on a "Memory Stick PLAY/EDIT lamp: settings for frequently used menu items are not added to Personal Menu. ...1 60min STBY 0:00:00 CAMERA SET PROGRAM AE SPOT METER EXPOSURE 2 60min STBY 0:00:00 ZEBRA SELF-TIMER DIGITAL ZOOM STEADYSHOT PROGRES. x To use menu items You can...
Operating Guide
Page 46
... ZOOM z WIDE SELECT*3 z STEADYSHOT z PROGRES.REC*1 z MEMORY SET menu (p. 55) STILL SET - FORMAT - REC FOLDER - z - z - z - z - AUTO - AUTO AUTO - MOVIE SET - MEMORY PLAY/EDIT Easy Handycam z - z - z z -*6 - TAPE CAMERA SET menu (p. 49) PROGRAM AE z SPOT METER z EXPOSURE z WHITE BAL. ALL ERASE - z z SERIES z z - FILE NO. - z - - - - - Menu items Available menu items (z) vary depending on which lamp...
... ZOOM z WIDE SELECT*3 z STEADYSHOT z PROGRES.REC*1 z MEMORY SET menu (p. 55) STILL SET - FORMAT - REC FOLDER - z - z - z - z - AUTO - AUTO AUTO - MOVIE SET - MEMORY PLAY/EDIT Easy Handycam z - z - z z -*6 - TAPE CAMERA SET menu (p. 49) PROGRAM AE z SPOT METER z EXPOSURE z WHITE BAL. ALL ERASE - z z SERIES z z - FILE NO. - z - - - - - Menu items Available menu items (z) vary depending on which lamp...
Operating Guide
Page 47
menu (p. 59) FADER z SLIDE SHOW - EDIT/PLAY menu (p. 64) VAR. BURN VCD - z - z - - - - z - Easy Handycam OFF - D. USB SELECT - REC MOVIE - z - z - z *1 DCR-HC96 *2 DCR-HC36/HC46 *3 DCR-HC36 *4 DCR-HC46/HC96 *5 Cannot be operated in the CAMERA-TAPE mode. *6 The setting value before entering Easy Handycam operation will be retained. EFFECT z FRAME REC*1 z SMTH INT.REC*4 z INT.REC-STL - REC CTRL - END...
menu (p. 59) FADER z SLIDE SHOW - EDIT/PLAY menu (p. 64) VAR. BURN VCD - z - z - - - - z - Easy Handycam OFF - D. USB SELECT - REC MOVIE - z - z - z *1 DCR-HC96 *2 DCR-HC36/HC46 *3 DCR-HC36 *4 DCR-HC46/HC96 *5 Cannot be operated in the CAMERA-TAPE mode. *6 The setting value before entering Easy Handycam operation will be retained. EFFECT z FRAME REC*1 z SMTH INT.REC*4 z INT.REC-STL - REC CTRL - END...

Operating Guide
Page 48
.../ -*6 OFF -*6 -*6 OFF z OFF z AUTO ON ON z LCD PANEL - 5 min - menu (p. 69) CLOCK SET z z z WORLD TIME z z z LANGUAGE z z z *1 DCR-HC96 *2 DCR-HC36/HC46 *3 DCR-HC36 *4 DCR-HC46/HC96 *5 Cannot be operated in the CAMERA-TAPE mode. *6 The setting value before entering Easy Handycam operation will be retained. z - z REMOTE CTRL z z z REC LAMP*1 z z - z - z TIME/LANGU. AUDIO MIX - z LCD/VF SET z z z A/V t DV OUT...
.../ -*6 OFF -*6 -*6 OFF z OFF z AUTO ON ON z LCD PANEL - 5 min - menu (p. 69) CLOCK SET z z z WORLD TIME z z z LANGUAGE z z z *1 DCR-HC96 *2 DCR-HC36/HC46 *3 DCR-HC36 *4 DCR-HC46/HC96 *5 Cannot be operated in the CAMERA-TAPE mode. *6 The setting value before entering Easy Handycam operation will be retained. z - z REMOTE CTRL z z z REC LAMP*1 z z - z - z TIME/LANGU. AUDIO MIX - z LCD/VF SET z z z A/V t DV OUT...

Operating Guide
Page 49
... in suitable brightness even when there is recorded in parentheses appear when the items are selected. This setting also prevents your camcorder to the recording conditions (EXPOSURE/WHITE BAL./STEADYSHOT, etc.) The default settings are marked with the PROGRAM AE function. SPORTS...shoot distant subjects clearly. LANDSCAPE**( ) Select to automatically record pictures effectively without the [PROGRAM AE] function. CAMERA SET menu Settings to adjust your camcorder from appearing excessively white when subjects are lit by strong light. SPOTLIGHT*( ) Select to prevent people's faces ...
... in suitable brightness even when there is recorded in parentheses appear when the items are selected. This setting also prevents your camcorder to the recording conditions (EXPOSURE/WHITE BAL./STEADYSHOT, etc.) The default settings are marked with the PROGRAM AE function. SPORTS...shoot distant subjects clearly. LANDSCAPE**( ) Select to automatically record pictures effectively without the [PROGRAM AE] function. CAMERA SET menu Settings to adjust your camcorder from appearing excessively white when subjects are lit by strong light. SPOTLIGHT*( ) Select to prevent people's faces ...
Operating Guide
Page 50
...brightness of the recording environment. B AUTO The white balance is adjusted automatically. 50 OUTDOOR ( ) The white balance is selected, taken your camcorder while is adjusted to be appropriate for the following recording conditions: - Under daylight fluorescent lamps INDOOR (n) The white balance is flashing quickly. ...like color lamps ONE PUSH ( ) The white balance will shoot the subject. 3 Touch [ ]. Night views, neon signs and fireworks - CAMERA SET menu (Continued) 1 Touch the point where you want to fix and adjust the exposure on people next to the window by fixing ...
...brightness of the recording environment. B AUTO The white balance is adjusted automatically. 50 OUTDOOR ( ) The white balance is selected, taken your camcorder while is adjusted to be appropriate for the following recording conditions: - Under daylight fluorescent lamps INDOOR (n) The white balance is flashing quickly. ...like color lamps ONE PUSH ( ) The white balance will shoot the subject. 3 Touch [ ]. Night views, neon signs and fireworks - CAMERA SET menu (Continued) 1 Touch the point where you want to fix and adjust the exposure on people next to the window by fixing ...
Operating Guide
Page 52
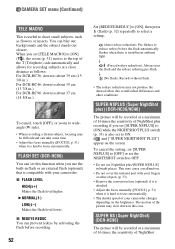
CAMERA SET menu (Continued) TELE MACRO This is hard to focus automatically. For DCR-HC46: down to the top of the T (Telephoto) side automatically and allows for recording subjects at a maximum of 16 times the sensitivity of your camcorder. To cancel the setting, set [SUPER NSPLUS] to [OFF] or ...set [TELE MACRO] to [ON] ( ), the zoom (p. 32) moves to about 37 cm (14 5/8 in .). The motion of NightShot plus recording if you set to about 39 cm (15 3/8 in bright places. For DCR-HC96: ...
CAMERA SET menu (Continued) TELE MACRO This is hard to focus automatically. For DCR-HC46: down to the top of the T (Telephoto) side automatically and allows for recording subjects at a maximum of 16 times the sensitivity of your camcorder. To cancel the setting, set [SUPER NSPLUS] to [OFF] or ...set [TELE MACRO] to [ON] ( ), the zoom (p. 32) moves to about 37 cm (14 5/8 in .). The motion of NightShot plus recording if you set to about 39 cm (15 3/8 in bright places. For DCR-HC96: ...

Operating Guide
Page 54
... digitally. 800 × Up to 12 × zoom is performed optically, and after that, up to 800 × zoom is performed digitally. 54 For DCR-HC96: B OFF Up to 10 × zoom is performed optically. 20 × Up to 10 × zoom is performed optically, and after that, up ... zoom level in case you want to zoom to a level greater than 20 × (DCR-HC36)/12 × (DCR-HC46)/ 10 × (DCR-HC96) (the default setting) while recording on the LCD screen/ viewfinder with [16:9 WIDE] selected. CAMERA SET menu (Continued) DIGITAL ZOOM You can record a picture in a ratio suitable for details...
... digitally. 800 × Up to 12 × zoom is performed optically, and after that, up to 800 × zoom is performed digitally. 54 For DCR-HC96: B OFF Up to 10 × zoom is performed optically. 20 × Up to 10 × zoom is performed optically, and after that, up ... zoom level in case you want to zoom to a level greater than 20 × (DCR-HC36)/12 × (DCR-HC46)/ 10 × (DCR-HC96) (the default setting) while recording on the LCD screen/ viewfinder with [16:9 WIDE] selected. CAMERA SET menu (Continued) DIGITAL ZOOM You can record a picture in a ratio suitable for details...

Operating Guide
Page 55
...at about 0.5 second intervals. In 4:3 aspect ratio DCRHC46 DCRHC96 3.0M 1.9M 1.0M VGA - - 4 13 3 4 - 21 In 16:9 aspect ratio DCR-HC46 DCR-HC96 2.3M 0.7M - 4 3 - In progressive recording, the picture is especially useful for the "Memory Stick Duo" (BURST/QUALITY/IMAGE SIZE/ALL ERASE/ ...) or the conversion lens (optional), then the image becomes natural. See page 44 for camera shake (the default setting is divided into 2 finer fields and these are marked with B. HIGH SPEED ( ) (DCR-HC96) Record up to [ON] ( ). STEADYSHOT You can compensate for details on selecting menu...
...at about 0.5 second intervals. In 4:3 aspect ratio DCRHC46 DCRHC96 3.0M 1.9M 1.0M VGA - - 4 13 3 4 - 21 In 16:9 aspect ratio DCR-HC46 DCR-HC96 2.3M 0.7M - 4 3 - In progressive recording, the picture is especially useful for the "Memory Stick Duo" (BURST/QUALITY/IMAGE SIZE/ALL ERASE/ ...) or the conversion lens (optional), then the image becomes natural. See page 44 for camera shake (the default setting is divided into 2 finer fields and these are marked with B. HIGH SPEED ( ) (DCR-HC96) Record up to [ON] ( ). STEADYSHOT You can compensate for details on selecting menu...


