
Operating Guide
Page 3
... short out parts that it is exposed to your home, consult your protection, please read these slots and openings must never be operated only from battery power, or other similar surface. - Accessories Do not place the set , and to insert the plug fully into the power outlet only one way. To...
... short out parts that it is exposed to your home, consult your protection, please read these slots and openings must never be operated only from battery power, or other similar surface. - Accessories Do not place the set , and to insert the plug fully into the power outlet only one way. To...
Operating Guide
Page 5
... U.S.A. This Class B digital apparatus complies with Part 15 of rechargeable batteries, call upon your used with the Handycam Station Model DCRA-C155 and AC Adaptor Model AC-L200/L200B. Note DCR-HC48 is for future reference. Owner's Record The model and serial numbers .... CAUTION Replace the battery with Part 15 of Conformity Trade Name: SONY Model No.: DCR-HC48 Responsible Party: Sony Electronics Inc. Otherwise, fire or injury may call: Sony Customer Information Center 1-800222-SONY (7669). and CANADA RECYCLING LITHIUM-ION BATTERIES Lithium-Ion batteries are located on the...
... U.S.A. This Class B digital apparatus complies with Part 15 of rechargeable batteries, call upon your used with the Handycam Station Model DCRA-C155 and AC Adaptor Model AC-L200/L200B. Note DCR-HC48 is for future reference. Owner's Record The model and serial numbers .... CAUTION Replace the battery with Part 15 of Conformity Trade Name: SONY Model No.: DCR-HC48 Responsible Party: Sony Electronics Inc. Otherwise, fire or injury may call: Sony Customer Information Center 1-800222-SONY (7669). and CANADA RECYCLING LITHIUM-ION BATTERIES Lithium-Ion batteries are located on the...

Operating Guide
Page 6
...and used in order to comply with the instructions, may apply, See www.dtsc.ca.gov/hazardouswaste/perchlorate Perchlorate Material: Lithium battery contains perchlorate. These limits are designed to provide reasonable protection against harmful interference in a particular installation. If this first (...Continued) Note This equipment has been tested and found to comply with the limits for connecting the camcorder to a computer and using a "Memory Stick Duo" with the Cassette Memory function (p. 78). Connect the equipment into the Memory ...
...and used in order to comply with the instructions, may apply, See www.dtsc.ca.gov/hazardouswaste/perchlorate Perchlorate Material: Lithium battery contains perchlorate. These limits are designed to provide reasonable protection against harmful interference in a particular installation. If this first (...Continued) Note This equipment has been tested and found to comply with the limits for connecting the camcorder to a computer and using a "Memory Stick Duo" with the Cassette Memory function (p. 78). Connect the equipment into the Memory ...

Operating Guide
Page 7
...Connect the A/V connecting cable to OFF (CHG) when you insert the camcorder into the Handycam Station or remove the camcorder from it. However, there may cause malfunctions. • Do not aim at dusk. Continued , 7 Viewfinder Battery pack About menu items, LCD panel, viewfinder, and lens • ... jack of the manufacturing process and do not affect the recording in each local language are normal results of the Handycam Station when using your camcorder to direct sunlight for illustrating the operating procedures. See "On use . Black point White, red, blue or ...
...Connect the A/V connecting cable to OFF (CHG) when you insert the camcorder into the Handycam Station or remove the camcorder from it. However, there may cause malfunctions. • Do not aim at dusk. Continued , 7 Viewfinder Battery pack About menu items, LCD panel, viewfinder, and lens • ... jack of the manufacturing process and do not affect the recording in each local language are normal results of the Handycam Station when using your camcorder to direct sunlight for illustrating the operating procedures. See "On use . Black point White, red, blue or ...
Operating Guide
Page 9
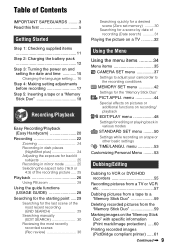
... the menu items .......... 34 Menu items 35 CAMERA SET menu 37 Settings to adjust your camcorder to the recording conditions MEMORY SET menu 42 Settings for the "Memory Stick Duo" PICT.... .........3 Read this first 5 Getting Started Step 1: Checking supplied items 11 Step 2: Charging the battery pack 12 Step 3: Turning the power on and setting the date and time 15 Changing the language... Inserting a tape or a "Memory Stick Duo 18 Recording/Playback Easy Recording/Playback (Easy Handycam 20 Recording 22 Zooming 24 Recording in dark places (NightShot plus 24 Adjusting the exposure for ...
... the menu items .......... 34 Menu items 35 CAMERA SET menu 37 Settings to adjust your camcorder to the recording conditions MEMORY SET menu 42 Settings for the "Memory Stick Duo" PICT.... .........3 Read this first 5 Getting Started Step 1: Checking supplied items 11 Step 2: Charging the battery pack 12 Step 3: Turning the power on and setting the date and time 15 Changing the language... Inserting a tape or a "Memory Stick Duo 18 Recording/Playback Easy Recording/Playback (Easy Handycam 20 Recording 22 Zooming 24 Recording in dark places (NightShot plus 24 Adjusting the exposure for ...

Operating Guide
Page 10
... ...... 77 Maintenance and precautions ...... 78 Usable cassette tapes 78 About the "Memory Stick 79 About the "InfoLITHIUM" battery pack 80 About i.LINK 81 On using your camcorder 82 Specifications 86 Quick Reference Identifying parts and controls ....... 90 Indicators displayed during recording/ playback 94 Index 97 Spanish Quick Guide/Guía rápida...
... ...... 77 Maintenance and precautions ...... 78 Usable cassette tapes 78 About the "Memory Stick 79 About the "InfoLITHIUM" battery pack 80 About i.LINK 81 On using your camcorder 82 Specifications 86 Quick Reference Identifying parts and controls ....... 90 Indicators displayed during recording/ playback 94 Index 97 Spanish Quick Guide/Guía rápida...

Operating Guide
Page 11
Getting Started Getting Started Step 1: Checking supplied items Make sure that item supplied. The number in the parentheses indicates the number of that you have following items supplied with your camcorder. A/V connecting cable (1) (p. 32, 55) USB cable (1) (p. 61) 11 AC Adaptor (1) (p. 12) Rechargeable battery pack NP-FH40 (1) (p. 12, 80) Power cord (1) (p. 12) CD-ROM "Handycam Application Software" (1) (p. 63) Operating Guide (This manual) (1) Handycam Station (1) (p. 12, 93) Wireless Remote Commander (1) (p. 93) A button-type lithium battery is already installed.
Getting Started Getting Started Step 1: Checking supplied items Make sure that item supplied. The number in the parentheses indicates the number of that you have following items supplied with your camcorder. A/V connecting cable (1) (p. 32, 55) USB cable (1) (p. 61) 11 AC Adaptor (1) (p. 12) Rechargeable battery pack NP-FH40 (1) (p. 12, 80) Power cord (1) (p. 12) CD-ROM "Handycam Application Software" (1) (p. 63) Operating Guide (This manual) (1) Handycam Station (1) (p. 12, 93) Wireless Remote Commander (1) (p. 93) A button-type lithium battery is already installed.

Operating Guide
Page 12
... way to the bottom. b Notes • You cannot attach any "InfoLITHIUM" battery pack other than the H series to your camcorder. 1 Align the terminals of the battery pack and your camcorder (1), then attach the battery pack and click it to your camcoder from the Handycam Station. 2 Slide the POWER switch to the DC IN jack on the...
... way to the bottom. b Notes • You cannot attach any "InfoLITHIUM" battery pack other than the H series to your camcorder. 1 Align the terminals of the battery pack and your camcorder (1), then attach the battery pack and click it to your camcoder from the Handycam Station. 2 Slide the POWER switch to the DC IN jack on the...

Operating Guide
Page 13
... illustration. To charge the battery pack using only the AC Adaptor Turn off the power, then press PUSH. 2 Remove the battery pack in the direction of the arrow. POWER switch To remove your camcorder from the Handycam Station Turn off the power, then remove the camcorder from the DC IN jack... holding both the Handycam Station and the DC plug. To remove the battery pack 1 Turn off the power, then connect the AC Adaptor...
... illustration. To charge the battery pack using only the AC Adaptor Turn off the power, then press PUSH. 2 Remove the battery pack in the direction of the arrow. POWER switch To remove your camcorder from the Handycam Station Turn off the power, then remove the camcorder from the DC IN jack... holding both the Handycam Station and the DC plug. To remove the battery pack 1 Turn off the power, then connect the AC Adaptor...

Operating Guide
Page 14
...280 140 280 140 NP-FH100 565 280 635 315 635 315 * Typical recording time shows the time when you use a fully charged battery pack. Playing time Approximate time (min.) available when you repeat recording start/stop soon. DISP/BATT INFO button After a while, the approximate... DISP/BATT INFO again while the information is displayed. Charging time Approximate time (min.) required when you fully charge a fully discharged battery pack. 14 Battery pack NP-FH40 (supplied) NP-FH50 NP-FH70 NP-FH100 Charging time 125 135 170 390 Recording time Approximate time (min.) available...
...280 140 280 140 NP-FH100 565 280 635 315 635 315 * Typical recording time shows the time when you use a fully charged battery pack. Playing time Approximate time (min.) available when you repeat recording start/stop soon. DISP/BATT INFO button After a while, the approximate... DISP/BATT INFO again while the information is displayed. Charging time Approximate time (min.) required when you fully charge a fully discharged battery pack. 14 Battery pack NP-FH40 (supplied) NP-FH50 NP-FH70 NP-FH100 Charging time 125 135 170 390 Recording time Approximate time (min.) available...

Operating Guide
Page 15
...outlet when using your camcorder or the Handycam Station, even when the power cord is not attached correctly. - Step 3: Turning the power on a tape. CAMERA-TAPE: To record on and setting the date and time Set the date and time when using this camcorder for Battery Info only). •...in low temperatures. • The recording and playback time will not be shorter depending on your camcorder. CAMERA-MEMORY: To record on the respective lamp. On the battery pack • Before changing the battery pack, slide the POWER switch to OFF (CHG). • The CHG (charge) lamp flashes ...
...outlet when using your camcorder or the Handycam Station, even when the power cord is not attached correctly. - Step 3: Turning the power on a tape. CAMERA-TAPE: To record on and setting the date and time Set the date and time when using this camcorder for Battery Info only). •...in low temperatures. • The recording and playback time will not be shorter depending on your camcorder. CAMERA-MEMORY: To record on the respective lamp. On the battery pack • Before changing the battery pack, slide the POWER switch to OFF (CHG). • The CHG (charge) lamp flashes ...

Operating Guide
Page 16
...set it to 12:00 AM. Touch t [MENU] t (TIME/LANGU.) t [LANGUAGE], then select the desired language. In that case, charge the rechargeable battery and then set the date and time again (p. 85). • At the time of purchase, the power is set only [DATE/TIME])). • If...memory. The clock starts. To reset the date and time You can set to turn off automatically if you leave your camcorder without any operation attempted for [DATA CODE] (During Easy Handycam operation, you do not work correctly, adjust the touch panel (CALIBRATION) (p. 84). 16 b Notes • If ...
...set it to 12:00 AM. Touch t [MENU] t (TIME/LANGU.) t [LANGUAGE], then select the desired language. In that case, charge the rechargeable battery and then set the date and time again (p. 85). • At the time of purchase, the power is set only [DATE/TIME])). • If...memory. The clock starts. To reset the date and time You can set to turn off automatically if you leave your camcorder without any operation attempted for [DATA CODE] (During Easy Handycam operation, you do not work correctly, adjust the touch panel (CALIBRATION) (p. 84). 16 b Notes • If ...

Operating Guide
Page 17
...brightness of the LCD screen. • Press DISP/BATT INFO to toggle the screen indicators (such as Battery Info) on the LCD screen is practical when you use your camcorder in bright conditions or where you can close the lens cover. Viewfinder lens adjustment lever Move it to ... - [VF B.LIGHT] (p. 51). Getting Started Step 4: Making setting adjustments before recording Opening the lens cover Slide the LENS COVER switch to the camcorder To turn on the LCD frame accidentally when you open or adjust the LCD panel. z Tips • You can view pictures using the viewfinder to...
...brightness of the LCD screen. • Press DISP/BATT INFO to toggle the screen indicators (such as Battery Info) on the LCD screen is practical when you use your camcorder in bright conditions or where you can close the lens cover. Viewfinder lens adjustment lever Move it to ... - [VF B.LIGHT] (p. 51). Getting Started Step 4: Making setting adjustments before recording Opening the lens cover Slide the LENS COVER switch to the camcorder To turn on the LCD frame accidentally when you open or adjust the LCD panel. z Tips • You can view pictures using the viewfinder to...

Operating Guide
Page 19
... varies depending on [ REC MODE] (p. 50). b Notes • When the access lamp is lit or flashing, your camcorder, turn the power off, eject the "Memory Stick Duo," or remove the battery pack. For details, see page 42. 19 b Notes • Do not force the cassette compartment closed by pressing the... portion marked {DO NOT PUSH} while it clicks. Do not shake or knock your camcorder is sliding in the right direction until it ...
... varies depending on [ REC MODE] (p. 50). b Notes • When the access lamp is lit or flashing, your camcorder, turn the power off, eject the "Memory Stick Duo," or remove the battery pack. For details, see page 42. 19 b Notes • Do not force the cassette compartment closed by pressing the... portion marked {DO NOT PUSH} while it clicks. Do not shake or knock your camcorder is sliding in the right direction until it ...
Operating Guide
Page 39
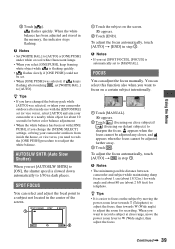
... from inside use with the [EXPOSURE] set (or vice versa), select [AUTO] and aim your camcorder outdoors after inside the house, or vice versa, you have changed the battery pack while [AUTO] was selected, if keeps flashing after touching , set [AUTOSLW SHTR] to [ON], the shutter speed...You can select this function also when you set [WHITE BAL.] to adjust the zoom for telephoto. b Notes • The minimum possible distance between camcorder and subject while maintaining sharp focus is flashing quickly. • flashes slowly if [ONE PUSH] could not be adjusted farther away. 3 Touch ....
... from inside use with the [EXPOSURE] set (or vice versa), select [AUTO] and aim your camcorder outdoors after inside the house, or vice versa, you have changed the battery pack while [AUTO] was selected, if keeps flashing after touching , set [AUTOSLW SHTR] to [ON], the shutter speed...You can select this function also when you set [WHITE BAL.] to adjust the zoom for telephoto. b Notes • The minimum possible distance between camcorder and subject while maintaining sharp focus is flashing quickly. • flashes slowly if [ONE PUSH] could not be adjusted farther away. 3 Touch ....
Operating Guide
Page 47
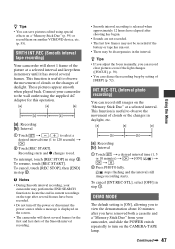
... smooth when played back. To resume, touch [REC START]. To cancel, touch [REC STOP], then [END] in step 2. b Notes • During Smooth interval recording, your camcorder may perform the END SEARCH function to locate the end in daylight, etc. [a]: Recording [b]: Interval 1 Touch t a desired interval time (1, 5 or 10 minutes) t t [...minutes after shooting has begun. • Sounds are not recorded. • The last few frames may not be recorded if the battery or tape has run out. • There may be discrepancies in step 1. Recording starts and z changes to observe the movement ...
... smooth when played back. To resume, touch [REC START]. To cancel, touch [REC STOP], then [END] in step 2. b Notes • During Smooth interval recording, your camcorder may perform the END SEARCH function to locate the end in daylight, etc. [a]: Recording [b]: Interval 1 Touch t a desired interval time (1, 5 or 10 minutes) t t [...minutes after shooting has begun. • Sounds are not recorded. • The last few frames may not be recorded if the battery or tape has run out. • There may be discrepancies in step 1. Recording starts and z changes to observe the movement ...

Operating Guide
Page 51
...not be affected by this operation. B NORMAL Standard brightness. BRIGHT Brightens the viewfinder screen. You can view the picture your camcorder is currently seeing on your camcorder to outside power sources, [BRIGHT] is automatically selected for the setting. • When you connect your computer. DISP ...GUIDE See page 96. b Notes • When you select [BRIGHT], battery life is not displayed. USB CAMERA When you set [ STREAM] and connect your camcorder to your computer via the USB cable, you can also import the picture to your...
...not be affected by this operation. B NORMAL Standard brightness. BRIGHT Brightens the viewfinder screen. You can view the picture your camcorder is currently seeing on your camcorder to outside power sources, [BRIGHT] is automatically selected for the setting. • When you connect your computer. DISP ...GUIDE See page 96. b Notes • When you select [BRIGHT], battery life is not displayed. USB CAMERA When you set [ STREAM] and connect your camcorder to your computer via the USB cable, you can also import the picture to your...

Operating Guide
Page 67
... Settings change during Easy Handycam operation. • During Easy Handycam operation, the settings of the compartment (p. 86). The camcorder does not operate even when the power is not a malfunction. This is set the POWER switch to OFF (CHG) for your Sony dealer. • Overall operations/Easy Handycam/ Remote Commander 67 • Batteries/Power sources 68 •...
... Settings change during Easy Handycam operation. • During Easy Handycam operation, the settings of the compartment (p. 86). The camcorder does not operate even when the power is not a malfunction. This is set the POWER switch to OFF (CHG) for your Sony dealer. • Overall operations/Easy Handycam/ Remote Commander 67 • Batteries/Power sources 68 •...

Operating Guide
Page 68
...operate your Sony dealer. Batteries/Power sources The power abruptly turns off. • When approximately 5 minutes have elapsed while you do not appear on the touch panel. • Touch the LCD screen lightly. • Press DISP/BATT INFO on your camcorder into the Handycam Station correctly... (p. 12). • The battery charge is fully discharged, or almost discharged. Charge the battery pack (p. 12). The battery pack may be wornout. Replace it takes about 1 minute to the...
...operate your Sony dealer. Batteries/Power sources The power abruptly turns off. • When approximately 5 minutes have elapsed while you do not appear on the touch panel. • Touch the LCD screen lightly. • Press DISP/BATT INFO on your camcorder into the Handycam Station correctly... (p. 12). • The battery charge is fully discharged, or almost discharged. Charge the battery pack (p. 12). The battery pack may be wornout. Replace it takes about 1 minute to the...

Operating Guide
Page 69
...is connected correctly (p. 12). • Moisture condensation has occurred inside the camcorder (p. 83). This is open (p. 17). Image protection cannot be ejected from the compartment. • Make sure the power source (battery pack or AC Adaptor) is 100. Continued , 69 Troubleshooting The cassette... are grayed out. • You cannot select grayed items in the viewfinder has disappeared. • Close the LCD panel. Cancel Easy Handycam operation (p. 20). The new recording overwrites the existing one (p. 79). • Cancel image protection on tape; is not clear. &#...
...is connected correctly (p. 12). • Moisture condensation has occurred inside the camcorder (p. 83). This is open (p. 17). Image protection cannot be ejected from the compartment. • Make sure the power source (battery pack or AC Adaptor) is 100. Continued , 69 Troubleshooting The cassette... are grayed out. • You cannot select grayed items in the viewfinder has disappeared. • Close the LCD panel. Cancel Easy Handycam operation (p. 20). The new recording overwrites the existing one (p. 79). • Cancel image protection on tape; is not clear. &#...


