
Operating Guide
Page 7
... following parts. "Memory Stick Duo" (This size can use "Memory Stick Duo" marked with or (p. 124). Memory Stick Duo Adaptor LCD panel Shoe cover (DCR-HC96) • The camcorder is not available under the current recording or playback conditions. Types of "Memory Stick" you insert the camcorder into the Handycam Station or remove the camcorder from the Handycam Station holding both the Handycam Station and...
... following parts. "Memory Stick Duo" (This size can use "Memory Stick Duo" marked with or (p. 124). Memory Stick Duo Adaptor LCD panel Shoe cover (DCR-HC96) • The camcorder is not available under the current recording or playback conditions. Types of "Memory Stick" you insert the camcorder into the Handycam Station or remove the camcorder from the Handycam Station holding both the Handycam Station and...
Operating Guide
Page 9
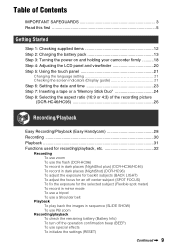
... your camcorder firmly ..........18 Step 4: Adjusting the LCD panel and viewfinder 20 Step 5: Using the touch panel 21 Changing the language setting 21 Checking the screen indicators (Display guide 21 Step 6: Setting the date and time 23 Step 7: Inserting a tape or a "Memory Stick Duo ...24 Step 8: Selecting the aspect ratio (16:9 or 4:3) of the recording picture (DCR-HC46/HC96 26 Recording/Playback Easy Recording/Playback (Easy Handycam 28 Recording 30 Playback 31 Functions used for recording/playback, etc 32...
... your camcorder firmly ..........18 Step 4: Adjusting the LCD panel and viewfinder 20 Step 5: Using the touch panel 21 Changing the language setting 21 Checking the screen indicators (Display guide 21 Step 6: Setting the date and time 23 Step 7: Inserting a tape or a "Memory Stick Duo ...24 Step 8: Selecting the aspect ratio (16:9 or 4:3) of the recording picture (DCR-HC46/HC96 26 Recording/Playback Easy Recording/Playback (Easy Handycam 28 Recording 30 Playback 31 Functions used for recording/playback, etc 32...
Operating Guide
Page 10
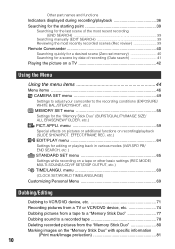
...Recording pictures from a TV or VCR/DVD device, etc 74 Dubbing pictures from a tape to a "Memory Stick Duo 77 Dubbing sound to the recording conditions (EXPOSURE/ WHITE BAL./STEADYSHOT, etc.) MEMORY SET menu 55 Settings for editing or playing back in various modes (VAR.SPD PB/ END SEARCH, etc...Using the menu items 44 Menu items 46 CAMERA SET menu 49 Settings to adjust your camcorder to a recorded tape 78 Deleting recorded pictures from the "Memory Stick Duo 80 Marking images on the "Memory Stick Duo" with specific information (Print mark/Image protection 81 10 EFFECT/FRAME REC, etc.)...
...Recording pictures from a TV or VCR/DVD device, etc 74 Dubbing pictures from a tape to a "Memory Stick Duo 77 Dubbing sound to the recording conditions (EXPOSURE/ WHITE BAL./STEADYSHOT, etc.) MEMORY SET menu 55 Settings for editing or playing back in various modes (VAR.SPD PB/ END SEARCH, etc...Using the menu items 44 Menu items 46 CAMERA SET menu 49 Settings to adjust your camcorder to a recorded tape 78 Deleting recorded pictures from the "Memory Stick Duo 80 Marking images on the "Memory Stick Duo" with specific information (Print mark/Image protection 81 10 EFFECT/FRAME REC, etc.)...
Operating Guide
Page 11
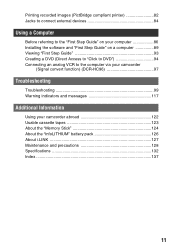
... "Click to DVD 94 Connecting an analog VCR to the computer via your camcorder (Signal convert function) (DCR-HC96 97 Troubleshooting Troubleshooting 99 Warning indicators and messages 117 Additional Information Using your camcorder abroad 122 Usable cassette tapes 123 About the "Memory Stick 124 About the "InfoLITHIUM" battery pack 126 About i.LINK 127 Maintenance and...
... "Click to DVD 94 Connecting an analog VCR to the computer via your camcorder (Signal convert function) (DCR-HC96 97 Troubleshooting Troubleshooting 99 Warning indicators and messages 117 Additional Information Using your camcorder abroad 122 Usable cassette tapes 123 About the "Memory Stick 124 About the "InfoLITHIUM" battery pack 126 About i.LINK 127 Maintenance and...

Operating Guide
Page 12
Handycam Station (1) (DCR-HC46/HC96) (p. 13) Rechargeable battery pack (1) (p. 13, 126) NP-FP30 (DCR-HC36) NP-FP50 (DCR-HC46/HC96) Wireless Remote Commander (1) (p. 40) A button-type lithium battery is already installed. The number in the parentheses ...you have following items supplied with your camcorder. A/V connecting cable (1) (p. 42, 74, 97) CD-ROM "Picture Package Ver.1.5.1" (1) (p. 86) Operating Guide (This manual) (1) 12 Getting Started Step 1: Checking supplied items Make sure that item supplied. • The cassette tape and "Memory Stick Duo" are not supplied. See page...
Handycam Station (1) (DCR-HC46/HC96) (p. 13) Rechargeable battery pack (1) (p. 13, 126) NP-FP30 (DCR-HC36) NP-FP50 (DCR-HC46/HC96) Wireless Remote Commander (1) (p. 40) A button-type lithium battery is already installed. The number in the parentheses ...you have following items supplied with your camcorder. A/V connecting cable (1) (p. 42, 74, 97) CD-ROM "Picture Package Ver.1.5.1" (1) (p. 86) Operating Guide (This manual) (1) 12 Getting Started Step 1: Checking supplied items Make sure that item supplied. • The cassette tape and "Memory Stick Duo" are not supplied. See page...

Operating Guide
Page 18
...the POWER switch repeatedly to turn on the respective lamp. If the POWER switch is set to turn on a "Memory Stick Duo." Step 3: Turning the power on and holding your camcorder, the current date and time will be displayed on the LCD screen for the first time, the [CLOCK SET].... 2 Hold the camcorder correctly. 1 Slide the POWER switch repeatedly in the direction of the cap. 3 Ensure a good grip, then fasten the Grip belt. When using it while pressing the green button. 18 4 1 2 3 For DCR-HC36/HC46: Remove the lens cap by pressing both knobs on a tape. CAMERA-MEMORY: To record on...
...the POWER switch repeatedly to turn on the respective lamp. If the POWER switch is set to turn on a "Memory Stick Duo." Step 3: Turning the power on and holding your camcorder, the current date and time will be displayed on the LCD screen for the first time, the [CLOCK SET].... 2 Hold the camcorder correctly. 1 Slide the POWER switch repeatedly in the direction of the cap. 3 Ensure a good grip, then fasten the Grip belt. When using it while pressing the green button. 18 4 1 2 3 For DCR-HC36/HC46: Remove the lens cap by pressing both knobs on a tape. CAMERA-MEMORY: To record on...
Operating Guide
Page 24
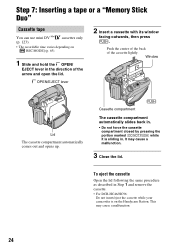
... its window facing outwards, then press . Step 7: Inserting a tape or a "Memory Stick Duo" Cassette tape You can use mini DV cassettes only (p. 123). • The recordable time varies depending on the Handycam Station. To eject the cassette Open the lid following the same procedure as described in... Step 1 and remove the cassette. • For DCR-HC46/HC96: Do not insert/eject the cassette while your camcorder is sliding in the direction of the...
... its window facing outwards, then press . Step 7: Inserting a tape or a "Memory Stick Duo" Cassette tape You can use mini DV cassettes only (p. 123). • The recordable time varies depending on the Handycam Station. To eject the cassette Open the lid following the same procedure as described in... Step 1 and remove the cassette. • For DCR-HC46/HC96: Do not insert/eject the cassette while your camcorder is sliding in the direction of the...

Operating Guide
Page 25
DCR-HC36/HC46: Access lamp With the v mark facing to the LCD screen 25 Do not shake or knock your camcorder is reading/writing data. DCR-HC96: Access lamp To eject a "Memory Stick Duo" Lightly push in once and slide out the "Memory Stick Duo" alongside the camcorder body. • Do not remove the "Memory Stick Duo" forcibly with or (p. 124). •...
DCR-HC36/HC46: Access lamp With the v mark facing to the LCD screen 25 Do not shake or knock your camcorder is reading/writing data. DCR-HC96: Access lamp To eject a "Memory Stick Duo" Lightly push in once and slide out the "Memory Stick Duo" alongside the camcorder body. • Do not remove the "Memory Stick Duo" forcibly with or (p. 124). •...
Operating Guide
Page 26
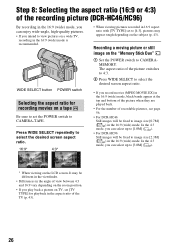
Recording a moving picture or still image on the "Memory Stick Duo" 1 Set the POWER switch to view pictures on a wide TV, recording in ... [2.3M] ( ) in the 16:9 (wide) mode. Step 8: Selecting the aspect ratio (16:9 or 4:3) of the recording picture (DCR-HC46/HC96) By recording in the 16:9 (wide) mode, you can enjoy wide-angle, high-quality pictures. • If you can ...select up to [1.0M] ( ). • For DCR-HC96: Still images will be fixed to image size [0.7M] ( ) in the 16:9 (wide) mode. The aspect ratio of the ...
Recording a moving picture or still image on the "Memory Stick Duo" 1 Set the POWER switch to view pictures on a wide TV, recording in ... [2.3M] ( ) in the 16:9 (wide) mode. Step 8: Selecting the aspect ratio (16:9 or 4:3) of the recording picture (DCR-HC46/HC96) By recording in the 16:9 (wide) mode, you can enjoy wide-angle, high-quality pictures. • If you can ...select up to [1.0M] ( ). • For DCR-HC96: Still images will be fixed to image size [0.7M] ( ) in the 16:9 (wide) mode. The aspect ratio of the ...

Operating Guide
Page 28
...which frees you from detailed adjustments. DCR-HC36/HC46: Remove the lens cap (p. 18). F C Movies 1 Slide the POWER switch E to turn on the CAMERA-MEMORY lamp. 2 Press EASY A. Recording/Playback Easy Recording/Playback (Easy Handycam) With this Easy Handycam operation, most of the camera settings ...), slide it while pressing the green button. DCR-HC36: B A DCR-HC36/ HC46 DCR-HC96 D E If the POWER switch is set to record. Still images (4:3) 1 Slide the POWER switch E to turn on the CAMERA-TAPE lamp. appears on a "Memory Stick Duo." 28 The screen font size increases for...
...which frees you from detailed adjustments. DCR-HC36/HC46: Remove the lens cap (p. 18). F C Movies 1 Slide the POWER switch E to turn on the CAMERA-MEMORY lamp. 2 Press EASY A. Recording/Playback Easy Recording/Playback (Easy Handycam) With this Easy Handycam operation, most of the camera settings ...), slide it while pressing the green button. DCR-HC36: B A DCR-HC36/ HC46 DCR-HC96 D E If the POWER switch is set to record. Still images (4:3) 1 Slide the POWER switch E to turn on the CAMERA-TAPE lamp. appears on a "Memory Stick Duo." 28 The screen font size increases for...

Operating Guide
Page 30
...; While recording movies on a tape, or while in accordance with the setting of a movie (MPEG MOVIE EX) recorded on a "Memory Stick Duo" will be monaural. When disappears, the image has been recorded. PHOTO DCR-HC36: POWER switch REC START/STOP B REC START/STOP A 1 Slide the POWER switch in 4:3 screen. 30 Flashing t Lit A shutter sound...
...; While recording movies on a tape, or while in accordance with the setting of a movie (MPEG MOVIE EX) recorded on a "Memory Stick Duo" will be monaural. When disappears, the image has been recorded. PHOTO DCR-HC36: POWER switch REC START/STOP B REC START/STOP A 1 Slide the POWER switch in 4:3 screen. 30 Flashing t Lit A shutter sound...

Operating Guide
Page 31
The most recently recorded image is not displayed when an inserted "Memory Stick Duo" contains no image data. is displayed. C Rewind/Fast forward On a "Memory Stick Duo": Touch t / to select a picture with / , then touch (p. 59). 31 SPD PB], p. 64). To ...touch To search for more than 3 minutes. Touch . To display pictures on a "Memory Stick Duo" on the PLAY/EDIT lamp. AB C P-MENU A Tape playback B Previous/Next C Index screen display • When a "Memory Stick Duo" is engaged for a scene during playback Touch and hold / during playback (...
The most recently recorded image is not displayed when an inserted "Memory Stick Duo" contains no image data. is displayed. C Rewind/Fast forward On a "Memory Stick Duo": Touch t / to select a picture with / , then touch (p. 59). 31 SPD PB], p. 64). To ...touch To search for more than 3 minutes. Touch . To display pictures on a "Memory Stick Duo" on the PLAY/EDIT lamp. AB C P-MENU A Tape playback B Previous/Next C Index screen display • When a "Memory Stick Duo" is engaged for a scene during playback Touch and hold / during playback (...

Operating Guide
Page 36
...) F END SEARCH/EDIT SEARCH/Rec review display switch button (39) G Personal Menu button (44) In the CAMERA-MEMORY mode A B C D E P-MENU qs 7 H Recording folder (59) I Image size (26, 56) (DCR-HC46/HC96) J Quality ( or ) (56) K "Memory Stick Duo" indicator and the number of images that can check them as [DATA CODE] during recording and the...
...) F END SEARCH/EDIT SEARCH/Rec review display switch button (39) G Personal Menu button (44) In the CAMERA-MEMORY mode A B C D E P-MENU qs 7 H Recording folder (59) I Image size (26, 56) (DCR-HC46/HC96) J Quality ( or ) (56) K "Memory Stick Duo" indicator and the number of images that can check them as [DATA CODE] during recording and the...

Operating Guide
Page 37
Viewing movies On a tape 1 2 qd 45 Viewing still images 1 qg 9 3.0M wd wf qh qj MEMORY PLAY qk ql qf 7 M Tape transport indicator N Video operation buttons (31) On a "Memory Stick Duo" D A 0:00:00 E B F C A Data file name B Play/Pause button (31) C Previous/Next image button (31) D Image size (58)... Previous/Next scene button A movie file will not be divided into a maximum of the movie. The number of scenes divided depends on the same "Memory Stick Duo." : Touch folder. : Touch to move to the previous to move to the next folder. : Touch / to move to play back....
Viewing movies On a tape 1 2 qd 45 Viewing still images 1 qg 9 3.0M wd wf qh qj MEMORY PLAY qk ql qf 7 M Tape transport indicator N Video operation buttons (31) On a "Memory Stick Duo" D A 0:00:00 E B F C A Data file name B Play/Pause button (31) C Previous/Next image button (31) D Image size (58)... Previous/Next scene button A movie file will not be divided into a maximum of the movie. The number of scenes divided depends on the same "Memory Stick Duo." : Touch folder. : Touch to move to the previous to move to the next folder. : Touch / to move to play back....

Operating Guide
Page 40
Searching quickly for a desired scene (Zero set memory display disappears. The tape stops automatically when the tape counter reaches "0:00:00." The tape counter returns to operate your camcorder (p. 35). • To change the battery, see page 131. Remote Commander...counter is set to CAMERATAPE. 40 *2 Not available during Easy Handycam operation with the POWER switch is not displayed, press DISPLAY 9. 2 Press STOP 4 when you want to locate later on -screen image when you press this button will be recorded onto the "Memory Stick Duo" as a still image. Insulation sheet 6 1 7...
Searching quickly for a desired scene (Zero set memory display disappears. The tape stops automatically when the tape counter reaches "0:00:00." The tape counter returns to operate your camcorder (p. 35). • To change the battery, see page 131. Remote Commander...counter is set to CAMERATAPE. 40 *2 Not available during Easy Handycam operation with the POWER switch is not displayed, press DISPLAY 9. 2 Press STOP 4 when you want to locate later on -screen image when you press this button will be recorded onto the "Memory Stick Duo" as a still image. Insulation sheet 6 1 7...

Operating Guide
Page 44
...to Personal Menu. 1 60min STBY 0:00:00 CAMERA SET PROGRAM AE SPOT METER EXPOSURE 2 60min STBY 0:00:00 ZEBRA SELF-TIMER DIGITAL ZOOM STEADYSHOT PROGRES. Using the Menu Using the menu items Follow the instructions below to use each of the menu items listed after this... STEADYSHOT: ON 0:00:00 4 60min STBY STEADYSHOT: OFF 0:00:00 1 Touch t [MENU]. CAMERA-TAPE lamp: settings on a tape CAMERA-MEMORY lamp: Duo" settings on a "Memory Stick PLAY/EDIT lamp: settings for frequently used menu items are added. • You can customize Personal Menu as that are not added to...
...to Personal Menu. 1 60min STBY 0:00:00 CAMERA SET PROGRAM AE SPOT METER EXPOSURE 2 60min STBY 0:00:00 ZEBRA SELF-TIMER DIGITAL ZOOM STEADYSHOT PROGRES. Using the Menu Using the menu items Follow the instructions below to use each of the menu items listed after this... STEADYSHOT: ON 0:00:00 4 60min STBY STEADYSHOT: OFF 0:00:00 1 Touch t [MENU]. CAMERA-TAPE lamp: settings on a tape CAMERA-MEMORY lamp: Duo" settings on a "Memory Stick PLAY/EDIT lamp: settings for frequently used menu items are added. • You can customize Personal Menu as that are not added to...

Operating Guide
Page 55
... at the best exposure. PROGRES.REC (DCR-HC96) You can reduce image blur when recording moving subject may appear awkward. • When recording under fluorescent light or a light bulb, the screen may flicker. MEMORY SET menu Settings for the "Memory Stick Duo" (BURST/QUALITY/IMAGE SIZE/ALL ERASE... for import to [ON] ( ). In 4:3 aspect ratio DCRHC46 DCRHC96 3.0M 1.9M 1.0M VGA - - 4 13 3 4 - 21 In 16:9 aspect ratio DCR-HC46 DCR-HC96 2.3M 0.7M - 4 3 - You can compare the 3 images and select an image recorded at about 0.07 second intervals. A picture recorded in an instant covers...
... at the best exposure. PROGRES.REC (DCR-HC96) You can reduce image blur when recording moving subject may appear awkward. • When recording under fluorescent light or a light bulb, the screen may flicker. MEMORY SET menu Settings for the "Memory Stick Duo" (BURST/QUALITY/IMAGE SIZE/ALL ERASE... for import to [ON] ( ). In 4:3 aspect ratio DCRHC46 DCRHC96 3.0M 1.9M 1.0M VGA - - 4 13 3 4 - 21 In 16:9 aspect ratio DCR-HC46 DCR-HC96 2.3M 0.7M - 4 3 - You can compare the 3 images and select an image recorded at about 0.07 second intervals. A picture recorded in an instant covers...

Operating Guide
Page 56
... for the maximum number of images to be recorded. 56 • If you to [FINE] during Easy Handycam operation. Capacity of the "Memory Stick Duo" (MB) and the number of images to CAMERA-MEMORY. VGA (0.3M) ( ) Allows for the maximum number of recordable pictures In 4:3 aspect ratio 3.0M*1 ... FLD/FRAME (DCR-HC36) B FIELD To record moving subjects correcting jitter (p. 30). FRAME ( ) To record stationary subjects in relatively clear quality. BRKTG] will not function when there is space of less than 3 images remaining on the "Memory Stick Duo." • For DCR-HC96: The flash...
... for the maximum number of images to be recorded. 56 • If you to [FINE] during Easy Handycam operation. Capacity of the "Memory Stick Duo" (MB) and the number of images to CAMERA-MEMORY. VGA (0.3M) ( ) Allows for the maximum number of recordable pictures In 4:3 aspect ratio 3.0M*1 ... FLD/FRAME (DCR-HC36) B FIELD To record moving subjects correcting jitter (p. 30). FRAME ( ) To record stationary subjects in relatively clear quality. BRKTG] will not function when there is space of less than 3 images remaining on the "Memory Stick Duo." • For DCR-HC96: The flash...
Operating Guide
Page 57
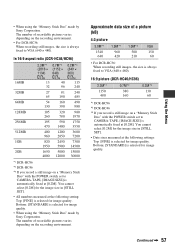
... fixed to VGA (640 × 480). 16:9 picture (DCR-HC46/HC96) 2.3M*1 1150 480 0.7M*2 380 160 0.2M*3 130 60 *1 DCR-HC96 *2 DCR-HC46 *3 If you record a still image on the recording environment. • For DCR-HC36: When recording still images, the size is always fixed to ...FINE] is selected for image quality. • When using the "Memory Stick Duo" made by Sony Corporation. The number of recordable pictures varies depending on a "Memory Stick Duo" with the POWER switch set to VGA (640 × 480). In 16:9 aspect ratio (DCR-HC46/HC96) 2.3M*1 (2016 × 1134) 0.7M*2 (1152...
... fixed to VGA (640 × 480). 16:9 picture (DCR-HC46/HC96) 2.3M*1 1150 480 0.7M*2 380 160 0.2M*3 130 60 *1 DCR-HC96 *2 DCR-HC46 *3 If you record a still image on the recording environment. • For DCR-HC36: When recording still images, the size is always fixed to ...FINE] is selected for image quality. • When using the "Memory Stick Duo" made by Sony Corporation. The number of recordable pictures varies depending on a "Memory Stick Duo" with the POWER switch set to VGA (640 × 480). In 16:9 aspect ratio (DCR-HC46/HC96) 2.3M*1 (2016 × 1134) 0.7M*2 (1152...

Operating Guide
Page 58
...Deletes all the pictures on a "Memory Stick Duo" without image protection, or in the selected folder. 1 Select [ALL FILES] or [CURRENT FOLDER]. [ALL FILES]: Deletes all the images on the "Memory Stick Duo" beforehand when using the "Memory Stick Duo" made by Sony Corporation. The file number is ...reset when a new folder is created or the recording folder is changed. MEMORY SET menu (Continued) MOVIE SET x IMAGE SIZE B 320 ...
...Deletes all the pictures on a "Memory Stick Duo" without image protection, or in the selected folder. 1 Select [ALL FILES] or [CURRENT FOLDER]. [ALL FILES]: Deletes all the images on the "Memory Stick Duo" beforehand when using the "Memory Stick Duo" made by Sony Corporation. The file number is ...reset when a new folder is created or the recording folder is changed. MEMORY SET menu (Continued) MOVIE SET x IMAGE SIZE B 320 ...


