Operating Guide
Page 4
... set yourself as the original parts. Adjust only those controls that have fallen into the set from the wall outlet and disconnect the antenna or cable system. this set during a lightning storm, or when it from the wall outlet and refer servicing to normal operation. - Safety Check Upon completion of time...
... set yourself as the original parts. Adjust only those controls that have fallen into the set from the wall outlet and disconnect the antenna or cable system. this set during a lightning storm, or when it from the wall outlet and refer servicing to normal operation. - Safety Check Upon completion of time...
Operating Guide
Page 6
... installation. Refer to these numbers whenever you can use in your camcorder You can use Your camcorder is supplied with two kinds of operation guides. - CAUTION You... (2) this first (Continued) Declaration of Conformity Trade Name: SONY Model No.: DCR-HC96 Responsible Party: Sony Electronics Inc. Reorient or relocate the receiving antenna. - Telephone...cable must accept any changes or modifications not expressly approved in this manual could void your authority to operate this product. "First Step Guide" for a digital device pursuant to which can be used with the Handycam...
... installation. Refer to these numbers whenever you can use in your camcorder You can use Your camcorder is supplied with two kinds of operation guides. - CAUTION You... (2) this first (Continued) Declaration of Conformity Trade Name: SONY Model No.: DCR-HC96 Responsible Party: Sony Electronics Inc. Reorient or relocate the receiving antenna. - Telephone...cable must accept any changes or modifications not expressly approved in this manual could void your authority to operate this product. "First Step Guide" for a digital device pursuant to which can be used with the Handycam...

Operating Guide
Page 7
..."Memory Stick" compatible equipment Be sure to insert the "Memory Stick Duo" into the Handycam Station or remove the camcorder from the Handycam Station holding both the Handycam Station and the DC plug. • For DCR-HC46/HC96: Be sure to slide the POWER switch to OFF (CHG) when you ..."Memory Stick PRO" compatible equipment. You can be used only with a USB or i.LINK cable, be used with your camcorder. • For DCR-HC46/HC96: Disconnect the AC Adaptor from it in your camcorder to avoid damaging the terminal, or cause a malfunction of "Memory Stick." Memory Stick Duo ...
..."Memory Stick" compatible equipment Be sure to insert the "Memory Stick Duo" into the Handycam Station or remove the camcorder from the Handycam Station holding both the Handycam Station and the DC plug. • For DCR-HC46/HC96: Be sure to slide the POWER switch to OFF (CHG) when you ..."Memory Stick PRO" compatible equipment. You can be used only with a USB or i.LINK cable, be used with your camcorder. • For DCR-HC46/HC96: Disconnect the AC Adaptor from it in your camcorder to avoid damaging the terminal, or cause a malfunction of "Memory Stick." Memory Stick Duo ...

Operating Guide
Page 12
.... • The cassette tape and "Memory Stick Duo" are not supplied. Handycam Station (1) (DCR-HC46/HC96) (p. 13) Rechargeable battery pack (1) (p. 13, 126) NP-FP30 (DCR-HC36) NP-FP50 (DCR-HC46/HC96) Wireless Remote Commander (1) (p. 40) A button-type lithium battery is already installed. See page 6, 123, 124, for compatible cassettes and "Memory Stick Duo" for your camcorder.
.... • The cassette tape and "Memory Stick Duo" are not supplied. Handycam Station (1) (DCR-HC46/HC96) (p. 13) Rechargeable battery pack (1) (p. 13, 126) NP-FP30 (DCR-HC36) NP-FP50 (DCR-HC46/HC96) Wireless Remote Commander (1) (p. 40) A button-type lithium battery is already installed. See page 6, 123, 124, for compatible cassettes and "Memory Stick Duo" for your camcorder.
Operating Guide
Page 42
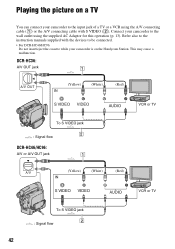
This may cause a malfunction. DCR-HC36: A/V OUT jack 1 A/V OUT (Yellow) (White) (Red) VCR or TV To S VIDEO jack 2 : Signal flow DCR-HC46/HC96: A/V or A/V OUT jack 1 A/V (Yellow) (White) (Red) VCR or TV To S VIDEO jack 2 : Signal flow 42 Connect your camcorder to the wall outlet using the A/V connecting cable (1) or the A/V connecting cable with the devices to...
This may cause a malfunction. DCR-HC36: A/V OUT jack 1 A/V OUT (Yellow) (White) (Red) VCR or TV To S VIDEO jack 2 : Signal flow DCR-HC46/HC96: A/V or A/V OUT jack 1 A/V (Yellow) (White) (Red) VCR or TV To S VIDEO jack 2 : Signal flow 42 Connect your camcorder to the wall outlet using the A/V connecting cable (1) or the A/V connecting cable with the devices to...
Operating Guide
Page 43
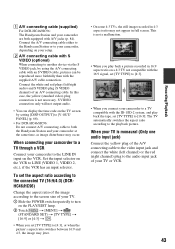
... input jack of an A/V connecting cable. When connecting your camcorder to a TV through a VCR Connect your camcorder are both the Handycam Station and your camcorder at the same time, as image disturbance may not appear in 4:3 aspect ratio may occur. A A/V connecting cable (supplied) For DCR-HC46/HC96: The Handycam Station and your camcorder to the LINE IN input on...
... input jack of an A/V connecting cable. When connecting your camcorder to a TV through a VCR Connect your camcorder are both the Handycam Station and your camcorder at the same time, as image disturbance may not appear in 4:3 aspect ratio may occur. A A/V connecting cable (supplied) For DCR-HC46/HC96: The Handycam Station and your camcorder to the LINE IN input on...
Operating Guide
Page 63
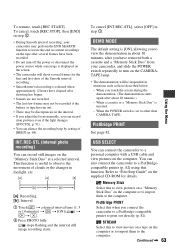
...• During Smooth interval recording, your camcorder, and slide the POWER switch repeatedly to ... on the screen. • The camcorder will shoot several frames have been recorded...). • You can also connect the camcorder to a PictBridgecompatible printer (p. 82) using this.... - When you connect the camcorder to a PictBridge-compatible printer to...hours have removed both a cassette and a "Memory Stick Duo" from your camcorder may be suspended in daylight, etc. [a]: Recording [b]: Interval 1 Touch ...photo recording) You can connect the camcorder to view the demonstration in step 1....
...• During Smooth interval recording, your camcorder, and slide the POWER switch repeatedly to ... on the screen. • The camcorder will shoot several frames have been recorded...). • You can also connect the camcorder to a PictBridgecompatible printer (p. 82) using this.... - When you connect the camcorder to a PictBridge-compatible printer to...hours have removed both a cassette and a "Memory Stick Duo" from your camcorder may be suspended in daylight, etc. [a]: Recording [b]: Interval 1 Touch ...photo recording) You can connect the camcorder to view the demonstration in step 1....
Operating Guide
Page 67
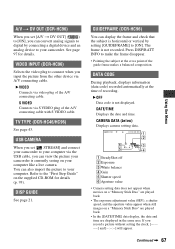
...also import the picture to your computer like a live camera. GUIDEFRAME (DCR-HC96) You can display the frame and check that the subject is horizontal or vertical by connecting a digital device and an analog device to your camcorder. B OFF Data code is not recorded. CAMERA DATA (below) Displays ... page 97 for details (p. 93). Continued , 67 Using the Menu A/V t DV OUT (DCR-HC96) When you set [ STREAM] and connect your camcorder to your computer via the USB cable, you can view the picture your camcorder is currently seeing on your computer. DATE/TIME Displays the date and time.
...also import the picture to your computer like a live camera. GUIDEFRAME (DCR-HC96) You can display the frame and check that the subject is horizontal or vertical by connecting a digital device and an analog device to your camcorder. B OFF Data code is not recorded. CAMERA DATA (below) Displays ... page 97 for details (p. 93). Continued , 67 Using the Menu A/V t DV OUT (DCR-HC96) When you set [ STREAM] and connect your camcorder to your computer via the USB cable, you can view the picture your camcorder is currently seeing on your computer. DATE/TIME Displays the date and time.
Operating Guide
Page 71
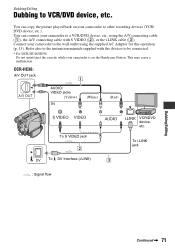
... outlet using the A/V connecting cable (1), the A/V connecting cable with the devices to be connected. • For DCR-HC46/HC96: Do not insert/eject the cassette while your camcorder is on your camcorder to other recording devices (VCR/ DVD device, etc.). This may cause a malfunction. To i.LINK jack Dubbing/Editing Continued , 71 DCR-HC36: A/V OUT jack 1 A/V OUT AUDIO...
... outlet using the A/V connecting cable (1), the A/V connecting cable with the devices to be connected. • For DCR-HC46/HC96: Do not insert/eject the cassette while your camcorder is on your camcorder to other recording devices (VCR/ DVD device, etc.). This may cause a malfunction. To i.LINK jack Dubbing/Editing Continued , 71 DCR-HC36: A/V OUT jack 1 A/V OUT AUDIO...
Operating Guide
Page 72
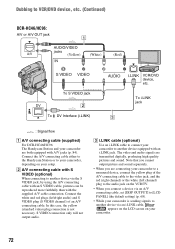
...). To i.LINK jack : Signal flow A A/V connecting cable (supplied) For DCR-HC46/HC96: The Handycam Station and your setup. Note that you cannot output picture and sound separately. • When you are transmitted digitally, producing high quality pictures and sound. The video and audio signals are connecting your camcorder to a monaural device, connect the yellow plug...
...). To i.LINK jack : Signal flow A A/V connecting cable (supplied) For DCR-HC46/HC96: The Handycam Station and your setup. Note that you cannot output picture and sound separately. • When you are transmitted digitally, producing high quality pictures and sound. The video and audio signals are connecting your camcorder to a monaural device, connect the yellow plug...
Operating Guide
Page 73
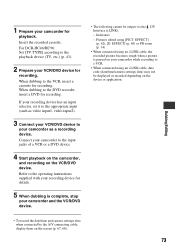
.../DVD device. EFFECT] (p. 60) or PB zoom (p. 34). • When connected using an i.LINK cable, the recorded picture becomes rough when a picture is complete, stop your camcorder and the VCR/DVD device. • The following cannot be displayed or recorded depending on the device or... when connected by the A/V connecting cable, display them on the screen (p. 67, 68). 73 Refer to the VCR, insert a cassette for recording. Indicators - EFFECT] (p. 62), [D. Insert the recorded cassette. For DCR-HC46/HC96: Set [TV TYPE] according to your camcorder as a recording device. If your...
.../DVD device. EFFECT] (p. 60) or PB zoom (p. 34). • When connected using an i.LINK cable, the recorded picture becomes rough when a picture is complete, stop your camcorder and the VCR/DVD device. • The following cannot be displayed or recorded depending on the device or... when connected by the A/V connecting cable, display them on the screen (p. 67, 68). 73 Refer to the VCR, insert a cassette for recording. Indicators - EFFECT] (p. 62), [D. Insert the recorded cassette. For DCR-HC46/HC96: Set [TV TYPE] according to your camcorder as a recording device. If your...
Operating Guide
Page 74
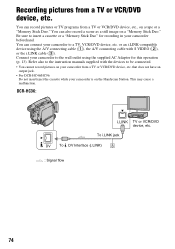
DCR-HC36: To i.LINK jack DV To DV Interface (i.LINK) 3 : Signal flow TV or VCR/DVD device, etc. 74 Be sure to the wall outlet using the A/V connecting cable (1), the A/V connecting cable with the devices to a TV, VCR/DVD device, etc. Connect your camcorder to insert a cassette or a "Memory Stick... record a scene as a still image on the Handycam Station. Refer also to the instruction manuals supplied with S VIDEO (2), or the i.LINK cable (3). or an i.LINK-compatible device using the supplied AC Adaptor for recording in your camcorder is on a "Memory Stick Duo." that does not...
DCR-HC36: To i.LINK jack DV To DV Interface (i.LINK) 3 : Signal flow TV or VCR/DVD device, etc. 74 Be sure to the wall outlet using the A/V connecting cable (1), the A/V connecting cable with the devices to a TV, VCR/DVD device, etc. Connect your camcorder to insert a cassette or a "Memory Stick... record a scene as a still image on the Handycam Station. Refer also to the instruction manuals supplied with S VIDEO (2), or the i.LINK cable (3). or an i.LINK-compatible device using the supplied AC Adaptor for recording in your camcorder is on a "Memory Stick Duo." that does not...

Operating Guide
Page 75
...the A/V connecting cable to another device via an i.LINK cable, appears on the LCD screen on your camcorder (This indicator may also appear on the connected device.). • For DCR-HC96: When you are transmitted digitally, producing high quality pictures and sound. DCR-HC46/HC96: A/V jack (DCR-HC96) 1 ...only will not input audio. The video and audio signals are connecting your camcorder is not necessary. To i.LINK jack : Signal flow A For DCR-HC96: A/V connecting cable (supplied) The Handycam Station and your camcorder to [LCD PANEL] (the default setting) (p. 68). In this case...
...the A/V connecting cable to another device via an i.LINK cable, appears on the LCD screen on your camcorder (This indicator may also appear on the connected device.). • For DCR-HC96: When you are transmitted digitally, producing high quality pictures and sound. DCR-HC46/HC96: A/V jack (DCR-HC96) 1 ...only will not input audio. The video and audio signals are connecting your camcorder is not necessary. To i.LINK jack : Signal flow A For DCR-HC96: A/V connecting cable (supplied) The Handycam Station and your camcorder to [LCD PANEL] (the default setting) (p. 68). In this case...
Operating Guide
Page 78
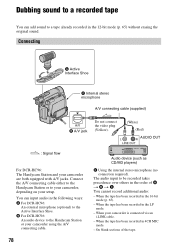
...) A/V B A/V jack Do not connect the video plug (Yellow). (White) (Red) AUDIO OUT : Signal flow For DCR-HC96: The Handycam Station and your setup. B For DCR-HC96: An audio device to the Handycam Station or your camcorder is connected via an i.LINK cable. - Dubbing sound to a recorded tape You can input audio in the following ways: A For...
...) A/V B A/V jack Do not connect the video plug (Yellow). (White) (Red) AUDIO OUT : Signal flow For DCR-HC96: The Handycam Station and your setup. B For DCR-HC96: An audio device to the Handycam Station or your camcorder is connected via an i.LINK cable. - Dubbing sound to a recorded tape You can input audio in the following ways: A For...

Operating Guide
Page 79
...other DCR-HC36/HC46/HC96 camcorders). To dub on other than that of your camcorder....camcorders (including other device. Sound you are recording is not output from the A/V jack. Check the sound using the A/V connecting cable...DCR-HC96: When you attach an external microphone (optional) to the Active Interface Shoe, you want to SAVE (p. 123). - Recording sound Insert a recorded cassette into your camcorder...DCR-HC46/HC96: Do not insert/eject the cassette while your camcorder...press ZERO SET MEMORY on your camcorder (p. 122). - On sections ...by connecting your camcorder is set ...
...other DCR-HC36/HC46/HC96 camcorders). To dub on other than that of your camcorder....camcorders (including other device. Sound you are recording is not output from the A/V jack. Check the sound using the A/V connecting cable...DCR-HC96: When you attach an external microphone (optional) to the Active Interface Shoe, you want to SAVE (p. 123). - Recording sound Insert a recorded cassette into your camcorder...DCR-HC46/HC96: Do not insert/eject the cassette while your camcorder...press ZERO SET MEMORY on your camcorder (p. 122). - On sections ...by connecting your camcorder is set ...
Operating Guide
Page 82
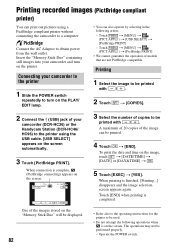
...cable. [USB SELECT] appears on the screen. Insert the "Memory Stick Duo" containing still images into your camcorder and turn on the PLAY/ EDIT lamp. • You can also operate by selecting in the following operations when is finished, [Printing...] disappears and the image selection screen appears again. Connecting your camcorder (DCR-HC36) or the Handycam... Station (DCR-HC46/ HC96) to be printed with / . Printing 1 Select the image to be...
...cable. [USB SELECT] appears on the screen. Insert the "Memory Stick Duo" containing still images into your camcorder and turn on the PLAY/ EDIT lamp. • You can also operate by selecting in the following operations when is finished, [Printing...] disappears and the image selection screen appears again. Connecting your camcorder (DCR-HC36) or the Handycam... Station (DCR-HC46/ HC96) to be printed with / . Printing 1 Select the image to be...
Operating Guide
Page 83
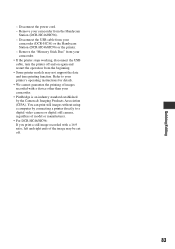
... operation from the Handycam Station (DCR-HC46/HC96). - You can print still images without using a computer by the Camera & Imaging Products Association (CIPA). Disconnect the power cord. - Disconnect the USB cable from your camcorder from the beginning. • Some printer models may be cut off. 83 Remove your camcorder (DCR-HC36) or the Handycam Station (DCR-HC46/HC96) or...
... operation from the Handycam Station (DCR-HC46/HC96). - You can print still images without using a computer by the Camera & Imaging Products Association (CIPA). Disconnect the power cord. - Disconnect the USB cable from your camcorder from the beginning. • Some printer models may be cut off. 83 Remove your camcorder (DCR-HC36) or the Handycam Station (DCR-HC46/HC96) or...
Operating Guide
Page 86
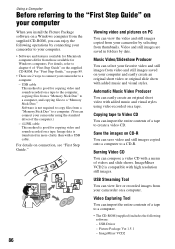
... the computer.) - Video and still images are 2 ways to connect your camcorder to a computer. - USB Driver - ImageMixer VCD2 86 Automatic Music Video Producer You can easily create an original short video with a USB cable. Save the images on CD-R You can save video and still images copied... Ver.1.5.1 - Music Video/Slideshow Producer You can select your favorite video and still images from video and still images saved on your camcorder on a computer. USB cable This method is good for copying video and sound recorded on a tape to the computer, copying files from a "Memory Stick Duo...
... the computer.) - Video and still images are 2 ways to connect your camcorder to a computer. - USB Driver - ImageMixer VCD2 86 Automatic Music Video Producer You can easily create an original short video with a USB cable. Save the images on CD-R You can save video and still images copied... Ver.1.5.1 - Music Video/Slideshow Producer You can select your favorite video and still images from video and still images saved on your camcorder on a computer. USB cable This method is good for copying video and sound recorded on a tape to the computer, copying files from a "Memory Stick Duo...
Operating Guide
Page 87
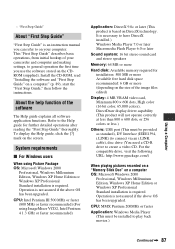
... or 256 colors or less.) Others: USB port (This must be provided as standard), DV Interface (IEEE1394, i.LINK) (to connect via an i.LINK cable), disc drive (You need a CD-R drive to play back movies.) Continued , 87 It is an instruction manual you use the software stored on your ...computer. This "First Step Guide" describes basic operations, from initial hookup of your camcorder and computer and making settings, to general operation the first time you can refer to have DirectX installed.) Windows Media Player 7.0 or later ...
... or 256 colors or less.) Others: USB port (This must be provided as standard), DV Interface (IEEE1394, i.LINK) (to connect via an i.LINK cable), disc drive (You need a CD-R drive to play back movies.) Continued , 87 It is an instruction manual you use the software stored on your ...computer. This "First Step Guide" describes basic operations, from initial hookup of your camcorder and computer and making settings, to general operation the first time you can refer to have DirectX installed.) Windows Media Player 7.0 or later ...
Operating Guide
Page 88
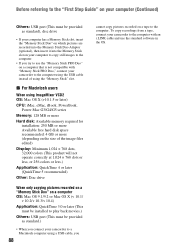
... use the "Memory Stick PRO Duo" on a computer that is not compatible with "Memory Stick PRO Duo," connect your camcorder to the computer using the USB cable instead of the image files edited) Display: Minimum 1,024 × 768 dots, 32,000 colors (This product will not operate correctly at 1,... on which pictures are recorded into the Memory Stick Duo Adaptor (optional), then insert it into the Memory Stick slot on your camcorder to a Macintosh computer using a USB cable, you try to use the standard software in the OS. Before referring to the "First Step Guide" on your computer (Continued...
... use the "Memory Stick PRO Duo" on a computer that is not compatible with "Memory Stick PRO Duo," connect your camcorder to the computer using the USB cable instead of the image files edited) Display: Minimum 1,024 × 768 dots, 32,000 colors (This product will not operate correctly at 1,... on which pictures are recorded into the Memory Stick Duo Adaptor (optional), then insert it into the Memory Stick slot on your camcorder to a Macintosh computer using a USB cable, you try to use the standard software in the OS. Before referring to the "First Step Guide" on your computer (Continued...


