Operating Guide
Page 3
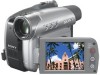
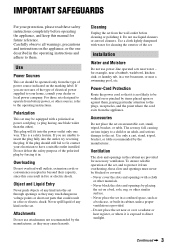
... be equipped with a polarized ac power cord plug (a plug having one way. Cleaning Unplug the set near water - For those sets designed to operate from battery power, or other materials. - This is exposed to the operating instructions. Never spill liquid of the set may touch dangerous voltage points or short out...
... be equipped with a polarized ac power cord plug (a plug having one way. Cleaning Unplug the set near water - For those sets designed to operate from battery power, or other materials. - This is exposed to the operating instructions. Never spill liquid of the set may touch dangerous voltage points or short out...
Operating Guide
Page 5
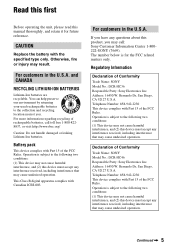
...batteries, call : Sony Customer Information Center 1-800222-SONY (7669). The number below is subject to the following two conditions: (1) This device may not cause harmful interference, and (2) this device must accept any interference received, including interference that may result. Bernardo Dr, San Diego, CA 92127 U.S.A. This Class B digital... Part 15 of Conformity Trade Name: SONY Model No.: DCR-HC36 Responsible Party: Sony Electronics Inc. You can help preserve our environment by returning your used rechargeable batteries to the following two conditions: (1) This...
...batteries, call : Sony Customer Information Center 1-800222-SONY (7669). The number below is subject to the following two conditions: (1) This device may not cause harmful interference, and (2) this device must accept any interference received, including interference that may result. Bernardo Dr, San Diego, CA 92127 U.S.A. This Class B digital... Part 15 of Conformity Trade Name: SONY Model No.: DCR-HC36 Responsible Party: Sony Electronics Inc. You can help preserve our environment by returning your used rechargeable batteries to the following two conditions: (1) This...

Operating Guide
Page 7
... to avoid damaging the terminal, or cause a malfunction of your camcorder. • For DCR-HC46/HC96: Disconnect the AC Adaptor from the Handycam Station holding both the Handycam Station and the DC plug. • For DCR-HC46/HC96: Be sure to slide the POWER switch to insert ...you can be used with your camcorder.) Using the camcorder • Do not hold the camcorder by the following parts. Memory Stick Duo Adaptor LCD panel Shoe cover (DCR-HC96) • The camcorder is not available under the current recording or playback conditions. Viewfinder Battery pack "Memory Stick" (You ...
... to avoid damaging the terminal, or cause a malfunction of your camcorder. • For DCR-HC46/HC96: Disconnect the AC Adaptor from the Handycam Station holding both the Handycam Station and the DC plug. • For DCR-HC46/HC96: Be sure to slide the POWER switch to insert ...you can be used with your camcorder.) Using the camcorder • Do not hold the camcorder by the following parts. Memory Stick Duo Adaptor LCD panel Shoe cover (DCR-HC96) • The camcorder is not available under the current recording or playback conditions. Viewfinder Battery pack "Memory Stick" (You ...
Operating Guide
Page 9
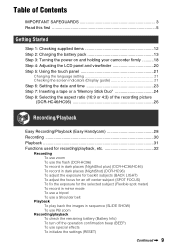
...Contents IMPORTANT SAFEGUARDS 3 Read this first 5 Getting Started Step 1: Checking supplied items 12 Step 2: Charging the battery pack 13 Step 3: Turning the power on and holding your camcorder firmly ..........18 Step 4: Adjusting the LCD panel and viewfinder 20 Step 5: Using the touch panel 21 Changing ... Easy Recording/Playback (Easy Handycam 28 Recording 30 Playback 31 Functions used for recording/playback, etc 32 Recording To use zoom To use the flash (DCR-HC96) To record in dark places (NightShot plus) (DCR-HC36/HC46) To record in dark places (NightShot) (DCR-HC96) To adjust the...
...Contents IMPORTANT SAFEGUARDS 3 Read this first 5 Getting Started Step 1: Checking supplied items 12 Step 2: Charging the battery pack 13 Step 3: Turning the power on and holding your camcorder firmly ..........18 Step 4: Adjusting the LCD panel and viewfinder 20 Step 5: Using the touch panel 21 Changing ... Easy Recording/Playback (Easy Handycam 28 Recording 30 Playback 31 Functions used for recording/playback, etc 32 Recording To use zoom To use the flash (DCR-HC96) To record in dark places (NightShot plus) (DCR-HC36/HC46) To record in dark places (NightShot) (DCR-HC96) To adjust the...
Operating Guide
Page 11
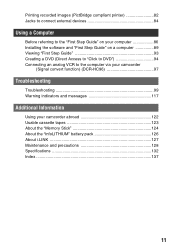
... 94 Connecting an analog VCR to the computer via your camcorder (Signal convert function) (DCR-HC96 97 Troubleshooting Troubleshooting 99 Warning indicators and messages 117 Additional Information Using your camcorder abroad 122 Usable cassette tapes 123 About the "Memory Stick 124 About the "InfoLITHIUM" battery pack 126 About i.LINK 127 Maintenance and precautions 128...
... 94 Connecting an analog VCR to the computer via your camcorder (Signal convert function) (DCR-HC96 97 Troubleshooting Troubleshooting 99 Warning indicators and messages 117 Additional Information Using your camcorder abroad 122 Usable cassette tapes 123 About the "Memory Stick 124 About the "InfoLITHIUM" battery pack 126 About i.LINK 127 Maintenance and precautions 128...

Operating Guide
Page 12
... lens cap to the metal fittings of that you have following items supplied with your camcorder. Handycam Station (1) (DCR-HC46/HC96) (p. 13) Rechargeable battery pack (1) (p. 13, 126) NP-FP30 (DCR-HC36) NP-FP50 (DCR-HC46/HC96) Wireless Remote Commander (1) (p. 40) A button-type lithium battery is already installed. Getting Started Step 1: Checking supplied items Make sure that item supplied...
... lens cap to the metal fittings of that you have following items supplied with your camcorder. Handycam Station (1) (DCR-HC46/HC96) (p. 13) Rechargeable battery pack (1) (p. 13, 126) NP-FP30 (DCR-HC36) NP-FP50 (DCR-HC46/HC96) Wireless Remote Commander (1) (p. 40) A button-type lithium battery is already installed. Getting Started Step 1: Checking supplied items Make sure that item supplied...
Operating Guide
Page 13
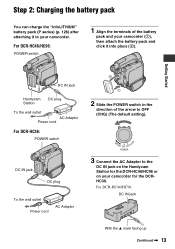
Getting Started DC IN jack Handycam Station DC plug To the wall outlet AC Adaptor Power cord For DCR-HC36: POWER switch 2 1 2 Slide the POWER switch in the direction of the battery pack and your camcorder for the DCR-HC46/HC96 or on your camcorder (1), then attach the battery pack and click it to OFF (CHG) (The default setting...
Getting Started DC IN jack Handycam Station DC plug To the wall outlet AC Adaptor Power cord For DCR-HC36: POWER switch 2 1 2 Slide the POWER switch in the direction of the battery pack and your camcorder for the DCR-HC46/HC96 or on your camcorder (1), then attach the battery pack and click it to OFF (CHG) (The default setting...
Operating Guide
Page 14
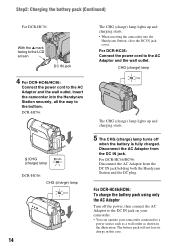
Step2: Charging the battery pack (Continued) For DCR-HC36: With the v mark facing to the LCD screen DC IN jack 4 For DCR-HC46/HC96: Connect the power cord to the AC Adaptor and the wall outlet. For DCR-HC36: Connect the power cord to the AC Adaptor and the wall outlet. CHG (charge) lamp The... CHG (charge) lamp lights up and charging starts. • When inserting the camcorder into the Handycam Station securely, all the way to a power source ...
Step2: Charging the battery pack (Continued) For DCR-HC36: With the v mark facing to the LCD screen DC IN jack 4 For DCR-HC46/HC96: Connect the power cord to the AC Adaptor and the wall outlet. For DCR-HC36: Connect the power cord to the AC Adaptor and the wall outlet. CHG (charge) lamp The... CHG (charge) lamp lights up and charging starts. • When inserting the camcorder into the Handycam Station securely, all the way to a power source ...
Operating Guide
Page 15
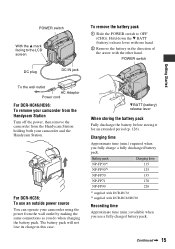
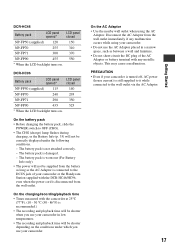
... time (min.) required when you use an outside power source You can operate your camcorder and the Handycam Station. Battery pack NP-FP30*1 NP-FP50*2 NP-FP70 NP-FP71 NP-FP90 Charging time 115 125 155 170 220 *1 supplied with DCR-HC36 *2 supplied with the other hand. POWER switch With the v mark facing to the...
... time (min.) required when you use an outside power source You can operate your camcorder and the Handycam Station. Battery pack NP-FP30*1 NP-FP50*2 NP-FP70 NP-FP71 NP-FP90 Charging time 115 125 155 170 220 *1 supplied with DCR-HC36 *2 supplied with the other hand. POWER switch With the v mark facing to the...

Operating Guide
Page 16
...345 190 • All times measured under the following conditions: Top: Recording with LCD screen. Middle: When the LCD backlight turns off . DCR-HC36 Battery pack LCD panel opened NP-FP30 (supplied) 90 NP-FP50 125 NP-FP70 265 NP-FP71 315 NP-FP90 475 LCD panel closed . ...Top: Recording with LCD screen. Middle: When the LCD backlight turns off . Bottom: Recording with LCD screen. Step2: Charging the battery pack (Continued) DCR-HC36 Battery pack Continuous recording time Typical recording time* NP-FP30 (supplied) 85 40 105 50 NP-FP50 120 60 150 75 NP-FP70 255...
...345 190 • All times measured under the following conditions: Top: Recording with LCD screen. Middle: When the LCD backlight turns off . DCR-HC36 Battery pack LCD panel opened NP-FP30 (supplied) 90 NP-FP50 125 NP-FP70 265 NP-FP71 315 NP-FP90 475 LCD panel closed . ...Top: Recording with LCD screen. Middle: When the LCD backlight turns off . Bottom: Recording with LCD screen. Step2: Charging the battery pack (Continued) DCR-HC36 Battery pack Continuous recording time Typical recording time* NP-FP30 (supplied) 85 40 105 50 NP-FP50 120 60 150 75 NP-FP70 255...
Operating Guide
Page 17
...; The recording and playback time will be correctly displayed under the following conditions. - The battery pack is damaged. - PRECAUTION • Even if your camcorder or the Handycam Station supplied with any malfunction occurs while using the AC Adaptor. This may cause a malfunction.... On the AC Adaptor • Use the nearby wall outlet when using your camcorder. • Do not use your camcorder. DCR-HC96 Battery pack LCD panel...
...; The recording and playback time will be correctly displayed under the following conditions. - The battery pack is damaged. - PRECAUTION • Even if your camcorder or the Handycam Station supplied with any malfunction occurs while using the AC Adaptor. This may cause a malfunction.... On the AC Adaptor • Use the nearby wall outlet when using your camcorder. • Do not use your camcorder. DCR-HC96 Battery pack LCD panel...
Operating Guide
Page 19
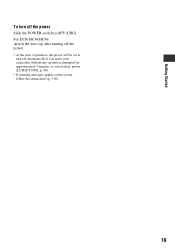
Getting Started To turn off the power Slide the POWER switch to save battery power ([A.SHUT OFF], p. 68). • If warning messages appear on the screen, follow the instructions (p. 118). 19 For DCR-HC36/HC46: Attach the lens cap after turning off the power. • At the time of purchase, the power will be set to turn off automatically if you leave your camcorder without any operation attempted for approximately 5 minutes, to OFF (CHG).
Getting Started To turn off the power Slide the POWER switch to save battery power ([A.SHUT OFF], p. 68). • If warning messages appear on the screen, follow the instructions (p. 118). 19 For DCR-HC36/HC46: Attach the lens cap after turning off the power. • At the time of purchase, the power will be set to turn off automatically if you leave your camcorder without any operation attempted for approximately 5 minutes, to OFF (CHG).
Operating Guide
Page 20
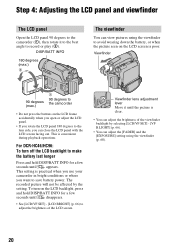
...picture seen on the LCD screen is clear. • You can adjust the brightness of the LCD screen. This is practical when you use your camcorder in bright conditions or where you want to adjust the brightness of the viewfinder backlight by the setting. Viewfinder lens adjustment lever Move it to... the LCD backlight, press and hold DISP/BATT INFO for a few seconds until disappears. • See [LCD/VF SET] - [LCD BRIGHT] (p. 66) to save battery power. For DCR-HC46/HC96: To turn on the LCD frame accidentally when you open or adjust the LCD panel. • If you can close the LCD...
...picture seen on the LCD screen is clear. • You can adjust the brightness of the LCD screen. This is practical when you use your camcorder in bright conditions or where you want to adjust the brightness of the viewfinder backlight by the setting. Viewfinder lens adjustment lever Move it to... the LCD backlight, press and hold DISP/BATT INFO for a few seconds until disappears. • See [LCD/VF SET] - [LCD BRIGHT] (p. 66) to save battery power. For DCR-HC46/HC96: To turn on the LCD frame accidentally when you open or adjust the LCD panel. • If you can close the LCD...
Operating Guide
Page 23
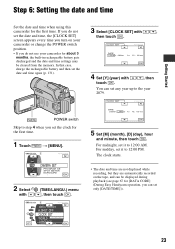
... The date and time are not displayed while recording, but they are automatically recorded on your camcorder or change the POWER switch position. • If you do not use your camcorder for [DATA CODE] (During Easy Handycam operation, you do not set only [DATE/TIME])). 23 DATE 2006Y JAN M 1D 12...For midday, set the clock for the first time. For midnight, set the date and time again (p. 131). In that case, charge the rechargeable battery and then set it to 12:00 PM. SHUT OFF CLOCK SET WORLD --:--:-- CLOCK SET -:--:-- Step 6: Setting the date and time Getting Started Set...
... The date and time are not displayed while recording, but they are automatically recorded on your camcorder or change the POWER switch position. • If you do not use your camcorder for [DATA CODE] (During Easy Handycam operation, you do not set only [DATE/TIME])). 23 DATE 2006Y JAN M 1D 12...For midday, set the clock for the first time. For midnight, set the date and time again (p. 131). In that case, charge the rechargeable battery and then set it to 12:00 PM. SHUT OFF CLOCK SET WORLD --:--:-- CLOCK SET -:--:-- Step 6: Setting the date and time Getting Started Set...

Operating Guide
Page 25
... or ejecting the "Memory Stick Duo," be damaged. • When the access lamp is lit or flashing, your camcorder, turn the power off, eject the "Memory Stick Duo," or remove the battery pack. With the v mark facing to the LCD screen • If you force the "Memory Stick Duo" into... camcorder body. • Do not remove the "Memory Stick Duo" forcibly with or (p. 124). • The number and time of recordable pictures varies depending on the image quality or the image size. Otherwise, image data may be careful that the "Memory Stick Duo" does not pop out and drop. DCR-HC36/...
... or ejecting the "Memory Stick Duo," be damaged. • When the access lamp is lit or flashing, your camcorder, turn the power off, eject the "Memory Stick Duo," or remove the battery pack. With the v mark facing to the LCD screen • If you force the "Memory Stick Duo" into... camcorder body. • Do not remove the "Memory Stick Duo" forcibly with or (p. 124). • The number and time of recordable pictures varies depending on the image quality or the image size. Otherwise, image data may be careful that the "Memory Stick Duo" does not pop out and drop. DCR-HC36/...

Operating Guide
Page 33
... the battery charge is complete (In the CAMERA-TAPE mode, it . This may create a shadow. • You can change the brightness of the flash lamp before using it takes a while to focus automatically. • Do not use these functions in dark places (NightShot plus) (DCR-HC36/HC46 ...3 Set the NIGHTSHOT PLUS switch 3 to the original colors, use Super NightShot function (p. 52). Therefore, do not cover the infrared port 1 with your fingers or other objects. To record an image brighter in color in dark places (NightShot) (DCR-HC96 8 Set the...
... the battery charge is complete (In the CAMERA-TAPE mode, it . This may create a shadow. • You can change the brightness of the flash lamp before using it takes a while to focus automatically. • Do not use these functions in dark places (NightShot plus) (DCR-HC36/HC46 ...3 Set the NIGHTSHOT PLUS switch 3 to the original colors, use Super NightShot function (p. 52). Therefore, do not cover the infrared port 1 with your fingers or other objects. To record an image brighter in color in dark places (NightShot) (DCR-HC96 8 Set the...

Operating Guide
Page 35
...RESET qf Press RESET qf to operate your camcorder. K Internal stereo microphone For DCR-HC96: An Active Interface Shoe compatible microphone will take precedence when connected (p. 78). To use special effects 4 See (PICT.APPLI.) menu on page 68. Remaining battery (approx.) Other part names and functions ... if the remaining tape or battery power is displayed. J Recording lamp (DCR-HC96) The recording lamp lights up to 20 seconds by pressing DISP/BATT INFO again while the battery information is low. Recording/playback To check the remaining battery (Battery Info qd Set the POWER ...
...RESET qf Press RESET qf to operate your camcorder. K Internal stereo microphone For DCR-HC96: An Active Interface Shoe compatible microphone will take precedence when connected (p. 78). To use special effects 4 See (PICT.APPLI.) menu on page 68. Remaining battery (approx.) Other part names and functions ... if the remaining tape or battery power is displayed. J Recording lamp (DCR-HC96) The recording lamp lights up to 20 seconds by pressing DISP/BATT INFO again while the battery information is low. Recording/playback To check the remaining battery (Battery Info qd Set the POWER ...

Operating Guide
Page 36
... during recording/playback Recording movies In the CAMERA-TAPE mode 123 45 Recording still images 81 60min 101 90 3.0M FINE qa 11 67 A Remaining battery (approx.) B Recording mode (SP or LP) (65) C Recording status ([STBY] (standby) or [REC] (recording)) D Recording: Tape counter (hour: minute: second) ...(39) G Personal Menu button (44) In the CAMERA-MEMORY mode A B C D E P-MENU qs 7 H Recording folder (59) I Image size (26, 56) (DCR-HC46/HC96) J Quality ( or ) (56) K "Memory Stick Duo" indicator and the number of images that can check them as [DATA CODE] during recording and the...
... during recording/playback Recording movies In the CAMERA-TAPE mode 123 45 Recording still images 81 60min 101 90 3.0M FINE qa 11 67 A Remaining battery (approx.) B Recording mode (SP or LP) (65) C Recording status ([STBY] (standby) or [REC] (recording)) D Recording: Tape counter (hour: minute: second) ...(39) G Personal Menu button (44) In the CAMERA-MEMORY mode A B C D E P-MENU qs 7 H Recording folder (59) I Image size (26, 56) (DCR-HC46/HC96) J Quality ( or ) (56) K "Memory Stick Duo" indicator and the number of images that can check them as [DATA CODE] during recording and the...

Operating Guide
Page 40
... the zero set to CAMERATAPE. 40 *2 Not available during Easy Handycam operation. • Aim the Remote Commander towards the remote sensor to locate later on -screen image when you want to operate your camcorder (p. 35). • To change the battery, see page 131. Insulation sheet 6 1 7 q; 2 8...zoom (p. 32, 34) I DISPLAY (p. 21) J Memory control buttons (Index*2, -/+, Memory playback) (p. 31) *1 Not available during Easy Handycam operation with the POWER switch is not displayed, press DISPLAY 9. 2 Press STOP 4 when you press this button will be recorded onto the "Memory...
... the zero set to CAMERATAPE. 40 *2 Not available during Easy Handycam operation. • Aim the Remote Commander towards the remote sensor to locate later on -screen image when you want to operate your camcorder (p. 35). • To change the battery, see page 131. Insulation sheet 6 1 7 q; 2 8...zoom (p. 32, 34) I DISPLAY (p. 21) J Memory control buttons (Index*2, -/+, Memory playback) (p. 31) *1 Not available during Easy Handycam operation with the POWER switch is not displayed, press DISPLAY 9. 2 Press STOP 4 when you press this button will be recorded onto the "Memory...
Operating Guide
Page 50
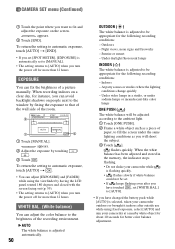
...Under video lamps in the memory, the indicator stops flashing. • Do not shake your camcorder at a nearby white object for about 10 seconds for instance, you have changed the battery pack while [AUTO] is adjusted to be appropriate for the following recording conditions: - To ...by touching / . 3 Touch . B AUTO The white balance is adjusted automatically. 50 OUTDOOR ( ) The white balance is selected, taken your camcorder outdoors or brought it indoors after you have touched , set . • If keeps flashing even after outside use while using fixed exposure, select [...
...Under video lamps in the memory, the indicator stops flashing. • Do not shake your camcorder at a nearby white object for about 10 seconds for instance, you have changed the battery pack while [AUTO] is adjusted to be appropriate for the following recording conditions: - To ...by touching / . 3 Touch . B AUTO The white balance is adjusted automatically. 50 OUTDOOR ( ) The white balance is selected, taken your camcorder outdoors or brought it indoors after you have touched , set . • If keeps flashing even after outside use while using fixed exposure, select [...


