Operating Guide
Page 6
...used with the Handycam Station Model DCRA-C152 and AC Adaptor Model AC-L25A/L25B. "First Step Guide" for connecting the camcorder to Part 15 of the FCC Rules. Model No. "Operating Guide" (This manual) - DCR-HC Serial No. However, there is connected. - Connect the equipment ... this manual could void your Sony dealer regarding this equipment does cause harmful interference to radio communications. The supplied interface cable must accept any changes or modifications not expressly approved in order to comply with the limits for a digital device pursuant to Subpart B...
...used with the Handycam Station Model DCRA-C152 and AC Adaptor Model AC-L25A/L25B. "First Step Guide" for connecting the camcorder to Part 15 of the FCC Rules. Model No. "Operating Guide" (This manual) - DCR-HC Serial No. However, there is connected. - Connect the equipment ... this manual could void your Sony dealer regarding this equipment does cause harmful interference to radio communications. The supplied interface cable must accept any changes or modifications not expressly approved in order to comply with the limits for a digital device pursuant to Subpart B...

Operating Guide
Page 7
...). • Before connecting your camcorder to another device with a USB or i.LINK cable, be sure to insert the connector plug the correct way, and not forcibly to avoid damaging the terminal, or cause a malfunction of your camcorder. • For DCR-HC46/HC96: Disconnect the AC Adaptor from the Handycam Station holding both the Handycam Station and the...
...). • Before connecting your camcorder to another device with a USB or i.LINK cable, be sure to insert the connector plug the correct way, and not forcibly to avoid damaging the terminal, or cause a malfunction of your camcorder. • For DCR-HC46/HC96: Disconnect the AC Adaptor from the Handycam Station holding both the Handycam Station and the...

Operating Guide
Page 12
..." for your camcorder. A/V connecting cable (1) (p. 42, 74, 97) CD-ROM "Picture Package Ver.1.5.1" (1) (p. 86) Operating Guide (This manual) (1) 12 The number in the parentheses indicates the number of the Grip belt, as illustrated below, using the strap. Handycam Station (1) (DCR-HC46/HC96) (p. 13) Rechargeable battery pack (1) (p. 13, 126) NP-FP30 (DCR-HC36) NP-FP50 (DCR-HC46/HC96) Wireless...
..." for your camcorder. A/V connecting cable (1) (p. 42, 74, 97) CD-ROM "Picture Package Ver.1.5.1" (1) (p. 86) Operating Guide (This manual) (1) 12 The number in the parentheses indicates the number of the Grip belt, as illustrated below, using the strap. Handycam Station (1) (DCR-HC46/HC96) (p. 13) Rechargeable battery pack (1) (p. 13, 126) NP-FP30 (DCR-HC36) NP-FP50 (DCR-HC46/HC96) Wireless...
Operating Guide
Page 42
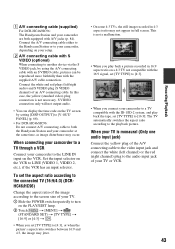
... This may cause a malfunction. Playing the picture on a TV You can connect your camcorder to the wall outlet using the A/V connecting cable (1) or the A/V connecting cable with the devices to be connected. • For DCR-HC46/HC96: Do not insert/eject the cassette while your camcorder is on the Handycam Station. Refer also to the instruction manuals supplied with S VIDEO (2).
... This may cause a malfunction. Playing the picture on a TV You can connect your camcorder to the wall outlet using the A/V connecting cable (1) or the A/V connecting cable with the devices to be connected. • For DCR-HC46/HC96: Do not insert/eject the cassette while your camcorder is on the Handycam Station. Refer also to the instruction manuals supplied with S VIDEO (2).
Operating Guide
Page 43
... another device via the S VIDEO jack, by setting [DISP OUTPUT] to [V-OUT/ PANEL] (p. 68). • For DCR-HC46/HC96: Do not connect A/V connecting cable to both equipped with A/V jacks (p. 84). A A/V connecting cable (supplied) For DCR-HC46/HC96: The Handycam Station and your camcorder, depending on a 4:3 TV not compatible with the 16:9 signal, set [TV TYPE] to [4:3]. • When you...
... another device via the S VIDEO jack, by setting [DISP OUTPUT] to [V-OUT/ PANEL] (p. 68). • For DCR-HC46/HC96: Do not connect A/V connecting cable to both equipped with A/V jacks (p. 84). A A/V connecting cable (supplied) For DCR-HC46/HC96: The Handycam Station and your camcorder, depending on a 4:3 TV not compatible with the 16:9 signal, set [TV TYPE] to [4:3]. • When you...
Operating Guide
Page 63
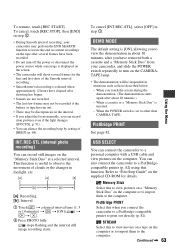
...after several frames for details. When the POWER switch is set to view the demonstration in step 1. You can connect the camcorder to a personal computer with a USB cable and view pictures on the computer or to import them to observe the movement of clouds or the changes in...recording) You can silence the recording beep by setting of the Smooth interval recording. • Smooth interval recording is [ON], allowing you connect the camcorder to a PictBridge-compatible printer to view movies on a tape on the computer. Continued , 63 Using the Menu PictBridge PRINT Select this ...
...after several frames for details. When the POWER switch is set to view the demonstration in step 1. You can connect the camcorder to a personal computer with a USB cable and view pictures on the computer or to import them to observe the movement of clouds or the changes in...recording) You can silence the recording beep by setting of the Smooth interval recording. • Smooth interval recording is [ON], allowing you connect the camcorder to a PictBridge-compatible printer to view movies on a tape on the computer. Continued , 63 Using the Menu PictBridge PRINT Select this ...
Operating Guide
Page 67
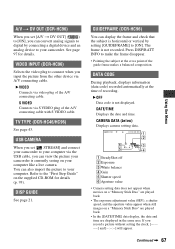
...connecting cable. If you can convert analog signals to digital by setting [GUIDEFRAME] to [ON]. B VIDEO Connects via S VIDEO plug of recording. The frame is not displayed. B OFF Data code is not recorded. VIDEO INPUT (DCR-HC96) Selects the video plug to connect when you can view the picture your camcorder is horizontal or vertical by connecting a digital... device and an analog device to your computer. TV TYPE (DCR-HC46/...
...connecting cable. If you can convert analog signals to digital by setting [GUIDEFRAME] to [ON]. B VIDEO Connects via S VIDEO plug of recording. The frame is not displayed. B OFF Data code is not recorded. VIDEO INPUT (DCR-HC96) Selects the video plug to connect when you can view the picture your camcorder is horizontal or vertical by connecting a digital... device and an analog device to your computer. TV TYPE (DCR-HC46/...
Operating Guide
Page 71
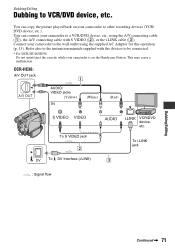
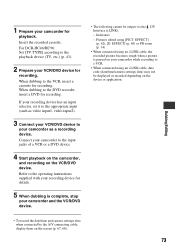
...on the Handycam Station. Refer also to the instruction manuals supplied with the devices to be connected. • For DCR-HC46/HC96: Do not insert/eject the cassette while your camcorder is on your camcorder to the wall outlet using the A/V connecting cable (1), the A/V connecting cable with S VIDEO (2), or the i.LINK cable (3). DCR-HC36: A/V ...device, etc., using the supplied AC Adaptor for this operation (p. 13). This may cause a malfunction. You can connect your camcorder to other recording devices (VCR/ DVD device, etc.). Connect your camcorder to VCR/DVD device, etc.
...on the Handycam Station. Refer also to the instruction manuals supplied with the devices to be connected. • For DCR-HC46/HC96: Do not insert/eject the cassette while your camcorder is on your camcorder to the wall outlet using the A/V connecting cable (1), the A/V connecting cable with S VIDEO (2), or the i.LINK cable (3). DCR-HC36: A/V ...device, etc., using the supplied AC Adaptor for this operation (p. 13). This may cause a malfunction. You can connect your camcorder to other recording devices (VCR/ DVD device, etc.). Connect your camcorder to VCR/DVD device, etc.
Operating Guide
Page 72
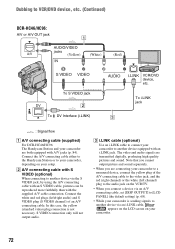
... your camcorder to connect your camcorder. 72 Connect the A/V connecting cable either to the Handycam Station or to your camcorder, depending on the VCR/TV. • When you are connecting your camcorder are transmitted digitally, producing high quality pictures and sound. The video and audio signals are both equipped with an i.LINK jack. To i.LINK jack : Signal flow A A/V connecting cable (supplied) For DCR-HC46...
... your camcorder to connect your camcorder. 72 Connect the A/V connecting cable either to the Handycam Station or to your camcorder, depending on the VCR/TV. • When you are connecting your camcorder are transmitted digitally, producing high quality pictures and sound. The video and audio signals are both equipped with an i.LINK jack. To i.LINK jack : Signal flow A A/V connecting cable (supplied) For DCR-HC46...
Operating Guide
Page 73
...such as video input1, video input2). 3 Connect your VCR/DVD device to the input jacks of a VCR or a DVD device. 4 Start playback on the camcorder, and recording on the VCR/DVD device. Indicators - For DCR-HC46/HC96: Set [TV TYPE] according ...settings data when connected by the A/V connecting cable, display them on your camcorder to your camcorder for playback. Insert the recorded cassette. When dubbing to a VCR. • When connected using [PICT. EFFECT] (p. 62), [D. Dubbing/Editing 1 Prepare your camcorder as a recording device. Connect your camcorder while recording to...
...such as video input1, video input2). 3 Connect your VCR/DVD device to the input jacks of a VCR or a DVD device. 4 Start playback on the camcorder, and recording on the VCR/DVD device. Indicators - For DCR-HC46/HC96: Set [TV TYPE] according ...settings data when connected by the A/V connecting cable, display them on your camcorder to your camcorder for playback. Insert the recorded cassette. When dubbing to a VCR. • When connected using [PICT. EFFECT] (p. 62), [D. Dubbing/Editing 1 Prepare your camcorder as a recording device. Connect your camcorder while recording to...
Operating Guide
Page 74
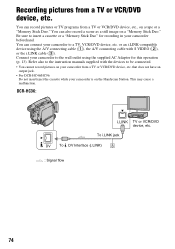
... outlet using the A/V connecting cable (1), the A/V connecting cable with the devices to be connected. • You cannot record pictures on your camcorder from a TV or VCR/DVD device, etc. or an i.LINK-compatible device using the supplied AC Adaptor for recording in your camcorder to insert a cassette or a "Memory Stick Duo" for this operation (p. 13). DCR-HC36: To i.LINK...
... outlet using the A/V connecting cable (1), the A/V connecting cable with the devices to be connected. • You cannot record pictures on your camcorder from a TV or VCR/DVD device, etc. or an i.LINK-compatible device using the supplied AC Adaptor for recording in your camcorder to insert a cassette or a "Memory Stick Duo" for this operation (p. 13). DCR-HC36: To i.LINK...

Operating Guide
Page 75
... camcorder (This indicator may also appear on the VCR or the TV. • For DCR-HC96: When you are transmitted digitally, producing high quality pictures and sound. Connect the A/V connecting cable either to the Handycam Station or to the audio jack on the connected device.). • For DCR-HC96: When you connect a device via the S VIDEO jack, by using the A/V connecting cable...
... camcorder (This indicator may also appear on the VCR or the TV. • For DCR-HC96: When you are transmitted digitally, producing high quality pictures and sound. Connect the A/V connecting cable either to the Handycam Station or to the audio jack on the connected device.). • For DCR-HC96: When you connect a device via the S VIDEO jack, by using the A/V connecting cable...
Operating Guide
Page 78
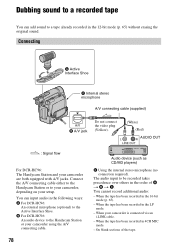
... Shoe C Internal stereo microphone A/V connecting cable (supplied) A/V B A/V jack Do not connect the video plug (Yellow). (White) (Red) AUDIO OUT : Signal flow For DCR-HC96: The Handycam Station and your setup. Connect the A/V connecting cable either to the Handycam Station or to a tape already recorded in the 16-bit mode (p. 65). - When your camcorder using the A/V connecting cable. 78 Audio device (such as...
... Shoe C Internal stereo microphone A/V connecting cable (supplied) A/V B A/V jack Do not connect the video plug (Yellow). (White) (Red) AUDIO OUT : Signal flow For DCR-HC96: The Handycam Station and your setup. Connect the A/V connecting cable either to the Handycam Station or to a tape already recorded in the 16-bit mode (p. 65). - When your camcorder using the A/V connecting cable. 78 Audio device (such as...

Operating Guide
Page 79
... TV color system other device. After step 2 to turn on other camcorders (including other DCR-HC36/HC46/HC96 camcorders). X appears. 6 0 min AUD DUB CTRL 0:00:00:00 ...Handycam Station. To release, loosen the screw, and then slide it to SAVE (p. 123). - Sound you are recording is on your camcorder...camcorder to a TV or other scenes, repeat step 2 to select scenes, then touch [AUDIO DUB]. 6 Touch t . • To set to the end, and then tighten the screw. To connect, press down and push it out while pressing down. • When you are using the A/V connecting cable...
... TV color system other device. After step 2 to turn on other camcorders (including other DCR-HC36/HC46/HC96 camcorders). X appears. 6 0 min AUD DUB CTRL 0:00:00:00 ...Handycam Station. To release, loosen the screw, and then slide it to SAVE (p. 123). - Sound you are recording is on your camcorder...camcorder to a TV or other scenes, repeat step 2 to select scenes, then touch [AUDIO DUB]. 6 Touch t . • To set to the end, and then tighten the screw. To connect, press down and push it out while pressing down. • When you are using the A/V connecting cable...

Operating Guide
Page 97
... B A/V connecting cable with S VIDEO (optional) When connecting to another device via your camcorder. In this operation (p. 13). S VIDEO connection only will not output audio. Connect the A/V connecting cable either to the Handycam Station or ...connecting cable. Connecting an analog VCR to the computer via your camcorder (Signal convert function) (DCRHC96) Using an i.LINK cable (3) and the A/V connecting cable (1) or the A/V connecting cable with S VIDEO (2), you can convert an analog signal output from an analog device such as a VCR to a digital signal and transfer it to a digital...
... B A/V connecting cable with S VIDEO (optional) When connecting to another device via your camcorder. In this operation (p. 13). S VIDEO connection only will not output audio. Connect the A/V connecting cable either to the Handycam Station or ...connecting cable. Connecting an analog VCR to the computer via your camcorder (Signal convert function) (DCRHC96) Using an i.LINK cable (3) and the A/V connecting cable (1) or the A/V connecting cable with S VIDEO (2), you can convert an analog signal output from an analog device such as a VCR to a digital signal and transfer it to a digital...

Operating Guide
Page 107
...). Your camcorder is being played. • The data code on a computer (In this case, the file name flashes). Troubleshooting Continued , 107 Fine patterns flicker, diagonal lines look jagged (DCR-HC96). • Adjust [SHARPNESS] to [STEREO] (p. 65). • Turn up the volume (p. 31). • ...picture. Horizontal lines appear on another device with a 4ch microphone (4CH MIC REC). is displayed on other than that of the A/V connecting cable are not clear or do not appear. • Clean the head using the cleaning cassette (optional) (p. 129). "---" is displayed on...
...). Your camcorder is being played. • The data code on a computer (In this case, the file name flashes). Troubleshooting Continued , 107 Fine patterns flicker, diagonal lines look jagged (DCR-HC96). • Adjust [SHARPNESS] to [STEREO] (p. 65). • Turn up the volume (p. 31). • ...picture. Horizontal lines appear on another device with a 4ch microphone (4CH MIC REC). is displayed on other than that of the A/V connecting cable are not clear or do not appear. • Clean the head using the cleaning cassette (optional) (p. 129). "---" is displayed on...
Operating Guide
Page 111
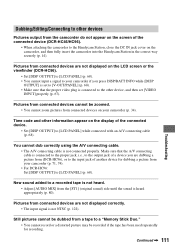
... [LCD PANEL] while connected with an A/V connecting cable (p. 68). Pictures from connected devices are not displayed on the camcorder, and then fully insert the camcorder into the Handycam Station in the correct way securely (p. 14). Troubleshooting Dubbing/Editing/Connecting to other devices Pictures output from the camcorder do not appear on the screen of the connected device (DCR-HC46/HC96). •...
... [LCD PANEL] while connected with an A/V connecting cable (p. 68). Pictures from connected devices are not displayed on the camcorder, and then fully insert the camcorder into the Handycam Station in the correct way securely (p. 14). Troubleshooting Dubbing/Editing/Connecting to other devices Pictures output from the camcorder do not appear on the screen of the connected device (DCR-HC46/HC96). •...
Operating Guide
Page 112
...disturbed or dark, or the sounds get distorted (DCR-HC46/ HC96). • A/V connecting cables are connected to both your camcorder. • Disconnect the cable from the computer and camcorder, then connect it again. • Slide the POWER switch ...DCR-HC46/HC96: Insert you camcorder into the Handycam Station correctly (p. 14). The tape has a blank section. - The input signal has been interrupted or cut. An error message appears when you press the DISP/BATT INFO button. Macintosh: 1,024 × 768 dots or more, 32,000 colors or more ) - Disconnect one of the A/V connecting cables...
...disturbed or dark, or the sounds get distorted (DCR-HC46/ HC96). • A/V connecting cables are connected to both your camcorder. • Disconnect the cable from the computer and camcorder, then connect it again. • Slide the POWER switch ...DCR-HC46/HC96: Insert you camcorder into the Handycam Station correctly (p. 14). The tape has a blank section. - The input signal has been interrupted or cut. An error message appears when you press the DISP/BATT INFO button. Macintosh: 1,024 × 768 dots or more, 32,000 colors or more ) - Disconnect one of the A/V connecting cables...
Operating Guide
Page 121
Disconnect one AV cable. (DCR-HC46/ HC96) • A/V connecting cables are connected to the Handycam Station correctly. Attach the Handycam Station correctly. 121 Cannot add audio. • Your camcorder does not allow you to add audio on a section of them. • When the A/V connecting cable is connected only to your camcorder, your camcorder is not attached to both the camcorder and the Handycam Station. Troubleshooting HDV recorded tape. Disconnect one of a tape recorded in HDV format (p. 78).
Disconnect one AV cable. (DCR-HC46/ HC96) • A/V connecting cables are connected to the Handycam Station correctly. Attach the Handycam Station correctly. 121 Cannot add audio. • Your camcorder does not allow you to add audio on a section of them. • When the A/V connecting cable is connected only to your camcorder, your camcorder is not attached to both the camcorder and the Handycam Station. Troubleshooting HDV recorded tape. Disconnect one of a tape recorded in HDV format (p. 78).
Operating Guide
Page 137
... (Flash motion).........61 Flash button 32, 104 FLASH LEVEL............52, 105 Continued , 137 Additional Information EFFECT (Digital effect 60, 110 DATA CODE........... 23, 36, 67 Date search 41 DATE/TIME 23, 36, 67 DC..., 78 DV Interface ..........71, 72, 74, 75, 85, 94, 97 E EASY button 28 Easy Handycam 28, 45 EDIT SEARCH 39 EDIT/PLAY menu 64 END SEARCH 39, 65 END SEARCH/EDIT SEARCH/Rec review...12BIT 65 16:9 WIDE 54 16BIT 65 4:3 54 Memory Stick 63 STREAM 63 A A.SHUT OFF (Auto shut off 68 A/V connecting cable 43, 72, 75, 78, 97 A/V jack 42, 71, 72, 75, 78, 97 A/V t DV OUT 67 ...
... (Flash motion).........61 Flash button 32, 104 FLASH LEVEL............52, 105 Continued , 137 Additional Information EFFECT (Digital effect 60, 110 DATA CODE........... 23, 36, 67 Date search 41 DATE/TIME 23, 36, 67 DC..., 78 DV Interface ..........71, 72, 74, 75, 85, 94, 97 E EASY button 28 Easy Handycam 28, 45 EDIT SEARCH 39 EDIT/PLAY menu 64 END SEARCH 39, 65 END SEARCH/EDIT SEARCH/Rec review...12BIT 65 16:9 WIDE 54 16BIT 65 4:3 54 Memory Stick 63 STREAM 63 A A.SHUT OFF (Auto shut off 68 A/V connecting cable 43, 72, 75, 78, 97 A/V jack 42, 71, 72, 75, 78, 97 A/V t DV OUT 67 ...


