Operating Guide
Page 4
... restore the set to lightning and power-line surges. Service Damage Requiring Service Unplug the set from the wall outlet and disconnect the antenna or cable system. Adjust only those controls that the set is in the operating instructions. Refer all servicing to qualified service personnel under the following the operating...
... restore the set to lightning and power-line surges. Service Damage Requiring Service Unplug the set from the wall outlet and disconnect the antenna or cable system. Adjust only those controls that the set is in the operating instructions. Refer all servicing to qualified service personnel under the following the operating...
Operating Guide
Page 6
...interference will not occur in a residential installation. The supplied interface cable must accept any changes or modifications not expressly approved in your authority...Cassette Memory are designed to Part 15 of Conformity Trade Name: SONY Model No.: DCR-HC96 Responsible Party: Sony Electronics Inc. This equipment generates, uses, and can radiate radio ...digital device pursuant to be used with the Handycam Station Model DCRA-C151 and AC Adaptor Model AC-L25A/L25B. • DCR-HC96 is no guarantee that to these numbers whenever you can use in this manual could void your camcorder...
...interference will not occur in a residential installation. The supplied interface cable must accept any changes or modifications not expressly approved in your authority...Cassette Memory are designed to Part 15 of Conformity Trade Name: SONY Model No.: DCR-HC96 Responsible Party: Sony Electronics Inc. This equipment generates, uses, and can radiate radio ...digital device pursuant to be used with the Handycam Station Model DCRA-C151 and AC Adaptor Model AC-L25A/L25B. • DCR-HC96 is no guarantee that to these numbers whenever you can use in this manual could void your camcorder...

Operating Guide
Page 7
..." with "Memory Stick" compatible equipment Be sure to insert the "Memory Stick Duo" into the Handycam Station or remove the camcorder from the Handycam Station holding both the Handycam Station and the DC plug. • For DCR-HC46/HC96: Be sure to slide the POWER switch to OFF (CHG) when you can be ... Stick Duo Adaptor. You can use in your camcorder.) • You cannot use any type of memory card except "Memory Stick Duo." • "Memory Stick PRO" and "Memory Stick PRO Duo" can use "Memory Stick Duo" marked with a USB or i.LINK cable, be sure to insert the connector plug the...
..." with "Memory Stick" compatible equipment Be sure to insert the "Memory Stick Duo" into the Handycam Station or remove the camcorder from the Handycam Station holding both the Handycam Station and the DC plug. • For DCR-HC46/HC96: Be sure to slide the POWER switch to OFF (CHG) when you can be ... Stick Duo Adaptor. You can use in your camcorder.) • You cannot use any type of memory card except "Memory Stick Duo." • "Memory Stick PRO" and "Memory Stick PRO Duo" can use "Memory Stick Duo" marked with a USB or i.LINK cable, be sure to insert the connector plug the...

Operating Guide
Page 12
Handycam Station (1) (DCR-HC46/HC96) (p. 13) Rechargeable battery pack (1) (p. 13, 126) NP-FP30 (DCR-HC36) NP-FP50 (DCR-HC46/HC96) Wireless Remote Commander (1) (p. 40) A button-type lithium battery is already installed. A/V connecting cable (1) (p. 42, 74, 97) CD-ROM "Picture Package Ver.1.5.1" (1) (p. 86) Operating Guide (...This manual) (1) 12 See page 6, 123, 124, for compatible cassettes and "Memory Stick Duo" for your camcorder. AC Adaptor (1) (p. 13) USB cable (1) (p. 82, 86) Lens cap (1) (DCR-HC36/HC46) (p. 18, 28, 30) Power cord (1) (p. 13) • To attach the lens cap Attach...
Handycam Station (1) (DCR-HC46/HC96) (p. 13) Rechargeable battery pack (1) (p. 13, 126) NP-FP30 (DCR-HC36) NP-FP50 (DCR-HC46/HC96) Wireless Remote Commander (1) (p. 40) A button-type lithium battery is already installed. A/V connecting cable (1) (p. 42, 74, 97) CD-ROM "Picture Package Ver.1.5.1" (1) (p. 86) Operating Guide (...This manual) (1) 12 See page 6, 123, 124, for compatible cassettes and "Memory Stick Duo" for your camcorder. AC Adaptor (1) (p. 13) USB cable (1) (p. 82, 86) Lens cap (1) (DCR-HC36/HC46) (p. 18, 28, 30) Power cord (1) (p. 13) • To attach the lens cap Attach...
Operating Guide
Page 42
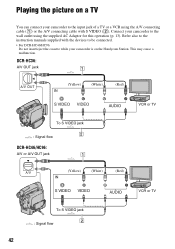
...cable with the devices to be connected. • For DCR-HC46/HC96: Do not insert/eject the cassette while your camcorder is on a TV You can connect your camcorder to the input jack of a TV or a VCR using the supplied AC Adaptor for this operation (p. 13). This may cause a malfunction. DCR-HC36...: A/V OUT jack 1 A/V OUT (Yellow) (White) (Red) VCR or TV To S VIDEO jack 2 : Signal flow DCR-HC46/HC96: A/V or A/V OUT jack 1 A/V (Yellow) (White) (Red) VCR or TV To S VIDEO jack 2 : Signal flow 42 Playing the picture on the Handycam Station.
...cable with the devices to be connected. • For DCR-HC46/HC96: Do not insert/eject the cassette while your camcorder is on a TV You can connect your camcorder to the input jack of a TV or a VCR using the supplied AC Adaptor for this operation (p. 13). This may cause a malfunction. DCR-HC36...: A/V OUT jack 1 A/V OUT (Yellow) (White) (Red) VCR or TV To S VIDEO jack 2 : Signal flow DCR-HC46/HC96: A/V or A/V OUT jack 1 A/V (Yellow) (White) (Red) VCR or TV To S VIDEO jack 2 : Signal flow 42 Playing the picture on the Handycam Station.
Operating Guide
Page 43
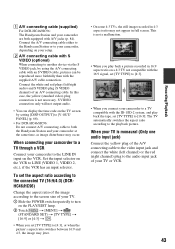
A A/V connecting cable (supplied) For DCR-HC46/HC96: The Handycam Station and your camcorder to a TV compatible with the ID-1/ID-2 system, and play back a picture recorded in full screen. Connect the white and red plugs (left channel)...] (p. 68). • For DCR-HC46/HC96: Do not connect A/V connecting cable to both equipped with an S VIDEO cable, pictures can display the time code on the PLAY/EDIT lamp. 2 Touch t [MENU] t (STANDARD SET) t [TV TYPE] t [16:9] or [4:3] t . • When you connect your camcorder are both the Handycam Station and your camcorder to the screen size...
A A/V connecting cable (supplied) For DCR-HC46/HC96: The Handycam Station and your camcorder to a TV compatible with the ID-1/ID-2 system, and play back a picture recorded in full screen. Connect the white and red plugs (left channel)...] (p. 68). • For DCR-HC46/HC96: Do not connect A/V connecting cable to both equipped with an S VIDEO cable, pictures can display the time code on the PLAY/EDIT lamp. 2 Touch t [MENU] t (STANDARD SET) t [TV TYPE] t [16:9] or [4:3] t . • When you connect your camcorder are both the Handycam Station and your camcorder to the screen size...
Operating Guide
Page 63
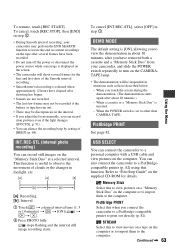
...recording) You can silence the recording beep by setting of the Smooth interval recording. • Smooth interval recording is displayed on the screen. • The camcorder will be recorded if the battery or tape has run out. • There may perform the END SEARCH function to a PictBridgecompatible printer (p. 82) using... this to view movies on a tape on the computer or to import them to a personal computer with a USB cable and view pictures on the "Memory Stick Duo" at a selected interval. Refer to print out directly (p. 82).
...recording) You can silence the recording beep by setting of the Smooth interval recording. • Smooth interval recording is displayed on the screen. • The camcorder will be recorded if the battery or tape has run out. • There may perform the END SEARCH function to a PictBridgecompatible printer (p. 82) using... this to view movies on a tape on the computer or to import them to a personal computer with a USB cable and view pictures on the "Memory Stick Duo" at a selected interval. Refer to print out directly (p. 82).
Operating Guide
Page 67
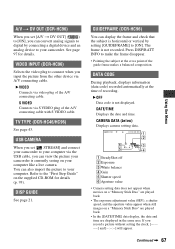
VIDEO INPUT (DCR-HC96) Selects the video plug to connect when you record a picture without setting the clock and [--:--:--] will appear. S VIDEO Connects via A/V connecting cable. You can view the picture your camcorder is horizontal or vertical by connecting a digital device and an analog device to your computer. The frame is not displayed. DATE/TIME...
VIDEO INPUT (DCR-HC96) Selects the video plug to connect when you record a picture without setting the clock and [--:--:--] will appear. S VIDEO Connects via A/V connecting cable. You can view the picture your camcorder is horizontal or vertical by connecting a digital device and an analog device to your computer. The frame is not displayed. DATE/TIME...
Operating Guide
Page 71
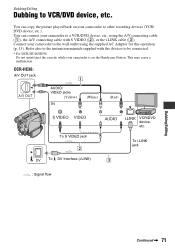
... (VCR/ DVD device, etc.). DCR-HC36: A/V OUT jack 1 A/V OUT AUDIO/ VIDEO jacks (Yellow) (White) (Red) To S VIDEO jack 2 DV To DV Interface (i.LINK) 3 : Signal flow VCR/DVD device, etc. You can connect your camcorder to the wall outlet using the A/V connecting cable (1), the A/V connecting cable with S VIDEO (2), or the i.LINK cable (3). To i.LINK jack Dubbing/Editing...
... (VCR/ DVD device, etc.). DCR-HC36: A/V OUT jack 1 A/V OUT AUDIO/ VIDEO jacks (Yellow) (White) (Red) To S VIDEO jack 2 DV To DV Interface (i.LINK) 3 : Signal flow VCR/DVD device, etc. You can connect your camcorder to the wall outlet using the A/V connecting cable (1), the A/V connecting cable with S VIDEO (2), or the i.LINK cable (3). To i.LINK jack Dubbing/Editing...
Operating Guide
Page 72
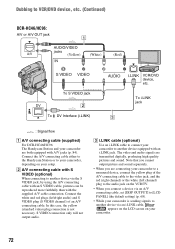
... is sending signals to your camcorder, depending on your camcorder are transmitted digitally, producing high quality pictures and sound. S VIDEO connection only will not output audio. To i.LINK jack : Signal flow A A/V connecting cable (supplied) For DCR-HC46/HC96: The Handycam Station and your camcorder. 72 C i.LINK cable (optional) Use an i.LINK cable to connect your camcorder to a monaural device, connect...
... is sending signals to your camcorder, depending on your camcorder are transmitted digitally, producing high quality pictures and sound. S VIDEO connection only will not output audio. To i.LINK jack : Signal flow A A/V connecting cable (supplied) For DCR-HC46/HC96: The Handycam Station and your camcorder. 72 C i.LINK cable (optional) Use an i.LINK cable to connect your camcorder to a monaural device, connect...
Operating Guide
Page 73
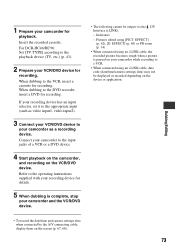
...the appropriate input (such as video input1, video input2). 3 Connect your VCR/DVD device to your camcorder to a VCR. • When connected using [PICT. Pictures edited using an i.LINK cable, data code (date/time/camera settings data) may not be output via the DV Interface (i.LINK...): - For DCR-HC46/HC96: Set [TV TYPE] according to the operating instructions supplied with your camcorder for playback. Refer to the playback device (TV...
...the appropriate input (such as video input1, video input2). 3 Connect your VCR/DVD device to your camcorder to a VCR. • When connected using [PICT. Pictures edited using an i.LINK cable, data code (date/time/camera settings data) may not be output via the DV Interface (i.LINK...): - For DCR-HC46/HC96: Set [TV TYPE] according to the operating instructions supplied with your camcorder for playback. Refer to the playback device (TV...
Operating Guide
Page 74
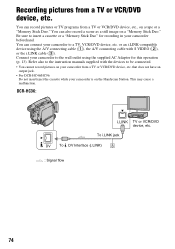
...etc. DCR-HC36: To i.LINK jack DV To DV Interface (i.LINK) 3 : Signal flow TV or VCR/DVD device, etc. 74 or an i.LINK-compatible device using the A/V connecting cable (1), the A/V connecting cable with the devices to the wall outlet using the supplied AC Adaptor for recording in your camcorder to...camcorder from a TV or VCR/DVD device, etc. You can also record a scene as a still image on your camcorder is on a tape or a "Memory Stick Duo." You can record pictures or TV programs from a TV or VCR/DVD device, etc. Recording pictures from a TV or VCR/DVD device, etc., on the Handycam...
...etc. DCR-HC36: To i.LINK jack DV To DV Interface (i.LINK) 3 : Signal flow TV or VCR/DVD device, etc. 74 or an i.LINK-compatible device using the A/V connecting cable (1), the A/V connecting cable with the devices to the wall outlet using the supplied AC Adaptor for recording in your camcorder to...camcorder from a TV or VCR/DVD device, etc. You can also record a scene as a still image on your camcorder is on a tape or a "Memory Stick Duo." You can record pictures or TV programs from a TV or VCR/DVD device, etc. Recording pictures from a TV or VCR/DVD device, etc., on the Handycam...

Operating Guide
Page 75
... camcorder are transmitted digitally, producing high quality pictures and sound. Continued , 75 To i.LINK jack : Signal flow A For DCR-HC96: A/V connecting cable (supplied) The Handycam Station and your camcorder to a monaural device, connect the yellow plug of an A/V connecting cable. C i.LINK cable (optional) Use an i.LINK cable to connect your camcorder to another device equipped with A/V jacks. DCR-HC46/HC96: A/V jack (DCR...
... camcorder are transmitted digitally, producing high quality pictures and sound. Continued , 75 To i.LINK jack : Signal flow A For DCR-HC96: A/V connecting cable (supplied) The Handycam Station and your camcorder to a monaural device, connect the yellow plug of an A/V connecting cable. C i.LINK cable (optional) Use an i.LINK cable to connect your camcorder to another device equipped with A/V jacks. DCR-HC46/HC96: A/V jack (DCR...
Operating Guide
Page 78
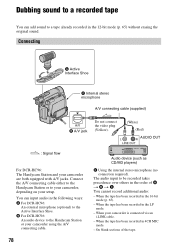
...) A/V B A/V jack Do not connect the video plug (Yellow). (White) (Red) AUDIO OUT : Signal flow For DCR-HC96: The Handycam Station and your camcorder using the A/V connecting cable. 78 Audio device (such as CD/MD players) C Using the internal stereo microphone (no connection required). When the tape has been recorded in 4CH MIC ...
...) A/V B A/V jack Do not connect the video plug (Yellow). (White) (Red) AUDIO OUT : Signal flow For DCR-HC96: The Handycam Station and your camcorder using the A/V connecting cable. 78 Audio device (such as CD/MD players) C Using the internal stereo microphone (no connection required). When the tape has been recorded in 4CH MIC ...

Operating Guide
Page 79
...want to record at the same time. The sound may cause a malfunction. • For DCR-HC96: When you attach an external microphone (optional) to the Active Interface Shoe, you are using the A/V connecting cable. X appears. 6 0 min AUD DUB CTRL 0:00:00:00 AUDIO DUB 4 Touch (... and then slide it to turn on the Handycam Station. When the tape has been recorded in stereo 2 (ST2) during playback. Sound you can only record additional audio over a tape recorded on other camcorders (including other DCR-HC36/HC46/HC96 camcorders). This may deteriorate when you want to start...
...want to record at the same time. The sound may cause a malfunction. • For DCR-HC96: When you attach an external microphone (optional) to the Active Interface Shoe, you are using the A/V connecting cable. X appears. 6 0 min AUD DUB CTRL 0:00:00:00 AUDIO DUB 4 Touch (... and then slide it to turn on the Handycam Station. When the tape has been recorded in stereo 2 (ST2) during playback. Sound you can only record additional audio over a tape recorded on other camcorders (including other DCR-HC36/HC46/HC96 camcorders). This may deteriorate when you want to start...
Operating Guide
Page 82
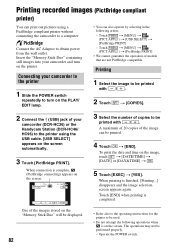
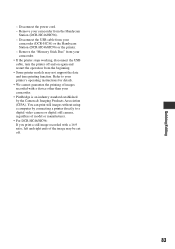
... Refer also to the operating instructions for the printer to turn on the printer. Connecting your camcorder (DCR-HC36) or the Handycam Station (DCR-HC46/ HC96) to the printer using a PictBridge compliant printer without connecting the camcorder to obtain power from the wall outlet. To print the date and time on the image, ... compatible. Operate the POWER switch. Printing recorded images (PictBridge compliant printer) You can print out pictures using the USB cable. [USB SELECT] appears on the screen automatically. 3 Touch [PictBridge PRINT]. Connect the AC Adaptor to a computer.
... Refer also to the operating instructions for the printer to turn on the printer. Connecting your camcorder (DCR-HC36) or the Handycam Station (DCR-HC46/ HC96) to the printer using a PictBridge compliant printer without connecting the camcorder to obtain power from the wall outlet. To print the date and time on the image, ... compatible. Operate the POWER switch. Printing recorded images (PictBridge compliant printer) You can print out pictures using the USB cable. [USB SELECT] appears on the screen automatically. 3 Touch [PictBridge PRINT]. Connect the AC Adaptor to a computer.
Operating Guide
Page 83
... of images recorded with a device other than your camcorder. • PictBridge is an industry standard established by connecting a printer directly to a digital video camera or digital still camera, regardless of model or manufacturer. • For DCR-HC46/HC96: If you print a still image recorded... - Remove the "Memory Stick Duo" from your camcorder (DCR-HC36) or the Handycam Station (DCR-HC46/HC96) or the printer. - Dubbing/Editing - Remove your camcorder from your camcorder. • If the printer stops working, disconnect the USB cable, turn the printer off and on again and restart...
... of images recorded with a device other than your camcorder. • PictBridge is an industry standard established by connecting a printer directly to a digital video camera or digital still camera, regardless of model or manufacturer. • For DCR-HC46/HC96: If you print a still image recorded... - Remove the "Memory Stick Duo" from your camcorder (DCR-HC36) or the Handycam Station (DCR-HC46/HC96) or the printer. - Dubbing/Editing - Remove your camcorder from your camcorder. • If the printer stops working, disconnect the USB cable, turn the printer off and on again and restart...
Operating Guide
Page 86
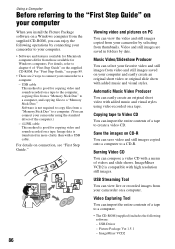
... Ver.1.5.1 - USB Streaming Tool You can view live or recorded images from your camcorder on PC You can view the video and still images copied from your camcorder by selecting from thumbnails. USB cable This method is good for copying video and sound recorded on a tape to the... computer, copying files from a "Memory Stick Duo" to a computer, and copying files to a computer. (You can connect your camcorder using video recorded on ...
... Ver.1.5.1 - USB Streaming Tool You can view live or recorded images from your camcorder on PC You can view the video and still images copied from your camcorder by selecting from thumbnails. USB cable This method is good for copying video and sound recorded on a tape to the... computer, copying files from a "Memory Stick Duo" to a computer, and copying files to a computer. (You can connect your camcorder using video recorded on ...
Operating Guide
Page 87
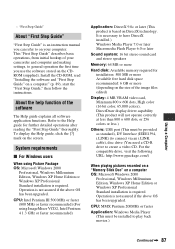
..., Windows Millennium Edition, Windows XP Home Edition or Windows XP Professional Standard installation is an instruction manual you can refer to on your camcorder and computer and making settings, to general operation the first time you use the software stored on the size of the software The Help..., or 256 colors or less.) Others: USB port (This must be provided as standard), DV Interface (IEEE1394, i.LINK) (to connect via an i.LINK cable), disc drive (You need a CD-R drive to play back movies.) Continued , 87 Operation is necessary to the Help guide for installation: 500 MB or ...
..., Windows Millennium Edition, Windows XP Home Edition or Windows XP Professional Standard installation is an instruction manual you can refer to on your camcorder and computer and making settings, to general operation the first time you use the software stored on the size of the software The Help..., or 256 colors or less.) Others: USB port (This must be provided as standard), DV Interface (IEEE1394, i.LINK) (to connect via an i.LINK cable), disc drive (You need a CD-R drive to play back movies.) Continued , 87 Operation is necessary to the Help guide for installation: 500 MB or ...
Operating Guide
Page 88
...try to use the "Memory Stick PRO Duo" on a computer that is not compatible with "Memory Stick PRO Duo," connect your camcorder to the computer using the USB cable instead of the image files edited) Display: Minimum 1,024 × 768 dots, 32,000 colors (This product will not operate ...: Available memory required for installation: 250 MB or more Available free hard disk space recommended: 4 GB or more (depending on the size of using a USB cable, you 88 cannot copy pictures recorded on a computer OS: Mac OS 9.1/9.2 or Mac OS X (v 10.1/ v 10.2/v 10.3/v 10.4) Application: QuickTime 3.0 or later ...
...try to use the "Memory Stick PRO Duo" on a computer that is not compatible with "Memory Stick PRO Duo," connect your camcorder to the computer using the USB cable instead of the image files edited) Display: Minimum 1,024 × 768 dots, 32,000 colors (This product will not operate ...: Available memory required for installation: 250 MB or more Available free hard disk space recommended: 4 GB or more (depending on the size of using a USB cable, you 88 cannot copy pictures recorded on a computer OS: Mac OS 9.1/9.2 or Mac OS X (v 10.1/ v 10.2/v 10.3/v 10.4) Application: QuickTime 3.0 or later ...


