
Camera Operations Guide
Page 4
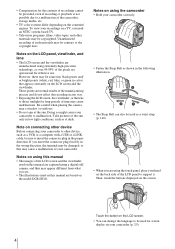
... or a computer with a USB or i.LINK cable, be used as at the sun. These points are based on the model DCR-HC40. Note on connecting other device Before connecting your camcorder to support it. Notes on using the touch panel, place your hand on the back side of the LCD panel to... process and do not affect the recording in the proper direction. However, there may be some tiny black points and/ or bright points (white, red, blue, or green in the wrong direction, the terminal may be damaged, or this manual are captured using extremely high-precision technology, so over 99.99...
... or a computer with a USB or i.LINK cable, be used as at the sun. These points are based on the model DCR-HC40. Note on connecting other device Before connecting your camcorder to support it. Notes on using the touch panel, place your hand on the back side of the LCD panel to... process and do not affect the recording in the proper direction. However, there may be some tiny black points and/ or bright points (white, red, blue, or green in the wrong direction, the terminal may be damaged, or this manual are captured using extremely high-precision technology, so over 99.99...
Camera Operations Guide
Page 14
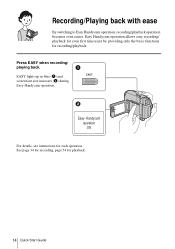
Easy Handycam operation ON For details, see instructions for recording/playback. Easy Handycam operation allows easy recording/ playback for even first time users by providing only the basic functions for each operation. See page 34 for recording, page 54 for playback. 14 Quick Start Guide Recording/Playing back with ease By switching to Easy Handycam operation, recording/playback operation becomes even easier. Press EASY when recording/ playing back. EASY lights up in blue (1) and screen font size increases (2) during Easy Handycam operation.
Easy Handycam operation ON For details, see instructions for recording/playback. Easy Handycam operation allows easy recording/ playback for even first time users by providing only the basic functions for each operation. See page 34 for recording, page 54 for playback. 14 Quick Start Guide Recording/Playing back with ease By switching to Easy Handycam operation, recording/playback operation becomes even easier. Press EASY when recording/ playing back. EASY lights up in blue (1) and screen font size increases (2) during Easy Handycam operation.
Camera Operations Guide
Page 35
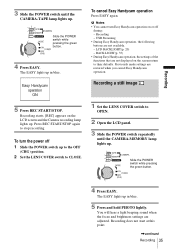
... the CAMERA-MEMORY lamp lights up . Slide the POWER switch while pressing the green button. 4 Press EASY. USB Streaming • During Easy Handycam operation, the following buttons are not displayed on the screen return to CLOSE. Recording a still image 1 Set the LENS COVER switch to stop ...the POWER switch while pressing the green button. 4 Press EASY. The EASY lights up in blue. To cancel Easy Handycam operation Press EASY again. Previously made settings are adjusted. The EASY lights up in blue. 5 Press and hold PHOTO lightly. You will hear a light beeping sound when the focus ...
... the CAMERA-MEMORY lamp lights up . Slide the POWER switch while pressing the green button. 4 Press EASY. USB Streaming • During Easy Handycam operation, the following buttons are not displayed on the screen return to CLOSE. Recording a still image 1 Set the LENS COVER switch to stop ...the POWER switch while pressing the green button. 4 Press EASY. The EASY lights up in blue. To cancel Easy Handycam operation Press EASY again. Previously made settings are adjusted. The EASY lights up in blue. 5 Press and hold PHOTO lightly. You will hear a light beeping sound when the focus ...
Camera Operations Guide
Page 43
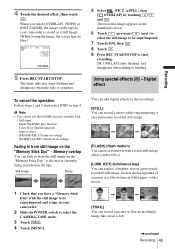
...such as a still image. (While storing the image, the screen turns to the movie currently being recorded on the "Memory Stick Duo" to blue.) 60min STBY 0:00:00 MOSAIC FADER P-MENU 5 Press REC START/STOP. The recorded image appears on the thumbnail screen. 6 Touch (previous)/... (next) to select the still image to be superimposed and a tape in from still image on the tape in your camcorder. 2 Slide the POWER switch to start recording. [M. Super NightShot plus function - APPLI.), then [ OVERLAP] by touching / and . Digital effect ...
...such as a still image. (While storing the image, the screen turns to the movie currently being recorded on the "Memory Stick Duo" to blue.) 60min STBY 0:00:00 MOSAIC FADER P-MENU 5 Press REC START/STOP. The recorded image appears on the thumbnail screen. 6 Touch (previous)/... (next) to select the still image to be superimposed and a tape in from still image on the tape in your camcorder. 2 Slide the POWER switch to start recording. [M. Super NightShot plus function - APPLI.), then [ OVERLAP] by touching / and . Digital effect ...
Camera Operations Guide
Page 45
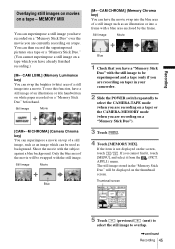
.... If the item is not displayed on a tape - Thumbnail screen 60min STBY MEMORY MIX: OFF OFF 0:00:00 M CAM LUMI. Still image Movie Blue 1 Check that you have recorded on a "Memory Stick Duo" over the movie you are currently recording on top of a still image such as an ...the brighter (white) area of an illustration or title handwritten on white paper recorded on the thumbnail screen. Only the blue area of the movie will be superimposed and a tape (only if you are recording on tape) in your camcorder. 2 Slide the POWER switch repeatedly to overlap. ,continued Recording 45
.... If the item is not displayed on a tape - Thumbnail screen 60min STBY MEMORY MIX: OFF OFF 0:00:00 M CAM LUMI. Still image Movie Blue 1 Check that you have recorded on a "Memory Stick Duo" over the movie you are currently recording on top of a still image such as an ...the brighter (white) area of an illustration or title handwritten on white paper recorded on the thumbnail screen. Only the blue area of the movie will be superimposed and a tape (only if you are recording on tape) in your camcorder. 2 Slide the POWER switch repeatedly to overlap. ,continued Recording 45

Camera Operations Guide
Page 46
... use the MEMORY MIX function in [MTCAM LUMI.] until the bar indicator is to the right side. Refer to play back pictures modified on your camcorder. To cancel MEMORY MIX Follow steps 3 and 4, then touch [OFF] in the still image which is currently displayed on the LCD screen. 60min ...the movie. When you are recording on a tape Press REC START/STOP. b Notes • When the overlapping still image has a large amount of the blue area in the thumbnail screen may not be swapped into a movie. 8 Touch twice. z Tip • The supplied SPVD-012 USB Driver CD-ROM contains...
... use the MEMORY MIX function in [MTCAM LUMI.] until the bar indicator is to the right side. Refer to play back pictures modified on your camcorder. To cancel MEMORY MIX Follow steps 3 and 4, then touch [OFF] in the still image which is currently displayed on the LCD screen. 60min ...the movie. When you are recording on a tape Press REC START/STOP. b Notes • When the overlapping still image has a large amount of the blue area in the thumbnail screen may not be swapped into a movie. 8 Touch twice. z Tip • The supplied SPVD-012 USB Driver CD-ROM contains...
Camera Operations Guide
Page 54
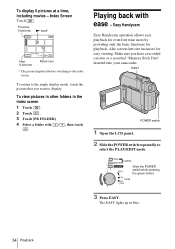
... the LCD panel. 2 Slide the POWER switch repeatedly to the index screen. To view pictures in other folders in blue. 54 Playback Easy Handycam Easy Handycam operation allows easy playback for even first time users by providing only the basic functions for easy viewing. Also screen font.../EDIT mode. To return to the single display mode, touch the picture that you have a recorded cassette or a recorded "Memory Stick Duo" inserted into your camcorder. Index Screen Touch . The EASY lights up in the index screen 1 Touch . 2 Touch . 3 Touch [PB FOLDER]. 4 Select a folder with . ...
... the LCD panel. 2 Slide the POWER switch repeatedly to the index screen. To view pictures in other folders in blue. 54 Playback Easy Handycam Easy Handycam operation allows easy playback for even first time users by providing only the basic functions for easy viewing. Also screen font.../EDIT mode. To return to the single display mode, touch the picture that you have a recorded cassette or a recorded "Memory Stick Duo" inserted into your camcorder. Index Screen Touch . The EASY lights up in the index screen 1 Touch . 2 Touch . 3 Touch [PB FOLDER]. 4 Select a folder with . ...
Camera Operations Guide
Page 81
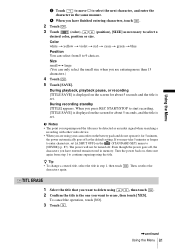
.... To cancel the operation, touch [NO]. 3 Touch . ,continued Using the Menu 81 b Notes • The point you want to delete using your camcorder on the (STANDARD SET) menu to [NEVER] (p. 87). Then, reselect the TITL ERASE 1 Select the title that you are entering more than 13 characters...recording with other video device. • When you want to erase, then touch [YES]. Color white t yellow t violet t red t cyan t green t blue Position You can only select the small size when you have entered remain stored in memory. The power will not be detected as necessary to...
.... To cancel the operation, touch [NO]. 3 Touch . ,continued Using the Menu 81 b Notes • The point you want to delete using your camcorder on the (STANDARD SET) menu to [NEVER] (p. 87). Then, reselect the TITL ERASE 1 Select the title that you are entering more than 13 characters...recording with other video device. • When you want to erase, then touch [YES]. Color white t yellow t violet t red t cyan t green t blue Position You can only select the small size when you have entered remain stored in memory. The power will not be detected as necessary to...
Camera Operations Guide
Page 102
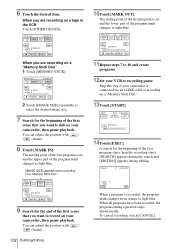
...:00 SCENE 0 END 9 Search for the beginning of the program mark changes to light blue. When all programs have been recorded, the program editing operation stops automatically. PROG. Skip this step if your camcorder, then pause playback. SEARCH -x1 0:00:00:00 SCENE 1/3 CANCEL END When a ... START 0:00:00:00 ED I T SET UNDO TOTAL 0:00:00:12 SCENE 1 END 11Repeat steps 7 to 10 and create programs. 12Set your camcorder, then pause playback. A search for the end of the first scene that you are recording on a "Memory Stick Duo." 13Touch [START]. To cancel...
...:00 SCENE 0 END 9 Search for the beginning of the program mark changes to light blue. When all programs have been recorded, the program editing operation stops automatically. PROG. Skip this step if your camcorder, then pause playback. SEARCH -x1 0:00:00:00 SCENE 1/3 CANCEL END When a ... START 0:00:00:00 ED I T SET UNDO TOTAL 0:00:00:12 SCENE 1 END 11Repeat steps 7 to 10 and create programs. 12Set your camcorder, then pause playback. A search for the end of the first scene that you are recording on a "Memory Stick Duo." 13Touch [START]. To cancel...
Camera Operations Guide
Page 115
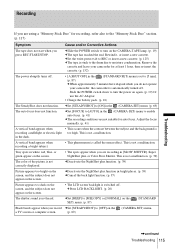
...20) The shutter sound is not correctly displayed. cDeactivate the NightShot plus , or Color Slow Shutter. Remove the cassette and leave your camcorder, the camcorder is not a malfunction. This is called the smear effect. cSlide the POWER switch to enable auto focus. (p. 41) cThe recording... conditions are recording in white, red, blue, or green appear on the SET) menu. (p. 87) (STANDARD Black bands appear when you press REC START/...
...20) The shutter sound is not correctly displayed. cDeactivate the NightShot plus , or Color Slow Shutter. Remove the cassette and leave your camcorder, the camcorder is not a malfunction. This is called the smear effect. cSlide the POWER switch to enable auto focus. (p. 41) cThe recording... conditions are recording in white, red, blue, or green appear on the SET) menu. (p. 87) (STANDARD Black bands appear when you press REC START/...
Camera Operations Guide
Page 132
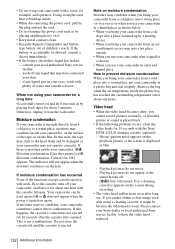
...camcorder is brought directly from a cold place to condense, your camcorder...camcorder can be damaged or your camcorder...camcorder, on the screen during recording. • The video head suffers from wear after long use your camcorder... your camcorder with ... your camcorder from...Sony DVM-12CLD cleaning cassette (optional). - If you use . Use a cleaning cassette.] appears on the surface of water and consult a doctor. consult your camcorder from a cold place into a warm place, put your camcorder...camcorder from an airconditioned car or room into a place warmed up inside your camcorder...
...camcorder is brought directly from a cold place to condense, your camcorder...camcorder can be damaged or your camcorder...camcorder, on the screen during recording. • The video head suffers from wear after long use your camcorder... your camcorder with ... your camcorder from...Sony DVM-12CLD cleaning cassette (optional). - If you use . Use a cleaning cassette.] appears on the surface of water and consult a doctor. consult your camcorder from a cold place into a warm place, put your camcorder...camcorder from an airconditioned car or room into a place warmed up inside your camcorder...
Camera Operations Guide
Page 138
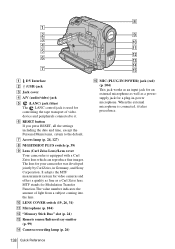
... switch (p. 39) I Lens (Carl Zeiss Lens)/Lens cover Your camcorder is connected, it . It adopts the MTF measurement system for video cameras and offers a quality as fine as a powersupply jack for a plug-in Germany, and Sony Corporation. qa qs qd qf qg O MIC (PLUG IN POWER)...recording lamp (p. 26) 138 Quick Reference 8 9 q; The lens for your camcorder was developed jointly by Carl Zeiss, in -power microphone. 1 2 3 4 5 6 7 A DV Interface B (USB) jack C Jack cover D A/V (audio/video) jack E (LANC) jack (blue) The LANC control jack is used for controlling the tape transport of light from ...
... switch (p. 39) I Lens (Carl Zeiss Lens)/Lens cover Your camcorder is connected, it . It adopts the MTF measurement system for video cameras and offers a quality as fine as a powersupply jack for a plug-in Germany, and Sony Corporation. qa qs qd qf qg O MIC (PLUG IN POWER)...recording lamp (p. 26) 138 Quick Reference 8 9 q; The lens for your camcorder was developed jointly by Carl Zeiss, in -power microphone. 1 2 3 4 5 6 7 A DV Interface B (USB) jack C Jack cover D A/V (audio/video) jack E (LANC) jack (blue) The LANC control jack is used for controlling the tape transport of light from ...

