Operating Guide
Page 13
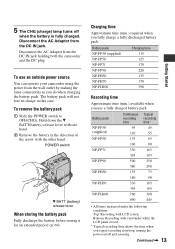
...the direction of the arrow with LCD screen. Bottom: Recording with viewfinder while the LCD panel closed. * Typical recording time shows the time when you use an outside power source You can operate your camcorder using the power from the wall outlet by making the same connections as you fully charge a... hand. 2 Remove the battery in this case. To use a fully charged battery pack. Disconnect the AC Adaptor from the DC IN jack holding both the camcorder and the DC plug. To remove the battery pack 1 Slide the POWER switch to OFF(CHG). POWER switch 1 2 V BATT (battery) release lever When ...
...the direction of the arrow with LCD screen. Bottom: Recording with viewfinder while the LCD panel closed. * Typical recording time shows the time when you use an outside power source You can operate your camcorder using the power from the wall outlet by making the same connections as you fully charge a... hand. 2 Remove the battery in this case. To use a fully charged battery pack. Disconnect the AC Adaptor from the DC IN jack holding both the camcorder and the DC plug. To remove the battery pack 1 Slide the POWER switch to OFF(CHG). POWER switch 1 2 V BATT (battery) release lever When ...
Operating Guide
Page 14
... power (house current) is still supplied to it while connected to the wall outlet via the AC Adaptor. Battery pack LCD panel opened LCD panel closed NP-FP30 (supplied) 105 135 NP-FP50 150 190 NP-FP71 370 465 NP-FP90 550 705 NP-FH50 170 220 NP-FH70 370 465... will not be supplied from the battery as long as between a wall and furniture. 14 • Do not short-circuit the DC plug of your camcorder. Disconnect the AC Adaptor from the wall outlet. This may cause a malfunction. The battery pack is not attached correctly. - Step2: Charging the battery pack (Continued...
... power (house current) is still supplied to it while connected to the wall outlet via the AC Adaptor. Battery pack LCD panel opened LCD panel closed NP-FP30 (supplied) 105 135 NP-FP50 150 190 NP-FP71 370 465 NP-FP90 550 705 NP-FH50 170 220 NP-FH70 370 465... will not be supplied from the battery as long as between a wall and furniture. 14 • Do not short-circuit the DC plug of your camcorder. Disconnect the AC Adaptor from the wall outlet. This may cause a malfunction. The battery pack is not attached correctly. - Step2: Charging the battery pack (Continued...
Operating Guide
Page 16
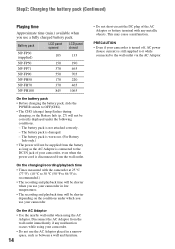
Viewfinder 90 degrees (max.) 1 90 degrees to the camcorder • If you rotate the LCD panel 180 degrees to the lens side, you can view pictures using the ...). 16 This is poor. Step 4: Adjusting the LCD panel and viewfinder The LCD panel Open the LCD panel 90 degrees to the camcorder (1), then rotate it until the picture is clear. • You can adjust the brightness of the LCD screen. Viewfinder lens adjustment ... operations. • See [LCD BRT] (p. 39) to record or play (2). 180 degrees (max.) 2 The viewfinder You can close the LCD panel with the LCD screen facing out.
Viewfinder 90 degrees (max.) 1 90 degrees to the camcorder • If you rotate the LCD panel 180 degrees to the lens side, you can view pictures using the ...). 16 This is poor. Step 4: Adjusting the LCD panel and viewfinder The LCD panel Open the LCD panel 90 degrees to the camcorder (1), then rotate it until the picture is clear. • You can adjust the brightness of the LCD screen. Viewfinder lens adjustment ... operations. • See [LCD BRT] (p. 39) to record or play (2). 180 degrees (max.) 2 The viewfinder You can close the LCD panel with the LCD screen facing out.
Operating Guide
Page 20
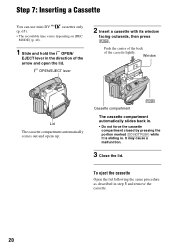
Cassette compartment The cassette compartment automatically slides back in. • Do not force the cassette compartment closed by pressing the portion marked {DO NOT PUSH} while it is sliding in step 1 and remove the cassette. 20 To eject the cassette Open the ...lid following the same procedure as described in . Push the center of the back of the arrow and open the lid. It may cause a malfunction. 3 Close the lid. Step 7: Inserting a Cassette You can use mini DV cassettes only (p. 65). • The recordable time varies depending on [REC MODE] (p. 46). 1 Slide and...
Cassette compartment The cassette compartment automatically slides back in. • Do not force the cassette compartment closed by pressing the portion marked {DO NOT PUSH} while it is sliding in step 1 and remove the cassette. 20 To eject the cassette Open the ...lid following the same procedure as described in . Push the center of the back of the arrow and open the lid. It may cause a malfunction. 3 Close the lid. Step 7: Inserting a Cassette You can use mini DV cassettes only (p. 65). • The recordable time varies depending on [REC MODE] (p. 46). 1 Slide and...
Operating Guide
Page 26
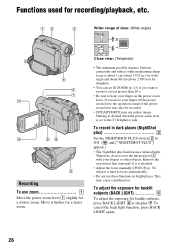
... on the power zoom lever. To adjust the exposure for backlit subjects (BACK LIGHT 6 To adjust the exposure for a faster zoom. Close view: (Telephoto) • The minimum possible distance between camcorder and subject while maintaining sharp focus is about 1 cm (about 2 5/8 feet) for telephoto. • You can set to display .. Therefore, do...
... on the power zoom lever. To adjust the exposure for backlit subjects (BACK LIGHT 6 To adjust the exposure for a faster zoom. Close view: (Telephoto) • The minimum possible distance between camcorder and subject while maintaining sharp focus is about 1 cm (about 2 5/8 feet) for telephoto. • You can set to display .. Therefore, do...
Operating Guide
Page 34
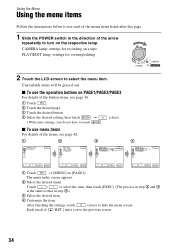
... items For details of [ RET.] takes you do not have to turn on PAGE1/PAGE2/PAGE3 For details of the arrow repeatedly to touch . (close ) to select the item, then touch [EXEC]. (The process in step 3 and 4 is the same as that in the direction of the button.... 1 Touch t [MENU] on a tape PLAY/EDIT lamp: settings for viewing/editing 2 Touch the LCD screen to the previous screen. 34 After finishing the settings, touch (close ). Each touch of the items, see page 36. 1 Touch . 2 Touch the desired page. 3 Touch the desired button. 4 Select the desired setting, then touch t...
... items For details of [ RET.] takes you do not have to turn on PAGE1/PAGE2/PAGE3 For details of the arrow repeatedly to touch . (close ) to select the item, then touch [EXEC]. (The process in step 3 and 4 is the same as that in the direction of the button.... 1 Touch t [MENU] on a tape PLAY/EDIT lamp: settings for viewing/editing 2 Touch the LCD screen to the previous screen. 34 After finishing the settings, touch (close ). Each touch of the items, see page 36. 1 Touch . 2 Touch the desired page. 3 Touch the desired button. 4 Select the desired setting, then touch t...

Operating Guide
Page 35
Using the Menu 35 After finishing the settings, touch (close) to use menu items during Easy Handycam operation 60min STBY 0:00:00 FN 1 Touch . 2 Select the desired menu. Each touch of [ RET.] takes you to the previous screen. • Cancel Easy Handycam operation to hide the menu screen. x To use menu items normally. Touch [MENU] then select the desired menu. 3 Change your item setting.
Using the Menu 35 After finishing the settings, touch (close) to use menu items during Easy Handycam operation 60min STBY 0:00:00 FN 1 Touch . 2 Select the desired menu. Each touch of [ RET.] takes you to the previous screen. • Cancel Easy Handycam operation to hide the menu screen. x To use menu items normally. Touch [MENU] then select the desired menu. 3 Change your item setting.
Operating Guide
Page 36
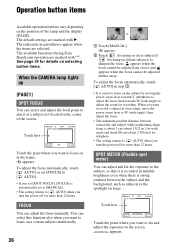
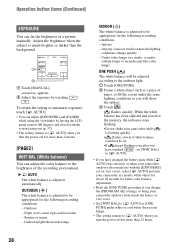
...focus on a certain subject intentionally. 36 1 Touch [MANUAL]. 9 appears. 2 Touch (focusing on close range, move the power zoom lever to W (wide angle), then adjust the focus. • The... To adjust the focus automatically, touch [ AUTO] in step 1. • It is strong contrast between camcorder and subject while maintaining sharp focus is automatically set [SPOT FOCUS], [FOCUS] is about 1 cm (about... located in parentheses appear when the items are selected. The available functions during Easy Handycam operation are marked with "*". FOCUS You can adjust and fix the exposure to fix...
...focus on a certain subject intentionally. 36 1 Touch [MANUAL]. 9 appears. 2 Touch (focusing on close range, move the power zoom lever to W (wide angle), then adjust the focus. • The... To adjust the focus automatically, touch [ AUTO] in step 1. • It is strong contrast between camcorder and subject while maintaining sharp focus is automatically set [SPOT FOCUS], [FOCUS] is about 1 cm (about... located in parentheses appear when the items are selected. The available functions during Easy Handycam operation are marked with "*". FOCUS You can adjust and fix the exposure to fix...
Operating Guide
Page 37
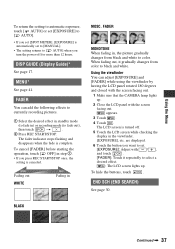
FADER You can adjust [EXPOSURE] and [FADER] while using the viewfinder by having the LCD panel rotated 180 degrees and closed with the screen facing out. 1 Make sure that the CAMERA lamp lights up . The fader indicator stops flashing and disappears when the fade is ...REC START/STOP. To hide the buttons, touch . BLACK Continued , 37 When fading out, it repeatedly to select a desired effect. : The LCD screen lights up . 2 Close the LCD panel with / , and touch . [FADER]: Touch it gradually changes from black and white to color. END SCH (END SEARCH) See page 30. Using...
FADER You can adjust [EXPOSURE] and [FADER] while using the viewfinder by having the LCD panel rotated 180 degrees and closed with the screen facing out. 1 Make sure that the CAMERA lamp lights up . The fader indicator stops flashing and disappears when the fade is ...REC START/STOP. To hide the buttons, touch . BLACK Continued , 37 When fading out, it repeatedly to select a desired effect. : The LCD screen lights up . 2 Close the LCD panel with / , and touch . [FADER]: Touch it gradually changes from black and white to color. END SCH (END SEARCH) See page 30. Using...
Operating Guide
Page 38
...much brighter or darker than 12 hours. 38 Under video lamps in the memory, the indicator stops flashing. •Do not shake your camcorder while is adjusted to be appropriate for the following recording conditions: - To return the setting to automatic exposure, touch [ AUTO]. •...you change quickly - Outdoors - appears. 2 Adjust the exposure by having the LCD panel rotated 180 degrees and closed with the [EXPOSURE] set (or vice versa), select [ AUTO] and aim your camcorder at a nearby white object for about 10 seconds for better color balance adjustment. • Redo the [ONE ...
...much brighter or darker than 12 hours. 38 Under video lamps in the memory, the indicator stops flashing. •Do not shake your camcorder while is adjusted to be appropriate for the following recording conditions: - To return the setting to automatic exposure, touch [ AUTO]. •...you change quickly - Outdoors - appears. 2 Adjust the exposure by having the LCD panel rotated 180 degrees and closed with the [EXPOSURE] set (or vice versa), select [ AUTO] and aim your camcorder at a nearby white object for about 10 seconds for better color balance adjustment. • Redo the [ONE ...
Operating Guide
Page 55
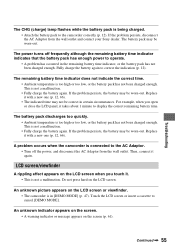
...screen (p. 61). An unknown indicator appears on the screen. • A warning indicator or message appears on the LCD screen when you open or close the LCD panel, it with a new one (p. 12, 66). Fully charge the battery again to cancel [DEMO MODE]. The remaining battery time ...the indication (p. 12). Continued , 55 The power turns off the power, and disconnect the AC Adaptor from the wall outlet and contact your Sony dealer. A problem occurs when the camcorder is not a malfunction. • Fully charge the battery again. Then, connect it with a new one (p. 12, 66). •...
...screen (p. 61). An unknown indicator appears on the screen. • A warning indicator or message appears on the LCD screen when you open or close the LCD panel, it with a new one (p. 12, 66). Fully charge the battery again to cancel [DEMO MODE]. The remaining battery time ...the indication (p. 12). Continued , 55 The power turns off the power, and disconnect the AC Adaptor from the wall outlet and contact your Sony dealer. A problem occurs when the camcorder is not a malfunction. • Fully charge the battery again. Then, connect it with a new one (p. 12, 66). •...
Operating Guide
Page 56
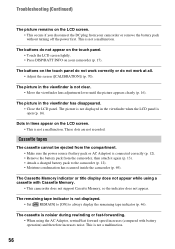
..., rewind/fast forward speed increases (compared with Cassette Memory. • This camcorder does not support Cassette Memory, so the indicator does not appear. The picture is not displayed in the viewfinder has disappeared. • Close the LCD panel. The picture in lines appear on the LCD screen. &#...8226; This occurs if you disconnect the DC plug from the camcorder, then attach it again (p. 13). • Attach a charged battery pack...
..., rewind/fast forward speed increases (compared with Cassette Memory. • This camcorder does not support Cassette Memory, so the indicator does not appear. The picture is not displayed in the viewfinder has disappeared. • Close the LCD panel. The picture in lines appear on the LCD screen. &#...8226; This occurs if you disconnect the DC plug from the camcorder, then attach it again (p. 13). • Attach a charged battery pack...
Operating Guide
Page 69
...will work. This is ejected. Mosaic-pattern noise appears on the camcorder and play a cassette for about one hour with the Sony DVM12CLD cleaning cassette (optional). - Turn off . - [x Dirty video head. Do not close the cassette lid until the cassette is not a malfunction. If ...this state, the tape may condense when you bring your camcorder from a cold place into a hot...
...will work. This is ejected. Mosaic-pattern noise appears on the camcorder and play a cassette for about one hour with the Sony DVM12CLD cleaning cassette (optional). - Turn off . - [x Dirty video head. Do not close the cassette lid until the cassette is not a malfunction. If ...this state, the tape may condense when you bring your camcorder from a cold place into a hot...
Marketing Specifications
Page 1
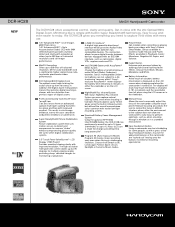
DCR-HC28 NEW MiniDV Handycam® Camcorder The DCR-HC28 offers exceptional control, clarity and quality. Super SteadyShot® Picture Stabilization System Picture stabilization system that uses motion sensors to enjoy, the DCR-HC28 gives you everything you can be intimidating for some other digital stabilization systems. 2.5" ...Zoom. Manual focusing also allows the user to bring the action close with Sony's Picture Effect Modes. The high resolution 123K pixel LCD screen rotates up to perform optimally, such as camcorders, digital VTRs, capture cards and PCs. i.LINK® DV...
DCR-HC28 NEW MiniDV Handycam® Camcorder The DCR-HC28 offers exceptional control, clarity and quality. Super SteadyShot® Picture Stabilization System Picture stabilization system that uses motion sensors to enjoy, the DCR-HC28 gives you everything you can be intimidating for some other digital stabilization systems. 2.5" ...Zoom. Manual focusing also allows the user to bring the action close with Sony's Picture Effect Modes. The high resolution 123K pixel LCD screen rotates up to perform optimally, such as camcorders, digital VTRs, capture cards and PCs. i.LINK® DV...


