2008 Water Housing Cross Reference
Page 1
..., DCR-HC36/38 DCR-HC46/48, DCR-HC52/54 DCR-HC62/96 DCR-DVD103/108 DCR-DVD203/308 DCR-DVD403/408 DCR-DVD508/610 DCR-DVD710/810 DCR-DVD910/92 DCR-SR200/220/220D DCR-SR300/42/45/46 DCR-SR62/65/82/85 HDR-CX7/CX12 HDR-HC3/5/7/9, HDR-SR5/7 HDR-SR10/10D/11/12 HDR-UX5/7/10/20 N/A © 2008 Sony Electronics...
..., DCR-HC36/38 DCR-HC46/48, DCR-HC52/54 DCR-HC62/96 DCR-DVD103/108 DCR-DVD203/308 DCR-DVD403/408 DCR-DVD508/610 DCR-DVD710/810 DCR-DVD910/92 DCR-SR200/220/220D DCR-SR300/42/45/46 DCR-SR62/65/82/85 HDR-CX7/CX12 HDR-HC3/5/7/9, HDR-SR5/7 HDR-SR10/10D/11/12 HDR-UX5/7/10/20 N/A © 2008 Sony Electronics...

2008 Water Housing Cross Reference
Page 2
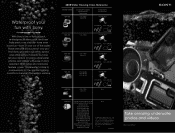
...still cameras • Protects against dust, rain and spray • Lets users take photos at depths up to 5 feet • Fits selected Sony® Handycam® camcorders • Guards against dust, dirt, and more • Allows videos to be taken up to 17 feet below the water's surface •... Fits selected Sony® Cyber-shot® digital still cameras • Allows underwater photography up to 132 feet deep • Works with the ...
...still cameras • Protects against dust, rain and spray • Lets users take photos at depths up to 5 feet • Fits selected Sony® Handycam® camcorders • Guards against dust, dirt, and more • Allows videos to be taken up to 17 feet below the water's surface •... Fits selected Sony® Cyber-shot® digital still cameras • Allows underwater photography up to 132 feet deep • Works with the ...
Operating Guide
Page 6
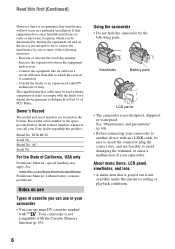
...is grayed out is not compatible with an i.LINK cable, be used with the equipment in the space provided below. DCR-HC28 Serial No. Your camcorder is not available under the current recording or playback conditions. 6 Consult the dealer or an experienced radio/TV technician for...call your Sony dealer regarding this first (Continued) However, there is connected. - Reorient or relocate the receiving antenna. - Record the serial number in order to radio or television reception, which the receiver is no guarantee that interference will not occur in your camcorder •...
...is grayed out is not compatible with an i.LINK cable, be used with the equipment in the space provided below. DCR-HC28 Serial No. Your camcorder is not available under the current recording or playback conditions. 6 Consult the dealer or an experienced radio/TV technician for...call your Sony dealer regarding this first (Continued) However, there is connected. - Reorient or relocate the receiving antenna. - Record the serial number in order to radio or television reception, which the receiver is no guarantee that interference will not occur in your camcorder •...
Operating Guide
Page 7
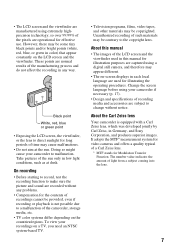
...of recordings cannot be copyrighted. These points are normal results of the manufacturing process and do not affect the recording in Germany, and Sony Corporation, and produces superior images. On recording • Before starting to record, test the recording function to make sure the picture and... you need an NTSC system-based TV. • Television programs, films, video tapes, and other materials may be contrary to a malfunction of the camcorder, storage media, etc. • TV color systems differ depending on the LCD screen and the viewfinder. About this manual • The images of ...
...of recordings cannot be copyrighted. These points are normal results of the manufacturing process and do not affect the recording in Germany, and Sony Corporation, and produces superior images. On recording • Before starting to record, test the recording function to make sure the picture and... you need an NTSC system-based TV. • Television programs, films, video tapes, and other materials may be contrary to a malfunction of the camcorder, storage media, etc. • TV color systems differ depending on the LCD screen and the viewfinder. About this manual • The images of ...
Operating Guide
Page 8
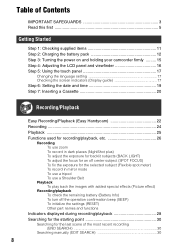
...first 5 Getting Started Step 1: Checking supplied items 11 Step 2: Charging the battery pack 12 Step 3: Turning the power on and holding your camcorder firmly ......... 15 Step 4: Adjusting the LCD panel and viewfinder 16 Step 5: Using the touch panel 17 Changing the language setting 17 Checking the... (Display guide 17 Step 6: Setting the date and time 19 Step 7: Inserting a Cassette 20 Recording/Playback Easy Recording/Playback (Easy Handycam 22 Recording 24 Playback 25 Functions used for recording/playback, etc 26 Recording To use zoom To record in dark places (NightShot plus)...
...first 5 Getting Started Step 1: Checking supplied items 11 Step 2: Charging the battery pack 12 Step 3: Turning the power on and holding your camcorder firmly ......... 15 Step 4: Adjusting the LCD panel and viewfinder 16 Step 5: Using the touch panel 17 Changing the language setting 17 Checking the... (Display guide 17 Step 6: Setting the date and time 19 Step 7: Inserting a Cassette 20 Recording/Playback Easy Recording/Playback (Easy Handycam 22 Recording 24 Playback 25 Functions used for recording/playback, etc 26 Recording To use zoom To record in dark places (NightShot plus)...
Operating Guide
Page 11
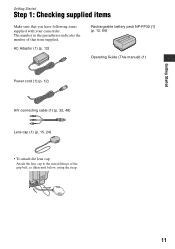
The number in the parentheses indicates the number of the grip belt, as illustrated below, using the strap. 11 AC Adaptor (1) (p. 12) Rechargeable battery pack NP-FP30 (1) (p. 12, 66) Operating Guide (This manual) (1) Power cord (1) (p. 12) A/V connecting cable (1) (p. 32, 48) Lens cap (1) (p. 15, 24) • To attach the lens cap Attach the lens cap to the metal fittings of that you have following items supplied with your camcorder. Getting Started Getting Started Step 1: Checking supplied items Make sure that item supplied.
The number in the parentheses indicates the number of the grip belt, as illustrated below, using the strap. 11 AC Adaptor (1) (p. 12) Rechargeable battery pack NP-FP30 (1) (p. 12, 66) Operating Guide (This manual) (1) Power cord (1) (p. 12) A/V connecting cable (1) (p. 32, 48) Lens cap (1) (p. 15, 24) • To attach the lens cap Attach the lens cap to the metal fittings of that you have following items supplied with your camcorder. Getting Started Getting Started Step 1: Checking supplied items Make sure that item supplied.
Operating Guide
Page 12
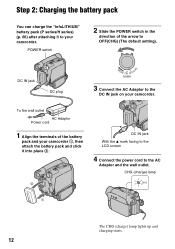
POWER switch 2 Slide the POWER switch in the direction of the battery pack and your camcorder 1, then attach the battery pack and click it to OFF(CHG) (The default setting). Step 2: Charging the battery pack You can charge the "InfoLITHIUM" battery ... it into place 2. 2 DC IN jack With the v mark facing to the LCD screen 4 Connect the power cord to the DC IN jack on your camcorder. CHG (charge) lamp 1 The CHG (charge) lamp lights up and charging starts. 12 To the wall outlet AC Adaptor Power cord 1 Align the terminals of...
POWER switch 2 Slide the POWER switch in the direction of the battery pack and your camcorder 1, then attach the battery pack and click it to OFF(CHG) (The default setting). Step 2: Charging the battery pack You can charge the "InfoLITHIUM" battery ... it into place 2. 2 DC IN jack With the v mark facing to the LCD screen 4 Connect the power cord to the DC IN jack on your camcorder. CHG (charge) lamp 1 The CHG (charge) lamp lights up and charging starts. 12 To the wall outlet AC Adaptor Power cord 1 Align the terminals of...
Operating Guide
Page 13
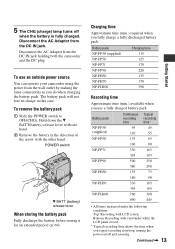
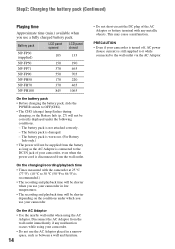
...-FH50 135 NP-FH70 170 NP-FH100 390 Recording time Approximate time (min.) available when you use an outside power source You can operate your camcorder using the power from the wall outlet by making the same connections as you fully charge a fully discharged battery pack. Battery pack Continuous recording time... jack. To remove the battery pack 1 Slide the POWER switch to OFF(CHG). Disconnect the AC Adaptor from the DC IN jack holding both the camcorder and the DC plug. To use a fully charged battery pack.
...-FH50 135 NP-FH70 170 NP-FH100 390 Recording time Approximate time (min.) available when you use an outside power source You can operate your camcorder using the power from the wall outlet by making the same connections as you fully charge a fully discharged battery pack. Battery pack Continuous recording time... jack. To remove the battery pack 1 Slide the POWER switch to OFF(CHG). Disconnect the AC Adaptor from the DC IN jack holding both the camcorder and the DC plug. To use a fully charged battery pack.
Operating Guide
Page 14
... still supplied to it while connected to the wall outlet via the AC Adaptor. On the charging/recording/playback time • Times measured with the camcorder at 25 °C (77 °F). (10 °C to 30 °C (50 °F to 86 °F) is recommended.) • The recording and...the conditions under the following conditions. - Step2: Charging the battery pack (Continued) Playing time Approximate time (min.) available when you use your camcorder in a narrow space, such as the AC Adaptor is connected to the DC IN jack of the AC Adaptor or battery terminal with any malfunction...
... still supplied to it while connected to the wall outlet via the AC Adaptor. On the charging/recording/playback time • Times measured with the camcorder at 25 °C (77 °F). (10 °C to 30 °C (50 °F to 86 °F) is recommended.) • The recording and...the conditions under the following conditions. - Step2: Charging the battery pack (Continued) Playing time Approximate time (min.) available when you use your camcorder in a narrow space, such as the AC Adaptor is connected to the DC IN jack of the AC Adaptor or battery terminal with any malfunction...
Operating Guide
Page 15
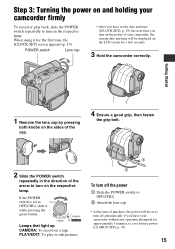
..., the [CLOCK SET] screen appears (p. 19). Step 3: Turning the power on and holding your camcorder firmly To record or play or edit pictures. 4 1 2 3 To turn off automatically if you leave your camcorder, the current date and time will be displayed on a tape. POWER switch Lens cap • ... using it while pressing the green button. If the POWER switch is set to turn on the power of your camcorder without any operation attempted for a few seconds. 3 Hold the camcorder correctly. PLAY/EDIT: To play back, slide the POWER switch repeatedly to save battery power ([A.SHUT OFF], p. ...
..., the [CLOCK SET] screen appears (p. 19). Step 3: Turning the power on and holding your camcorder firmly To record or play or edit pictures. 4 1 2 3 To turn off automatically if you leave your camcorder, the current date and time will be displayed on a tape. POWER switch Lens cap • ... using it while pressing the green button. If the POWER switch is set to turn on the power of your camcorder without any operation attempted for a few seconds. 3 Hold the camcorder correctly. PLAY/EDIT: To play back, slide the POWER switch repeatedly to save battery power ([A.SHUT OFF], p. ...
Operating Guide
Page 16
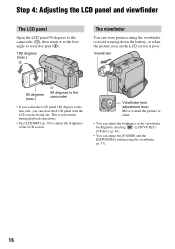
Step 4: Adjusting the LCD panel and viewfinder The LCD panel Open the LCD panel 90 degrees to the camcorder (1), then rotate it until the picture is clear. • You can adjust the [FADER] and the [EXPOSURE] setting using the viewfinder to avoid wearing down ... (2). 180 degrees (max.) 2 The viewfinder You can close the LCD panel with the LCD screen facing out. Viewfinder 90 degrees (max.) 1 90 degrees to the camcorder • If you rotate the LCD panel 180 degrees to adjust the brightness of the viewfinder backlight by selecting (LCD/VF SET) - [VF B.L.] (p. 46). •...
Step 4: Adjusting the LCD panel and viewfinder The LCD panel Open the LCD panel 90 degrees to the camcorder (1), then rotate it until the picture is clear. • You can adjust the [FADER] and the [EXPOSURE] setting using the viewfinder to avoid wearing down ... (2). 180 degrees (max.) 2 The viewfinder You can close the LCD panel with the LCD screen facing out. Viewfinder 90 degrees (max.) 1 90 degrees to the camcorder • If you rotate the LCD panel 180 degrees to adjust the brightness of the viewfinder backlight by selecting (LCD/VF SET) - [VF B.L.] (p. 46). •...

Operating Guide
Page 19
...can be displayed during playback (see page 39 for [DATA CODE] (During Easy Handycam operation, you do not set the date and time, the [CLOCK SET] ... 0 7 JAN 1 12 : 0 0 AM OK 4 Set [Y] (year) with / , then touch . If you do not use your camcorder or change the POWER switch position. • If you can set it to 12:00 AM. For midday, set any year up to step ... • The date and time are not displayed while recording, but they are automatically recorded on your camcorder for the first time. 1 Touch t [MENU]. Step 6: Setting the date and time Getting Started Set the date...
...can be displayed during playback (see page 39 for [DATA CODE] (During Easy Handycam operation, you do not set the date and time, the [CLOCK SET] ... 0 7 JAN 1 12 : 0 0 AM OK 4 Set [Y] (year) with / , then touch . If you do not use your camcorder or change the POWER switch position. • If you can set it to 12:00 AM. For midday, set any year up to step ... • The date and time are not displayed while recording, but they are automatically recorded on your camcorder for the first time. 1 Touch t [MENU]. Step 6: Setting the date and time Getting Started Set the date...
Operating Guide
Page 26
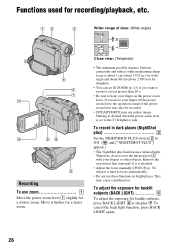
... 2 5/8 feet) for telephoto. • You can set to keep your finger on the power zoom lever. Close view: (Telephoto) • The minimum possible distance between camcorder and subject while maintaining sharp focus is hard to focus automatically. • Do not use zoom 1 Move the power zoom lever 1 slightly for a slower zoom...
... 2 5/8 feet) for telephoto. • You can set to keep your finger on the power zoom lever. Close view: (Telephoto) • The minimum possible distance between camcorder and subject while maintaining sharp focus is hard to focus automatically. • Do not use zoom 1 Move the power zoom lever 1 slightly for a slower zoom...
Operating Guide
Page 27
... out from the speaker. • For how to OFF(CHG), then press DISP/BATT INFO 7. qa Open the LCD panel qa 90 degrees to the camcorder (1), then rotate it 180 degrees to the lens side (2). 2 1 • A mirror-image of the subject appears on the LCD screen, but the picture will be...
... out from the speaker. • For how to OFF(CHG), then press DISP/BATT INFO 7. qa Open the LCD panel qa 90 degrees to the camcorder (1), then rotate it 180 degrees to the lens side (2). 2 1 • A mirror-image of the subject appears on the LCD screen, but the picture will be...
Operating Guide
Page 30
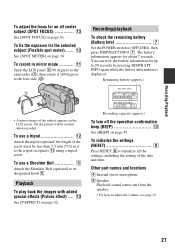
... while viewing the pictures on the tape. • This operation is also available when the POWER switch is played back for about 5 seconds, and the camcorder enters the standby mode at the point where you have recorded on the tape. EDIT FN 5 Touch and hold (to go forward) and release it...
... while viewing the pictures on the tape. • This operation is also available when the POWER switch is played back for about 5 seconds, and the camcorder enters the standby mode at the point where you have recorded on the tape. EDIT FN 5 Touch and hold (to go forward) and release it...
Operating Guide
Page 31
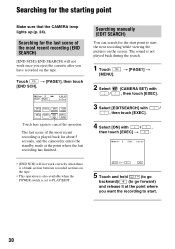
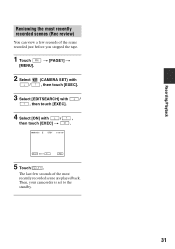
The last few seconds of the most recently recorded scene are played back. Then, your camcorder is set to the standby. 31 Recording/Playback Reviewing the most recently recorded scenes (Rec review) You can view a few seconds of the scene recorded just before you stopped the tape. 1 Touch [MENU]. t [PAGE1] t 2 Select / (CAMERA SET) with , then touch [EXEC]. 3 Select [EDITSEARCH] with / , then touch [EXEC]. 4 Select [ON] with / , then touch [EXEC] t . 60min STBY 0:00:00 EDIT FN 5 Touch .
The last few seconds of the most recently recorded scene are played back. Then, your camcorder is set to the standby. 31 Recording/Playback Reviewing the most recently recorded scenes (Rec review) You can view a few seconds of the scene recorded just before you stopped the tape. 1 Touch [MENU]. t [PAGE1] t 2 Select / (CAMERA SET) with , then touch [EXEC]. 3 Select [EDITSEARCH] with / , then touch [EXEC]. 4 Select [ON] with / , then touch [EXEC] t . 60min STBY 0:00:00 EDIT FN 5 Touch .
Operating Guide
Page 32
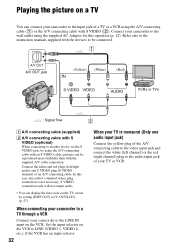
... • You can display the time code on the VCR to the LINE IN input on the VCR. When connecting your camcorder to a TV through a VCR Connect your camcorder to the input jack of your TV or VCR. Set the input selector on the TV screen by using the A/V connecting ...cable with an S VIDEO cable, pictures can connect your camcorder to the wall outlet using the A/V connecting cable (1) or the A/V connecting cable with the supplied A/V cable connection. Refer also to the instruction manuals supplied...
... • You can display the time code on the VCR to the LINE IN input on the VCR. When connecting your camcorder to a TV through a VCR Connect your camcorder to the input jack of your TV or VCR. Set the input selector on the TV screen by using the A/V connecting ...cable with an S VIDEO cable, pictures can connect your camcorder to the wall outlet using the A/V connecting cable (1) or the A/V connecting cable with the supplied A/V cable connection. Refer also to the instruction manuals supplied...
Operating Guide
Page 36
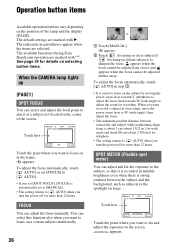
...also when you want to [ AUTO] when you want to aim it is recorded in suitable brightness even when there is strong contrast between camcorder and subject while maintaining sharp focus is about 1 cm (about 13/32 in parentheses appear when the items are marked with "*". When .... You can adjust the focus manually. Operation button items Available operation buttons vary depending on the position of the screen. The available functions during Easy Handycam operation are marked with B. To adjust the focus automatically, touch [ AUTO] or set [FOCUS] to [ AUTO]. • If you want to ...
...also when you want to [ AUTO] when you want to aim it is recorded in suitable brightness even when there is strong contrast between camcorder and subject while maintaining sharp focus is about 1 cm (about 13/32 in parentheses appear when the items are marked with "*". When .... You can adjust the focus manually. Operation button items Available operation buttons vary depending on the position of the screen. The available functions during Easy Handycam operation are marked with B. To adjust the focus automatically, touch [ AUTO] or set [FOCUS] to [ AUTO]. • If you want to ...
Operating Guide
Page 38
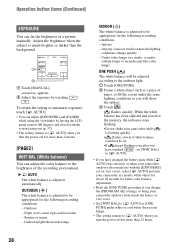
...] when you will be set. •If keeps flashing even after you have touched , set (or vice versa), select [ AUTO] and aim your camcorder at a nearby white object for about 10 seconds for better color balance adjustment. • Redo the [ONE PUSH] procedure if you change quickly - At... party scenes or studios where the lighting conditions change the [PROGRAM AE] settings, or bring your camcorder outdoors from inside use with the screen facing out (p. 37). • The setting returns to [ AUTO] when you turn the power off for ...
...] when you will be set. •If keeps flashing even after you have touched , set (or vice versa), select [ AUTO] and aim your camcorder at a nearby white object for about 10 seconds for better color balance adjustment. • Redo the [ONE PUSH] procedure if you change quickly - At... party scenes or studios where the lighting conditions change the [PROGRAM AE] settings, or bring your camcorder outdoors from inside use with the screen facing out (p. 37). • The setting returns to [ AUTO] when you turn the power off for ...
Operating Guide
Page 42
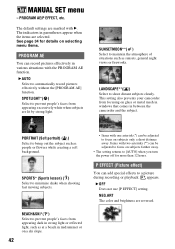
...focus on a ski slope. 42 • Items with B. B AUTO Select to a picture during recording or playback. This setting also prevents your camcorder from focusing on glass or metal mesh in windows that comes in midsummer or on subjects only a short distance away. LANDSCAPE**( ) Select to bring... when subjects are selected. SPORTS* (Sports lesson) ( ) Select to maintain the atmosphere of situations such as at a beach in between the camcorder and the subject. BEACH&SKI*( ) Select to prevent people's faces from appearing dark in strong light or reflected light, such as sunsets, general...
...focus on a ski slope. 42 • Items with B. B AUTO Select to a picture during recording or playback. This setting also prevents your camcorder from focusing on glass or metal mesh in windows that comes in midsummer or on subjects only a short distance away. LANDSCAPE**( ) Select to bring... when subjects are selected. SPORTS* (Sports lesson) ( ) Select to maintain the atmosphere of situations such as at a beach in between the camcorder and the subject. BEACH&SKI*( ) Select to prevent people's faces from appearing dark in strong light or reflected light, such as sunsets, general...


