Operating Guide
Page 1
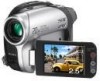
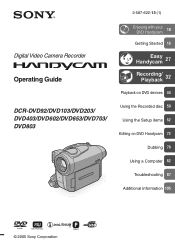
Digital Video Camera Recorder Operating Guide DCR-DVD92/DVD103/DVD203/ DVD403/DVD602/DVD653/DVD703/ DVD803 2-587-622-13 (1) Enjoying with your DVD Handycam 10 Getting Started 16 Easy Handycam 27 Recording/ Playback 32 Playback on DVD devices 44 Using the Recorded disc 50 Using the Setup items 52 Editing on DVD Handycam 72 Dubbing 78 Using a Computer 82 Troubleshooting 87 Additional Information 105 © 2005 Sony Corporation
Digital Video Camera Recorder Operating Guide DCR-DVD92/DVD103/DVD203/ DVD403/DVD602/DVD653/DVD703/ DVD803 2-587-622-13 (1) Enjoying with your DVD Handycam 10 Getting Started 16 Easy Handycam 27 Recording/ Playback 32 Playback on DVD devices 44 Using the Recorded disc 50 Using the Setup items 52 Editing on DVD Handycam 72 Dubbing 78 Using a Computer 82 Troubleshooting 87 Additional Information 105 © 2005 Sony Corporation
Operating Guide
Page 13
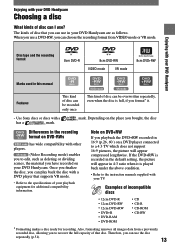
...(p.51). 13 Enjoying with your TV. Enjoying with your DVD Handycam Disc type and the recording format 8cm DVD-R 8cm DVD-RW VIDEO mode VR mode 8cm DVD+RW Marks used in your DVD Handycam. Also, formatting removes all images data from VIDEO mode or VR mode. Depending on the place you bought... format from a previously recorded disc, allowing you have recorded on a DVD player connected to edit, such as follows. Once you finalize the disc, you format* it. • Use Sony discs or discs with a DVD player that supports VR mode. • Refer to recover the full ...
...(p.51). 13 Enjoying with your TV. Enjoying with your DVD Handycam Disc type and the recording format 8cm DVD-R 8cm DVD-RW VIDEO mode VR mode 8cm DVD+RW Marks used in your DVD Handycam. Also, formatting removes all images data from VIDEO mode or VR mode. Depending on the place you bought... format from a previously recorded disc, allowing you have recorded on a DVD player connected to edit, such as follows. Once you finalize the disc, you format* it. • Use Sony discs or discs with a DVD player that supports VR mode. • Refer to recover the full ...
Operating Guide
Page 25
... the date you can be displayed correctly depending on various DVD devices. Cannot edit in Camcorder VIDEO VR OK VIDEO mode You can edit, delete pictures, or divide movies on the disc condition or recorded materials. It may take some time to step 6. • During Easy Handycam operation (p.27), [Format the disc? It may not be...
... the date you can be displayed correctly depending on various DVD devices. Cannot edit in Camcorder VIDEO VR OK VIDEO mode You can edit, delete pictures, or divide movies on the disc condition or recorded materials. It may take some time to step 6. • During Easy Handycam operation (p.27), [Format the disc? It may not be...
Operating Guide
Page 27
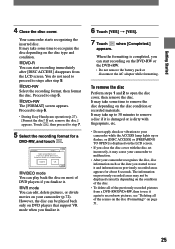
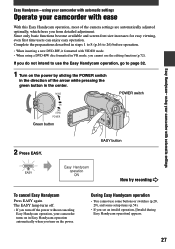
...power without canceling Easy Handycam operation, your camcorder with automatic settings Easy Handycam - MODE POWER switch ON OFF (CHG) POWER Green button 2 Press EASY. using your camcorder with automatic settings Operate your camcorder with VIDEO mode. • When using your camcorder turns on in ... during Easy Handycam operation] appears. 27 Complete the preparations described in steps 1 to 8 (p.16 to page 32. 1 Turn on the power. Now try recording During Easy Handycam operation • You cannot use the editing function (p.72). using a DVD-RW disc formatted...
...power without canceling Easy Handycam operation, your camcorder with automatic settings Easy Handycam - MODE POWER switch ON OFF (CHG) POWER Green button 2 Press EASY. using your camcorder with automatic settings Operate your camcorder with VIDEO mode. • When using your camcorder turns on in ... during Easy Handycam operation] appears. 27 Complete the preparations described in steps 1 to 8 (p.16 to page 32. 1 Turn on the power. Now try recording During Easy Handycam operation • You cannot use the editing function (p.72). using a DVD-RW disc formatted...
Operating Guide
Page 42
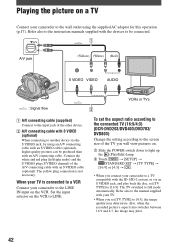
... the image may deteriorate. Refer also to the manual supplied with your TV. • When you connect your camcorder to a TV compatible with the ID-1/ID-2 system, or via the S VIDEO jack, by using the supplied AC adaptor for this operation (p.17). Refer also to the instruction manuals supplied with...set the aspect ratio according to the connected TV (16:9/4:3) (DCR-DVD203/DVD403/DVD703/ DVD803) Change the setting according to the screen size of the TV you will view pictures on. Slide the POWER switch down to light up the (Play/Edit) lamp. Touch [SETUP] ...
... the image may deteriorate. Refer also to the manual supplied with your TV. • When you connect your camcorder to a TV compatible with the ID-1/ID-2 system, or via the S VIDEO jack, by using the supplied AC adaptor for this operation (p.17). Refer also to the instruction manuals supplied with...set the aspect ratio according to the connected TV (16:9/4:3) (DCR-DVD203/DVD403/DVD703/ DVD803) Change the setting according to the screen size of the TV you will view pictures on. Slide the POWER switch down to light up the (Play/Edit) lamp. Touch [SETUP] ...

Operating Guide
Page 48
... application must finalize the disc. The play back or edit movies that have created a DVD menu (DVD-R/DVD-RW:VIDEO mode/ DVD+RW) You can be played back, freezes for DCR-DVD92/ DVD602). 48 A photomovie is placed in the position where a disc can select the desired scene in the menu. For details on how to import movies...
... application must finalize the disc. The play back or edit movies that have created a DVD menu (DVD-R/DVD-RW:VIDEO mode/ DVD+RW) You can be played back, freezes for DCR-DVD92/ DVD602). 48 A photomovie is placed in the position where a disc can select the desired scene in the menu. For details on how to import movies...

Operating Guide
Page 52
... is displayed. Select the desired setting, then touch . To use the short-cuts of Personal Menu On Personal Menu, short-cuts for viewing/editing Slide the POWER switch while pressing the green MODE button in the center only when the POWER switch ON OFF is in the OFF (CHG...
... is displayed. Select the desired setting, then touch . To use the short-cuts of Personal Menu On Personal Menu, short-cuts for viewing/editing Slide the POWER switch while pressing the green MODE button in the center only when the POWER switch ON OFF is in the OFF (CHG...
Operating Guide
Page 79
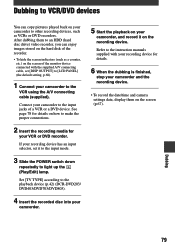
...set [DISP OUTPUT] to [LCD PANEL] (the default setting, p.68). 1 Connect your camcorder, and record it to the input mode. 3 Slide the POWER switch down repeatedly to an HDD (hard disc drive) video recorder, you can enjoy images stored on the hard disk of the recorder. • To ...indicators (such as VCRs or DVD recorders. Refer to other recording devices, such as a counter, etc.) on the recording device. Dubbing 79 See page 78 for details on how to the playback device (p.42) (DCR-DVD203/ DVD403/DVD703/DVD803). 4 Insert the recorded disc into your camcorder. 5 Start the playback ...
...set [DISP OUTPUT] to [LCD PANEL] (the default setting, p.68). 1 Connect your camcorder, and record it to the input mode. 3 Slide the POWER switch down repeatedly to an HDD (hard disc drive) video recorder, you can enjoy images stored on the hard disk of the recorder. • To ...indicators (such as VCRs or DVD recorders. Refer to other recording devices, such as a counter, etc.) on the recording device. Dubbing 79 See page 78 for details on how to the playback device (p.42) (DCR-DVD203/ DVD403/DVD703/DVD803). 4 Insert the recorded disc into your camcorder. 5 Start the playback ...
Operating Guide
Page 80
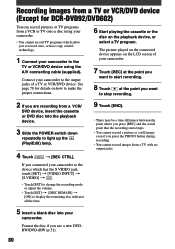
...page 78 for DCR-DVD92/DVD602) You can record pictures or TV programs from a VCR or TV onto a disc using the A/V connecting cable (supplied). The picture played on the connected device appears on the playback device, or select a TV program. If you connected your camcorder to the ... you to record once, or have copy control technology. 1 Connect your camcorder to the TV or VCR/DVD device using your camcorder. • You cannot record TV programs which has the S VIDEO jack, touch [SET] [VIDEO INPUT] [S VIDEO] . • Touch [SET] to change the recording mode...
...page 78 for DCR-DVD92/DVD602) You can record pictures or TV programs from a VCR or TV onto a disc using the A/V connecting cable (supplied). The picture played on the connected device appears on the playback device, or select a TV program. If you connected your camcorder to the ... you to record once, or have copy control technology. 1 Connect your camcorder to the TV or VCR/DVD device using your camcorder. • You cannot record TV programs which has the S VIDEO jack, touch [SET] [VIDEO INPUT] [S VIDEO] . • Touch [SET] to change the recording mode...
Operating Guide
Page 82
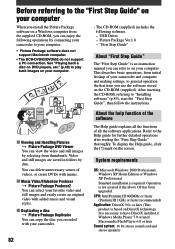
...DCR-DVD92/DVD602 do not support a PC connection. USB Driver - "First Step Guide" About "First Step Guide" The "First Step Guide" is an instruction manual you can refer to on your camcorder. It is not assured if the above OS has been upgraded. Picture Package Ver.1.8 - You can delete unnecessary scenes of videos...57862; Viewing and Handling Pictures Picture Package DVD Viewer You can view the video and still images by date. System requirements OS: Microsoft Windows 2000 Professional, Windows XP Home Edition or Windows XP Professional Standard installation is based on ...
...DCR-DVD92/DVD602 do not support a PC connection. USB Driver - "First Step Guide" About "First Step Guide" The "First Step Guide" is an instruction manual you can refer to on your camcorder. It is not assured if the above OS has been upgraded. Picture Package Ver.1.8 - You can delete unnecessary scenes of videos...57862; Viewing and Handling Pictures Picture Package DVD Viewer You can view the video and still images by date. System requirements OS: Microsoft Windows 2000 Professional, Windows XP Home Edition or Windows XP Professional Standard installation is based on ...
Operating Guide
Page 83
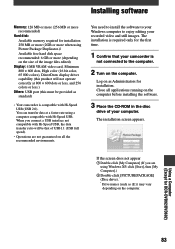
...: 4 MB VRAM video card, Minimum 800 × 600 dots, High color (16 bit color, 65 000 colors), DirectDraw display driver capability (this product will be provided as standard) • Your camcorder is not connected to enjoy editing your Windows computer to the computer. 2 Turn on all applications running on as... disk: Available memory required for installation: 250 MB or more (2GB or more (depending on the computer. The installation is required only for DCR-DVD92/DVD602) 83 You can transfer data at 800 × 600 dots or less, and 256 colors or less.) Others: USB port (this must...
...: 4 MB VRAM video card, Minimum 800 × 600 dots, High color (16 bit color, 65 000 colors), DirectDraw display driver capability (this product will be provided as standard) • Your camcorder is not connected to enjoy editing your Windows computer to the computer. 2 Turn on all applications running on as... disk: Available memory required for installation: 250 MB or more (2GB or more (depending on the computer. The installation is required only for DCR-DVD92/DVD602) 83 You can transfer data at 800 × 600 dots or less, and 256 colors or less.) Others: USB port (this must...
Operating Guide
Page 93
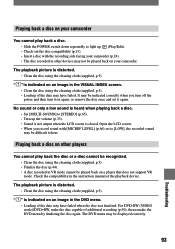
... players You cannot play back a disc. • Slide the POWER switch down repeatedly to hear. The DVD menu may have failed. For DVD-RW (VIDEO mode)/DVD+RW, make the disc capable of the data may not be displayed correctly. 93 Troubleshooting The playback picture ...DVD menu by finalizing the disc again. " " is closed. No sound or only a low sound is heard when playing back a disc. • Set [MULTI-SOUND] to [STEREO] (p.65). • Turn up (Play/Edit). • Check out the disc compatibility (p.13). • Insert a disc with the recording side facing your camcorder...
... players You cannot play back a disc. • Slide the POWER switch down repeatedly to hear. The DVD menu may have failed. For DVD-RW (VIDEO mode)/DVD+RW, make the disc capable of the data may not be displayed correctly. 93 Troubleshooting The playback picture ...DVD menu by finalizing the disc again. " " is closed. No sound or only a low sound is heard when playing back a disc. • Set [MULTI-SOUND] to [STEREO] (p.65). • Turn up (Play/Edit). • Check out the disc compatibility (p.13). • Insert a disc with the recording side facing your camcorder...
Operating Guide
Page 97
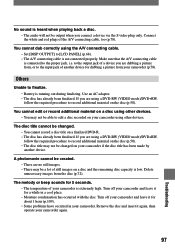
... is running out during finalizing. If you connect a device via the S video plug only. Delete unnecessary images from your camcorder (p.78). You cannot dub correctly using a DVD-RW (VIDEO mode)/DVD+RW, follow the required procedure to record additional material on the disc (p.50). Use... be able to edit a disc recorded on your camcorder and leave it for a while in your camcorder again. 97 Troubleshooting The disc title cannot be changed on your camcorder is extremely high. Turn off your camcorder and leave it again, then operate your camcorder. Others Unable to...
... is running out during finalizing. If you connect a device via the S video plug only. Delete unnecessary images from your camcorder (p.78). You cannot dub correctly using a DVD-RW (VIDEO mode)/DVD+RW, follow the required procedure to record additional material on the disc (p.50). Use... be able to edit a disc recorded on your camcorder and leave it for a while in your camcorder again. 97 Troubleshooting The disc title cannot be changed on your camcorder is extremely high. Turn off your camcorder and leave it again, then operate your camcorder. Others Unable to...


