Operating Guide
Page 3
...camcorder by the following two conditions: (1) This device may not cause harmful interference, and (2) this equipment. Telephone No.: 858-942-2230 This device complies with two kinds of Conformity Trade Name: SONY Model No.: DCR-DVD203 Responsible Party:Sony Electronics Inc. However, there is supplied with Part 15 of Conformity Trade Name: SONY Model No.: DCR... equipment into an outlet on the supplied CD-ROM)* * The DCR-DVD92/DVD602 do not include a "First Step Guide". Notes on ,...the limits for help. The supplied interface cable must accept any changes or modifi...
...camcorder by the following two conditions: (1) This device may not cause harmful interference, and (2) this equipment. Telephone No.: 858-942-2230 This device complies with two kinds of Conformity Trade Name: SONY Model No.: DCR-DVD203 Responsible Party:Sony Electronics Inc. However, there is supplied with Part 15 of Conformity Trade Name: SONY Model No.: DCR... equipment into an outlet on the supplied CD-ROM)* * The DCR-DVD92/DVD602 do not include a "First Step Guide". Notes on ,...the limits for help. The supplied interface cable must accept any changes or modifi...
Operating Guide
Page 4
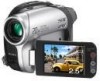
If you record them on a DVD-R. 4 Use a DVD-RW/DVD+RW (not supplied) for trial recording (p.13). • Compensation ...finder used on this manual are based on the model DCR-DVD403. About the Carl Zeiss lens Your camcorder is equipped with a USB cable etc., be sure to insert the connector plug in color) that... Take pictures of the sun only in Germany, and Sony Corporation, and produces superior images. You cannot dub copyright protected software on your camcorder to malfunction. Doing so might cause your camcorder. However, there may be copyrighted. To view your ...
If you record them on a DVD-R. 4 Use a DVD-RW/DVD+RW (not supplied) for trial recording (p.13). • Compensation ...finder used on this manual are based on the model DCR-DVD403. About the Carl Zeiss lens Your camcorder is equipped with a USB cable etc., be sure to insert the connector plug in color) that... Take pictures of the sun only in Germany, and Sony Corporation, and produces superior images. You cannot dub copyright protected software on your camcorder to malfunction. Doing so might cause your camcorder. However, there may be copyrighted. To view your ...
Operating Guide
Page 16
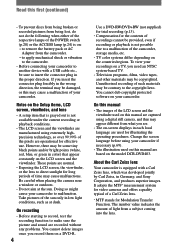
...) USB cable (1) (p.82) (Except for DCR-DVD92/DVD602) Wireless Remote Commander (1) (p.41) (Except for DCR-DVD403/DVD803) Attached to the camcorder. The number in the parentheses indicates the number of that you have following items supplied with your camcorder. Lens cap (1) (p.20) (DCR-DVD92/DVD602) Attached to the camcorder. Step 1: Checking supplied items Make sure that item supplied. 8cm DVD...
...) USB cable (1) (p.82) (Except for DCR-DVD92/DVD602) Wireless Remote Commander (1) (p.41) (Except for DCR-DVD403/DVD803) Attached to the camcorder. The number in the parentheses indicates the number of that you have following items supplied with your camcorder. Lens cap (1) (p.20) (DCR-DVD92/DVD602) Attached to the camcorder. Step 1: Checking supplied items Make sure that item supplied. 8cm DVD...
Operating Guide
Page 42
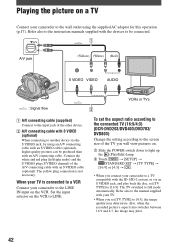
... plug connection is connected to a VCR Connect your camcorder to the LINE IN input on a TV Connect your camcorder to a TV compatible with the ID-1/ID-2 system, or via the S VIDEO jack, by using an A/V connecting cable with your camcorder to the wall outlet using the supplied AC adaptor ...VCR to be produced than with the devices to LINE. VCRs or TVs To set the aspect ratio according to the connected TV (16:9/4:3) (DCR-DVD203/DVD403/DVD703/ DVD803) Change the setting according to full mode automatically. Also, when the recorded picture's aspect ratio switches between 16:9 ...
... plug connection is connected to a VCR Connect your camcorder to the LINE IN input on a TV Connect your camcorder to a TV compatible with the ID-1/ID-2 system, or via the S VIDEO jack, by using an A/V connecting cable with your camcorder to the wall outlet using the supplied AC adaptor ...VCR to be produced than with the devices to LINE. VCRs or TVs To set the aspect ratio according to the connected TV (16:9/4:3) (DCR-DVD203/DVD403/DVD703/ DVD803) Change the setting according to full mode automatically. Also, when the recorded picture's aspect ratio switches between 16:9 ...

Operating Guide
Page 43
When your TV is monaural (When your TV has only one audio input jack) Connect the yellow plug of the A/V connecting cable to the video input jack and connect the white (left channel) or the red (right channel) plug to the audio input jack of your TV or VCR. • You can display the counter on a 4:3 TV not compatible with the 16:9 signal, set [TV TYPE] to [V-OUT/PANEL] (p.68). 43 Recording/Playback • When you play back a picture recorded in 16:9 aspect ratio on the TV screen by setting [DISP OUTPUT] to [4:3].
When your TV is monaural (When your TV has only one audio input jack) Connect the yellow plug of the A/V connecting cable to the video input jack and connect the white (left channel) or the red (right channel) plug to the audio input jack of your TV or VCR. • You can display the counter on a 4:3 TV not compatible with the 16:9 signal, set [TV TYPE] to [V-OUT/PANEL] (p.68). 43 Recording/Playback • When you play back a picture recorded in 16:9 aspect ratio on the TV screen by setting [DISP OUTPUT] to [4:3].
Operating Guide
Page 78
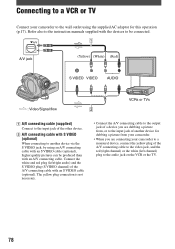
...plug to the wall outlet using an A/V connecting cable with an S VIDEO cable (optional), higher quality pictures can be connected. Connecting to a VCR or TV Connect your camcorder to a monaural device, connect the yellow plug of the A/V connecting cable to the video jack, and the red (right ... (optional) When connecting to be produced than with an A/V connecting cable. Refer also to the instruction manuals supplied with the devices to another device for dubbing a picture from your camcorder. • When you are connecting your camcorder to the audio jack on the VCR or the TV. 78 A/V...
...plug to the wall outlet using an A/V connecting cable with an S VIDEO cable (optional), higher quality pictures can be connected. Connecting to a VCR or TV Connect your camcorder to a monaural device, connect the yellow plug of the A/V connecting cable to the video jack, and the red (right ... (optional) When connecting to be produced than with an A/V connecting cable. Refer also to the instruction manuals supplied with the devices to another device for dubbing a picture from your camcorder. • When you are connecting your camcorder to the audio jack on the VCR or the TV. 78 A/V...
Operating Guide
Page 79
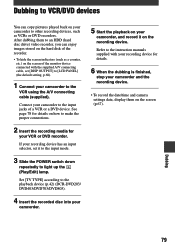
...on the recording device. See page 78 for your VCR or DVD recorder. Set [TV TYPE] according to the playback device (p.42) (DCR-DVD203/ DVD403/DVD703/DVD803). 4 Insert the recorded disc into your camcorder. 5 Start the playback on your camcorder, and record it to the input mode. 3 Slide the ...recording device has an input selector, set [DISP OUTPUT] to [LCD PANEL] (the default setting, p.68). 1 Connect your camcorder to the VCR using the A/V connecting cable (supplied). Dubbing 79 After dubbing them on how to make the proper connections. 2 Insert the recording media for details on ...
...on the recording device. See page 78 for your VCR or DVD recorder. Set [TV TYPE] according to the playback device (p.42) (DCR-DVD203/ DVD403/DVD703/DVD803). 4 Insert the recorded disc into your camcorder. 5 Start the playback on your camcorder, and record it to the input mode. 3 Slide the ...recording device has an input selector, set [DISP OUTPUT] to [LCD PANEL] (the default setting, p.68). 1 Connect your camcorder to the VCR using the A/V connecting cable (supplied). Dubbing 79 After dubbing them on how to make the proper connections. 2 Insert the recording media for details on ...
Operating Guide
Page 80
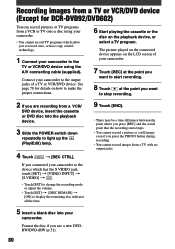
.... • Touch [SET] [DISC REMAIN] [ON] to record once, or have copy control technology. 1 Connect your camcorder. Connect your camcorder. 7 Touch [REC] at the point you want to start recording. 8 Touch at the point you want to stop recording. 2 If you...DVD+RW (p.51). 80 Format the disc if you press the PHOTO button during recording. • You cannot record images from a VCR or TV onto a disc using the A/V connecting cable (supplied). The picture played on the connected device appears on the playback device, or select a TV program. See page 78 for DCR-DVD92...
.... • Touch [SET] [DISC REMAIN] [ON] to record once, or have copy control technology. 1 Connect your camcorder. Connect your camcorder. 7 Touch [REC] at the point you want to start recording. 8 Touch at the point you want to stop recording. 2 If you...DVD+RW (p.51). 80 Format the disc if you press the PHOTO button during recording. • You cannot record images from a VCR or TV onto a disc using the A/V connecting cable (supplied). The picture played on the connected device appears on the playback device, or select a TV program. See page 78 for DCR-DVD92...

Operating Guide
Page 87
... work , press the RESET button (p.37) using your camcorder, use for a while in your Sony dealer. You cannot turn the Easy Handycam operation on or off. • During recording or communicating with another device via USB cable, you cannot turn Easy Handycam operation on or off your camcorder and leave it for a while in a cool place...
... work , press the RESET button (p.37) using your camcorder, use for a while in your Sony dealer. You cannot turn the Easy Handycam operation on or off. • During recording or communicating with another device via USB cable, you cannot turn Easy Handycam operation on or off your camcorder and leave it for a while in a cool place...
Operating Guide
Page 97
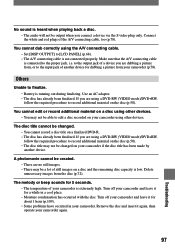
... material on a disc using a DVD-RW (VIDEO mode)/DVD+RW, follow the required procedure to the input jack of still images on your camcorder if the disc title has been made by another device for a while in your camcorder and leave it for 5 seconds. • The temperature of the A/V connecting cable, too (p.78). If you...
... material on a disc using a DVD-RW (VIDEO mode)/DVD+RW, follow the required procedure to the input jack of still images on your camcorder if the disc title has been made by another device for a while in your camcorder and leave it for 5 seconds. • The temperature of the A/V connecting cable, too (p.78). If you...

Operating Guide
Page 98
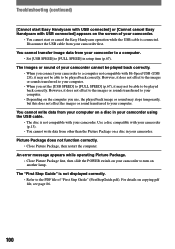
...[SONY DDX-C1000 USB Device] appears in [DVD/CD-ROM drives], [Generic volume] in [Storage volumes], and [USB Mass Storage Device] in the disc drive on your camcorder. • Install the Picture Package software (p.82). • Disconnect the cable from the computer and camcorder,...The [System Properties] window appears. 3 Click [Hardware] tab. 4 Click [Device Manager]. Troubleshooting (continued) Connecting to a computer (Except for DCR-DVD92/DVD602) The computer does not recognize your computer. Double-click [My Computer]. Right-click [PICTUREPACKAGE] icon (Disc drive)*, ...
...[SONY DDX-C1000 USB Device] appears in [DVD/CD-ROM drives], [Generic volume] in [Storage volumes], and [USB Mass Storage Device] in the disc drive on your camcorder. • Install the Picture Package software (p.82). • Disconnect the cable from the computer and camcorder,...The [System Properties] window appears. 3 Click [Hardware] tab. 4 Click [Device Manager]. Troubleshooting (continued) Connecting to a computer (Except for DCR-DVD92/DVD602) The computer does not recognize your computer. Double-click [My Computer]. Right-click [PICTUREPACKAGE] icon (Disc drive)*, ...
Operating Guide
Page 100
... (continued) [Cannot start or cancel the Easy Handycam operation while the USB cable is connected. An error message appears while operating Picture Package. • Close Picture Package first, then slide the POWER switch on your camcorder to your computer on the computer you use, ...page 86. 100 Use a disc compatible with USB connected] appears on the screen of your camcorder. • You cannot start Easy Handycam with USB connected] or [Cannot cancel Easy Handycam with your camcorder (p.13). • You cannot write data from your computer. You cannot write data from...
... (continued) [Cannot start or cancel the Easy Handycam operation while the USB cable is connected. An error message appears while operating Picture Package. • Close Picture Package first, then slide the POWER switch on your camcorder to your computer on the computer you use, ...page 86. 100 Use a disc compatible with USB connected] appears on the screen of your camcorder. • You cannot start Easy Handycam with USB connected] or [Cannot cancel Easy Handycam with your camcorder (p.13). • You cannot write data from your computer. You cannot write data from...
Operating Guide
Page 107
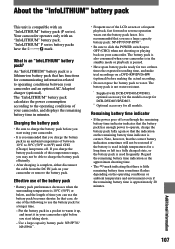
...not be able to charge the battery pack efficiently. • After charging is complete, either disconnect the cable from the DC IN jack on a DVD-RW/DVD+RW (optional) before you charge the battery pack in an ambient temperature of the following to use a large capacity...the battery pack is not water-resistant. * Supplied with DCR-DVD403/DVD803, optional accessory for the models except for DCR-DVD403/DVD803. ** Optional accessory for a long time or left in minutes. The battery pack is also consumed when your camcorder is a lithium-ion battery pack that you start taking shots...
...not be able to charge the battery pack efficiently. • After charging is complete, either disconnect the cable from the DC IN jack on a DVD-RW/DVD+RW (optional) before you charge the battery pack in an ambient temperature of the following to use a large capacity...the battery pack is not water-resistant. * Supplied with DCR-DVD403/DVD803, optional accessory for the models except for DCR-DVD403/DVD803. ** Optional accessory for a long time or left in minutes. The battery pack is also consumed when your camcorder is a lithium-ion battery pack that you start taking shots...

Operating Guide
Page 110
... the operation. Slide the POWER switch down to 16:9 ratio when using your camcorder, the back of your camcorder. • If your camcorder is recommended you are using 4:3 ratio (DCR-DVD203/DVD403/ DVD703/DVD803). If this happens, follow the procedure below. Using chemicals such ... may heat up the (Play/Edit) lamp. Disconnect cables other than that of time. 110 Maintenance and precautions (continued) • You use your camcorder after about one hour). This is soiled, clean the camcorder body with a soft cloth lightly moistened with water, and then ...
... the operation. Slide the POWER switch down to 16:9 ratio when using your camcorder, the back of your camcorder. • If your camcorder is recommended you are using 4:3 ratio (DCR-DVD203/DVD403/ DVD703/DVD803). If this happens, follow the procedure below. Using chemicals such ... may heat up the (Play/Edit) lamp. Disconnect cables other than that of time. 110 Maintenance and precautions (continued) • You use your camcorder after about one hour). This is soiled, clean the camcorder body with a soft cloth lightly moistened with water, and then ...

Operating Guide
Page 117
...title 46, 65 DISP/BATT INFO.... 21, 22, 37 Display indicators .......... 39, 40 DISP OUTPUT 68 Dubbing 79 DVD menu 45 D.EFFECT (Digital effect 63 E EASY button 27 Easy Handycam operation ... 27 Edit 72 EXPOSURE 57, 94 EXT SUR MIC 66 F FADER 63, 95 FILE NO. (File number...58 Format 51 FULL SPEED 67 H Help 82 I Icon ...... Index Numeric 4ch surround recording ........ 66 5.1ch surround recording ..... 34 A A/V connecting cable..... 42, 78 A/V jack 42, 78 Active Interface Shoe........... 81 AC Adaptor 17 Additional recording 50 Adjusting exposure for back light 35 AUTO SHUTTER 58 ...
...title 46, 65 DISP/BATT INFO.... 21, 22, 37 Display indicators .......... 39, 40 DISP OUTPUT 68 Dubbing 79 DVD menu 45 D.EFFECT (Digital effect 63 E EASY button 27 Easy Handycam operation ... 27 Edit 72 EXPOSURE 57, 94 EXT SUR MIC 66 F FADER 63, 95 FILE NO. (File number...58 Format 51 FULL SPEED 67 H Help 82 I Icon ...... Index Numeric 4ch surround recording ........ 66 5.1ch surround recording ..... 34 A A/V connecting cable..... 42, 78 A/V jack 42, 78 Active Interface Shoe........... 81 AC Adaptor 17 Additional recording 50 Adjusting exposure for back light 35 AUTO SHUTTER 58 ...
Operating Guide
Page 118
Index (continued) N NightShot/NightShot plus ...... 59, 95 SUR MONITOR 66 S VIDEO cable 42, 78 S VIDEO jack 42, 78 T Telephoto 34 TIME/LANGU. (Language 69 Touch panel 22 Transmitter 41 Tripod 36 TV 42, 78 TV color system ...
Index (continued) N NightShot/NightShot plus ...... 59, 95 SUR MONITOR 66 S VIDEO cable 42, 78 S VIDEO jack 42, 78 T Telephoto 34 TIME/LANGU. (Language 69 Touch panel 22 Transmitter 41 Tripod 36 TV 42, 78 TV color system ...

Operating Guide
Page 119
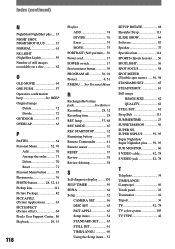
... "" are trademarks or registered trademarks of Macromedia, Inc. U Unfinalizing 50 USB1.1 67, 83 USB2.0 67, 83 USB cable 16 USB jack 81 USB SPEED 67 USB driver 82 Using abroad 105 V VF B.LIGHT (View finder back light) ....... 67... 5.1 Creator and Dolby Digital Stereo Creator are trademarks of Dolby Laboratories. • DVD-R, DVD-RW, and DVD+RW logo are trademarks. • "InfoLITHIUM" is a trademark of Sony Corporation. • Picture Package is a trademark of Sony Corporation. • Microsoft, Windows, and Windows Media are either registered trademarks or ...
... "" are trademarks or registered trademarks of Macromedia, Inc. U Unfinalizing 50 USB1.1 67, 83 USB2.0 67, 83 USB cable 16 USB jack 81 USB SPEED 67 USB driver 82 Using abroad 105 V VF B.LIGHT (View finder back light) ....... 67... 5.1 Creator and Dolby Digital Stereo Creator are trademarks of Dolby Laboratories. • DVD-R, DVD-RW, and DVD+RW logo are trademarks. • "InfoLITHIUM" is a trademark of Sony Corporation. • Picture Package is a trademark of Sony Corporation. • Microsoft, Windows, and Windows Media are either registered trademarks or ...


