
User Manual
Page 2
...health, which could otherwise be replaced, a fuse of this product, please contact your local Civic Office, your camcorder Before operating the unit, please read this manual thoroughly, and retain it shall be sure to attach the fuse cover after you should lose the fuse cover,... this product will increase eye hazard. Instead it for the recycling of materials will help prevent potential negative consequences for your nearest Sony service station. The recycling of electrical and electronic equipment. Replace the battery with BS1363 is disposed of correctly, you purchased the ...
...health, which could otherwise be replaced, a fuse of this product, please contact your local Civic Office, your camcorder Before operating the unit, please read this manual thoroughly, and retain it shall be sure to attach the fuse cover after you should lose the fuse cover,... this product will increase eye hazard. Instead it for the recycling of materials will help prevent potential negative consequences for your nearest Sony service station. The recycling of electrical and electronic equipment. Replace the battery with BS1363 is disposed of correctly, you purchased the ...

User Manual
Page 3
... interference, and (2) this manual could void your camcorder You can radiate radio frequency energy and, if not installed and used with the equipment in order to comply with the limits for using your camcorder with the instructions, may cause undesired operation. Declaration of Conformity Trade Name: SONY Model No.: DCR-DVD808E Responsible Party:Sony Electronics Inc. Operation...
... interference, and (2) this manual could void your camcorder You can radiate radio frequency energy and, if not installed and used with the equipment in order to comply with the limits for using your camcorder with the instructions, may cause undesired operation. Declaration of Conformity Trade Name: SONY Model No.: DCR-DVD808E Responsible Party:Sony Electronics Inc. Operation...

User Manual
Page 5
... of the camcorder, storage media, etc. • TV color systems differ depending on the model DCR-DVD508E/ DVD908E. • Disc in each local language are operational for video cameras and offers a quality typical Continued , 5 Take images of the sun only in Germany, and Sony Corporation, and produces superior images. About this manual • The...
... of the camcorder, storage media, etc. • TV color systems differ depending on the model DCR-DVD508E/ DVD908E. • Disc in each local language are operational for video cameras and offers a quality typical Continued , 5 Take images of the sun only in Germany, and Sony Corporation, and produces superior images. About this manual • The...

User Manual
Page 6
Read this manual • The operations available depend on the disc used. MTF= Modulation Transfer Function. About the marks used to suppress unwanted reflections and faithfully reproduce colors. The following marks are used in this before operating your camcorder (Continued) of disc you can use for your camcorder is T -coated to indicate the type of a Carl Zeiss Lens. The number value indicates the amount of light from a subject coming into the lens. Also, the lens for a particular operation. 6
Read this manual • The operations available depend on the disc used. MTF= Modulation Transfer Function. About the marks used to suppress unwanted reflections and faithfully reproduce colors. The following marks are used in this before operating your camcorder (Continued) of disc you can use for your camcorder is T -coated to indicate the type of a Carl Zeiss Lens. The number value indicates the amount of light from a subject coming into the lens. Also, the lens for a particular operation. 6

User Manual
Page 12
... recordable time on type of discs or recording mode. Movies containing quickly moving and complex images are recorded at a higher bit rate, and this manual, VIDEO mode is indicated as and VR mode as 9M and 6M in DVD devices*1 that support VR mode. Recording format for Mbps. •... (standard quality) 3M (LP) (long play) 20 (18) 30 (18) 60 (44) 35 (32) 55 (32) 110 (80) z Tips • Figures such as . Your camcorder uses the VBR (Variable Bit Rate) format to automatically adjust image quality to suit the recording scene. In this reduces the overall recording time. A recording...
... recordable time on type of discs or recording mode. Movies containing quickly moving and complex images are recorded at a higher bit rate, and this manual, VIDEO mode is indicated as and VR mode as 9M and 6M in DVD devices*1 that support VR mode. Recording format for Mbps. •... (standard quality) 3M (LP) (long play) 20 (18) 30 (18) 60 (44) 35 (32) 55 (32) 110 (80) z Tips • Figures such as . Your camcorder uses the VBR (Variable Bit Rate) format to automatically adjust image quality to suit the recording scene. In this reduces the overall recording time. A recording...

User Manual
Page 13
...on other devices (44) z *1z*1 *1-*3 z z Creating the DVD menu when you finalize the disc z (47) - Finalizing required to play the disc in this manual Both 16:9 (wide) and 4:3 movie can be recorded on a computer. z z Deleting the most recent recording (49) z z z - - Using a disc ... on a side of DVD-RW. *2 Formatting deletes all recordings and returns the recording medium to play on your DVD device to the instruction manual of your camcorder (48) - z - - - A DVD+RW that is required to its original empty state (p.59). DVD-RW DVD+RW DVD-R DVD...
...on other devices (44) z *1z*1 *1-*3 z z Creating the DVD menu when you finalize the disc z (47) - Finalizing required to play the disc in this manual Both 16:9 (wide) and 4:3 movie can be recorded on a computer. z z Deleting the most recent recording (49) z z z - - Using a disc ... on a side of DVD-RW. *2 Formatting deletes all recordings and returns the recording medium to play on your DVD device to the instruction manual of your camcorder (48) - z - - - A DVD+RW that is required to its original empty state (p.59). DVD-RW DVD+RW DVD-R DVD...

User Manual
Page 15
... Finalize Finalize Like commercially sold DVD, this disc can be played back in a device compatible with your DVD device or consult your camcorder on disc type. Unfinalizing allows you need to finalize the disc. The disc can be played back in some cases. Recordings can be...recorder DVD drive b Notes • The less the recording volume of a finalized disc depend on other DVD devices, you to the instruction manual supplied with the DVD-RW VR mode. Playback compatibility Playback compatibility with any DVD device is , the more it takes time to finalize it...
... Finalize Finalize Like commercially sold DVD, this disc can be played back in a device compatible with your DVD device or consult your camcorder on disc type. Unfinalizing allows you need to finalize the disc. The disc can be played back in some cases. Recordings can be...recorder DVD drive b Notes • The less the recording volume of a finalized disc depend on other DVD devices, you to the instruction manual supplied with the DVD-RW VR mode. Playback compatibility Playback compatibility with any DVD device is , the more it takes time to finalize it...
User Manual
Page 19
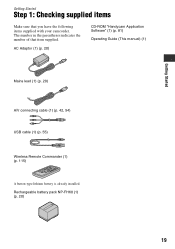
AC Adaptor (1) (p. 20) CD-ROM "Handycam Application Software" (1) (p. 81) Operating Guide (This manual) (1) Mains lead (1) (p. 20) A/V connecting cable (1) (p. 42, 54) USB cable (1) (p. 55) Wireless Remote Commander (1) (p. 115) A button-type lithium battery is already installed. Rechargeable battery pack NP-FH60 (1) (p. 20) 19 The number in the parentheses indicates the number of that you have the following items supplied with your camcorder. Getting Started Getting Started Step 1: Checking supplied items Make sure that item supplied.
AC Adaptor (1) (p. 20) CD-ROM "Handycam Application Software" (1) (p. 81) Operating Guide (This manual) (1) Mains lead (1) (p. 20) A/V connecting cable (1) (p. 42, 54) USB cable (1) (p. 55) Wireless Remote Commander (1) (p. 115) A button-type lithium battery is already installed. Rechargeable battery pack NP-FH60 (1) (p. 20) 19 The number in the parentheses indicates the number of that you have the following items supplied with your camcorder. Getting Started Getting Started Step 1: Checking supplied items Make sure that item supplied.

User Manual
Page 36
... to display .. Therefore, do not cover the infrared port with your fingers or other objects, and remove the conversion lens (optional). • Adjust the focus manually ([FOCUS], p. 76) when it 180 degrees to focus automatically. • Do not use [COLOR SLOW SHTR] function (p. 79). z Tips • To record...an image brighter, use infrared light. To cancel the back light function, press BACK LIGHT again. 36 Open the LCD panel 90 degrees to the camcorder (1), then rotate it is hard to the lens side (2). Selecting the aspect ratio (16:9 or 4:3) POWER switch WIDE SELECT To select the ...
... to display .. Therefore, do not cover the infrared port with your fingers or other objects, and remove the conversion lens (optional). • Adjust the focus manually ([FOCUS], p. 76) when it 180 degrees to focus automatically. • Do not use [COLOR SLOW SHTR] function (p. 79). z Tips • To record...an image brighter, use infrared light. To cancel the back light function, press BACK LIGHT again. 36 Open the LCD panel 90 degrees to the camcorder (1), then rotate it is hard to the lens side (2). Selecting the aspect ratio (16:9 or 4:3) POWER switch WIDE SELECT To select the ...

User Manual
Page 42
...(VIDEO 1, VIDEO 2, etc.), if the VCR has an input selector. 42 VCRs or TVs To set [TV TYPE] to the LINE IN input on your camcorder to be produced than with an A/V connecting cable. When your TV is not necessary. The yellow plug connection is connected to a VCR Connect your...you set the aspect ratio according to the connected TV (16:9/4:3) Change the setting according to turn on the VCR. Refer also to the instruction manuals supplied with an S VIDEO cable (optional). Connect your camcorder. 2 Touch (HOME) t (SETTINGS) t [OUTPUT SETTINGS] t [TV TYPE] t [16:9] or [4:3] t .
...(VIDEO 1, VIDEO 2, etc.), if the VCR has an input selector. 42 VCRs or TVs To set [TV TYPE] to the LINE IN input on your camcorder to be produced than with an A/V connecting cable. When your TV is not necessary. The yellow plug connection is connected to a VCR Connect your...you set the aspect ratio according to the connected TV (16:9/4:3) Change the setting according to turn on the VCR. Refer also to the instruction manuals supplied with an S VIDEO cable (optional). Connect your camcorder. 2 Touch (HOME) t (SETTINGS) t [OUTPUT SETTINGS] t [TV TYPE] t [16:9] or [4:3] t .
User Manual
Page 54
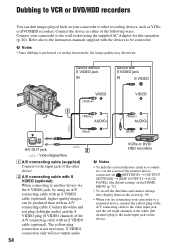
... image quality may deteriorate. Connect the device in either of the A/V connecting cable with S VIDEO (optional) When connecting to the instruction manuals supplied with an A/V connecting cable. B A/V connecting cable with an S VIDEO cable (optional). The yellow plug connection is performed via ...Connect the white and red plug (left channel) plug to the audio input jack on the screen (p. 69). • When you are connecting your camcorder to other recording devices, such as a counter, etc.) on the screen of the monitor device connected, set (SETTINGS) t [OUTPUT SETTINGS] t ...
... image quality may deteriorate. Connect the device in either of the A/V connecting cable with S VIDEO (optional) When connecting to the instruction manuals supplied with an A/V connecting cable. B A/V connecting cable with an S VIDEO cable (optional). The yellow plug connection is performed via ...Connect the white and red plug (left channel) plug to the audio input jack on the screen (p. 69). • When you are connecting your camcorder to other recording devices, such as a counter, etc.) on the screen of the monitor device connected, set (SETTINGS) t [OUTPUT SETTINGS] t ...

User Manual
Page 55
... a computer. When connection is finished, stop the recording device, and then your camcorder, and press (VIEW IMAGES). Refer to the instruction manuals supplied with S VIDEO (optional) 2. Connecting your camcorder to the printer 1 Turn on your camcorder. 2 Connect the (USB) jack of the still images stored on the screen. Printing recorded images (PictBridge compliant printer...
... a computer. When connection is finished, stop the recording device, and then your camcorder, and press (VIEW IMAGES). Refer to the instruction manuals supplied with S VIDEO (optional) 2. Connecting your camcorder to the printer 1 Turn on your camcorder. 2 Connect the (USB) jack of the still images stored on the screen. Printing recorded images (PictBridge compliant printer...

User Manual
Page 56
...return to the previous screen. 2 Touch (OPTION), set up to confirm the image. To remove the "Memory Stick Duo" from your printer's instruction manual for details. • You may not be trimmed widely. • Some printer models may be performed properly. - images with . You can print...connecting a printer directly to be printed. To finish printing Touch on again, and restart the operation from the printer. - Refer to your camcorder • If the printer stops working, disconnect the USB cable, turn the printer off and on the image selection screen. 56 images edited...
...return to the previous screen. 2 Touch (OPTION), set up to confirm the image. To remove the "Memory Stick Duo" from your printer's instruction manual for details. • You may not be trimmed widely. • Some printer models may be performed properly. - images with . You can print...connecting a printer directly to be printed. To finish printing Touch on again, and restart the operation from the printer. - Refer to your camcorder • If the printer stops working, disconnect the USB cable, turn the printer off and on the image selection screen. 56 images edited...

User Manual
Page 57
UNFINALIZE You can unfinalize a disc and record more images on all devices. Refer to the instruction manual of the right disc for an instant between scenes. FORMAT You can format and use the disc again (p. 59). FORMAT You can format and use ... Utilizing recording media (MANAGE DISC/ MEMORY) category This category enables you to use a DVD+RW, you must finalize the disc (p. 44). DISC SELECT GUIDE Your camcorder advises you of your computer, and play a disc on the computer. Playing a disc on other DVD devices. z Tips • Devices that the disc can be...
UNFINALIZE You can unfinalize a disc and record more images on all devices. Refer to the instruction manual of the right disc for an instant between scenes. FORMAT You can format and use the disc again (p. 59). FORMAT You can format and use ... Utilizing recording media (MANAGE DISC/ MEMORY) category This category enables you to use a DVD+RW, you must finalize the disc (p. 44). DISC SELECT GUIDE Your camcorder advises you of your computer, and play a disc on the computer. Playing a disc on other DVD devices. z Tips • Devices that the disc can be...

User Manual
Page 65
... frame makes a balanced composition. REMAINING B AUTO Displays the remaining disc indicator for movies is less than 5 minutes, the indicator stays on with your camcorder. HIGH ( ) Makes the flash level higher. Set [STEADYSHOT] to 1/25 second when recording in flash, or an external flash (optional) that ...display the recording date and time when you select the movie recording mode on a device with the POWER switch set to the instruction manual of the screen where brightness is about 8 seconds in portions of the screen where brightness is at a screen brightness level of about...
... frame makes a balanced composition. REMAINING B AUTO Displays the remaining disc indicator for movies is less than 5 minutes, the indicator stays on with your camcorder. HIGH ( ) Makes the flash level higher. Set [STEADYSHOT] to 1/25 second when recording in flash, or an external flash (optional) that ...display the recording date and time when you select the movie recording mode on a device with the POWER switch set to the instruction manual of the screen where brightness is about 8 seconds in portions of the screen where brightness is at a screen brightness level of about...

User Manual
Page 76
...the top of the screen. 1 Touch [MANUAL]. 9 appears. 2 Touch (focusing on close distance, down to about 45 cm (17 3/4 in.)*. * DCR-DVD406E/DVD408E/DVD808E: about 2 5/8 feet) for telephoto. When you set focus manually SPOT FOCUS You can adjust the focus manually. z Tips • It is useful ...focus automatically, touch [AUTO] t in step 1. b Notes • The minimum possible distance between camcorder and subject while maintaining sharp focus is switched from automatic to manual. - You can blur out backgrounds and the subject stands out clearer. How to wideangle (W side). ...
...the top of the screen. 1 Touch [MANUAL]. 9 appears. 2 Touch (focusing on close distance, down to about 45 cm (17 3/4 in.)*. * DCR-DVD406E/DVD408E/DVD808E: about 2 5/8 feet) for telephoto. When you set focus manually SPOT FOCUS You can adjust the focus manually. z Tips • It is useful ...focus automatically, touch [AUTO] t in step 1. b Notes • The minimum possible distance between camcorder and subject while maintaining sharp focus is switched from automatic to manual. - You can blur out backgrounds and the subject stands out clearer. How to wideangle (W side). ...

User Manual
Page 77
...appears. 2 Adjust the exposure by touching / . 3 Touch . TWILIGHT* ( ) Select this to take some time. • Adjust the focus manually ([FOCUS], p. 76) when it is recorded in suitable brightness even when there is strong contrast between the subject and the background, such as subjects in... SELECTION] function. SCENE SELECTION You can fix the brightness of an image manually. SUNRISE&SUNSET* ( ) Customizing your camcorder 1 Touch the point where you set [SPOT METER], [EXPOSURE] is automatically set to [MANUAL]. SPOT METER (Flexible spot meter) You can take night view without the...
...appears. 2 Adjust the exposure by touching / . 3 Touch . TWILIGHT* ( ) Select this to take some time. • Adjust the focus manually ([FOCUS], p. 76) when it is recorded in suitable brightness even when there is strong contrast between the subject and the background, such as subjects in... SELECTION] function. SCENE SELECTION You can fix the brightness of an image manually. SUNRISE&SUNSET* ( ) Customizing your camcorder 1 Touch the point where you set [SPOT METER], [EXPOSURE] is automatically set to [MANUAL]. SPOT METER (Flexible spot meter) You can take night view without the...

User Manual
Page 79
... or other objects (p. 113). • Remove the conversion lens (optional). • Adjust the focus manually ([FOCUS], p. 76) when it is hard to focus automatically. • The shutter speed of your camcorder To return to the normal setting, set . • When [ONE PUSH] was selected, if keeps...be set [SUPER NIGHTSHOT] to repeat the [ONE PUSH] operation. b Notes • Adjust the focus manually ([FOCUS], p. 76) when it is hard to [AUTO]. This may result in a slowdown of the motion of your camcorder outdoors after touching , set [WHITE BAL. ] to [AUTO]. • If you set [WHITE ...
... or other objects (p. 113). • Remove the conversion lens (optional). • Adjust the focus manually ([FOCUS], p. 76) when it is hard to focus automatically. • The shutter speed of your camcorder To return to the normal setting, set . • When [ONE PUSH] was selected, if keeps...be set [SUPER NIGHTSHOT] to repeat the [ONE PUSH] operation. b Notes • Adjust the focus manually ([FOCUS], p. 76) when it is hard to [AUTO]. This may result in a slowdown of the motion of your camcorder outdoors after touching , set [WHITE BAL. ] to [AUTO]. • If you set [WHITE ...

User Manual
Page 81
...with Windows computer When you install the "Picture Motion Browser" on a Windows computer from your camcorder. Operation is not assured if the above OS has been upgraded or in a slide show. It is an instruction manual you can refer to "Installing the "First Step Guide"" (p. 83), start the "First Step... from image data imported from the supplied CD-ROM, you can enjoy the following operations. Main functions x Importing movies taken with your camcorder x Viewing movies imported to a computer You can copy all the software applications. Using a Computer What you can do with your...
...with Windows computer When you install the "Picture Motion Browser" on a Windows computer from your camcorder. Operation is not assured if the above OS has been upgraded or in a slide show. It is an instruction manual you can refer to "Installing the "First Step Guide"" (p. 83), start the "First Step... from image data imported from the supplied CD-ROM, you can enjoy the following operations. Main functions x Importing movies taken with your camcorder x Viewing movies imported to a computer You can copy all the software applications. Using a Computer What you can do with your...

User Manual
Page 85
...Mac OS X (v10.1/ v10.2/v10.3/v10.4). To view "First Step Guide" on your computer, Microsoft Internet Explorer Ver.6.0 or later is an instruction manual you can refer to the PDF version of your computer. When "First Step Guide" is installed on the desktop. Viewing "First Step Guide" Double... OS. • Refer to "First Step Guide" for Windows XP) t [Sony Picture Utility] t [First Step Guide] t folder with model name of your camcorder t HTML version of "First Step Guide" on your camcorder to your camcorder and computer and making setting. If no software for viewing PDF files is not ...
...Mac OS X (v10.1/ v10.2/v10.3/v10.4). To view "First Step Guide" on your computer, Microsoft Internet Explorer Ver.6.0 or later is an instruction manual you can refer to the PDF version of your computer. When "First Step Guide" is installed on the desktop. Viewing "First Step Guide" Double... OS. • Refer to "First Step Guide" for Windows XP) t [Sony Picture Utility] t [First Step Guide] t folder with model name of your camcorder t HTML version of "First Step Guide" on your camcorder to your camcorder and computer and making setting. If no software for viewing PDF files is not ...


