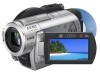

User Manual
Page 2
... discontinue midway (fail), restart the application or disconnect and connect the communication cable (USB, etc.) again. Read this before operating your camcorder Before operating the unit, please read this manual thoroughly, and retain it shall be handed over to this equipment for your nearest Sony service station. Use of controls or adjustments or performance of procedures other European countries with separate collection...
... discontinue midway (fail), restart the application or disconnect and connect the communication cable (USB, etc.) again. Read this before operating your camcorder Before operating the unit, please read this manual thoroughly, and retain it shall be handed over to this equipment for your nearest Sony service station. Use of controls or adjustments or performance of procedures other European countries with separate collection...

User Manual
Page 5
... of your camcorder to another device with a USB cable, be some tiny black points and/or bright points (white, red, blue, or green in color) that is grayed out is equipped with a digital still camera, and may look different from what you record them on the LCD screen and the viewfinder. On recording • Before starting to record, test the recording function to 8cm DVD discs. Unauthorized recording of time may...
... of your camcorder to another device with a USB cable, be some tiny black points and/or bright points (white, red, blue, or green in color) that is grayed out is equipped with a digital still camera, and may look different from what you record them on the LCD screen and the viewfinder. On recording • Before starting to record, test the recording function to 8cm DVD discs. Unauthorized recording of time may...
User Manual
Page 7
... setting the date and time 23 Changing the language setting 24 Step 4: Preparing for recording 25 Step 5: Inserting a disc or a "Memory Stick Duo 26 Recording/Playback Recording and playing back with ease (Easy Handycam 29 Recording 32 Zooming 34 Recording sound with more presence (5.1ch surround recording 34 Using the flash 34 Recording high quality still images during movie recording (Dual Rec 35 Recording in dark places (NightShot 36 Adjusting the exposure for backlit subjects 36 Recording in mirror mode 36...
... setting the date and time 23 Changing the language setting 24 Step 4: Preparing for recording 25 Step 5: Inserting a disc or a "Memory Stick Duo 26 Recording/Playback Recording and playing back with ease (Easy Handycam 29 Recording 32 Zooming 34 Recording sound with more presence (5.1ch surround recording 34 Using the flash 34 Recording high quality still images during movie recording (Dual Rec 35 Recording in dark places (NightShot 36 Adjusting the exposure for backlit subjects 36 Recording in mirror mode 36...
User Manual
Page 8
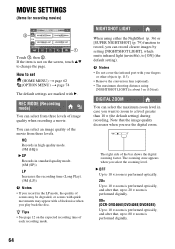
... (SETTINGS) category items 63 MOVIE SETTINGS 64 (Items for recording movies) PHOTO SETTINGS 66 (Items for recording still images) VIEW IMAGES SET 69 (Items to customize the display) SOUND/DISP SET 70 (Items to adjust beep and the screen) OUTPUT SETTINGS 72 (Items for when connecting other devices) CLOCK/ LANG 72 (Items to set clock and language) GENERAL SET 73 (Other setup items) Activating functions using the OPTION MENU 74 Using the OPTION MENU 74 Recording items on the OPTION MENU 75 Viewing...
... (SETTINGS) category items 63 MOVIE SETTINGS 64 (Items for recording movies) PHOTO SETTINGS 66 (Items for recording still images) VIEW IMAGES SET 69 (Items to customize the display) SOUND/DISP SET 70 (Items to adjust beep and the screen) OUTPUT SETTINGS 72 (Items for when connecting other devices) CLOCK/ LANG 72 (Items to set clock and language) GENERAL SET 73 (Other setup items) Activating functions using the OPTION MENU 74 Using the OPTION MENU 74 Recording items on the OPTION MENU 75 Viewing...
User Manual
Page 22
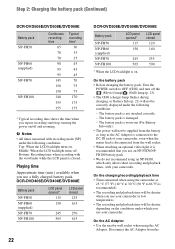
... displayed under the following conditions: Top: When the LCD backlight turns on . b Notes • All times measured with recording mode [SP] under the following conditions: - Playing time Approximate time (min.) available when you use your camcorder in low temperatures. • The recording and playback time will not be supplied from the DCR-DVD406E/DVD408E/DVD808E Battery pack NP-FH50 NP-FH60 (supplied) NP-FH70 NP-FH100 LCD panel opened...
... displayed under the following conditions: Top: When the LCD backlight turns on . b Notes • All times measured with recording mode [SP] under the following conditions: - Playing time Approximate time (min.) available when you use your camcorder in low temperatures. • The recording and playback time will not be supplied from the DCR-DVD406E/DVD408E/DVD808E Battery pack NP-FH50 NP-FH60 (supplied) NP-FH70 NP-FH100 LCD panel opened...
User Manual
Page 24
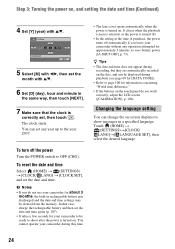
... save battery power ([A.SHUT OFF], p. 73). Step 3: Turning the power on -screen displays to show messages in a specified language. To turn off automatically if you do not use your camcorder for information concerning "World time difference." • If the buttons on the touch panel do not work correctly, adjust the LCD screen ([CALIBRATION], p. 106). Changing the language setting You can change the on , and setting the date and time (Continued) 4 Set [Y] (year) with v/V. 5 Select [M] with b/B, then set...
... save battery power ([A.SHUT OFF], p. 73). Step 3: Turning the power on -screen displays to show messages in a specified language. To turn off automatically if you do not use your camcorder for information concerning "World time difference." • If the buttons on the touch panel do not work correctly, adjust the LCD screen ([CALIBRATION], p. 106). Changing the language setting You can change the on , and setting the date and time (Continued) 4 Set [Y] (year) with v/V. 5 Select [M] with b/B, then set...
User Manual
Page 29
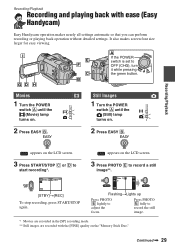
... POWER switch is set to adjust the focus. appears on the LCD screen. 3 Press START/STOP C or D to start recording*. FlashingtLights up Press PHOTO E lightly to OFF (CHG), turn it while pressing the green button. Recording/Playback appears on the LCD screen. 3 Press PHOTO E to record the still image. * Movies are recorded in the [SP] recording mode. ** Still images are recorded with ease (Easy Handycam) Easy Handycam operation makes nearly all settings automatic so that you can perform recording or playing back operation...
... POWER switch is set to adjust the focus. appears on the LCD screen. 3 Press START/STOP C or D to start recording*. FlashingtLights up Press PHOTO E lightly to OFF (CHG), turn it while pressing the green button. Recording/Playback appears on the LCD screen. 3 Press PHOTO E to record the still image. * Movies are recorded in the [SP] recording mode. ** Still images are recorded with ease (Easy Handycam) Easy Handycam operation makes nearly all settings automatic so that you can perform recording or playing back operation...
User Manual
Page 34
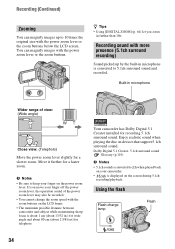
... cannot change the zoom speed with the power zoom lever or the zoom buttons below the LCD screen. Enjoy realistic sound when playing the disc on the power zoom lever. Dolby Digital 5.1 Creator, 5.1ch surround sound Glossary (p.119) b Notes • 5.1ch sound is converted to 10 times the original size with the zoom buttons on the screen during 5.1ch recording/playback. Built-in .) for a slower zoom. Your camcorder has Dolby Digital 5.1 Creator installed for a faster zoom. z Tips • Using [DIGITAL ZOOM] (p. 64...
... cannot change the zoom speed with the power zoom lever or the zoom buttons below the LCD screen. Enjoy realistic sound when playing the disc on the power zoom lever. Dolby Digital 5.1 Creator, 5.1ch surround sound Glossary (p.119) b Notes • 5.1ch sound is converted to 10 times the original size with the zoom buttons on the screen during 5.1ch recording/playback. Built-in .) for a slower zoom. Your camcorder has Dolby Digital 5.1 Creator installed for a faster zoom. z Tips • Using [DIGITAL ZOOM] (p. 64...

User Manual
Page 42
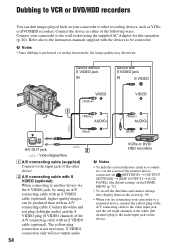
... jack IN S VIDEO VIDEO (Yellow) VIDEO (White) AUDIO (Red) (White) AUDIO (Red) A/V OUT jack : Signal flow 1 A/V connecting cable (supplied) Connect to the input jack of the A/V connecting cable with S VIDEO 2. Playing the picture on a TV Connect your camcorder to the LINE IN input on the VCR. Refer also to the instruction manuals supplied with the devices to the wall socket using an A/V connecting cable with an S VIDEO cable (optional), higher quality pictures can be connected. Connect your camcorder. 2 Touch (HOME) t (SETTINGS) t [OUTPUT SETTINGS] t [TV TYPE] t [16:9] or...
... jack IN S VIDEO VIDEO (Yellow) VIDEO (White) AUDIO (Red) (White) AUDIO (Red) A/V OUT jack : Signal flow 1 A/V connecting cable (supplied) Connect to the input jack of the A/V connecting cable with S VIDEO 2. Playing the picture on a TV Connect your camcorder to the LINE IN input on the VCR. Refer also to the instruction manuals supplied with the devices to the wall socket using an A/V connecting cable with an S VIDEO cable (optional), higher quality pictures can be connected. Connect your camcorder. 2 Touch (HOME) t (SETTINGS) t [OUTPUT SETTINGS] t [TV TYPE] t [16:9] or...
User Manual
Page 54
...to the instruction manuals supplied with S VIDEO jack IN S VIDEO VIDEO (Yellow) VIDEO (White) AUDIO (Red) (White) AUDIO (Red) A/V OUT jack : Video/Signal flow A A/V connecting cable (supplied) Connect to the input jack of the other recording devices, such as a counter, etc.) on the screen of the monitor device connected, set (SETTINGS) t [OUTPUT SETTINGS] t [DISP OUTPUT] t [LCD PANEL] (the default setting) on the HOME MENU (p. 72). • To record the date/time and camera settings data, display them on the screen (p. 69). • When you are connecting your camcorder to a monaural...
...to the instruction manuals supplied with S VIDEO jack IN S VIDEO VIDEO (Yellow) VIDEO (White) AUDIO (Red) (White) AUDIO (Red) A/V OUT jack : Video/Signal flow A A/V connecting cable (supplied) Connect to the input jack of the other recording devices, such as a counter, etc.) on the screen of the monitor device connected, set (SETTINGS) t [OUTPUT SETTINGS] t [DISP OUTPUT] t [LCD PANEL] (the default setting) on the HOME MENU (p. 72). • To record the date/time and camera settings data, display them on the screen (p. 69). • When you are connecting your camcorder to a monaural...

User Manual
Page 56
... . [COPIES]: Set number of copies of 3MB or more - Refer to your camcorder • If the printer stops working, disconnect the USB cable, turn the printer off and on (OPTION). You can print still images without using tab t [PRINT] on again, and restart the operation from the printer. - To finish printing Touch on the screen. To operate the POWER switch. - To remove the "Memory Stick Duo" from your printer's instruction manual for...
... . [COPIES]: Set number of copies of 3MB or more - Refer to your camcorder • If the printer stops working, disconnect the USB cable, turn the printer off and on (OPTION). You can print still images without using tab t [PRINT] on again, and restart the operation from the printer. - To finish printing Touch on the screen. To operate the POWER switch. - To remove the "Memory Stick Duo" from your printer's instruction manual for...
User Manual
Page 64
...). • Remove the conversion lens (optional). • The maximum shooting distance using either the NightShot (p. 36) or [SUPER NIGHTSHOT] (p. 79) function to [ON] (the default setting). If the item is performed optically, and after that , up to 20 × zoom is performed digitally. 80× (DCR-DVD406E/DVD408E/DVD808E) Up to 10 × zoom is not on the expected recording time of the...
...). • Remove the conversion lens (optional). • The maximum shooting distance using either the NightShot (p. 36) or [SUPER NIGHTSHOT] (p. 79) function to [ON] (the default setting). If the item is performed optically, and after that , up to 20 × zoom is performed digitally. 80× (DCR-DVD406E/DVD408E/DVD808E) Up to 10 × zoom is not on the expected recording time of the...

User Manual
Page 65
... your camcorder recognizes the remaining disc capacity with the POWER switch set to [ON] (the default setting), the shutter speed is automatically reduced to 1/25 second when recording in portions of about 8 seconds in flash, or an external flash (optional) that the subject is horizontal or vertical by setting [GUIDEFRAME] to (Movie). - HIGH ( ) Makes the flash level higher. AUTO SLW SHUTTR (Auto slow shutter) When this function when you play back a disc on...
... your camcorder recognizes the remaining disc capacity with the POWER switch set to [ON] (the default setting), the shutter speed is automatically reduced to 1/25 second when recording in portions of about 8 seconds in flash, or an external flash (optional) that the subject is horizontal or vertical by setting [GUIDEFRAME] to (Movie). - HIGH ( ) Makes the flash level higher. AUTO SLW SHUTTR (Auto slow shutter) When this function when you play back a disc on...
User Manual
Page 86
... LEVEL] 86 Recording format for DVD-RW: [VIDEO] • The following menu items are fixed during Easy Handycam operation. Playback zoom (p.41) - The camcorder does not operate even when the power is set to OFF (CHG) for your camcorder to shoot after about 1 minute. If the problem persists, disconnect the power source and contact your Sony dealer. • Overall operations/Easy Handycam operation/Remote Commander 86 • Batteries/Power sources 87 • LCD screen/viewfinder 88 • Discs/"Memory Stick Duo...
... LEVEL] 86 Recording format for DVD-RW: [VIDEO] • The following menu items are fixed during Easy Handycam operation. Playback zoom (p.41) - The camcorder does not operate even when the power is set to OFF (CHG) for your camcorder to shoot after about 1 minute. If the problem persists, disconnect the power source and contact your Sony dealer. • Overall operations/Easy Handycam operation/Remote Commander 86 • Batteries/Power sources 87 • LCD screen/viewfinder 88 • Discs/"Memory Stick Duo...
User Manual
Page 88
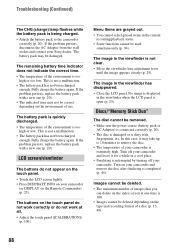
.... • Touch the LCD screen lightly. • Press DISP/BATT INFO on the Remote Commander) (p. 25). Menu items are grayed out. • You cannot select grayed items in the current recording/playback status. • Some functions cannot be damaged. Images cannot be deleted. • The maximum number of your camcorder (or DISPLAY on your camcorder is interrupted by turning off your Sony dealer. In this case...
.... • Touch the LCD screen lightly. • Press DISP/BATT INFO on the Remote Commander) (p. 25). Menu items are grayed out. • You cannot select grayed items in the current recording/playback status. • Some functions cannot be damaged. Images cannot be deleted. • The maximum number of your camcorder (or DISPLAY on your camcorder is interrupted by turning off your Sony dealer. In this case...
User Manual
Page 90
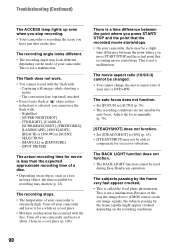
...; The recording conditions are not suitable for excessive vibrations. Capturing still images while shooting a movie - The conversion lens (optional) attached • Even if auto flash or (Auto redeye reduction) is not a malfunction. Adjust the focus manually (p. 76). [STEADYSHOT] does not function. • Set [STEADYSHOT] to [ON] (p. 65). • [STEADYSHOT] may look different depending on the mode of a disc. • Depending on the disc. Because of your camcorder and...
...; The recording conditions are not suitable for excessive vibrations. Capturing still images while shooting a movie - The conversion lens (optional) attached • Even if auto flash or (Auto redeye reduction) is not a malfunction. Adjust the focus manually (p. 76). [STEADYSHOT] does not function. • Set [STEADYSHOT] to [ON] (p. 65). • [STEADYSHOT] may look different depending on the mode of a disc. • Depending on the disc. Because of your camcorder and...
User Manual
Page 103
... a "Memory Stick" compliant device, be used on a "Memory Stick Duo" by your camcorder conform to the "Design rule for replacement while your camcorder, you carry or store a "Memory Stick Duo," put it all the way in. On a "Memory Stick Duo" with a write-protect tab You can use the "Memory Stick Duo" near magnets or magnetic fields. On image data compatibility • Image data files recorded on your camcorder is inserted facing in the correct direction...
... a "Memory Stick" compliant device, be used on a "Memory Stick Duo" by your camcorder conform to the "Design rule for replacement while your camcorder, you carry or store a "Memory Stick Duo," put it all the way in. On a "Memory Stick Duo" with a write-protect tab You can use the "Memory Stick Duo" near magnets or magnetic fields. On image data compatibility • Image data files recorded on your camcorder is inserted facing in the correct direction...

User Manual
Page 104
...-ion battery pack that has functions for a longer time. - When playing back image data recorded with an "InfoLITHIUM" battery pack (H series). The "InfoLITHIUM" battery pack calculates the power consumption according to play back images with your camcorder (p. 60). Use the remaining battery time indication as a rough guide only. • The E mark that the battery indication will be able to use the battery pack for communicating information related to operating conditions between...
...-ion battery pack that has functions for a longer time. - When playing back image data recorded with an "InfoLITHIUM" battery pack (H series). The "InfoLITHIUM" battery pack calculates the power consumption according to play back images with your camcorder (p. 60). Use the remaining battery time indication as a rough guide only. • The E mark that the battery indication will be able to use the battery pack for communicating information related to operating conditions between...
User Manual
Page 120
... 106 CAMERA DATA 69 CANDLE 77 CD-ROM 81 Charging time 21 CLOCK SET 23 CLOCK/LANG 72 COLOR SLOW SHTR (Color Slow Shutter 79, 94 Computer 81 Copyright 5, 111 120 D DATA CODE 69, 118 DATE/TIME.......... 24, 69, 118 DC IN jack 20 DC plug 20 DELETE Disc 48 "Memory Stick Duo" .... 49 DEMO MODE 73 DIGITAL ZOOM 64 Disc 26, 101 Disc cover OPEN switch ..... 26 DISC INFO 57 Disc remaining 65 DISC SELECT GUIDE ....... 58 DISP OUTPUT 72 DISPLAY 69 Display indicators...
... 106 CAMERA DATA 69 CANDLE 77 CD-ROM 81 Charging time 21 CLOCK SET 23 CLOCK/LANG 72 COLOR SLOW SHTR (Color Slow Shutter 79, 94 Computer 81 Copyright 5, 111 120 D DATA CODE 69, 118 DATE/TIME.......... 24, 69, 118 DC IN jack 20 DC plug 20 DELETE Disc 48 "Memory Stick Duo" .... 49 DEMO MODE 73 DIGITAL ZOOM 64 Disc 26, 101 Disc cover OPEN switch ..... 26 DISC INFO 57 Disc remaining 65 DISC SELECT GUIDE ....... 58 DISP OUTPUT 72 DISPLAY 69 Display indicators...

User Manual
Page 121
... OPTION MENU 74 Original DELETE 48 DIVIDE 50 OTHERS category 48 OUTDOOR 78 OUTPUT SETTINGS...........72 P PAL 99 PASTEL 80 PHOTO SETTINGS 66 Pickup lens 107 PictBridge 55 Picture Motion Browser ....... 81 PICT.EFFECT (Picture effect 80, 94 Playback 29, 39 Playback zoom 41 Playing time 22 Playlist Creating 51 Playback 30, 52 PORTRAIT 78 Pre-installed rechargeable battery 107 Preparation 19 Print 55 R REC MODE (Recording mode 64 Recording 29, 32 Recording format 12 Recording time...
... OPTION MENU 74 Original DELETE 48 DIVIDE 50 OTHERS category 48 OUTDOOR 78 OUTPUT SETTINGS...........72 P PAL 99 PASTEL 80 PHOTO SETTINGS 66 Pickup lens 107 PictBridge 55 Picture Motion Browser ....... 81 PICT.EFFECT (Picture effect 80, 94 Playback 29, 39 Playback zoom 41 Playing time 22 Playlist Creating 51 Playback 30, 52 PORTRAIT 78 Pre-installed rechargeable battery 107 Preparation 19 Print 55 R REC MODE (Recording mode 64 Recording 29, 32 Recording format 12 Recording time...


