
Operating Guide
Page 1
Operating Guide DCR-DVD505/DVD905 © 2006 Sony Corporation 2-661-367-11(1) Enjoying with your DVD Handycam 14 Getting Started 20 Easy Handycam 33 Recording /Playback 40 Playback on DVD devices 54 Using the Recorded disc 61 Using the Setup items 64 Editing on DVD Handycam 84 Dubbing, Printing 92 Using a Computer 99 Troubleshooting 105 Additional Information 129 Glossary, Index 142
Operating Guide DCR-DVD505/DVD905 © 2006 Sony Corporation 2-661-367-11(1) Enjoying with your DVD Handycam 14 Getting Started 20 Easy Handycam 33 Recording /Playback 40 Playback on DVD devices 54 Using the Recorded disc 61 Using the Setup items 64 Editing on DVD Handycam 84 Dubbing, Printing 92 Using a Computer 99 Troubleshooting 105 Additional Information 129 Glossary, Index 142
Operating Guide
Page 12
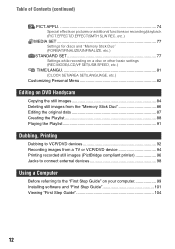
...etc.) TIME/LANGU 81 (CLOCK SET/AREA SET/LANGUAGE, etc.) Customizing Personal Menu 82 Editing on DVD Handycam Copying the still images 84 Deleting still images from the "Memory Stick Duo 86 Editing the original data 87 Creating the Playlist 88 Playing the Playlist 91 Dubbing, Printing Dubbing to... VCR/DVD devices 92 Recording images from a TV or VCR/DVD device 94 Printing recorded still...
...etc.) TIME/LANGU 81 (CLOCK SET/AREA SET/LANGUAGE, etc.) Customizing Personal Menu 82 Editing on DVD Handycam Copying the still images 84 Deleting still images from the "Memory Stick Duo 86 Editing the original data 87 Creating the Playlist 88 Playing the Playlist 91 Dubbing, Printing Dubbing to... VCR/DVD devices 92 Recording images from a TV or VCR/DVD device 94 Printing recorded still...
Operating Guide
Page 15
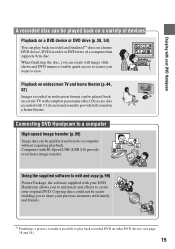
... even faster image transfer. Connecting DVD Handycam to play back recorded and finalized** discs on a home DVD device, DVD recorder or DVD drive of devices Playback on a DVD device or DVD drive (p.38, 54) You can play back recorded DVD on other DVD devices (see page 38 and 54). 15 Using the supplied software to edit and copy (p.99) Picture...
... even faster image transfer. Connecting DVD Handycam to play back recorded and finalized** discs on a home DVD device, DVD recorder or DVD drive of devices Playback on a DVD device or DVD drive (p.38, 54) You can play back recorded DVD on other DVD devices (see page 38 and 54). 15 Using the supplied software to edit and copy (p.99) Picture...
Operating Guide
Page 16
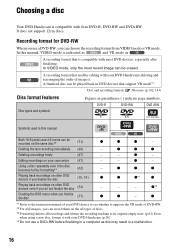
...editing with 8cm DVD-R, DVD-RW and DVD+RW. z - - Choosing a disc Your DVD Handycam is compatible with your DVD Handycam (deleting and rearranging the order of images). A finalized disc can be erased. Disc and recording formats Glossary (p.142, 143) Disc format features Figures in a malfunction. 16 DVD-R DVD-RW DVD... that is indicated as and VR mode as this manual, VIDEO mode is compatible with your camcorder (87) - In VIDEO mode, only the most DVD devices, especially after finalizing. In this may result in parentheses ( ) indicate page numbers. It ...
...editing with 8cm DVD-R, DVD-RW and DVD+RW. z - - Choosing a disc Your DVD Handycam is compatible with your DVD Handycam (deleting and rearranging the order of images). A finalized disc can be erased. Disc and recording formats Glossary (p.142, 143) Disc format features Figures in a malfunction. 16 DVD-R DVD-RW DVD... that is indicated as and VR mode as this manual, VIDEO mode is compatible with your camcorder (87) - In VIDEO mode, only the most DVD devices, especially after finalizing. In this may result in parentheses ( ) indicate page numbers. It ...

Operating Guide
Page 18
... the disc that best suits your needs. You can delete or edit You can be played back even without finalizing 2Shooting, deleting and editing You cannot (See pages 34, 40, 48 delete a and 87.) recorded image. Deleting and editing images in your DVD Handycam Playing back disc on the right page 18 Repeated use of...
... the disc that best suits your needs. You can delete or edit You can be played back even without finalizing 2Shooting, deleting and editing You cannot (See pages 34, 40, 48 delete a and 87.) recorded image. Deleting and editing images in your DVD Handycam Playing back disc on the right page 18 Repeated use of...
Operating Guide
Page 29
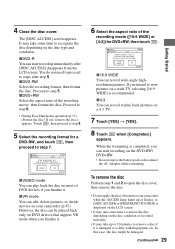
...the AC Adaptor while formatting. Touch , then proceed to step 8. 5 Select the recording format for DVD+RW, then touch . However, the disc can edit, delete pictures, or divide movies on your camcorder while the ACCESS lamp lights up or flashes, or [DISC ACCESS] or [PREPARING TO OPEN] ...8226; During Easy Handycam operation (p.33), [Format the disc? It may take some time to remove the disc depending on the disc condition or recorded materials. • It may take up to 10 minutes to your camcorder (p.87). 4 Close the disc cover. Cannot edit in Camcorder VIDEO VR OK xVIDEO...
...the AC Adaptor while formatting. Touch , then proceed to step 8. 5 Select the recording format for DVD+RW, then touch . However, the disc can edit, delete pictures, or divide movies on your camcorder while the ACCESS lamp lights up or flashes, or [DISC ACCESS] or [PREPARING TO OPEN] ...8226; During Easy Handycam operation (p.33), [Format the disc? It may take some time to remove the disc depending on the disc condition or recorded materials. • It may take up to 10 minutes to your camcorder (p.87). 4 Close the disc cover. Cannot edit in Camcorder VIDEO VR OK xVIDEO...
Operating Guide
Page 33
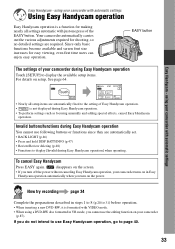
... on in Easy Handycam operation automatically when you do not intend to use Easy Handycam operation, go to 31) before operation. • When inserting a new DVD-RW, it is formatted with automatic settings Easy Handycam - using your camcorder (p.87). Your camcorder automatically carries out the...fixed to display the available setup items. For details on your camcorder with automatic settings Using Easy Handycam operation Easy Handycam operation is not displayed during Easy Handycam operation You cannot use the editing function on setup, See page 64. EASY button The settings...
... on in Easy Handycam operation automatically when you do not intend to use Easy Handycam operation, go to 31) before operation. • When inserting a new DVD-RW, it is formatted with automatic settings Easy Handycam - using your camcorder (p.87). Your camcorder automatically carries out the...fixed to display the available setup items. For details on your camcorder with automatic settings Using Easy Handycam operation Easy Handycam operation is not displayed during Easy Handycam operation You cannot use the editing function on setup, See page 64. EASY button The settings...
Operating Guide
Page 36
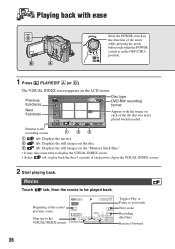
... Reverse/ Forward 36 Beginning of the arrow while pressing the green button only when the POWER switch is in the OFF (CHG) position. 1 Press PLAY/EDIT A (or B) The VISUAL INDEX screen appears on the LCD screen. Returns to the recording screen 1 23 1 tab: Displays the movies. 2 tab: Displays ... Playing back with the image on each movie clip in the VISUAL INDEX screen. 2 Start playing back. Previous 6 pictures Next 6 pictures Disc type DVD-RW recording format Appears with ease Slide the POWER switch in the direction of the scene/ previous scene Stop (go to be played back.
... Reverse/ Forward 36 Beginning of the arrow while pressing the green button only when the POWER switch is in the OFF (CHG) position. 1 Press PLAY/EDIT A (or B) The VISUAL INDEX screen appears on the LCD screen. Returns to the recording screen 1 23 1 tab: Displays the movies. 2 tab: Displays ... Playing back with the image on each movie clip in the VISUAL INDEX screen. 2 Start playing back. Previous 6 pictures Next 6 pictures Disc type DVD-RW recording format Appears with ease Slide the POWER switch in the direction of the scene/ previous scene Stop (go to be played back.
Operating Guide
Page 42
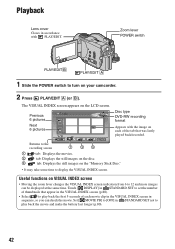
Playback Lens cover Closes in STANDARD SET not to display the VISUAL INDEX screen. Previous 6 pictures Next 6 pictures Disc type DVD-RW recording format Appears with PLAY/EDIT. Touch [ DISPLAY] in STANDARD SET to set the number of thumbnails that appear in sequence, so you can be displayed ... the first 5 seconds of the tab that was lastly played back/recorded. Set [ MOVIE PB] to [OFF] in accordance with the image on your camcorder. 2 Press PLAY/EDIT A (or B). Returns to the recording screen 1 23 1 tab: Displays the movies. 2 tab: Displays the still images on the disc. 3 tab...
Playback Lens cover Closes in STANDARD SET not to display the VISUAL INDEX screen. Previous 6 pictures Next 6 pictures Disc type DVD-RW recording format Appears with PLAY/EDIT. Touch [ DISPLAY] in STANDARD SET to set the number of thumbnails that appear in sequence, so you can be displayed ... the first 5 seconds of the tab that was lastly played back/recorded. Set [ MOVIE PB] to [OFF] in accordance with the image on your camcorder. 2 Press PLAY/EDIT A (or B). Returns to the recording screen 1 23 1 tab: Displays the movies. 2 tab: Displays the still images on the disc. 3 tab...

Operating Guide
Page 49
...SP / LP) (77) 3 Recording status ([STBY] (standby) / [REC] (recording)) 4 Counter (hour: minute: second) 5 Disc type (16) 6 Recording format of a DVD-RW(16) 7 Dual Rec (45) 8 Remaining recordable time of still images recorded in "Memory Stick Duo" increases, new folders are automatically created to store them... position differs slightly from that during recording/playback Recording movies ( ) is a reference page. Personal Menu button (64) Viewing movies qa PLAY/EDIT button qs Image size (72) qd Quality ([FINE] / [STD]) (72) qf The number of recordable still images and recording media qg...
...SP / LP) (77) 3 Recording status ([STBY] (standby) / [REC] (recording)) 4 Counter (hour: minute: second) 5 Disc type (16) 6 Recording format of a DVD-RW(16) 7 Dual Rec (45) 8 Remaining recordable time of still images recorded in "Memory Stick Duo" increases, new folders are automatically created to store them... position differs slightly from that during recording/playback Recording movies ( ) is a reference page. Personal Menu button (64) Viewing movies qa PLAY/EDIT button qs Image size (72) qd Quality ([FINE] / [STD]) (72) qf The number of recordable still images and recording media qg...

Operating Guide
Page 52
...) and 4:3, the image may deteriorate. S VIDEO connection only will view pictures on. 1 Slide the POWER switch to turn on a TV Connect your camcorder to the input jack of the other device. 2 A/V connecting cable with S VIDEO (optional) When connecting to another device via an S VIDEO jack,...channel) of the TV you set [TV TYPE] to [16:9]. Playing the picture on your camcorder and press PLAY/EDIT. 2 Touch t [SETUP] t STANDARD SET t [TV TYPE] t [16:9] or [4:3] t . • When you connect your camcorder to a TV compatible with the ID-1/ID-2 system, or via the S VIDEO jack, ...
...) and 4:3, the image may deteriorate. S VIDEO connection only will view pictures on. 1 Slide the POWER switch to turn on a TV Connect your camcorder to the input jack of the other device. 2 A/V connecting cable with S VIDEO (optional) When connecting to another device via an S VIDEO jack,...channel) of the TV you set [TV TYPE] to [16:9]. Playing the picture on your camcorder and press PLAY/EDIT. 2 Touch t [SETUP] t STANDARD SET t [TV TYPE] t [16:9] or [4:3] t . • When you connect your camcorder to a TV compatible with the ID-1/ID-2 system, or via the S VIDEO jack, ...

Operating Guide
Page 57
Select [NO MENU] if you have finished entering characters, touch . Select [NO] if you do not create a DVD menu. 3 Touch t [END]. To insert a space: Touch [t]. 4 Touch [t] as you register a character to move to the next entry point. • Up to 20 characters... • It may take more time it on the EDIT screen (p.90). Playback on a DVD-RW (VR mode) in the JPEG format using a DVD drive on your computer without creating a Photomovie (p.59). • You cannot create a Photomovie on DVD devices To select a DVD menu style 1 Touch [DVD MENU]. 2 Select the desired style from the end. 3...
Select [NO MENU] if you have finished entering characters, touch . Select [NO] if you do not create a DVD menu. 3 Touch t [END]. To insert a space: Touch [t]. 4 Touch [t] as you register a character to move to the next entry point. • Up to 20 characters... • It may take more time it on the EDIT screen (p.90). Playback on a DVD-RW (VR mode) in the JPEG format using a DVD drive on your computer without creating a Photomovie (p.59). • You cannot create a Photomovie on DVD devices To select a DVD menu style 1 Touch [DVD MENU]. 2 Select the desired style from the end. 3...

Operating Guide
Page 59
...the desktop. 3 Right-click the DVD drive with an 8cm DVD as it may occur accidentally in the JPEG format. For details, refer to the instruction manuals of your computer. • You cannot play back or edit movies that supports 8cm discs, and a DVD playback application must finalize the disc... (p.54). Playing back a disc on a computer with a DVD drive installed • Do not use the 8cm CD adaptor with the disc ...
...the desktop. 3 Right-click the DVD drive with an 8cm DVD as it may occur accidentally in the JPEG format. For details, refer to the instruction manuals of your computer. • You cannot play back or edit movies that supports 8cm discs, and a DVD playback application must finalize the disc... (p.54). Playing back a disc on a computer with a DVD drive installed • Do not use the 8cm CD adaptor with the disc ...

Operating Guide
Page 62
... The disc is no need to finalize the disc before viewing it . • A DVD-R cannot be finalized again to be formatted. xDVD-RW Select the recording format, then format the disc. Cannot edit in a DVD device.* * To use a double-sided disc, formatting is recovered by deleting all images...AC Adaptor during formatting. • When you set in a DVD device. FORMAT : VIDEO Can playback on various DVD devices. Format the disc again to your camcorder. 4 Touch t [ FORMAT]. Replace it has to enable playback in step 6 for a DVD-RW, touch ,then proceed to step 5. Deleting all of ...
... The disc is no need to finalize the disc before viewing it . • A DVD-R cannot be finalized again to be formatted. xDVD-RW Select the recording format, then format the disc. Cannot edit in a DVD device.* * To use a double-sided disc, formatting is recovered by deleting all images...AC Adaptor during formatting. • When you set in a DVD device. FORMAT : VIDEO Can playback on various DVD devices. Format the disc again to your camcorder. 4 Touch t [ FORMAT]. Replace it has to enable playback in step 6 for a DVD-RW, touch ,then proceed to step 5. Deleting all of ...

Operating Guide
Page 64
... setup item is in the direction of Personal Menu On Personal Menu, short-cuts for still images When carrying out the playback settings, press PLAY/EDIT to go to the playback screen. 2 Touch the LCD screen to select the setup item.
... setup item is in the direction of Personal Menu On Personal Menu, short-cuts for still images When carrying out the playback settings, press PLAY/EDIT to go to the playback screen. 2 Touch the LCD screen to select the setup item.
Operating Guide
Page 66
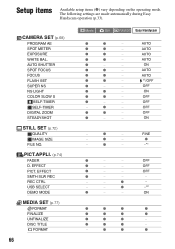
... FILE NO. EFFECT SMTH SLW REC REC CTRL USB SELECT DEMO MODE MEDIA SET (p.77) FORMAT FINALIZE UNFINALIZE DISC TITLE FORMAT 66 Movie Still PLAY/EDIT Easy Handycam z z - z - - z - - - z z - z - - The following settings are made automatically during Easy Handycam operation (p.33). z - - z - - PICT.APPLI. (p.74) FADER D. FINE z -*1 z - - z - - EFFECT PICT...
... FILE NO. EFFECT SMTH SLW REC REC CTRL USB SELECT DEMO MODE MEDIA SET (p.77) FORMAT FINALIZE UNFINALIZE DISC TITLE FORMAT 66 Movie Still PLAY/EDIT Easy Handycam z z - z - - z - - - z z - z - - The following settings are made automatically during Easy Handycam operation (p.33). z - - z - - PICT.APPLI. (p.74) FADER D. FINE z -*1 z - - z - - EFFECT PICT...
Operating Guide
Page 67
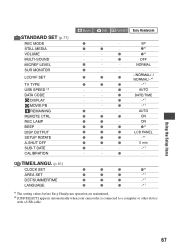
TIME/LANGU. (p.81) CLOCK SET z z z z*1 AREA SET z z z -*1 DST/SUMMERTIME z z z -*1 LANGUAGE z z z -*1 *1 The setting values before Easy Handycam operation are maintained. *2 [USB SELECT] appears automatically when your camcorder is connected to a computer or other device with a USB cable. Using the Setup items 67 z z*1 - - z DATE/TIME - - z*1 - - NORMAL z - - - z AUTO - - AUTO z z z ON z ... CALIBRATION Movie Still PLAY/EDIT Easy Handycam z - - SP z z - ON z z z z*1 z z z LCD PANEL z z z -*1 z z z 5 min...
TIME/LANGU. (p.81) CLOCK SET z z z z*1 AREA SET z z z -*1 DST/SUMMERTIME z z z -*1 LANGUAGE z z z -*1 *1 The setting values before Easy Handycam operation are maintained. *2 [USB SELECT] appears automatically when your camcorder is connected to a computer or other device with a USB cable. Using the Setup items 67 z z*1 - - z DATE/TIME - - z*1 - - NORMAL z - - - z AUTO - - AUTO z z z ON z ... CALIBRATION Movie Still PLAY/EDIT Easy Handycam z - - SP z z - ON z z z z*1 z z z LCD PANEL z z z -*1 z z z 5 min...

Operating Guide
Page 76
... the POWER switch is finished. PRINT Prints still images in about 10 minutes, after you slide the disc cover OPEN switch. - when connecting your camcorder to (Movie) without inserting a disc or "Memory Stick Duo." • The demonstration will be recorded. when you touch the screen during the ...connect to ON (p.45). when you set the POWER switch to your camcorder to another device with the supplied software. REC CTRL See page 94. To cancel [SMTH SLW REC], select [END]. when PLAY/EDIT is inserted. - when you have set the NIGHTSHOT switch to the PictBridge...
... the POWER switch is finished. PRINT Prints still images in about 10 minutes, after you slide the disc cover OPEN switch. - when connecting your camcorder to (Movie) without inserting a disc or "Memory Stick Duo." • The demonstration will be recorded. when you touch the screen during the ...connect to ON (p.45). when you set the POWER switch to your camcorder to another device with the supplied software. REC CTRL See page 94. To cancel [SMTH SLW REC], select [END]. when PLAY/EDIT is inserted. - when you have set the NIGHTSHOT switch to the PictBridge...
Operating Guide
Page 77
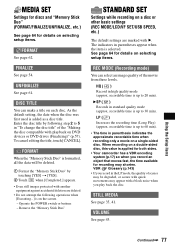
...• Even still images protected with another equipment against accidental deletion are marked with playback on DVD devices or DVD drives (Finalizing)" (p.57). See page 64 for details on selecting setup items. FORMAT See ... setup items. REC MODE (Recording mode) You can make a title on each disc. To cancel editing the title, touch [CANCEL]. Operate the POWER switch or buttons - LP ( LP ) Increases the...( HQ ) Record in parentheses appear when the item is applied for both sides. • Your camcorder has a VBR encoding system (p.17) so when you play back the disc. B SP ( SP...
...• Even still images protected with another equipment against accidental deletion are marked with playback on DVD devices or DVD drives (Finalizing)" (p.57). See page 64 for details on selecting setup items. FORMAT See ... setup items. REC MODE (Recording mode) You can make a title on each disc. To cancel editing the title, touch [CANCEL]. Operate the POWER switch or buttons - LP ( LP ) Increases the...( HQ ) Record in parentheses appear when the item is applied for both sides. • Your camcorder has a VBR encoding system (p.17) so when you play back the disc. B SP ( SP...

Operating Guide
Page 82
... items to Personal Menu, and customize Personal Menu settings. Customizing Personal Menu You can add up to 27 setup items for (Movie), (Still) or PLAY/EDIT.
... items to Personal Menu, and customize Personal Menu settings. Customizing Personal Menu You can add up to 27 setup items for (Movie), (Still) or PLAY/EDIT.

