
Operating Guide
Page 3
... outlet, try reversing the plug. Polarization This set may fall, causing serious injury to a child or an adult, and serious damage to the set from battery power, or other ). If the plug should be walked on or pinched by the manufacturer. Carefully observe all warnings, precautions and instructions on an unstable...
... outlet, try reversing the plug. Polarization This set may fall, causing serious injury to a child or an adult, and serious damage to the set from battery power, or other ). If the plug should be walked on or pinched by the manufacturer. Carefully observe all warnings, precautions and instructions on an unstable...
Operating Guide
Page 5
... product will not occur in accordance with Part 15 of Conformity Trade Name: SONY Model No.: DCR-DVD505 Responsible Party:Sony Electronics Inc. and CANADA RECYCLING LITHIUM-ION BATTERIES Lithium-Ion batteries are located on the bottom. Record the serial number in the U.S.A. For... regarding recycling of rechargeable batteries, call upon your authority to correct the interference by turning the equipment off and on a circuit different from that any changes or modifications not expressly approved in a residential installation. DCR-DVD Serial No. Bernardo Dr, San Diego, CA ...
... product will not occur in accordance with Part 15 of Conformity Trade Name: SONY Model No.: DCR-DVD505 Responsible Party:Sony Electronics Inc. and CANADA RECYCLING LITHIUM-ION BATTERIES Lithium-Ion batteries are located on the bottom. Record the serial number in the U.S.A. For... regarding recycling of rechargeable batteries, call upon your authority to correct the interference by turning the equipment off and on a circuit different from that any changes or modifications not expressly approved in a residential installation. DCR-DVD Serial No. Bernardo Dr, San Diego, CA ...

Operating Guide
Page 7
... setup item that is grayed out is not dustproofed, dripproofed or waterproofed. to apply mechanical shock or vibration to the camcorder. • Before connecting your camcorder to insert the "Memory Stick Duo" into the Memory Stick Duo Adaptor. See "Maintenance and precautions" (p.136). &#... "Memory Stick" compatible equipment Be sure to malfunction. to remove the battery pack or AC Adaptor from being broken or recorded pictures from the camcorder. - Viewfinder LCD screen Battery • The camcorder is not available under the current recording or playback conditions. •...
... setup item that is grayed out is not dustproofed, dripproofed or waterproofed. to apply mechanical shock or vibration to the camcorder. • Before connecting your camcorder to insert the "Memory Stick Duo" into the Memory Stick Duo Adaptor. See "Maintenance and precautions" (p.136). &#... "Memory Stick" compatible equipment Be sure to malfunction. to remove the battery pack or AC Adaptor from being broken or recorded pictures from the camcorder. - Viewfinder LCD screen Battery • The camcorder is not available under the current recording or playback conditions. •...

Operating Guide
Page 10
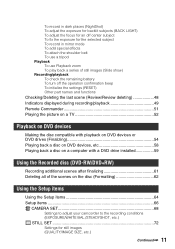
... supplied items 20 Step 2: Charging the battery pack 21 Step 3: Turning the power on a DVD player (Finalizing 38 Recording/Playback Recording 40 Playback 42 Functions used for recording/playback, etc 44 Recording To use zoom To record sound with your DVD Handycam 14 Choosing a disc 16 Using your camcorder 24 Step 4: Adjusting the LCD screen...
... supplied items 20 Step 2: Charging the battery pack 21 Step 3: Turning the power on a DVD player (Finalizing 38 Recording/Playback Recording 40 Playback 42 Functions used for recording/playback, etc 44 Recording To use zoom To record sound with your DVD Handycam 14 Choosing a disc 16 Using your camcorder 24 Step 4: Adjusting the LCD screen...
Operating Guide
Page 11
... use a tripod Playback To use Playback zoom To play back a series of still images (Slide show) Recording/playback To check the remaining battery To turn off the operation confirmation beep To initialize the settings (RESET) Other part names and functions Checking/Deleting the last scene (Review/Review...59 Using the Recorded disc (DVD-RW/DVD+RW) Recording additional scenes after finalizing 61 Deleting all of the scenes on the disc (Formatting 62 Using the Setup items Using the Setup items 64 Setup items 66 CAMERA SET 68 Settings to adjust your camcorder to the recording conditions (EXPOSURE...
... use a tripod Playback To use Playback zoom To play back a series of still images (Slide show) Recording/playback To check the remaining battery To turn off the operation confirmation beep To initialize the settings (RESET) Other part names and functions Checking/Deleting the last scene (Review/Review...59 Using the Recorded disc (DVD-RW/DVD+RW) Recording additional scenes after finalizing 61 Deleting all of the scenes on the disc (Formatting 62 Using the Setup items Using the Setup items 64 Setup items 66 CAMERA SET 68 Settings to adjust your camcorder to the recording conditions (EXPOSURE...
Operating Guide
Page 13
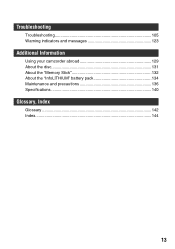
Troubleshooting Troubleshooting 105 Warning indicators and messages 123 Additional Information Using your camcorder abroad 129 About the disc 131 About the "Memory Stick 132 About the "InfoLITHIUM" battery pack 134 Maintenance and precautions 136 Specifications 140 Glossary, Index Glossary 142 Index...144 13
Troubleshooting Troubleshooting 105 Warning indicators and messages 123 Additional Information Using your camcorder abroad 129 About the disc 131 About the "Memory Stick 132 About the "InfoLITHIUM" battery pack 134 Maintenance and precautions 136 Specifications 140 Glossary, Index Glossary 142 Index...144 13
Operating Guide
Page 20
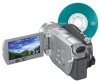
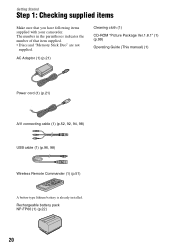
Getting Started Step 1: Checking supplied items Make sure that item supplied. • Discs and "Memory Stick Duo" are not supplied. Rechargeable battery pack NP-FP60 (1) (p.22) 20 AC Adaptor (1) (p.21) Cleaning cloth (1) CD-ROM "Picture Package Ver.1.8.1" (1) (p.99) Operating Guide (This manual) (1) Power... cord (1) (p.21) A/V connecting cable (1) (p.52, 92, 94, 98) USB cable (1) (p.96, 98) Wireless Remote Commander (1) (p.51) A button-type lithium battery is already installed. The number in the parentheses indicates the number of that you have following items supplied with your...
Getting Started Step 1: Checking supplied items Make sure that item supplied. • Discs and "Memory Stick Duo" are not supplied. Rechargeable battery pack NP-FP60 (1) (p.22) 20 AC Adaptor (1) (p.21) Cleaning cloth (1) CD-ROM "Picture Package Ver.1.8.1" (1) (p.99) Operating Guide (This manual) (1) Power... cord (1) (p.21) A/V connecting cable (1) (p.52, 92, 94, 98) USB cable (1) (p.96, 98) Wireless Remote Commander (1) (p.51) A button-type lithium battery is already installed. The number in the parentheses indicates the number of that you have following items supplied with your...

Operating Guide
Page 21
... Started Step 2: Charging the battery pack You can charge the battery after attaching the "InfoLITHIUM" battery pack (P series) (p.134) to your camcorder. • You cannot use an NP-FP30 battery pack with your camcorder. (See the reverse side of the battery pack for the model number.) Installing the battery pack with v mark on your camcorder. Jack cover 4 Connect the...
... Started Step 2: Charging the battery pack You can charge the battery after attaching the "InfoLITHIUM" battery pack (P series) (p.134) to your camcorder. • You cannot use an NP-FP30 battery pack with your camcorder. (See the reverse side of the battery pack for the model number.) Installing the battery pack with v mark on your camcorder. Jack cover 4 Connect the...

Operating Guide
Page 22
...8226; Times shown vary according to the following conditions. - To use a fully charged battery pack. Top: When the LCD backlight turns on your camcorder. • Disconnect the AC Adaptor holding both your camcorder and the DC plug. Playback time Approximate time (min.) available when you use an outside... power source Make the same connections as you repeat recording start/stop, turning the power on/ off when the battery is fully charged. Charging time ...
...8226; Times shown vary according to the following conditions. - To use a fully charged battery pack. Top: When the LCD backlight turns on your camcorder. • Disconnect the AC Adaptor holding both your camcorder and the DC plug. Playback time Approximate time (min.) available when you use an outside... power source Make the same connections as you repeat recording start/stop, turning the power on/ off when the battery is fully charged. Charging time ...

Operating Guide
Page 23
... from the wall outlet. • Do not use your camcorder. The battery pack is not attached correctly. - Getting Started On the battery pack • Before changing the battery pack, slide the POWER switch to OFF (CHG). • The CHG (charge) lamp flashes during charging, or BATTERY INFO (p.47) will not be shorter when you use... long as the AC Adaptor is connected to the DC IN jack of the AC Adaptor or battery terminal with the camcorder at 25 °C (77°F). (10-30°C (50-86°F) is attached. PRECAUTION • The set is not disconnected from the AC power source (...
... from the wall outlet. • Do not use your camcorder. The battery pack is not attached correctly. - Getting Started On the battery pack • Before changing the battery pack, slide the POWER switch to OFF (CHG). • The CHG (charge) lamp flashes during charging, or BATTERY INFO (p.47) will not be shorter when you use... long as the AC Adaptor is connected to the DC IN jack of the AC Adaptor or battery terminal with the camcorder at 25 °C (77°F). (10-30°C (50-86°F) is attached. PRECAUTION • The set is not disconnected from the AC power source (...

Operating Guide
Page 24
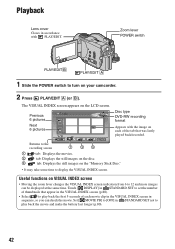
..., switch the power mode by sliding the POWER switch in the direction of the arrow while pressing the green button in the direction of your camcorder, the current date and time will be set the date and time ([CLOCK SET], p.27), the next time you turn on the power of the... by sliding the POWER switch in the center. Step 3: Turning the power on, and holding your camcorder To record, slide the POWER switch to save battery power. ([A.SHUT OFF], p.81). • When you turn on your camcorder, the lens cover opens up . 3 Ensure a good grip, then fasten the belt. Green button (Movie): To...
..., switch the power mode by sliding the POWER switch in the direction of the arrow while pressing the green button in the direction of your camcorder, the current date and time will be set the date and time ([CLOCK SET], p.27), the next time you turn on the power of the... by sliding the POWER switch in the center. Step 3: Turning the power on, and holding your camcorder To record, slide the POWER switch to save battery power. ([A.SHUT OFF], p.81). • When you turn on your camcorder, the lens cover opens up . 3 Ensure a good grip, then fasten the belt. Green button (Movie): To...

Operating Guide
Page 25
...when you open or adjust the LCD screen. • If you open the LCD screen 90 degrees to the camcorder, then rotate it 180 degrees to the lens side, you want to save battery power. Getting Started Step 4: Adjusting the LCD screen and viewfinder The LCD screen Open the LCD screen 90... degrees to the camcorder (1), then rotate it to the best angle to record or play (2). 2 180 degrees (max.) DISP/BATT ...
...when you open or adjust the LCD screen. • If you open the LCD screen 90 degrees to the camcorder, then rotate it 180 degrees to the lens side, you want to save battery power. Getting Started Step 4: Adjusting the LCD screen and viewfinder The LCD screen Open the LCD screen 90... degrees to the camcorder (1), then rotate it to the best angle to record or play (2). 2 180 degrees (max.) DISP/BATT ...
Operating Guide
Page 27
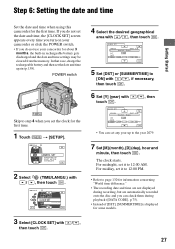
...midday, set the date and time, the [CLOCK SET] screen appears every time you turn on your camcorder for the first time. POWER switch Skip to step 4 when you do not use your camcorder or slide the POWER switch. • If you can check them during playback ([DATA CODE], p.75... (day), hour and minute, then touch . Step 6: Setting the date and time Getting Started Set the date and time when using this camcorder for about 3 months, the built-in rechargeable battery gets discharged and the date and time settings may be cleared from the memory. In that case, charge the rechargeable...
...midday, set the date and time, the [CLOCK SET] screen appears every time you turn on your camcorder for the first time. POWER switch Skip to step 4 when you do not use your camcorder or slide the POWER switch. • If you can check them during playback ([DATA CODE], p.75... (day), hour and minute, then touch . Step 6: Setting the date and time Getting Started Set the date and time when using this camcorder for about 3 months, the built-in rechargeable battery gets discharged and the date and time settings may be cleared from the memory. In that case, charge the rechargeable...
Operating Guide
Page 29
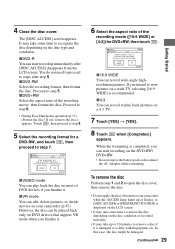
...not apply shock or vibration to your camcorder (p.87). When the formatting is dirty with fingerprints, etc. FORMAT : 16:9 Select aspect ratio of the recording movie ([16:9 WIDE] or [4:3]) for a DVD-RW, and touch , then proceed to step 6. • During Easy Handycam operation (p.33), [Format the disc?... You do not need to proceed to be damaged. 29 Getting Started xVR mode You can play back pictures on the DVD-RW/ DVD+RW. • Do not remove the battery pack or disconnect the AC Adaptor ...
...not apply shock or vibration to your camcorder (p.87). When the formatting is dirty with fingerprints, etc. FORMAT : 16:9 Select aspect ratio of the recording movie ([16:9 WIDE] or [4:3]) for a DVD-RW, and touch , then proceed to step 6. • During Easy Handycam operation (p.33), [Format the disc?... You do not need to proceed to be damaged. 29 Getting Started xVR mode You can play back pictures on the DVD-RW/ DVD+RW. • Do not remove the battery pack or disconnect the AC Adaptor ...

Operating Guide
Page 30
..., see "Deleting all of the scenes on the disc (Formatting)" on page 62. Do not shake or knock your camcorder, turn the power off when inserting and removing it from a DVD-RW/DVD+RW, then to use it clicks. Otherwise, image data may not be displayed correctly depending on the condition of the... be damaged. • Make sure that the "Memory Stick Duo" does not pop up and drop off , eject the "Memory Stick Duo," or remove the battery pack. Memory Stick Duo cover To eject a "Memory Stick Duo" Lightly push the "Memory Stick Duo" after following step 1 and 2. • When the ACCESS lamp...
..., see "Deleting all of the scenes on the disc (Formatting)" on page 62. Do not shake or knock your camcorder, turn the power off when inserting and removing it from a DVD-RW/DVD+RW, then to use it clicks. Otherwise, image data may not be displayed correctly depending on the condition of the... be damaged. • Make sure that the "Memory Stick Duo" does not pop up and drop off , eject the "Memory Stick Duo," or remove the battery pack. Memory Stick Duo cover To eject a "Memory Stick Duo" Lightly push the "Memory Stick Duo" after following step 1 and 2. • When the ACCESS lamp...
Operating Guide
Page 41
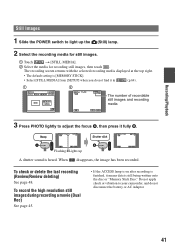
... [MEMORY STICK]. • Select [STILL MEDIA] from [SETUP] when you do not disconnect the battery or AC Adaptor. 41 When disappears, the image has been recorded. Recording/Playback Still Images 1 Slide the POWER switch to your camcorder, and do not find it in (p.64). 1 2 The number of recordable still images and recording...
... [MEMORY STICK]. • Select [STILL MEDIA] from [SETUP] when you do not disconnect the battery or AC Adaptor. 41 When disappears, the image has been recorded. Recording/Playback Still Images 1 Slide the POWER switch to your camcorder, and do not find it in (p.64). 1 2 The number of recordable still images and recording...
Operating Guide
Page 42
Previous 6 pictures Next 6 pictures Disc type DVD-RW recording format Appears with PLAY/EDIT. Touch [ DISPLAY] in STANDARD SET to set the number of the tab that was ... movie clip in the VISUAL INDEX screen in sequence, so you can be displayed at the same time. The VISUAL INDEX screen appears on your camcorder. 2 Press PLAY/EDIT A (or B). Useful functions on the "Memory Stick Duo." • It may take some time to turn on the LCD...of each of thumbnails that appear in the VISUAL INDEX screen (p.80). • Select to play back the movie and make the battery last longer (p.80). 42
Previous 6 pictures Next 6 pictures Disc type DVD-RW recording format Appears with PLAY/EDIT. Touch [ DISPLAY] in STANDARD SET to set the number of the tab that was ... movie clip in the VISUAL INDEX screen in sequence, so you can be displayed at the same time. The VISUAL INDEX screen appears on your camcorder. 2 Press PLAY/EDIT A (or B). Useful functions on the "Memory Stick Duo." • It may take some time to turn on the LCD...of each of thumbnails that appear in the VISUAL INDEX screen (p.80). • Select to play back the movie and make the battery last longer (p.80). 42
Operating Guide
Page 45
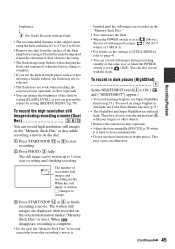
... or dust obscures the lamp. • The flash charge lamp flickers when charging the flash, and remains lit when the battery charge is complete. • If you can also record with your camcorder from after recording a movie is set to (Movie), the size of recordable still images and recording media. To record...
... or dust obscures the lamp. • The flash charge lamp flickers when charging the flash, and remains lit when the battery charge is complete. • If you can also record with your camcorder from after recording a movie is set to (Movie), the size of recordable still images and recording media. To record...
Operating Guide
Page 47
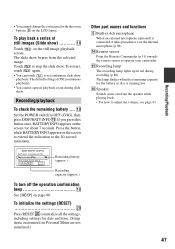
...initialize all the settings, including settings for date and time. (Setup items customized on the screen to extend the indication to operate your camcorder. ql Set the POWER switch to adjust the volume, see page 43. qg Recording lamp The recording lamp lights up in 4ch ...Slide show . qh Speaker Sounds come out from the selected image. Touch to stop the slide show qk Touch screen. on the screen for the battery or disc is [ON] (continuous playback). • You cannot operate playback zoom during recording (p.80). To initialize the settings (RESET w; If...
...initialize all the settings, including settings for date and time. (Setup items customized on the screen to extend the indication to operate your camcorder. ql Set the POWER switch to adjust the volume, see page 43. qg Recording lamp The recording lamp lights up in 4ch ...Slide show . qh Speaker Sounds come out from the selected image. Touch to stop the slide show qk Touch screen. on the screen for the battery or disc is [ON] (continuous playback). • You cannot operate playback zoom during recording (p.80). To initialize the settings (RESET w; If...

Operating Guide
Page 49
...name wd VISUAL INDEX button (37, 43) wf Slide show button (46) wg Previous/Next button (37, 43) 49 Recording still images Recording/Playback 1 Remaining battery (approx.) (47) 2 Recording mode (HQ / SP / LP) (77) 3 Recording status ([STBY] (standby) / [REC] (recording)) 4 Counter (hour:... minute: second) 5 Disc type (16) 6 Recording format of a DVD-RW(16) 7 Dual Rec (45) 8 Remaining recordable time of still images recorded in "Memory Stick Duo" increases, new folders are automatically created to store them. ...
...name wd VISUAL INDEX button (37, 43) wf Slide show button (46) wg Previous/Next button (37, 43) 49 Recording still images Recording/Playback 1 Remaining battery (approx.) (47) 2 Recording mode (HQ / SP / LP) (77) 3 Recording status ([STBY] (standby) / [REC] (recording)) 4 Counter (hour:... minute: second) 5 Disc type (16) 6 Recording format of a DVD-RW(16) 7 Dual Rec (45) 8 Remaining recordable time of still images recorded in "Memory Stick Duo" increases, new folders are automatically created to store them. ...


