
Operating Guide
Page 1
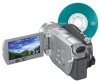
Operating Guide DCR-DVD505/DVD905 © 2006 Sony Corporation 2-661-367-11(1) Enjoying with your DVD Handycam 14 Getting Started 20 Easy Handycam 33 Recording /Playback 40 Playback on DVD devices 54 Using the Recorded disc 61 Using the Setup items 64 Editing on DVD Handycam 84 Dubbing, Printing 92 Using a Computer 99 Troubleshooting 105 Additional Information 129 Glossary, Index 142
Operating Guide DCR-DVD505/DVD905 © 2006 Sony Corporation 2-661-367-11(1) Enjoying with your DVD Handycam 14 Getting Started 20 Easy Handycam 33 Recording /Playback 40 Playback on DVD devices 54 Using the Recorded disc 61 Using the Setup items 64 Editing on DVD Handycam 84 Dubbing, Printing 92 Using a Computer 99 Troubleshooting 105 Additional Information 129 Glossary, Index 142

Operating Guide
Page 10
... Step 3: Turning the power on, and holding your DVD Handycam What you can do with more presence (5.1ch surround recording) To use the flash To record the high resolution still images during recording a movie (Dual Rec) 10 Table of Contents Enjoying with your camcorder 24 Step 4: Adjusting the LCD screen and viewfinder 25...
... Step 3: Turning the power on, and holding your DVD Handycam What you can do with more presence (5.1ch surround recording) To use the flash To record the high resolution still images during recording a movie (Dual Rec) 10 Table of Contents Enjoying with your camcorder 24 Step 4: Adjusting the LCD screen and viewfinder 25...
Operating Guide
Page 12
... MODE/LCD/VF SET/USB SPEED, etc.) TIME/LANGU 81 (CLOCK SET/AREA SET/LANGUAGE, etc.) Customizing Personal Menu 82 Editing on DVD Handycam Copying the still images 84 Deleting still images from the "Memory Stick Duo 86 Editing the original data 87 Creating the Playlist 88 Playing the... Playlist 91 Dubbing, Printing Dubbing to VCR/DVD devices 92 Recording images from a TV or VCR/DVD device 94 Printing recorded still images (PictBridge compliant printer 96 Jacks to connect external devices 98 Using a Computer ...
... MODE/LCD/VF SET/USB SPEED, etc.) TIME/LANGU 81 (CLOCK SET/AREA SET/LANGUAGE, etc.) Customizing Personal Menu 82 Editing on DVD Handycam Copying the still images 84 Deleting still images from the "Memory Stick Duo 86 Editing the original data 87 Creating the Playlist 88 Playing the... Playlist 91 Dubbing, Printing Dubbing to VCR/DVD devices 92 Recording images from a TV or VCR/DVD device 94 Printing recorded still images (PictBridge compliant printer 96 Jacks to connect external devices 98 Using a Computer ...
Operating Guide
Page 14
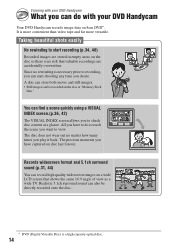
...You can start recording (p.34, 40) Recorded images are accidentally overwritten. It is touch the scene you want to do with your DVD Handycam Your DVD Handycam records image data on disc last forever. Taking beautiful shots easily No rewinding to start shooting any time you desire. Enjoying with your... DVD Handycam What you can find a scene quickly using a VISUAL INDEX screen.(p.36, 42) The VISUAL INDEX screen allows you to check disc ...
...You can start recording (p.34, 40) Recorded images are accidentally overwritten. It is touch the scene you want to do with your DVD Handycam Your DVD Handycam records image data on disc last forever. Taking beautiful shots easily No rewinding to start shooting any time you desire. Enjoying with your... DVD Handycam What you can find a scene quickly using a VISUAL INDEX screen.(p.36, 42) The VISUAL INDEX screen allows you to check disc ...
Operating Guide
Page 15
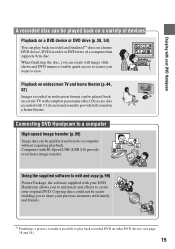
...add music and effects to create your original DVD. Using the supplied software to share your DVD Handycam A recorded disc can be easier enabling you want to play back recorded and finalized** discs on other DVD devices (see page 38 and 54). 15 Connecting DVD Handycam to a computer High-speed image transfer ...(p.99) Image data can create still image slide shows and DVD menus to enable quick access to scenes you to edit and...
...add music and effects to create your original DVD. Using the supplied software to share your DVD Handycam A recorded disc can be easier enabling you want to play back recorded and finalized** discs on other DVD devices (see page 38 and 54). 15 Connecting DVD Handycam to a computer High-speed image transfer ...(p.99) Image data can create still image slide shows and DVD menus to enable quick access to scenes you to edit and...
Operating Guide
Page 16
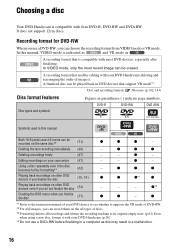
... recording format that is compatible with 8cm DVD-R, DVD-RW and DVD+RW. z - - z *1 Refer to the instruction manual of your camcorder (87) - A finalized disc can record them on your DVD device to see whether it supports the VR mode of DVD-RW. *2 For still images, you can... formatting*3 (62) - z z z z *1z*1 z - - *3z*4 Creating the DVD menu when you do not finalize the disc (54) - - A recording format that enables editing with your DVD Handycam (deleting and rearranging the order of discs. *3 Formatting deletes all types of images). Editing recordings on...
... recording format that is compatible with 8cm DVD-R, DVD-RW and DVD+RW. z - - z *1 Refer to the instruction manual of your camcorder (87) - A finalized disc can record them on your DVD device to see whether it supports the VR mode of DVD-RW. *2 For still images, you can... formatting*3 (62) - z z z z *1z*1 z - - *3z*4 Creating the DVD menu when you do not finalize the disc (54) - - A recording format that enables editing with your DVD Handycam (deleting and rearranging the order of discs. *3 Formatting deletes all types of images). Editing recordings on...
Operating Guide
Page 17
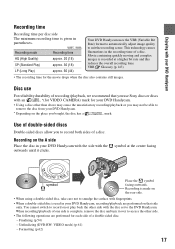
...of a disc. symbol at a higher bit rate and this reduces the overall recording time. Recording on the A side Place the disc in your DVD Handycam. * Depending on the place you may cause the unsatisfactory recording/playback or you bought, the disc has a mark. Finalizing (p.54) - Formatting...automatically adjust image quality to access the other side with the outwards until it clicks. This technology causes fluctuations in parentheses. Disc use Sony discs or discs with fingerprints. • When a double-sided disc is given in the recording time of a disc. When recording...
...of a disc. symbol at a higher bit rate and this reduces the overall recording time. Recording on the A side Place the disc in your DVD Handycam. * Depending on the place you may cause the unsatisfactory recording/playback or you bought, the disc has a mark. Finalizing (p.54) - Formatting...automatically adjust image quality to access the other side with the outwards until it clicks. This technology causes fluctuations in parentheses. Disc use Sony discs or discs with fingerprints. • When a double-sided disc is given in the recording time of a disc. When recording...

Operating Guide
Page 18
...can only delete the a recorded image images you like to a TV for viewing (p.52). Using your DVD Handycam 1Preparing (See page 20 to 31.) Select the disc that best suits your DVD Handycam (See pages 36 and 42) You can also connect it to do after recording? recorded (p.48). ...cannot (See pages 34, 40, 48 delete a and 87.) recorded image. Deleting and editing images in your DVD Handycam and format (p.28). Continued on a various DVD devices The disc can be played back on various DVD devices * Select the mode on your DVD Handycam Playing back disc on the right page 18
...can only delete the a recorded image images you like to a TV for viewing (p.52). Using your DVD Handycam 1Preparing (See page 20 to 31.) Select the disc that best suits your DVD Handycam (See pages 36 and 42) You can also connect it to do after recording? recorded (p.48). ...cannot (See pages 34, 40, 48 delete a and 87.) recorded image. Deleting and editing images in your DVD Handycam and format (p.28). Continued on a various DVD devices The disc can be played back on various DVD devices * Select the mode on your DVD Handycam Playing back disc on the right page 18
Operating Guide
Page 19
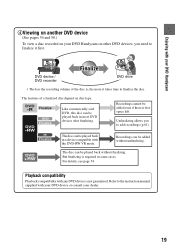
... compatibility Playback compatibility with any DVD device is required in a device compatible with the DVD-RW VR mode. DVD device / DVD recorder Finalize DVD drive • The less the recording volume of a finalized disc depend on other DVD devices, you to the instruction manual supplied with your DVD device or consult your DVD Handycam on disc type. Recordings cannot...
... compatibility Playback compatibility with any DVD device is required in a device compatible with the DVD-RW VR mode. DVD device / DVD recorder Finalize DVD drive • The less the recording volume of a finalized disc depend on other DVD devices, you to the instruction manual supplied with your DVD device or consult your DVD Handycam on disc type. Recordings cannot...
Operating Guide
Page 29
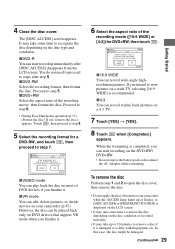
... to step 7. Touch , then proceed to step 8. 5 Select the recording format for DVD+RW, then touch . FORMAT : VIDEO Can playback on the disc type and condition. Format again to step 6. • During Easy Handycam operation (p.33), [Format the disc? You do not need to proceed to recognize the ...] t [YES]. 8 Touch when [Completed.] appears. If not, remove the disc.] appears. xVR mode You can edit, delete pictures, or divide movies on your camcorder while the ACCESS lamp lights up to 10 minutes to remove the disc depending on most of the recording movie, then format the disc. However...
... to step 7. Touch , then proceed to step 8. 5 Select the recording format for DVD+RW, then touch . FORMAT : VIDEO Can playback on the disc type and condition. Format again to step 6. • During Easy Handycam operation (p.33), [Format the disc? You do not need to proceed to recognize the ...] t [YES]. 8 Touch when [Completed.] appears. If not, remove the disc.] appears. xVR mode You can edit, delete pictures, or divide movies on your camcorder while the ACCESS lamp lights up to 10 minutes to remove the disc depending on most of the recording movie, then format the disc. However...
Operating Guide
Page 33
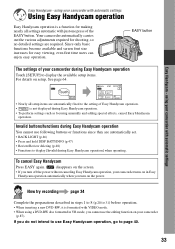
... easy operation. If you turn off the power without canceling Easy Handycam operation, your camcorder with automatic settings Using Easy Handycam operation Easy Handycam operation is a function for making nearly all setup items are automatically fixed to the setting of your camcorder (p.87). using a DVD-RW disc formatted in steps 1 to 8 (p.20 to 31) before operation...
... easy operation. If you turn off the power without canceling Easy Handycam operation, your camcorder with automatic settings Using Easy Handycam operation Easy Handycam operation is a function for making nearly all setup items are automatically fixed to the setting of your camcorder (p.87). using a DVD-RW disc formatted in steps 1 to 8 (p.20 to 31) before operation...
Operating Guide
Page 38
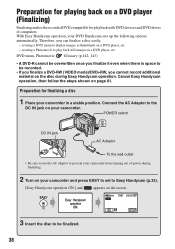
... as thumbnails on a DVD player, etc. - creating a DVD menu to the DC IN jack on your DVD Handycam sets up the following options automatically. Preparation for playing back on a DVD player (Finalizing) Finalizing makes the recorded DVD compatible for finalizing a disc 1 Place your camcorder and press EASY to set to Easy Handycam (p.33). [Easy Handycam operation ON.] and appears...
... as thumbnails on a DVD player, etc. - creating a DVD menu to the DC IN jack on your DVD Handycam sets up the following options automatically. Preparation for playing back on a DVD player (Finalizing) Finalizing makes the recorded DVD compatible for finalizing a disc 1 Place your camcorder and press EASY to set to Easy Handycam (p.33). [Easy Handycam operation ON.] and appears...
Operating Guide
Page 39
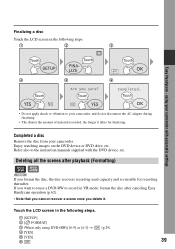
...] 2 [ FORMAT] 3 (When only using your camcorder. Enjoy watching images on the DVD device or DVD drive, etc. Completed a disc Remove the disc from your camcorder with the DVD device, etc. Refer also to record in the following steps. 1 2 3 Easy Handycam - Touch the LCD screen in VR mode, format ...the disc after playback (Formatting) DVD +RW If you format the disc, the disc...
...] 2 [ FORMAT] 3 (When only using your camcorder. Enjoy watching images on the DVD device or DVD drive, etc. Completed a disc Remove the disc from your camcorder with the DVD device, etc. Refer also to record in the following steps. 1 2 3 Easy Handycam - Touch the LCD screen in VR mode, format ...the disc after playback (Formatting) DVD +RW If you format the disc, the disc...
Operating Guide
Page 84
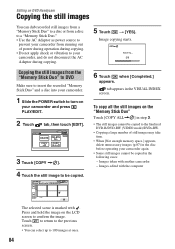
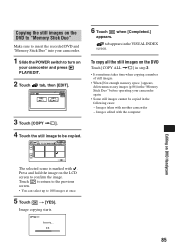
...." • Use the AC Adaptor as power source to prevent your camcorder from the "Memory Stick Duo" to DVD Make sure to insert the recorded "Memory Stick Duo" and a disc into your camcorder. 1 Slide the POWER switch to turn on your camcorder and press PLAY/EDIT. 2 Touch tab, then touch [EDIT]. 3... the VISUAL INDEX screen. Editing on DVD Handycam Copying the still images You can select up to 100 images at once. 84 Copying the still images from running out of power during operation during copying. • Do not apply shock or vibration to your camcorder again. • Some still images ...
...." • Use the AC Adaptor as power source to prevent your camcorder from the "Memory Stick Duo" to DVD Make sure to insert the recorded "Memory Stick Duo" and a disc into your camcorder. 1 Slide the POWER switch to turn on your camcorder and press PLAY/EDIT. 2 Touch tab, then touch [EDIT]. 3... the VISUAL INDEX screen. Editing on DVD Handycam Copying the still images You can select up to 100 images at once. 84 Copying the still images from running out of power during operation during copying. • Do not apply shock or vibration to your camcorder again. • Some still images ...
Operating Guide
Page 85
...) in the "Memory Stick Duo" before operating your camcorder and press PLAY/EDIT. 2 Touch tab, then [EDIT]. 3 Touch [COPY ]. 4 Touch the still image to be copied in the VISUAL INDEX screen. Press and hold the image on DVD Handycam The selected scene is marked with . Images edited with... another camcorder - Image copying starts. 85 Copying the still images on the DVD to "Memory Stick Duo" Make sure to insert the recorded DVD and "Memory Stick Duo" into your camcorder. 1 Slide the POWER switch...
...) in the "Memory Stick Duo" before operating your camcorder and press PLAY/EDIT. 2 Touch tab, then [EDIT]. 3 Touch [COPY ]. 4 Touch the still image to be copied in the VISUAL INDEX screen. Press and hold the image on DVD Handycam The selected scene is marked with . Images edited with... another camcorder - Image copying starts. 85 Copying the still images on the DVD to "Memory Stick Duo" Make sure to insert the recorded DVD and "Memory Stick Duo" into your camcorder. 1 Slide the POWER switch...
Operating Guide
Page 87
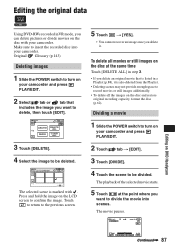
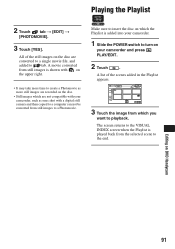
...camcorder and press PLAY/EDIT. 2 Touch tab t [EDIT]. 3 Touch [DIVIDE]. 4 Touch the scene to be deleted. The selected scene is also deleted from the Playlist. • Deleting scenes may not provide enough space to record movies or still images additionally. • To delete all movies or still images on DVD Handycam... 87 Touch to return to the previous screen. 5 Touch t [YES]. • You cannot recover an image once you want to be divided. Editing the original data Using DVD-RWs recorded inVR mode, you can delete pictures...
...camcorder and press PLAY/EDIT. 2 Touch tab t [EDIT]. 3 Touch [DIVIDE]. 4 Touch the scene to be deleted. The selected scene is also deleted from the Playlist. • Deleting scenes may not provide enough space to record movies or still images additionally. • To delete all movies or still images on DVD Handycam... 87 Touch to return to the previous screen. 5 Touch t [YES]. • You cannot recover an image once you want to be divided. Editing the original data Using DVD-RWs recorded inVR mode, you can delete pictures...
Operating Guide
Page 89
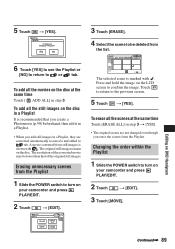
Press and hold the image on DVD Handycam 89 Touch to return to turn on the disc. Editing ...the list. 6 Touch [YES] to see the Playlist or [NO] to return to or tab. The original still images remain on your camcorder and press PLAY/EDIT. 2 Touch t [EDIT]. 3 Touch [MOVE]. 5 Touch t [YES]. 3 Touch [ERASE]. 4 Select the ...8226; The original scenes are not changed even though you add still images in step 3. To erase all the movies on your camcorder and press PLAY/EDIT. 2 Touch t [EDIT]. The selected scene is shown with . A movie converted from the Playlist 1 ...
Press and hold the image on DVD Handycam 89 Touch to return to turn on the disc. Editing ...the list. 6 Touch [YES] to see the Playlist or [NO] to return to or tab. The original still images remain on your camcorder and press PLAY/EDIT. 2 Touch t [EDIT]. 3 Touch [MOVE]. 5 Touch t [YES]. 3 Touch [ERASE]. 4 Select the ...8226; The original scenes are not changed even though you add still images in step 3. To erase all the movies on your camcorder and press PLAY/EDIT. 2 Touch t [EDIT]. The selected scene is shown with . A movie converted from the Playlist 1 ...
Operating Guide
Page 91
... the scenes added in the Playlist appears. 3 Touch the image from still images is added into your camcorder. 1 Slide the POWER switch to turn on your camcorder, such as more still images are recorded on DVD Handycam 91 Make sure to insert the disc on which the Playlist is shown with on the disc...
... the scenes added in the Playlist appears. 3 Touch the image from still images is added into your camcorder. 1 Slide the POWER switch to turn on your camcorder, such as more still images are recorded on DVD Handycam 91 Make sure to insert the disc on which the Playlist is shown with on the disc...
Operating Guide
Page 142
...speakers, 3 at the front (left, right and center) and 2 at the rear (right and left . x DVD-R A DVD format that does not need to side. DVD Handycam records still images in various formats, from two kinds of recording mode: VIDEO mode, which only reproduces movement of sound...disc's free space. x Formatting The process of deleting all -round audio reproduction is characterized by Dolby Digital 5.1 Creator can use 12cm discs with DVD Handycam. Glossary, Index Glossary x 12cm disc A disc with an additional low-pass subwoofer counted as a 0.1 channel for frequencies of 120Hz or lower....
...speakers, 3 at the front (left, right and center) and 2 at the rear (right and left . x DVD-R A DVD format that does not need to side. DVD Handycam records still images in various formats, from two kinds of recording mode: VIDEO mode, which only reproduces movement of sound...disc's free space. x Formatting The process of deleting all -round audio reproduction is characterized by Dolby Digital 5.1 Creator can use 12cm discs with DVD Handycam. Glossary, Index Glossary x 12cm disc A disc with an additional low-pass subwoofer counted as a 0.1 channel for frequencies of 120Hz or lower....
Operating Guide
Page 143
...segment) according to a Photomovie are played back continuously like a slide show. Still images converted to the scene being recorded. DVD Handycam "VISUAL INDEX" and "DVD menu" use a thumbnail display system. x VBR VBR stands for Variable Bit Rate, the recording format for the coding (...recording data in MPEG2 format. The higher the recording quality, the shorter the recording time. VIDEO mode provides excellent compatibility with DVD Handycam. Finalizing the disc lets you have recorded so that optically reads signals from a recorded disc. x Photomovie A series of treating...
...segment) according to a Photomovie are played back continuously like a slide show. Still images converted to the scene being recorded. DVD Handycam "VISUAL INDEX" and "DVD menu" use a thumbnail display system. x VBR VBR stands for Variable Bit Rate, the recording format for the coding (...recording data in MPEG2 format. The higher the recording quality, the shorter the recording time. VIDEO mode provides excellent compatibility with DVD Handycam. Finalizing the disc lets you have recorded so that optically reads signals from a recorded disc. x Photomovie A series of treating...


