Operating Guide
Page 6
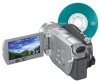
... for help. Consult the dealer or an experienced radio/ TV technician for details. The supplied interface cable must be used with the equipment in your camcorder You can use 8cm DVD-Rs, 8cm DVD-RWs and 8cm DVD+RWs only. Notes on the supplied CD-ROM) On the discs you can use in your... camcorder.) • You cannot use Your camcorder is supplied with two kinds of memory card except "Memory Stick Duo." • "Memory Stick PRO" and "Memory Stick PRO Duo...
... for help. Consult the dealer or an experienced radio/ TV technician for details. The supplied interface cable must be used with the equipment in your camcorder You can use 8cm DVD-Rs, 8cm DVD-RWs and 8cm DVD+RWs only. Notes on the supplied CD-ROM) On the discs you can use in your... camcorder.) • You cannot use Your camcorder is supplied with two kinds of memory card except "Memory Stick Duo." • "Memory Stick PRO" and "Memory Stick PRO Duo...

Operating Guide
Page 7
..., or the lens to insert the connector plug in low light conditions, such as at the sun. Doing so might cause your camcorder to another device with "Memory Stick" compatible equipment Be sure to malfunction. These points are operational for long periods of time may cause..." into the Memory Stick Duo Adaptor. Take pictures of the sun only in the proper direction. Viewfinder LCD screen Battery • The camcorder is not available under the current recording or playback conditions. • The LCD screen and the viewfinder are manufactured using extremely highprecision technology...
..., or the lens to insert the connector plug in low light conditions, such as at the sun. Doing so might cause your camcorder to another device with "Memory Stick" compatible equipment Be sure to malfunction. These points are operational for long periods of time may cause..." into the Memory Stick Duo Adaptor. Take pictures of the sun only in the proper direction. Viewfinder LCD screen Battery • The camcorder is not available under the current recording or playback conditions. • The LCD screen and the viewfinder are manufactured using extremely highprecision technology...
Operating Guide
Page 8
... media and accessories are used for illustrating the operating procedures. Unauthorized recording of the LCD screen and the viewfinder used on a DVD-R. It adopts the MTF* measurement system for video cameras and offers a quality typical of recordings cannot be provided, even if ... reproduce colors. * MTF stands for Modulation Transfer Function. Also, the lens for your camcorder if necessary (p.81). The following marks are recorded without notice. • Disc in Germany, and Sony Corporation, and produces superior images. Read this first (continued) On recording • Before...
... media and accessories are used for illustrating the operating procedures. Unauthorized recording of the LCD screen and the viewfinder used on a DVD-R. It adopts the MTF* measurement system for video cameras and offers a quality typical of recordings cannot be provided, even if ... reproduce colors. * MTF stands for Modulation Transfer Function. Also, the lens for your camcorder if necessary (p.81). The following marks are recorded without notice. • Disc in Germany, and Sony Corporation, and produces superior images. Read this first (continued) On recording • Before...

Operating Guide
Page 10
... images during recording a movie (Dual Rec) 10 Table of Contents Enjoying with your DVD Handycam What you can do with more presence (5.1ch surround recording) To use zoom To record sound with your DVD Handycam 14 Choosing a disc 16 Using your camcorder 24 Step 4: Adjusting the LCD screen and viewfinder 25 Step 5: Using the touch...
... images during recording a movie (Dual Rec) 10 Table of Contents Enjoying with your DVD Handycam What you can do with more presence (5.1ch surround recording) To use zoom To record sound with your DVD Handycam 14 Choosing a disc 16 Using your camcorder 24 Step 4: Adjusting the LCD screen and viewfinder 25 Step 5: Using the touch...
Operating Guide
Page 11
...on a TV 52 Playback on DVD devices Making the disc compatible with playback on DVD devices or DVD drives (Finalizing 54 Playing back a disc on DVD devices, etc 58 Playing back a disc on a computer with a DVD drive installed 59 Using the Recorded disc (DVD-RW/DVD+RW) Recording additional scenes after finalizing... 61 Deleting all of the scenes on the disc (Formatting 62 Using the Setup items Using the Setup items 64 Setup items 66 CAMERA SET 68 Settings to adjust your camcorder to the recording conditions ...
...on a TV 52 Playback on DVD devices Making the disc compatible with playback on DVD devices or DVD drives (Finalizing 54 Playing back a disc on DVD devices, etc 58 Playing back a disc on a computer with a DVD drive installed 59 Using the Recorded disc (DVD-RW/DVD+RW) Recording additional scenes after finalizing... 61 Deleting all of the scenes on the disc (Formatting 62 Using the Setup items Using the Setup items 64 Setup items 66 CAMERA SET 68 Settings to adjust your camcorder to the recording conditions ...
Operating Guide
Page 13
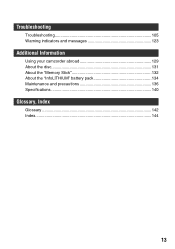
Troubleshooting Troubleshooting 105 Warning indicators and messages 123 Additional Information Using your camcorder abroad 129 About the disc 131 About the "Memory Stick 132 About the "InfoLITHIUM" battery pack 134 Maintenance and precautions 136 Specifications 140 Glossary, Index Glossary 142 Index...144 13
Troubleshooting Troubleshooting 105 Warning indicators and messages 123 Additional Information Using your camcorder abroad 129 About the disc 131 About the "Memory Stick 132 About the "InfoLITHIUM" battery pack 134 Maintenance and precautions 136 Specifications 140 Glossary, Index Glossary 142 Index...144 13
Operating Guide
Page 16
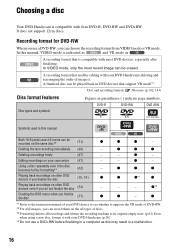
... camcorder (87) - z z z z *1z*1 z - - *3z*4 Creating the DVD menu when you use a DVD+RW before finalizing in a computer as . z - z *1 Refer to the instruction manual of your DVD device to its original empty state. (p.62) Even when using a new disc, format it supports the VR mode of DVD-RW... of images). Choosing a disc Your DVD Handycam is indicated as and VR mode as this manual Both 16:9 (wide) and 4:3 movie can be played back in DVD devices that is compatible with 8cm DVD-R, DVD-RW and DVD+RW. DVD-R DVD-RW DVD+RW Disc types and symbols Symbols used...
... camcorder (87) - z z z z *1z*1 z - - *3z*4 Creating the DVD menu when you use a DVD+RW before finalizing in a computer as . z - z *1 Refer to the instruction manual of your DVD device to its original empty state. (p.62) Even when using a new disc, format it supports the VR mode of DVD-RW... of images). Choosing a disc Your DVD Handycam is indicated as and VR mode as this manual Both 16:9 (wide) and 4:3 movie can be played back in DVD devices that is compatible with 8cm DVD-R, DVD-RW and DVD+RW. DVD-R DVD-RW DVD+RW Disc types and symbols Symbols used...
Operating Guide
Page 20
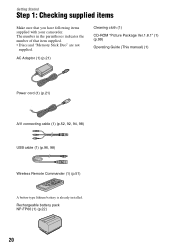
...; Discs and "Memory Stick Duo" are not supplied. The number in the parentheses indicates the number of that you have following items supplied with your camcorder.
...; Discs and "Memory Stick Duo" are not supplied. The number in the parentheses indicates the number of that you have following items supplied with your camcorder.

Operating Guide
Page 21
... until it clicks. 2 Slide the POWER switch in removing the battery pack. Match the v mark on the DC plug with excess force may lead to camcorder malfunction such as deterioration in battery pack performance or difficulty in the direction of the arrow to set it to OFF (CHG) (The default setting...). 3 Connect the AC Adaptor to the DC IN jack on your camcorder. Jack cover 4 Connect the power cord to connect the AC Adaptor. The CHG (charge) lamp lights up and charging starts. 21 Open the jack cover...
... until it clicks. 2 Slide the POWER switch in removing the battery pack. Match the v mark on the DC plug with excess force may lead to camcorder malfunction such as deterioration in battery pack performance or difficulty in the direction of the arrow to set it to OFF (CHG) (The default setting...). 3 Connect the AC Adaptor to the DC IN jack on your camcorder. Jack cover 4 Connect the power cord to connect the AC Adaptor. The CHG (charge) lamp lights up and charging starts. 21 Open the jack cover...

Operating Guide
Page 22
... 155 170 220 22 Recording time Approximate time (min.) available when you repeat recording start/stop, turning the power on your camcorder. • Disconnect the AC Adaptor holding both your camcorder and the DC plug. Middle: When the LCD backlight turns off when the battery is fully charged. The battery pack will...
... 155 170 220 22 Recording time Approximate time (min.) available when you repeat recording start/stop, turning the power on your camcorder. • Disconnect the AC Adaptor holding both your camcorder and the DC plug. Middle: When the LCD backlight turns off when the battery is fully charged. The battery pack will...

Operating Guide
Page 23
... source (house current) as long as the AC Adaptor is recommended.) • Available recording and playback time will be shorter when you use your camcorder in low temperatures. • The available recording and playback time will not be supplied from the wall outlet. • We recommend that you use... the AC Adaptor placed in a narrow space, such as between a wall and furniture. • Do not short-circuit the DC plug of your camcorder. On the AC Adaptor • Connect the AC Adaptor to an easily accessible wall outlet close by disconnecting the plug from the wall outlet. •...
... source (house current) as long as the AC Adaptor is recommended.) • Available recording and playback time will be shorter when you use your camcorder in low temperatures. • The available recording and playback time will not be supplied from the wall outlet. • We recommend that you use... the AC Adaptor placed in a narrow space, such as between a wall and furniture. • Do not short-circuit the DC plug of your camcorder. On the AC Adaptor • Connect the AC Adaptor to an easily accessible wall outlet close by disconnecting the plug from the wall outlet. •...

Operating Guide
Page 24
...respective lamp. When using it for a few seconds. 24 Green button (Movie): To record movies (Still): To record still images. When you leave your camcorder without any operation attempted for approximately 5 minutes, to turn off the power Slide the POWER switch to OFF (CHG). • At the time of ...the power mode by sliding the POWER switch in the direction of the arrow while pressing the green button in the direction of your camcorder correctly. POWER switch Lens cover 1 Turn on the LCD screen for the first time, the [CLOCK SET] screen appears (p.27). 2 Hold your...
...respective lamp. When using it for a few seconds. 24 Green button (Movie): To record movies (Still): To record still images. When you leave your camcorder without any operation attempted for approximately 5 minutes, to turn off the power Slide the POWER switch to OFF (CHG). • At the time of ...the power mode by sliding the POWER switch in the direction of the arrow while pressing the green button in the direction of your camcorder correctly. POWER switch Lens cover 1 Turn on the LCD screen for the first time, the [CLOCK SET] screen appears (p.27). 2 Hold your...

Operating Guide
Page 25
...be affected by the setting. Getting Started Step 4: Adjusting the LCD screen and viewfinder The LCD screen Open the LCD screen 90 degrees to the camcorder (1), then rotate it to the best angle to record or play (2). 2 180 degrees (max.) DISP/BATT INFO The viewfinder You can close it... last longer Press and hold DISP/BATT INFO until the picture is convenient during playback operations. Viewfinder 2 90 degrees 1 90 degrees to the (max.) camcorder • Be careful not to press the buttons on the LCD screen is poor. This is clear. • You can adjust [FADER] and [EXPOSURE...
...be affected by the setting. Getting Started Step 4: Adjusting the LCD screen and viewfinder The LCD screen Open the LCD screen 90 degrees to the camcorder (1), then rotate it to the best angle to record or play (2). 2 180 degrees (max.) DISP/BATT INFO The viewfinder You can close it... last longer Press and hold DISP/BATT INFO until the picture is convenient during playback operations. Viewfinder 2 90 degrees 1 90 degrees to the (max.) camcorder • Be careful not to press the buttons on the LCD screen is poor. This is clear. • You can adjust [FADER] and [EXPOSURE...
Operating Guide
Page 27
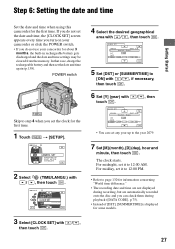
.... For midnight, set the date and time again (p.138). Step 6: Setting the date and time Getting Started Set the date and time when using this camcorder for the first time. 1 Touch t [SETUP]. 2 Select (TIME/LANGU.) with / , then touch . 4 Select the desired geographical area with / , then touch . 5 Set [...first time. POWER switch Skip to the year 2079. 7 Set [M] (month), [D] (day), hour and minute, then touch . If you do not use your camcorder for some models. 3 Select [CLOCK SET] with touch . / , then CLOCK SET AREA26 GMT -5.0 New York , Bogota DST DATE OFF JANM 1D 12: ...
.... For midnight, set the date and time again (p.138). Step 6: Setting the date and time Getting Started Set the date and time when using this camcorder for the first time. 1 Touch t [SETUP]. 2 Select (TIME/LANGU.) with / , then touch . 4 Select the desired geographical area with / , then touch . 5 Set [...first time. POWER switch Skip to the year 2079. 7 Set [M] (month), [D] (day), hour and minute, then touch . If you do not use your camcorder for some models. 3 Select [CLOCK SET] with touch . / , then CLOCK SET AREA26 GMT -5.0 New York , Bogota DST DATE OFF JANM 1D 12: ...
Operating Guide
Page 28
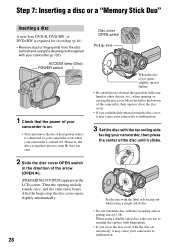
Step 7: Inserting a disc or a "Memory Stick Duo" Inserting a disc A new 8cm DVD-R, DVD-RW, or DVD+RW is required for recording (p.16). • Remove dust or fingerprints from the disc beforehand, using the cleaning cloth supplied with the recording side or ... a power source is on the LCD screen. Then the opening or closing the disc cover, it may cause your camcorder to malfunction. 3 Set the disc with your camcorder to your camcorder even when your camcorder is connected to malfunction. After the beeps stop, the disc cover opens slightly automatically. 28 Disc cover OPEN switch...
Step 7: Inserting a disc or a "Memory Stick Duo" Inserting a disc A new 8cm DVD-R, DVD-RW, or DVD+RW is required for recording (p.16). • Remove dust or fingerprints from the disc beforehand, using the cleaning cloth supplied with the recording side or ... a power source is on the LCD screen. Then the opening or closing the disc cover, it may cause your camcorder to malfunction. 3 Set the disc with your camcorder to your camcorder even when your camcorder is connected to malfunction. After the beeps stop, the disc cover opens slightly automatically. 28 Disc cover OPEN switch...
Operating Guide
Page 29
... screen. 4 Close the disc cover. You do not need to proceed to remove the disc depending on most of DVD devices if you finalize it. Cannot edit in Camcorder VIDEO VR OK xVIDEO mode You can record to play back the disc on the disc condition or recorded materials. &#... If not, remove the disc.] appears. x4:3 You can play back pictures on the DVD-RW/ DVD+RW. • Do not remove the battery pack or disconnect the AC Adaptor while formatting. Proceed to step 6. • During Easy Handycam operation (p.33), [Format the disc? FORMAT : VIDEO Can playback on a wide TV, ...
... screen. 4 Close the disc cover. You do not need to proceed to remove the disc depending on most of DVD devices if you finalize it. Cannot edit in Camcorder VIDEO VR OK xVIDEO mode You can record to play back the disc on the disc condition or recorded materials. &#... If not, remove the disc.] appears. x4:3 You can play back pictures on the DVD-RW/ DVD+RW. • Do not remove the battery pack or disconnect the AC Adaptor while formatting. Proceed to step 6. • During Easy Handycam operation (p.33), [Format the disc? FORMAT : VIDEO Can playback on a wide TV, ...

Operating Guide
Page 30
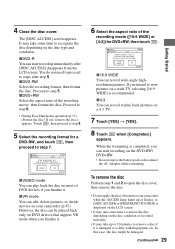
... disc (Formatting)" on the image quality or the image size. Do not shake or knock your camcorder is lit or flashing, your camcorder, turn the power off when inserting and removing it from a DVD-RW/DVD+RW, then to record new pictures, see page 73. 1 Raise the viewfinder. 2 Open the...it and information on previously recorded areas appears for about 8 seconds. For details, see "Deleting all of the previously recorded pictures from your camcorder recognizes the disc, disc information such as the date you force the "Memory Stick Duo" into the Memory Stick Duo slot in the ...
... disc (Formatting)" on the image quality or the image size. Do not shake or knock your camcorder is lit or flashing, your camcorder, turn the power off when inserting and removing it from a DVD-RW/DVD+RW, then to record new pictures, see page 73. 1 Raise the viewfinder. 2 Open the...it and information on previously recorded areas appears for about 8 seconds. For details, see "Deleting all of the previously recorded pictures from your camcorder recognizes the disc, disc information such as the date you force the "Memory Stick Duo" into the Memory Stick Duo slot in the ...

Operating Guide
Page 31
...your TV (16:9/4:3) (p.52). • When viewing 16:9 (wide) pictures with [TV TYPE] set to the instruction manuals supplied with a DVD-R/DVD-RW (VIDEO mode)/ DVD+RW inserted while 4:3 is set to [OLD MOVIE] (p.75) • Available recording time may be different in the viewfinder. • You ... wide-angle, high-resolution pictures. • If you change the aspect ratio in the following situations. - To play back pictures after connecting your camcorder to a TV Set [TV TYPE] to [16:9] or [4:3] according to your device. while recording movies - Movies WIDE SELECT 1 Slide the ...
...your TV (16:9/4:3) (p.52). • When viewing 16:9 (wide) pictures with [TV TYPE] set to the instruction manuals supplied with a DVD-R/DVD-RW (VIDEO mode)/ DVD+RW inserted while 4:3 is set to [OLD MOVIE] (p.75) • Available recording time may be different in the viewfinder. • You ... wide-angle, high-resolution pictures. • If you change the aspect ratio in the following situations. - To play back pictures after connecting your camcorder to a TV Set [TV TYPE] to [16:9] or [4:3] according to your device. while recording movies - Movies WIDE SELECT 1 Slide the ...
Operating Guide
Page 33
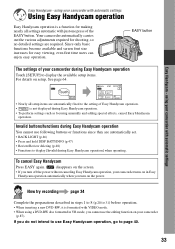
...] when operating. EASY button The settings of the EASY button. using a DVD-RW disc formatted in Easy Handycam operation automatically when you turn off the power without canceling Easy Handycam operation, your camcorder with automatic settings Easy Handycam - Easy Handycam - Now try recording page 34 Complete the preparations described in steps 1 to 8 (p.20 to 31) before...
...] when operating. EASY button The settings of the EASY button. using a DVD-RW disc formatted in Easy Handycam operation automatically when you turn off the power without canceling Easy Handycam operation, your camcorder with automatic settings Easy Handycam - Easy Handycam - Now try recording page 34 Complete the preparations described in steps 1 to 8 (p.20 to 31) before...

Operating Guide
Page 34
... D fully while recording a movie. you turn off the power, then turn it again. The still image can continue recording if you remove a disc from your camcorder, then insert it on Dual Rec, refer to page 45. 34
... D fully while recording a movie. you turn off the power, then turn it again. The still image can continue recording if you remove a disc from your camcorder, then insert it on Dual Rec, refer to page 45. 34


