Operating Guide
Page 6
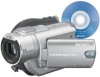
... determined by one or more of operations guides. - You can use Your camcorder is supplied with "Memory Stick PRO" compatible equipment. 6 On the types of FCC Rules. Connect the equipment into an outlet on use 8cm DVD-Rs, 8cm DVD-RWs and 8cm DVD+RWs only. "Operating Guide" (This manual) - Consult the dealer or an experienced...
... determined by one or more of operations guides. - You can use Your camcorder is supplied with "Memory Stick PRO" compatible equipment. 6 On the types of FCC Rules. Connect the equipment into an outlet on use 8cm DVD-Rs, 8cm DVD-RWs and 8cm DVD+RWs only. "Operating Guide" (This manual) - Consult the dealer or an experienced...
Operating Guide
Page 7
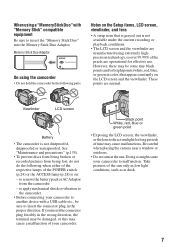
...placing the camera near a window or outdoors. • Do not aim at dusk. 7 Doing so might cause your camcorder to another device with "Memory Stick" compatible equipment Be sure to remove the battery pack or AC Adaptor from being broken or recorded pictures from the... camcorder. - Viewfinder LCD screen Battery • The camcorder is on the LCD screen and the viewfinder. to insert the "Memory Stick Duo" into the Memory Stick Duo Adaptor. Notes on the Setup items, LCD screen, viewfinder, and ...
...placing the camera near a window or outdoors. • Do not aim at dusk. 7 Doing so might cause your camcorder to another device with "Memory Stick" compatible equipment Be sure to remove the battery pack or AC Adaptor from being broken or recorded pictures from the... camcorder. - Viewfinder LCD screen Battery • The camcorder is on the LCD screen and the viewfinder. to insert the "Memory Stick Duo" into the Memory Stick Duo Adaptor. Notes on the Setup items, LCD screen, viewfinder, and ...

Operating Guide
Page 10
... power on, and holding your camcorder 24 Step 4: Adjusting the LCD screen and viewfinder 25 Step 5: Using the touch panel 26 Step 6: Setting the date and time 27 Step 7: Inserting a disc or a "Memory Stick Duo 28 Step 8: Selecting the aspect ratio (16:9 or 4:3) of Contents Enjoying with your DVD Handycam What you can do with...
... power on, and holding your camcorder 24 Step 4: Adjusting the LCD screen and viewfinder 25 Step 5: Using the touch panel 26 Step 6: Setting the date and time 27 Step 7: Inserting a disc or a "Memory Stick Duo 28 Step 8: Selecting the aspect ratio (16:9 or 4:3) of Contents Enjoying with your DVD Handycam What you can do with...
Operating Guide
Page 12
...discs and "Memory Stick Duo" (FORMAT/FINALIZE/UNFINALIZE, etc.) STANDARD SET 77 Settings while recording on a disc or other basic settings (REC MODE/LCD/VF SET/USB SPEED, etc.) TIME/LANGU 81 (CLOCK SET/AREA SET/LANGUAGE, etc.) Customizing Personal Menu 82 Editing on DVD Handycam Copying the ...still images 84 Deleting still images from the "Memory Stick Duo 86 Editing the original data 87 Creating the Playlist 88 Playing the Playlist 91 Dubbing, Printing Dubbing ...
...discs and "Memory Stick Duo" (FORMAT/FINALIZE/UNFINALIZE, etc.) STANDARD SET 77 Settings while recording on a disc or other basic settings (REC MODE/LCD/VF SET/USB SPEED, etc.) TIME/LANGU 81 (CLOCK SET/AREA SET/LANGUAGE, etc.) Customizing Personal Menu 82 Editing on DVD Handycam Copying the ...still images 84 Deleting still images from the "Memory Stick Duo 86 Editing the original data 87 Creating the Playlist 88 Playing the Playlist 91 Dubbing, Printing Dubbing ...
Operating Guide
Page 13
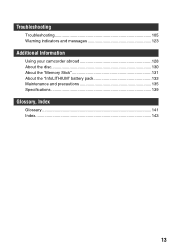
Troubleshooting Troubleshooting 105 Warning indicators and messages 123 Additional Information Using your camcorder abroad 128 About the disc 130 About the "Memory Stick 131 About the "InfoLITHIUM" battery pack 133 Maintenance and precautions 135 Specifications 139 Glossary, Index Glossary 141 Index...143 13
Troubleshooting Troubleshooting 105 Warning indicators and messages 123 Additional Information Using your camcorder abroad 128 About the disc 130 About the "Memory Stick 131 About the "InfoLITHIUM" battery pack 133 Maintenance and precautions 135 Specifications 139 Glossary, Index Glossary 141 Index...143 13

Operating Guide
Page 14
... scene you want to view. All you have captured on the disc or "Memory Stick Duo." Realistic 5.1ch surround sound can also be recorded on disc last forever.... screen that valuable recordings are stored in empty areas on 8cm DVD*. The precious moments you have to do with your DVD Handycam Your DVD Handycam records image data on the disc so there is no matter how... recording, you can start recording (p.34, 40) Recorded images are accidentally overwritten. Enjoying with your DVD Handycam What you can find a scene quickly using a VISUAL INDEX screen.(p.36, 42) The VISUAL INDEX...
... scene you want to view. All you have captured on the disc or "Memory Stick Duo." Realistic 5.1ch surround sound can also be recorded on disc last forever.... screen that valuable recordings are stored in empty areas on 8cm DVD*. The precious moments you have to do with your DVD Handycam Your DVD Handycam records image data on the disc so there is no matter how... recording, you can start recording (p.34, 40) Recorded images are accidentally overwritten. Enjoying with your DVD Handycam What you can find a scene quickly using a VISUAL INDEX screen.(p.36, 42) The VISUAL INDEX...
Operating Guide
Page 20
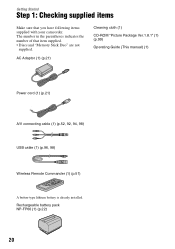
... (1) (p.51) A button-type lithium battery is already installed. The number in the parentheses indicates the number of that you have following items supplied with your camcorder. Rechargeable battery pack NP-FP60 (1) (p.22) 20 Getting Started Step 1: Checking supplied items Make sure that item supplied. • Discs and "Memory Stick Duo" are not supplied.
... (1) (p.51) A button-type lithium battery is already installed. The number in the parentheses indicates the number of that you have following items supplied with your camcorder. Rechargeable battery pack NP-FP60 (1) (p.22) 20 Getting Started Step 1: Checking supplied items Make sure that item supplied. • Discs and "Memory Stick Duo" are not supplied.

Operating Guide
Page 28
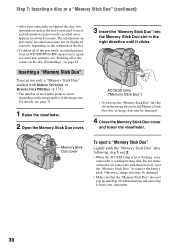
Step 7: Inserting a disc or a "Memory Stick Duo" Inserting a disc A new 8cm DVD-R, DVD-RW, or DVD+RW is required for recording (p.16). • Remove dust or fingerprints from the disc beforehand, using a single-sided disc. • Do not touch the disc ...; If you catch the belt when closing the disc cover. Then the opening or closing the disc cover, it may cause your camcorder to malfunction. 3 Set the disc with your camcorder to malfunction. After the beeps stop, the disc cover opens slightly automatically. 28 Disc cover OPEN switch Pickup lens When the...
Step 7: Inserting a disc or a "Memory Stick Duo" Inserting a disc A new 8cm DVD-R, DVD-RW, or DVD+RW is required for recording (p.16). • Remove dust or fingerprints from the disc beforehand, using a single-sided disc. • Do not touch the disc ...; If you catch the belt when closing the disc cover. Then the opening or closing the disc cover, it may cause your camcorder to malfunction. 3 Set the disc with your camcorder to malfunction. After the beeps stop, the disc cover opens slightly automatically. 28 Disc cover OPEN switch Pickup lens When the...
Operating Guide
Page 30
... direction until it from a DVD-RW/DVD+RW, then to use it again to use only a "Memory Stick Duo" marked with or (p.131). • The number of the scenes on the disc (Formatting)" on the image quality or the image size. Step 7: Inserting a disc or a "Memory Stick Duo" (continued) • After your camcorder is lit or flashing...
... direction until it from a DVD-RW/DVD+RW, then to use it again to use only a "Memory Stick Duo" marked with or (p.131). • The number of the scenes on the disc (Formatting)" on the image quality or the image size. Step 7: Inserting a disc or a "Memory Stick Duo" (continued) • After your camcorder is lit or flashing...

Operating Guide
Page 32
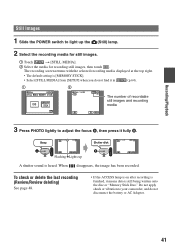
... to 4:3. 2 Select the recording media for still images. 1 Touch t [STILL MEDIA]. 2 Select the recording media for still images and touch . • The default setting is [MEMORY STICK]. 3 Press WIDE SELECT repeatedly to select the desired setting. • Still image size is [ 2.3M] ( ) when 16:9 (wide) is set and maximum [3.0M] ( ) when 4:3 is...
... to 4:3. 2 Select the recording media for still images. 1 Touch t [STILL MEDIA]. 2 Select the recording media for still images and touch . • The default setting is [MEMORY STICK]. 3 Press WIDE SELECT repeatedly to select the desired setting. • Still image size is [ 2.3M] ( ) when 16:9 (wide) is set and maximum [3.0M] ( ) when 4:3 is...
Operating Guide
Page 35
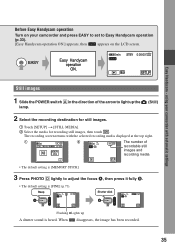
...and recording media • The default setting is [MEMORY STICK]. 3 Press PHOTO D lightly to light up A shutter sound is [FINE] (p.73). using your camcorder and press EASY to set to Easy Handycam operation (p.33). [Easy Handycam operation ON.] appears, then appears on the LCD screen...still images. 1 Touch [SETUP] t [STILL MEDIA]. 2 Select the media for recording still images, then touch . Easy Handycam - Before Easy Handycam operation Turn on your camcorder with the selected recording media displayed at the top right. 1 2 The number of the arrow to adjust the focus A, then...
...and recording media • The default setting is [MEMORY STICK]. 3 Press PHOTO D lightly to light up A shutter sound is [FINE] (p.73). using your camcorder and press EASY to set to Easy Handycam operation (p.33). [Easy Handycam operation ON.] appears, then appears on the LCD screen...still images. 1 Touch [SETUP] t [STILL MEDIA]. 2 Select the media for recording still images, then touch . Easy Handycam - Before Easy Handycam operation Turn on your camcorder with the selected recording media displayed at the top right. 1 2 The number of the arrow to adjust the focus A, then...

Operating Guide
Page 36
... the recording screen 1 23 1 tab: Displays the movies. 2 tab: Displays the still images on the disc. 3 tab: Displays the still images on the "Memory Stick Duo." • It may take some time to display the VISUAL INDEX screen. • Select tab to play back the first 5 seconds of the arrow ... INDEX screen) Toggles Play or Pause as you touch Next scene Recording date/time Reverse/ Forward 36 Previous 6 pictures Next 6 pictures Disc type DVD-RW recording format Appears with ease Slide the POWER switch in the direction of each of the scene/ previous scene Stop (go to be played...
... the recording screen 1 23 1 tab: Displays the movies. 2 tab: Displays the still images on the disc. 3 tab: Displays the still images on the "Memory Stick Duo." • It may take some time to display the VISUAL INDEX screen. • Select tab to play back the first 5 seconds of the arrow ... INDEX screen) Toggles Play or Pause as you touch Next scene Recording date/time Reverse/ Forward 36 Previous 6 pictures Next 6 pictures Disc type DVD-RW recording format Appears with ease Slide the POWER switch in the direction of each of the scene/ previous scene Stop (go to be played...
Operating Guide
Page 37
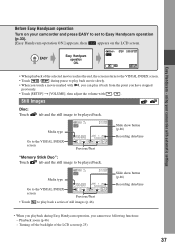
Still Images Disc: Touch tab and the still image to be played back. Media type Go to the VISUAL INDEX screen Previous/Next "Memory Stick Duo": Touch tab and the still image to play back movie slowly. • When you touch a movie marked with i, you can ... Go to the VISUAL INDEX screen Previous/Next • Touch to Easy Handycam operation (p.33). [Easy Handycam operation ON.] appears, then appears on your camcorder with automatic settings • When playback of the LCD screen (p.25) 37 Easy Handycam - Playback zoom (p.46) - Turning off the backlight of the selected...
Still Images Disc: Touch tab and the still image to be played back. Media type Go to the VISUAL INDEX screen Previous/Next "Memory Stick Duo": Touch tab and the still image to play back movie slowly. • When you touch a movie marked with i, you can ... Go to the VISUAL INDEX screen Previous/Next • Touch to Easy Handycam operation (p.33). [Easy Handycam operation ON.] appears, then appears on your camcorder with automatic settings • When playback of the LCD screen (p.25) 37 Easy Handycam - Playback zoom (p.46) - Turning off the backlight of the selected...
Operating Guide
Page 41
...Playback Still Images 1 Slide the POWER switch to adjust the focus A, then press it means data is still being written onto the disc or "Memory Stick Duo." When disappears, the image has been recorded. To check or delete the last recording (Review/Review deleting) See page 48. • If...still images, then touch . Do not apply shock or vibration to your camcorder, and do not find it in (p.64). 1 2 The number of recordable still images and recording media 3 Press PHOTO lightly to light up A shutter sound is [MEMORY STICK]. • Select [STILL MEDIA] from [SETUP] when you do ...
...Playback Still Images 1 Slide the POWER switch to adjust the focus A, then press it means data is still being written onto the disc or "Memory Stick Duo." When disappears, the image has been recorded. To check or delete the last recording (Review/Review deleting) See page 48. • If...still images, then touch . Do not apply shock or vibration to your camcorder, and do not find it in (p.64). 1 2 The number of recordable still images and recording media 3 Press PHOTO lightly to light up A shutter sound is [MEMORY STICK]. • Select [STILL MEDIA] from [SETUP] when you do ...

Operating Guide
Page 42
...Returns to the recording screen 1 23 1 tab: Displays the movies. 2 tab: Displays the still images on the disc. 3 tab: Displays the still images on the "Memory Stick Duo." • It may take some time to 12 and more images can check the movie. Useful functions on VISUAL INDEX screen • Moving the...each movie clip in the VISUAL INDEX screen in sequence, so you can be displayed at the same time. Previous 6 pictures Next 6 pictures Disc type DVD-RW recording format Appears with PLAY/EDIT. Set [ MOVIE PB] to [OFF] in STANDARD SET not to turn on the LCD screen. The VISUAL INDEX...
...Returns to the recording screen 1 23 1 tab: Displays the movies. 2 tab: Displays the still images on the disc. 3 tab: Displays the still images on the "Memory Stick Duo." • It may take some time to 12 and more images can check the movie. Useful functions on VISUAL INDEX screen • Moving the...each movie clip in the VISUAL INDEX screen in sequence, so you can be displayed at the same time. Previous 6 pictures Next 6 pictures Disc type DVD-RW recording format Appears with PLAY/EDIT. Set [ MOVIE PB] to [OFF] in STANDARD SET not to turn on the LCD screen. The VISUAL INDEX...

Operating Guide
Page 43
... slowly. • One touch makes the reverse/fast forward approximately 5 times faster, two touches makes it approximately 10 times* faster. * Approximately 8 times faster using a DVD+RW • When you touch a movie marked with / . • If you cannot find [VOLUME ] in [SETUP] (p.64). , touch To playback the disc on... VISUAL INDEX screen. • Touch / during pause to be played back. Go to the VISUAL Previous/ INDEX screen Next Slide show button (p.46) "Memory Stick Duo": Touch tab and the still image to be played back. Recording/Playback 3 Start playing back.
... slowly. • One touch makes the reverse/fast forward approximately 5 times faster, two touches makes it approximately 10 times* faster. * Approximately 8 times faster using a DVD+RW • When you touch a movie marked with / . • If you cannot find [VOLUME ] in [SETUP] (p.64). , touch To playback the disc on... VISUAL INDEX screen. • Touch / during pause to be played back. Go to the VISUAL Previous/ INDEX screen Next Slide show button (p.46) "Memory Stick Duo": Touch tab and the still image to be played back. Recording/Playback 3 Start playing back.

Operating Guide
Page 48
.... Movie Touch to display below function buttons. : Return to the following reasons. - There is grayed out, you record images in a DVD-RW (VR mode) and "Memory Stick Duo" (p.86, 87). 48 When is a movie or still image that has been recorded just after finishing recording. You cannot delete it... if: - Data once recorded on the "Memory Stick Duo" until turning off the power after the scene being played back. • When you have recorded the new movies or still images. The...
.... Movie Touch to display below function buttons. : Return to the following reasons. - There is grayed out, you record images in a DVD-RW (VR mode) and "Memory Stick Duo" (p.86, 87). 48 When is a movie or still image that has been recorded just after finishing recording. You cannot delete it... if: - Data once recorded on the "Memory Stick Duo" until turning off the power after the scene being played back. • When you have recorded the new movies or still images. The...
Operating Guide
Page 49
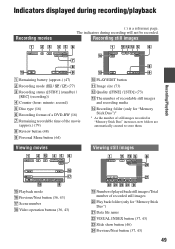
...) / [REC] (recording)) 4 Counter (hour: minute: second) 5 Disc type (16) 6 Recording format of a DVD-RW (16) 7 Remaining recordable time of still images recorded in "Memory Stick Duo" increases, new folders are automatically created to store them. Indicators displayed during recording will not be recorded. The indicators... during recording/playback Recording movies ( ) is a reference page. Play back folder (only for "Memory Stick Duo")* * As the number of the movie (approx.) (79) 8 Review button (48) 9 Personal Menu button (64) Viewing...
...) / [REC] (recording)) 4 Counter (hour: minute: second) 5 Disc type (16) 6 Recording format of a DVD-RW (16) 7 Remaining recordable time of still images recorded in "Memory Stick Duo" increases, new folders are automatically created to store them. Indicators displayed during recording will not be recorded. The indicators... during recording/playback Recording movies ( ) is a reference page. Play back folder (only for "Memory Stick Duo")* * As the number of the movie (approx.) (79) 8 Review button (48) 9 Personal Menu button (64) Viewing...

Operating Guide
Page 50
... (31) SteadyShot off (25) Center Indicator E ( ) is recorded automatically on the LCD screen and viewfinder When you can view the recording date and time on a DVD device, etc. (p.58, [SUB-T DATE], p.80). 50 Indicators displayed during recording/playback (continued) Indicators on the disc and "Memory Stick Duo."
... (31) SteadyShot off (25) Center Indicator E ( ) is recorded automatically on the LCD screen and viewfinder When you can view the recording date and time on a DVD device, etc. (p.58, [SUB-T DATE], p.80). 50 Indicators displayed during recording/playback (continued) Indicators on the disc and "Memory Stick Duo."

Operating Guide
Page 72
...( ) : 3 images 1.9M ( ) : 4 images VGA (0.3M) ( ) : 21 images 2.3M ( ) : 3 images EXP. The right side of the disc or "Memory Stick Duo." • [EXP.BRKTG] will not function when there is performed optically, and after that the image quality decreases when you select the zooming level.... STILL SET Settings for details on a disc or "Memory Stick Duo." B OFF Select this when not recording continuously. NORMAL ( ) Records still images continuously at approximately 0.5 second intervals. Record the...
...( ) : 3 images 1.9M ( ) : 4 images VGA (0.3M) ( ) : 21 images 2.3M ( ) : 3 images EXP. The right side of the disc or "Memory Stick Duo." • [EXP.BRKTG] will not function when there is performed optically, and after that the image quality decreases when you select the zooming level.... STILL SET Settings for details on a disc or "Memory Stick Duo." B OFF Select this when not recording continuously. NORMAL ( ) Records still images continuously at approximately 0.5 second intervals. Record the...


