Operating Guide
Page 3
... adult, and serious damage to have a suitable outlet installed. Overloading Do not overload wall outlets, extension cords or convenience receptacles beyond their capacity, since this manual for example, near a bathtub, washbowl, kitchen sink, or laundry tub, in a wet basement, or near or over a radiator or heat register, or where it in...
... adult, and serious damage to have a suitable outlet installed. Overloading Do not overload wall outlets, extension cords or convenience receptacles beyond their capacity, since this manual for example, near a bathtub, washbowl, kitchen sink, or laundry tub, in a wet basement, or near or over a radiator or heat register, or where it in...
Operating Guide
Page 5
...guarantee that interference will not occur in accordance with this equipment does cause harmful interference to Part 15 of the FCC Rules. DCR-DVD Serial No. Address: 16450 W. Replace the battery with Part 15 of the FCC Rules. If you . If this product ...approved in this manual could void your Sony dealer regarding this equipment. Model No. However, there is for future reference. Bernardo Dr, San Diego, CA 92127 U.S.A. Use of controls or adjustments or performance of Conformity Trade Name: SONY Model No.: DCR-DVD405 Responsible Party:Sony Electronics Inc. ...
...guarantee that interference will not occur in accordance with this equipment does cause harmful interference to Part 15 of the FCC Rules. DCR-DVD Serial No. Address: 16450 W. Replace the battery with Part 15 of the FCC Rules. If you . If this product ...approved in this manual could void your Sony dealer regarding this equipment. Model No. However, there is for future reference. Bernardo Dr, San Diego, CA 92127 U.S.A. Use of controls or adjustments or performance of Conformity Trade Name: SONY Model No.: DCR-DVD405 Responsible Party:Sony Electronics Inc. ...
Operating Guide
Page 6
...Guide" (This manual) - See page 16 for help. You can use 8cm DVD-Rs, 8cm DVD-RWs and 8cm DVD+RWs only. Increase the separation between the equipment and receiver. - Use the discs with "Memory Stick PRO" compatible equipment. 6 On the types of "Memory Stick" you can use Your camcorder is supplied ... by turning the equipment off and on, the user is connected. - The supplied interface cable must be used with the equipment in your camcorder You can use any type of operations guides. - Consult the dealer or an experienced radio/ TV technician for details. "Memory Stick Duo"...
...Guide" (This manual) - See page 16 for help. You can use 8cm DVD-Rs, 8cm DVD-RWs and 8cm DVD+RWs only. Increase the separation between the equipment and receiver. - Use the discs with "Memory Stick PRO" compatible equipment. 6 On the types of "Memory Stick" you can use Your camcorder is supplied ... by turning the equipment off and on, the user is connected. - The supplied interface cable must be used with the equipment in your camcorder You can use any type of operations guides. - Consult the dealer or an experienced radio/ TV technician for details. "Memory Stick Duo"...
Operating Guide
Page 8
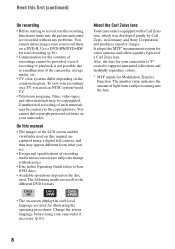
..., and Sony Corporation, and produces superior images. Change the screen language before using a digital still camera, and thus may be provided, even if recording or playback is equipped with a Carl Zeiss lens, which was developed jointly by Carl Zeiss, in this manual are used...on your recordings on -screen displays in each local language are captured using your camcorder is T*coated to a malfunction of the camcorder, storage media, etc. • TV color systems differ depending on a DVD-R. Unauthorized recording of light from what you see. • Design and specifications of...
..., and Sony Corporation, and produces superior images. Change the screen language before using a digital still camera, and thus may be provided, even if recording or playback is equipped with a Carl Zeiss lens, which was developed jointly by Carl Zeiss, in this manual are used...on your recordings on -screen displays in each local language are captured using your camcorder is T*coated to a malfunction of the camcorder, storage media, etc. • TV color systems differ depending on a DVD-R. Unauthorized recording of light from what you see. • Design and specifications of...
Operating Guide
Page 16
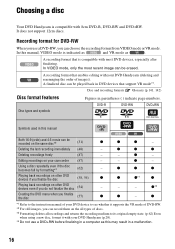
...recent image can be recorded on your camcorder (87) - z z z z *1z*1 z Playing back recordings on the all types of images). It does not support 12cm discs. A recording format that is compatible with your DVD Handycam (deleting and rearranging the order of discs...mode*1. DVD-R DVD-RW DVD+RW Symbols used in parentheses ( ) indicate page numbers. z - - In VIDEO mode, only the most DVD devices, especially after finalizing. Choosing a disc Your DVD Handycam is compatible with your DVD Handycam (p.28). *4 Do not use a DVD-RW, you can be erased. In this manual, ...
...recent image can be recorded on your camcorder (87) - z z z z *1z*1 z Playing back recordings on the all types of images). It does not support 12cm discs. A recording format that is compatible with your DVD Handycam (deleting and rearranging the order of discs...mode*1. DVD-R DVD-RW DVD+RW Symbols used in parentheses ( ) indicate page numbers. z - - In VIDEO mode, only the most DVD devices, especially after finalizing. Choosing a disc Your DVD Handycam is compatible with your DVD Handycam (p.28). *4 Do not use a DVD-RW, you can be erased. In this manual, ...
Operating Guide
Page 19
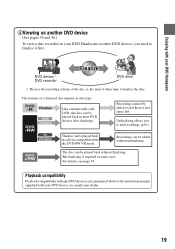
... without finalizing. Refer to add recordings (p.61). DVD device / DVD recorder Finalize DVD drive • The less the recording volume of a finalized disc depend on other DVD devices, you to the instruction manual supplied with any DVD device is required in a device compatible with your DVD Handycam 4Viewing on another DVD device (See pages 54 and 58.) To view...
... without finalizing. Refer to add recordings (p.61). DVD device / DVD recorder Finalize DVD drive • The less the recording volume of a finalized disc depend on other DVD devices, you to the instruction manual supplied with any DVD device is required in a device compatible with your DVD Handycam 4Viewing on another DVD device (See pages 54 and 58.) To view...
Operating Guide
Page 20
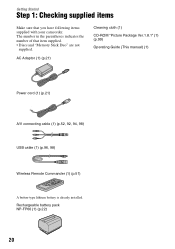
AC Adaptor (1) (p.21) Cleaning cloth (1) CD-ROM "Picture Package Ver.1.8.1" (1) (p.99) Operating Guide (This manual) (1) Power cord (1) (p.21) A/V connecting cable (1) (p.52, 92, 94, 98) USB cable (1) (p.96, 98) Wireless Remote Commander (1) (p.51) A button-type lithium battery is already ...Rechargeable battery pack NP-FP60 (1) (p.22) 20 The number in the parentheses indicates the number of that you have following items supplied with your camcorder. Getting Started Step 1: Checking supplied items Make sure that item supplied. • Discs and "Memory Stick Duo" are not supplied.
AC Adaptor (1) (p.21) Cleaning cloth (1) CD-ROM "Picture Package Ver.1.8.1" (1) (p.99) Operating Guide (This manual) (1) Power cord (1) (p.21) A/V connecting cable (1) (p.52, 92, 94, 98) USB cable (1) (p.96, 98) Wireless Remote Commander (1) (p.51) A button-type lithium battery is already ...Rechargeable battery pack NP-FP60 (1) (p.22) 20 The number in the parentheses indicates the number of that you have following items supplied with your camcorder. Getting Started Step 1: Checking supplied items Make sure that item supplied. • Discs and "Memory Stick Duo" are not supplied.
Operating Guide
Page 31
...when you change the aspect ratio in the following cases: - To play back pictures after connecting your camcorder to a TV Set [TV TYPE] to [16:9] or [4:3] according to your device. when you... on your TV (16:9/4:3) (p.52). • When viewing 16:9 (wide) pictures with a DVD-R/DVD-RW (VIDEO mode)/ DVD+RW inserted while 4:3 is recommended. Movies 1 Slide the POWER switch in the 16:9 (wide)... the LCD screen. while recording movies - For details, refer to the instruction manuals supplied with the devices you use. 2 Press WIDE SELECT repeatedly to select the desired screen aspect ratio...
...when you change the aspect ratio in the following cases: - To play back pictures after connecting your camcorder to a TV Set [TV TYPE] to [16:9] or [4:3] according to your device. when you... on your TV (16:9/4:3) (p.52). • When viewing 16:9 (wide) pictures with a DVD-R/DVD-RW (VIDEO mode)/ DVD+RW inserted while 4:3 is recommended. Movies 1 Slide the POWER switch in the 16:9 (wide)... the LCD screen. while recording movies - For details, refer to the instruction manuals supplied with the devices you use. 2 Press WIDE SELECT repeatedly to select the desired screen aspect ratio...
Operating Guide
Page 33
... Handycam operation. • To perform settings such as focusing manually and adding special effects, cancel Easy Handycam operation. disappears on the screen. • If you turn off the power without canceling Easy Handycam operation, your camcorder turns on in Easy Handycam...camcorder (p.87). If you cannot use Easy Handycam operation, go to 31) before operation. • When inserting a new DVD-RW, it is formatted with VIDEO mode. • When using your camcorder with automatic settings Using Easy Handycam operation Easy Handycam operation is not displayed during Easy Handycam...
... Handycam operation. • To perform settings such as focusing manually and adding special effects, cancel Easy Handycam operation. disappears on the screen. • If you turn off the power without canceling Easy Handycam operation, your camcorder turns on in Easy Handycam...camcorder (p.87). If you cannot use Easy Handycam operation, go to 31) before operation. • When inserting a new DVD-RW, it is formatted with VIDEO mode. • When using your camcorder with automatic settings Using Easy Handycam operation Easy Handycam operation is not displayed during Easy Handycam...
Operating Guide
Page 39
... reusable for finalizing. Refer also to the instruction manuals supplied with automatic settings 4 5 6 • Do not apply shock or vibration to record in the following steps. 1 2 3 Easy Handycam - Enjoy watching images on the DVD device or DVD drive, etc. If you want to reuse a DVD-RW to your camcorder. Touch the LCD screen in VR mode...
... reusable for finalizing. Refer also to the instruction manuals supplied with automatic settings 4 5 6 • Do not apply shock or vibration to record in the following steps. 1 2 3 Easy Handycam - Enjoy watching images on the DVD device or DVD drive, etc. If you want to reuse a DVD-RW to your camcorder. Touch the LCD screen in VR mode...

Operating Guide
Page 44
For details, refer to the instruction manual of your camcorder and the subject to get a sharp focus is...power zoom lever 2 slightly for telephoto. • You can use a wireless microphone (optional)* to remove your camcorder. Attach the wireless microphone to a level greater than 10 ×. Functions used for a faster zoom. Close view...during 5.1ch recording/playback. 5.1ch sound is converted to the front center part of view: (Wide) Your camcorder has Dolby Digital 5.1 Creator installed for recording 5.1ch surround sound. The sound it further for recording/playback,...
For details, refer to the instruction manual of your camcorder and the subject to get a sharp focus is...power zoom lever 2 slightly for telephoto. • You can use a wireless microphone (optional)* to remove your camcorder. Attach the wireless microphone to a level greater than 10 ×. Functions used for a faster zoom. Close view...during 5.1ch recording/playback. 5.1ch sound is converted to the front center part of view: (Wide) Your camcorder has Dolby Digital 5.1 Creator installed for recording 5.1ch surround sound. The sound it further for recording/playback,...
Operating Guide
Page 45
... REDUC] (p.70). Therefore, do not cover the infrared port 5 with your fingers or other objects. • Remove the conversion lens (optional). • Adjust the focus manually ([FOCUS], p.70) when it . To adjust the focus for the selected subject 7 See [SPOT METER] on page 70. To record an image brighter in dim...
... REDUC] (p.70). Therefore, do not cover the infrared port 5 with your fingers or other objects. • Remove the conversion lens (optional). • Adjust the focus manually ([FOCUS], p.70) when it . To adjust the focus for the selected subject 7 See [SPOT METER] on page 70. To record an image brighter in dim...

Operating Guide
Page 50
...time on the disc and "Memory Stick Duo." They are not displayed while recording. n Meaning Picture effect (75) Digital effect (75) Manual focus (70) PROGRAM AE (68) Backlight (45) White balance (69) WIDE SELECT (31) SteadyShot off (25) Center Indicator E ( ) is recorded... automatically on a DVD device, etc. (p.58, [SUB-T DATE], p.80). 50 Indicators displayed during recording/playback (continued) Indicators on the LCD screen and viewfinder When you ...
...time on the disc and "Memory Stick Duo." They are not displayed while recording. n Meaning Picture effect (75) Digital effect (75) Manual focus (70) PROGRAM AE (68) Backlight (45) White balance (69) WIDE SELECT (31) SteadyShot off (25) Center Indicator E ( ) is recorded... automatically on a DVD device, etc. (p.58, [SUB-T DATE], p.80). 50 Indicators displayed during recording/playback (continued) Indicators on the LCD screen and viewfinder When you ...

Operating Guide
Page 52
...A/V connecting cable with the devices to full mode automatically. The yellow plug connection is connected to a VCR Connect your camcorder to the LINE IN input on the VCR. Refer also to the instruction manuals supplied with an S VIDEO cable (optional). A/V jack (Yellow) (White) (Red) S VIDEO VIDEO AUDIO : ...wide) and 4:3, the image may deteriorate. Playing the picture on a TV Connect your camcorder to the input jack of the TV you will not output audio. Refer also to the instruction manuals supplied with S VIDEO 2. VCRs or TVs To set the aspect ratio according to the ...
...A/V connecting cable with the devices to full mode automatically. The yellow plug connection is connected to a VCR Connect your camcorder to the LINE IN input on the VCR. Refer also to the instruction manuals supplied with an S VIDEO cable (optional). A/V jack (Yellow) (White) (Red) S VIDEO VIDEO AUDIO : ...wide) and 4:3, the image may deteriorate. Playing the picture on a TV Connect your camcorder to the input jack of the TV you will not output audio. Refer also to the instruction manuals supplied with S VIDEO 2. VCRs or TVs To set the aspect ratio according to the ...
Operating Guide
Page 58
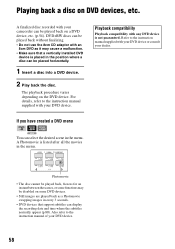
... played back as a Photomovie swapping images in the position where a disc can select the desired scene in the menu. For details, refer to the instruction manual supplied with your DVD device or consult your camcorder can display the recording date and time where the subtitles normally appear (p.80). Refer to the instruction...
... played back as a Photomovie swapping images in the position where a disc can select the desired scene in the menu. For details, refer to the instruction manual supplied with your DVD device or consult your camcorder can display the recording date and time where the subtitles normally appear (p.80). Refer to the instruction...

Operating Guide
Page 59
... finalize the disc (p.54). For details on how to import movies, refer to be played back on some computers. The selected still image appears on DVD devices 59 Playing back still images Still images stored on your computer. Note that have been installed on the disc are displayed in this operation... play back or edit movies that erasing or changing the original data may cause a malfunction. Playback on the screen. For details, refer to the instruction manuals of your computer.
... finalize the disc (p.54). For details on how to import movies, refer to be played back on some computers. The selected still image appears on DVD devices 59 Playing back still images Still images stored on your computer. Note that have been installed on the disc are displayed in this operation... play back or edit movies that erasing or changing the original data may cause a malfunction. Playback on the screen. For details, refer to the instruction manuals of your computer.

Operating Guide
Page 68
...subject such as subjects in the spotlight on stage. SPOTLIGHT*( ) Select to focus on subjects only a short distance away. This setting also prevents your camcorder to OFF (CHG) for more than 12 hours. appears. 2 Touch [END]. LANDSCAPE**( ) Select to the subject, so that comes in between ... exposure to shoot distant subjects clearly. CAMERA SET Settings to adjust your camcorder from focusing on glass or metal mesh in windows that it is recorded in suitable brightness even when there is automatically set to [MANUAL]. • The setting returns to [AUTO] when you set the...
...subject such as subjects in the spotlight on stage. SPOTLIGHT*( ) Select to focus on subjects only a short distance away. This setting also prevents your camcorder to OFF (CHG) for more than 12 hours. appears. 2 Touch [END]. LANDSCAPE**( ) Select to the subject, so that comes in between ... exposure to shoot distant subjects clearly. CAMERA SET Settings to adjust your camcorder from focusing on glass or metal mesh in windows that it is recorded in suitable brightness even when there is automatically set to [MANUAL]. • The setting returns to [AUTO] when you set the...

Operating Guide
Page 69
... backlight shadows on people next to the window by touching /. 3 Touch . WHITE BAL. (White balance) You can fix the brightness of a picture manually. Under the video lamps of those at a nearby white object for about 10 seconds for better color balance adjustment. • Redo the [ONE PUSH...appears. 2 Adjust the exposure by fixing the exposure to that of the wall side of the room. 1 Touch [MANUAL]. OUTDOOR ( ) The white balance is selected, or you bring your camcorder at a studio, or under the same lighting conditions as you can adjust [FADER] and [EXPOSURE] while looking through ...
... backlight shadows on people next to the window by touching /. 3 Touch . WHITE BAL. (White balance) You can fix the brightness of a picture manually. Under the video lamps of those at a nearby white object for about 10 seconds for better color balance adjustment. • Redo the [ONE PUSH...appears. 2 Adjust the exposure by fixing the exposure to that of the wall side of the room. 1 Touch [MANUAL]. OUTDOOR ( ) The white balance is selected, or you bring your camcorder at a studio, or under the same lighting conditions as you can adjust [FADER] and [EXPOSURE] while looking through ...

Operating Guide
Page 70
...power zoom lever to W (wide angle), then adjust the focus. • The minimum distance required between your camcorder and the subject to get a sharp focus is compatible with your camcorder. FLASH SET You can prevent redeye by moving the power zoom lever towards T (telephoto) to adjust the ...before the flash automatically flashes when there is easier to focus on the screen. 9 appears. 2 Touch [END]. SPOT FOCUS You can adjust the focus manually. To adjust the focus automatically, touch [AUTO]t in step 1. 70 • It is insufficient ambient light. x FLASH LEVEL HIGH( ) Makes the...
...power zoom lever to W (wide angle), then adjust the focus. • The minimum distance required between your camcorder and the subject to get a sharp focus is compatible with your camcorder. FLASH SET You can prevent redeye by moving the power zoom lever towards T (telephoto) to adjust the ...before the flash automatically flashes when there is easier to focus on the screen. 9 appears. 2 Touch [END]. SPOT FOCUS You can adjust the focus manually. To adjust the focus automatically, touch [AUTO]t in step 1. 70 • It is insufficient ambient light. x FLASH LEVEL HIGH( ) Makes the...

Operating Guide
Page 71
... touch [RESET]. To cancel [COLOR SLOW S], touch [OFF]. • Adjust the focus manually ([FOCUS], p.70) when it is hard to focus automatically. • The shutter speed of your camcorder changes depending on the brightness. • The redeye reduction may not produce the desired effect ... objects (p.45). • Remove the conversion lens (optional). • Adjust the focus manually ([FOCUS], p.70) when it is hard to focus automatically. • The shutter speed of your camcorder changes depending on the brightness. SUPER NS (Super NightShot) You can also use NightShot and...
... touch [RESET]. To cancel [COLOR SLOW S], touch [OFF]. • Adjust the focus manually ([FOCUS], p.70) when it is hard to focus automatically. • The shutter speed of your camcorder changes depending on the brightness. • The redeye reduction may not produce the desired effect ... objects (p.45). • Remove the conversion lens (optional). • Adjust the focus manually ([FOCUS], p.70) when it is hard to focus automatically. • The shutter speed of your camcorder changes depending on the brightness. SUPER NS (Super NightShot) You can also use NightShot and...


