
Operating Guide
Page 11
...battery To turn off the operation confirmation beep To initialize the settings (RESET) Other part names and functions Checking/Deleting the last scene (Review/Review deleting 48 Indicators displayed during recording/playback 49 Remote Commander 51 Playing the picture on a TV 52 Playback on... 59 Using the Recorded disc (DVD-RW/DVD+RW) Recording additional scenes after finalizing 61 Deleting all of the scenes on the disc (Formatting 62 Using the Setup items Using the Setup items 64 Setup items 66 CAMERA SET 68 Settings to adjust your camcorder to the recording conditions (EXPOSURE/...
...battery To turn off the operation confirmation beep To initialize the settings (RESET) Other part names and functions Checking/Deleting the last scene (Review/Review deleting 48 Indicators displayed during recording/playback 49 Remote Commander 51 Playing the picture on a TV 52 Playback on... 59 Using the Recorded disc (DVD-RW/DVD+RW) Recording additional scenes after finalizing 61 Deleting all of the scenes on the disc (Formatting 62 Using the Setup items Using the Setup items 64 Setup items 66 CAMERA SET 68 Settings to adjust your camcorder to the recording conditions (EXPOSURE/...
Operating Guide
Page 33
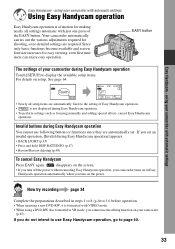
...If you turn off the power without canceling Easy Handycam operation, your camcorder (p.87). using a DVD-RW disc formatted in VR mode, you do not intend to use the editing function on your camcorder turns on the power. Since only basic functions ...Review/Review deleting (p.48) To cancel Easy Handycam Press EASY again. Easy Handycam - Now try recording page 34 Complete the preparations described in Easy Handycam operation automatically when you set . EASY button The settings of Easy Handycam operation. • is formatted with VIDEO mode. • When using your camcorder...
...If you turn off the power without canceling Easy Handycam operation, your camcorder (p.87). using a DVD-RW disc formatted in VR mode, you do not intend to use the editing function on your camcorder turns on the power. Since only basic functions ...Review/Review deleting (p.48) To cancel Easy Handycam Press EASY again. Easy Handycam - Now try recording page 34 Complete the preparations described in Easy Handycam operation automatically when you set . EASY button The settings of Easy Handycam operation. • is formatted with VIDEO mode. • When using your camcorder...
Operating Guide
Page 41
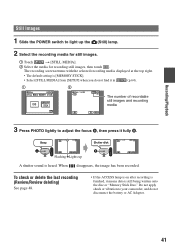
When disappears, the image has been recorded. To check or delete the last recording (Review/Review deleting) See page 48. • If the ACCESS lamp is on after recording is finished, it fully B. The recording screen returns with the selected recording ... MEDIA] from [SETUP] when you do not find it in (p.64). 1 2 The number of recordable still images and recording media 3 Press PHOTO lightly to your camcorder, and do not disconnect the battery or AC Adaptor. 41 Do not apply shock or vibration to adjust the focus A, then press it means data...
When disappears, the image has been recorded. To check or delete the last recording (Review/Review deleting) See page 48. • If the ACCESS lamp is on after recording is finished, it fully B. The recording screen returns with the selected recording ... MEDIA] from [SETUP] when you do not find it in (p.64). 1 2 The number of recordable still images and recording media 3 Press PHOTO lightly to your camcorder, and do not disconnect the battery or AC Adaptor. 41 Do not apply shock or vibration to adjust the focus A, then press it means data...

Operating Guide
Page 48
Deleting the last scene (Review deleting) DVD +RW If the checked scene is not displayed. • When reviewing still images recorded continuously (p.72), you can delete it on the spot. Data once recorded on the "Memory Stick Duo" until turning off the ...delete it . • You can check or delete the last recorded scene. Checking the last scene (Review) 1 Slide the POWER switch to delete still images recorded on DVD-Rs cannot be deleted. 1 Press during the review. The last recorded scene has been already deleted. - Use the same procedure to light up the (Movie...
Deleting the last scene (Review deleting) DVD +RW If the checked scene is not displayed. • When reviewing still images recorded continuously (p.72), you can delete it on the spot. Data once recorded on the "Memory Stick Duo" until turning off the ...delete it . • You can check or delete the last recorded scene. Checking the last scene (Review) 1 Slide the POWER switch to delete still images recorded on DVD-Rs cannot be deleted. 1 Press during the review. The last recorded scene has been already deleted. - Use the same procedure to light up the (Movie...
Operating Guide
Page 49
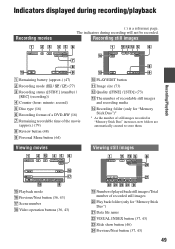
... (36, 43) qj Scene number qk Video operation buttons (36, 43) ql Number of played back still images /Total number of the movie (approx.) (79) 8 Review button (48) 9 Personal Menu button (64) Viewing movies q; Play back folder (only for "Memory Stick Duo")* * As the number of recordable still images and recording... battery (approx.) (47) 2 Recording mode (HQ / SP / LP) (77) 3 Recording status ([STBY] (standby) / [REC] (recording)) 4 Counter (hour: minute: second) 5 Disc type (16) 6 Recording format of a DVD-RW (16) 7 Remaining recordable time of recorded still images w;
... (36, 43) qj Scene number qk Video operation buttons (36, 43) ql Number of played back still images /Total number of the movie (approx.) (79) 8 Review button (48) 9 Personal Menu button (64) Viewing movies q; Play back folder (only for "Memory Stick Duo")* * As the number of recordable still images and recording... battery (approx.) (47) 2 Recording mode (HQ / SP / LP) (77) 3 Recording status ([STBY] (standby) / [REC] (recording)) 4 Counter (hour: minute: second) 5 Disc type (16) 6 Recording format of a DVD-RW (16) 7 Remaining recordable time of recorded still images w;

Operating Guide
Page 108
... The disc may take up to 10 minutes to remove the disc. • The temperature of the "Memory Stick Duo." (p.131) • On the Review screen only the most recently recorded image can be deleted (p.48). • On the Edit screen only up the (Still) lamp or press PLAY/EDIT... power source (battery pack or AC Adaptor) is connected correctly (p.21). • Remove the battery pack from the camcorder, then attach it again (p.22). • Attach a charged battery pack to the camcorder (p.21). • The disc is damaged or is completed (p.54). Remaining disc space indicator is not displayed. &#...
... The disc may take up to 10 minutes to remove the disc. • The temperature of the "Memory Stick Duo." (p.131) • On the Review screen only the most recently recorded image can be deleted (p.48). • On the Edit screen only up the (Still) lamp or press PLAY/EDIT... power source (battery pack or AC Adaptor) is connected correctly (p.21). • Remove the battery pack from the camcorder, then attach it again (p.22). • Attach a charged battery pack to the camcorder (p.21). • The disc is damaged or is completed (p.54). Remaining disc space indicator is not displayed. &#...
Operating Guide
Page 145
... REDUC 70 REMAINING 79 Remaining battery 49 Remaining display Battery 47 Disc 49 "Memory Stick Duo".....47 Remote Commander 51 Remote sensor 47 RESET 47 Review 48 Review deleting 48 S Self-diagnosis display.........123 SELF-TIMER 71 SEPIA 75 Setup 64 CAMERA SET 68 MEDIA SET 76 Personal Menu.........64, 82 PICT...
... REDUC 70 REMAINING 79 Remaining battery 49 Remaining display Battery 47 Disc 49 "Memory Stick Duo".....47 Remote Commander 51 Remote sensor 47 RESET 47 Review 48 Review deleting 48 S Self-diagnosis display.........123 SELF-TIMER 71 SEPIA 75 Setup 64 CAMERA SET 68 MEDIA SET 76 Personal Menu.........64, 82 PICT...

