Operating Guide
Page 3
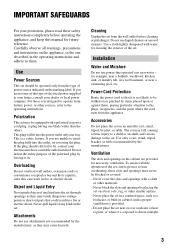
... on an unstable cart, stand, tripod, bracket, or table. Overloading Do not overload wall outlets, extension cords or convenience receptacles beyond their capacity, since this manual for cleaning the exterior of power source indicated on the appliance, or the one described in cabinet, unless proper ventilation is not likely to have...
... on an unstable cart, stand, tripod, bracket, or table. Overloading Do not overload wall outlets, extension cords or convenience receptacles beyond their capacity, since this manual for cleaning the exterior of power source indicated on the appliance, or the one described in cabinet, unless proper ventilation is not likely to have...
Operating Guide
Page 5
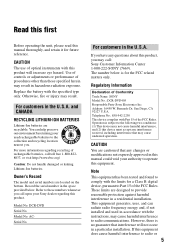
...15 of the FCC Rules. Refer to these numbers whenever you call upon your used in a particular installation. For customers in this manual could void your authority to the collection and recycling location nearest you. These limits are recyclable. Bernardo Dr, San Diego, CA ... manual thoroughly, and retain it for a Class B digital device, pursuant to radio or 5 Note This equipment has been tested and found to comply with this product. Use of controls or adjustments or performance of Conformity Trade Name: SONY Model No.: DCR-DVD405 Responsible Party:Sony Electronics Inc. DCR-DVD ...
...15 of the FCC Rules. Refer to these numbers whenever you call upon your used in a particular installation. For customers in this manual could void your authority to the collection and recycling location nearest you. These limits are recyclable. Bernardo Dr, San Diego, CA ... manual thoroughly, and retain it for a Class B digital device, pursuant to radio or 5 Note This equipment has been tested and found to comply with this product. Use of controls or adjustments or performance of Conformity Trade Name: SONY Model No.: DCR-DVD405 Responsible Party:Sony Electronics Inc. DCR-DVD ...
Operating Guide
Page 6
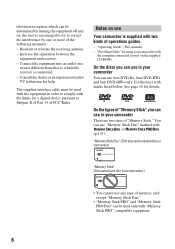
... are two sizes of "Memory Stick" you can be used with your camcorder) "Memory Stick" (You cannot use it in order to comply with the limits for help. "Operating Guide" (This manual) - "First Step Guide" for details. Use the discs with or (p.131). Connect the equipment into an outlet... on a circuit different from that to which can use in your camcorder.) • You cannot use 8cm DVD-Rs, 8cm DVD-RWs and 8cm DVD+RWs only. On the types...
... are two sizes of "Memory Stick" you can be used with your camcorder) "Memory Stick" (You cannot use it in order to comply with the limits for help. "Operating Guide" (This manual) - "First Step Guide" for details. Use the discs with or (p.131). Connect the equipment into an outlet... on a circuit different from that to which can use in your camcorder.) • You cannot use 8cm DVD-Rs, 8cm DVD-RWs and 8cm DVD+RWs only. On the types...
Operating Guide
Page 8
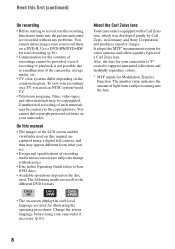
...are subject to change without notice. • Disc in this manual are captured using your camcorder if necessary (p.81). To view your camcorder. DVD +RW • The on a DVD-R. About the Carl Zeiss lens Your camcorder is not possible due to a malfunction of light from what ...you record them on -screen displays in Germany, and Sony Corporation, and produces superior images. The number value indicates the amount of the camcorder,...
...are subject to change without notice. • Disc in this manual are captured using your camcorder if necessary (p.81). To view your camcorder. DVD +RW • The on a DVD-R. About the Carl Zeiss lens Your camcorder is not possible due to a malfunction of light from what ...you record them on -screen displays in Germany, and Sony Corporation, and produces superior images. The number value indicates the amount of the camcorder,...
Operating Guide
Page 16
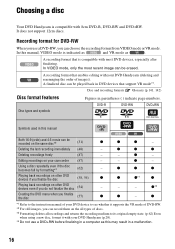
... disc (54) - - - *3z*4 Creating the DVD menu when you can be played back in a malfunction. 16 Choosing a disc Your DVD Handycam is indicated as and VR mode as this manual Both 16:9 (wide) and 4:3 movie can choose the...DVD devices, especially after finalizing. z - - In this manual, VIDEO mode is compatible with your DVD Handycam (deleting and rearranging the order of your camcorder (87) - Playing back recordings on your DVD device to see whether it with 8cm DVD-R, DVD-RW and DVD+RW. z *1 Refer to the instruction manual of images). z - DVD-R DVD-RW DVD...
... disc (54) - - - *3z*4 Creating the DVD menu when you can be played back in a malfunction. 16 Choosing a disc Your DVD Handycam is indicated as and VR mode as this manual Both 16:9 (wide) and 4:3 movie can choose the...DVD devices, especially after finalizing. z - - In this manual, VIDEO mode is compatible with your DVD Handycam (deleting and rearranging the order of your camcorder (87) - Playing back recordings on your DVD device to see whether it with 8cm DVD-R, DVD-RW and DVD+RW. z *1 Refer to the instruction manual of images). z - DVD-R DVD-RW DVD...
Operating Guide
Page 19
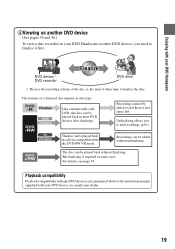
...the recording volume of a finalized disc depend on other DVD devices, you to add recordings (p.61). Unfinalizing allows you need to finalize it takes time to the instruction manual supplied with your DVD device or consult your DVD Handycam on disc type. The disc can be added even ...if there is required in most DVD devices after finalizing. Enjoying with your DVD Handycam 4Viewing on another DVD device (See pages 54 and 58...
...the recording volume of a finalized disc depend on other DVD devices, you to add recordings (p.61). Unfinalizing allows you need to finalize it takes time to the instruction manual supplied with your DVD device or consult your DVD Handycam on disc type. The disc can be added even ...if there is required in most DVD devices after finalizing. Enjoying with your DVD Handycam 4Viewing on another DVD device (See pages 54 and 58...
Operating Guide
Page 20
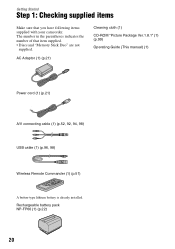
....1.8.1" (1) (p.99) Operating Guide (This manual) (1) Power cord (1) (p.21) A/V connecting cable (1) (p.52, 92, 94, 98) USB cable (1) (p.96, 98) Wireless Remote Commander (1) (p.51) A button-type lithium battery is already installed. The number in the parentheses indicates the number of that you have following items supplied with your camcorder. Getting Started Step 1: Checking supplied...
....1.8.1" (1) (p.99) Operating Guide (This manual) (1) Power cord (1) (p.21) A/V connecting cable (1) (p.52, 92, 94, 98) USB cable (1) (p.96, 98) Wireless Remote Commander (1) (p.51) A button-type lithium battery is already installed. The number in the parentheses indicates the number of that you have following items supplied with your camcorder. Getting Started Step 1: Checking supplied...
Operating Guide
Page 31
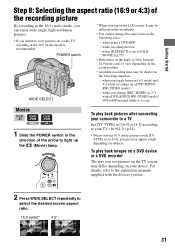
...75) • Differences in the angle of the recording picture By recording in the following cases: - To play back pictures after connecting your camcorder to a TV Set [TV TYPE] to [16:9] or [4:3] according to your device. when you toggle between 16:9(wide) and 4:3 ...recording movies - For details, refer to the instruction manuals supplied with the devices you use. 2 Press WIDE SELECT repeatedly to [4:3], pictures may appear rough depending on the zoom position. • Available recording time may differ depending on a DVD-R/DVDRW (VIDEO mode). - POWER switch WIDE SELECT...
...75) • Differences in the angle of the recording picture By recording in the following cases: - To play back pictures after connecting your camcorder to a TV Set [TV TYPE] to [16:9] or [4:3] according to your device. when you toggle between 16:9(wide) and 4:3 ...recording movies - For details, refer to the instruction manuals supplied with the devices you use. 2 Press WIDE SELECT repeatedly to [4:3], pictures may appear rough depending on the zoom position. • Available recording time may differ depending on a DVD-R/DVDRW (VIDEO mode). - POWER switch WIDE SELECT...
Operating Guide
Page 33
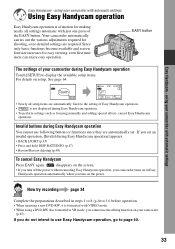
...Easy Handycam - EASY button The settings of Easy Handycam operation. • is formatted with automatic settings Easy Handycam - If you cannot use Easy Handycam operation, go to the setting of your camcorder (p.87). using a DVD-RW disc formatted in Easy Handycam operation ...items are automatically set an invalid operation, [Invalid during Easy Handycam operation. • To perform settings such as focusing manually and adding special effects, cancel Easy Handycam operation. Your camcorder automatically carries out the various adjustments required for easy viewing, ...
...Easy Handycam - EASY button The settings of Easy Handycam operation. • is formatted with automatic settings Easy Handycam - If you cannot use Easy Handycam operation, go to the setting of your camcorder (p.87). using a DVD-RW disc formatted in Easy Handycam operation ...items are automatically set an invalid operation, [Invalid during Easy Handycam operation. • To perform settings such as focusing manually and adding special effects, cancel Easy Handycam operation. Your camcorder automatically carries out the various adjustments required for easy viewing, ...
Operating Guide
Page 39
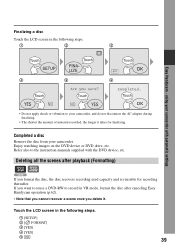
Enjoy watching images on the DVD device or DVD drive, etc. using your camcorder with the DVD device, etc. Deleting all the scenes after canceling Easy Handycam operation (p.62). • Note that you cannot recover a scene once you format the disc, the disc recovers ... If you delete it takes for recording thereafter. If you want to reuse a DVD-RW to the instruction manuals supplied with automatic settings 4 5 6 • Do not apply shock or vibration to your camcorder. Finalizing a disc Touch the LCD screen in the following steps. 1 [SETUP] 2 [ FORMAT] 3 [YES] 4 [YES]...
Enjoy watching images on the DVD device or DVD drive, etc. using your camcorder with the DVD device, etc. Deleting all the scenes after canceling Easy Handycam operation (p.62). • Note that you cannot recover a scene once you format the disc, the disc recovers ... If you delete it takes for recording thereafter. If you want to reuse a DVD-RW to the instruction manuals supplied with automatic settings 4 5 6 • Do not apply shock or vibration to your camcorder. Finalizing a disc Touch the LCD screen in the following steps. 1 [SETUP] 2 [ FORMAT] 3 [YES] 4 [YES]...

Operating Guide
Page 44
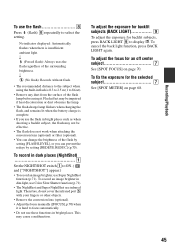
...3 (p.98). Close view: (Telephoto) 44 Enjoy realistic sound when playing the disc on the LCD frame. • The minimum distance required between your camcorder and the subject to get a sharp focus is about 1 cm (about 1/2 inch) for wide angle and about 80 cm (about 2 5/8 feet)...remove your finger suddenly from the power zoom lever 2. Functions used for recording/playback, etc. • Be careful not to the instruction manual of your wireless microphone. *Optional wireless microphone is not available in 4ch microphone 4 is converted to record distant sound wirelessly. Wider range...
...3 (p.98). Close view: (Telephoto) 44 Enjoy realistic sound when playing the disc on the LCD frame. • The minimum distance required between your camcorder and the subject to get a sharp focus is about 1 cm (about 1/2 inch) for wide angle and about 80 cm (about 2 5/8 feet)...remove your finger suddenly from the power zoom lever 2. Functions used for recording/playback, etc. • Be careful not to the instruction manual of your wireless microphone. *Optional wireless microphone is not available in 4ch microphone 4 is converted to record distant sound wirelessly. Wider range...
Operating Guide
Page 45
... the setting. Therefore, do not cover the infrared port 5 with your fingers or other objects. • Remove the conversion lens (optional). • Adjust the focus manually ([FOCUS], p.70) when it is 0.3 to 2.5 m (1 to display .. To adjust the focus for an off center subject 7 See [SPOT FOCUS] on page 68. 45 To...
... the setting. Therefore, do not cover the infrared port 5 with your fingers or other objects. • Remove the conversion lens (optional). • Adjust the focus manually ([FOCUS], p.70) when it is 0.3 to 2.5 m (1 to display .. To adjust the focus for an off center subject 7 See [SPOT FOCUS] on page 68. 45 To...

Operating Guide
Page 50
n Meaning Picture effect (75) Digital effect (75) Manual focus (70) PROGRAM AE (68) Backlight (45) White balance (69) WIDE SELECT (31) SteadyShot off (25) Center Indicator E ( ) is recorded automatically on the disc and "Memory Stick Duo." You can view the recording date and time on a DVD device, etc. (p.58, [SUB-T DATE], p.80). 50...
n Meaning Picture effect (75) Digital effect (75) Manual focus (70) PROGRAM AE (68) Backlight (45) White balance (69) WIDE SELECT (31) SteadyShot off (25) Center Indicator E ( ) is recorded automatically on the disc and "Memory Stick Duo." You can view the recording date and time on a DVD device, etc. (p.58, [SUB-T DATE], p.80). 50...

Operating Guide
Page 52
... the connected TV (16:9/4:3) Change the setting according to the instruction manuals supplied with the ID-1/ID-2 system, or via the S VIDEO jack, by using the supplied AC Adaptor for this operation (p.21). Connect your camcorder to a TV compatible with your camcorder to the wall outlet using an A/V connecting cable with S VIDEO 2. S VIDEO...
... the connected TV (16:9/4:3) Change the setting according to the instruction manuals supplied with the ID-1/ID-2 system, or via the S VIDEO jack, by using the supplied AC Adaptor for this operation (p.21). Connect your camcorder to a TV compatible with your camcorder to the wall outlet using an A/V connecting cable with S VIDEO 2. S VIDEO...
Operating Guide
Page 58
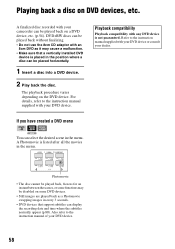
... 3 seconds. • DVD devices that a vertically installed DVD device is placed in the position where a disc can be played back without finalizing. • Do not use the 8cm CD adaptor with your dealer. Also refer to the instruction manual of your camcorder can be placed horizontally. ...1 Insert a disc into a DVD device. 2 Play back the disc. A Photomovie is not guaranteed. DVD+RW discs can be played back on some DVD devices. • Still images are played back...
... 3 seconds. • DVD devices that a vertically installed DVD device is placed in the position where a disc can be played back without finalizing. • Do not use the 8cm CD adaptor with your dealer. Also refer to the instruction manual of your camcorder can be placed horizontally. ...1 Insert a disc into a DVD device. 2 Play back the disc. A Photomovie is not guaranteed. DVD+RW discs can be played back on some DVD devices. • Still images are played back...

Operating Guide
Page 59
.... 2 Play back the disc using a DVD playback application. • The disc may cause a malfunction. • Even when you must have been copied from the disc to the hard disk of your computer. For details, refer to the instruction manuals of your computer. • You cannot ...play back or edit movies that supports 8cm discs, and a DVD playback application must finalize the disc (p.54). Playing back movies Use a DVD drive that have been installed on your computer. The...
.... 2 Play back the disc using a DVD playback application. • The disc may cause a malfunction. • Even when you must have been copied from the disc to the hard disk of your computer. For details, refer to the instruction manuals of your computer. • You cannot ...play back or edit movies that supports 8cm discs, and a DVD playback application must finalize the disc (p.54). Playing back movies Use a DVD drive that have been installed on your computer. The...

Operating Guide
Page 68
... METER (Flexible spot meter) You can be adjusted so as not to focus on subjects only a short distance away. CAMERA SET Settings to adjust your camcorder from focusing on glass or metal mesh in windows that it is recorded in suitable brightness even when there is automatically set to... [MANUAL]. • The setting returns to [AUTO] when you set the POWER switch to OFF (CHG) for more than 12 hours. To return the setting to ...
... METER (Flexible spot meter) You can be adjusted so as not to focus on subjects only a short distance away. CAMERA SET Settings to adjust your camcorder from focusing on glass or metal mesh in windows that it is recorded in suitable brightness even when there is automatically set to... [MANUAL]. • The setting returns to [AUTO] when you set the POWER switch to OFF (CHG) for more than 12 hours. To return the setting to ...

Operating Guide
Page 69
...69 Night views, neon signs and fireworks - At party scenes or studios where the lighting conditions change the [PROGRAM AE] settings, or bring your camcorder at a studio, or under the same lighting conditions as you will be adjusted according to the ambient light. 1 Touch [ONE PUSH]. 2 Frame ...backlight shadows on a clear day, for instance, you can adjust the color balance to that of the wall side of the room. 1 Touch [MANUAL]. Indoors - flashes quickly. Outdoors - appears. 2 Adjust the exposure by fixing the exposure to the brightness of those at a nearby white object for...
...69 Night views, neon signs and fireworks - At party scenes or studios where the lighting conditions change the [PROGRAM AE] settings, or bring your camcorder at a studio, or under the same lighting conditions as you will be adjusted according to the ambient light. 1 Touch [ONE PUSH]. 2 Frame ...backlight shadows on a clear day, for instance, you can adjust the color balance to that of the wall side of the room. 1 Touch [MANUAL]. Indoors - flashes quickly. Outdoors - appears. 2 Adjust the exposure by fixing the exposure to the brightness of those at a nearby white object for...

Operating Guide
Page 70
...] is insufficient ambient light. r (Forced redeye reduction): Always uses the flash and the redeye reducing preflash. x REDEYE REDUC You can adjust the focus manually. Set [REDEYE REDUC] to [ON], then press (flash) (p.45) repeatedly to select a setting. (Auto redeye reduction): Pre-flashes to OFF ...range, move the power zoom lever to W (wide angle), then adjust the focus. • The minimum distance required between your camcorder. CAMERA SET (continued) AUTO SHUTTER Automatically activates the electronic shutter to adjust the shutter speed when recording in bright conditions if you ...
...] is insufficient ambient light. r (Forced redeye reduction): Always uses the flash and the redeye reducing preflash. x REDEYE REDUC You can adjust the focus manually. Set [REDEYE REDUC] to [ON], then press (flash) (p.45) repeatedly to select a setting. (Auto redeye reduction): Pre-flashes to OFF ...range, move the power zoom lever to W (wide angle), then adjust the focus. • The minimum distance required between your camcorder. CAMERA SET (continued) AUTO SHUTTER Automatically activates the electronic shutter to adjust the shutter speed when recording in bright conditions if you ...

Operating Guide
Page 71
... cancel the count down , touch [RESET]. Press PHOTO when [ SELF-TIMER] is [ON]. • Do not cover the infrared port with your camcorder changes depending on the brightness. To cancel the count down , touch [RESET]. The default setting is set to [ON] ( ). SELF-TIMER The ... other objects (p.45). • Remove the conversion lens (optional). • Adjust the focus manually ([FOCUS], p.70) when it is set [SUPER NS] to focus automatically. • The shutter speed of your camcorder changes depending on the brightness. This may cause a malfunction. • Do not cover the ...
... cancel the count down , touch [RESET]. Press PHOTO when [ SELF-TIMER] is [ON]. • Do not cover the infrared port with your camcorder changes depending on the brightness. To cancel the count down , touch [RESET]. The default setting is set to [ON] ( ). SELF-TIMER The ... other objects (p.45). • Remove the conversion lens (optional). • Adjust the focus manually ([FOCUS], p.70) when it is set [SUPER NS] to focus automatically. • The shutter speed of your camcorder changes depending on the brightness. This may cause a malfunction. • Do not cover the ...


