Operating Guide
Page 7
When using a "Memory Stick Duo" with a USB cable etc., be sure to insert the "Memory Stick Duo" into ...insert the connector plug forcibly in the wrong direction, the terminal may cause malfunctions. Doing so might cause your camcorder. Black point White, red, blue or green point • Exposing the LCD screen, the viewfinder, or...24) or the ACCESS lamp (p.28) is not dustproofed, dripproofed or waterproofed. Viewfinder LCD screen Battery • The camcorder is on the LCD screen and the viewfinder. See "Maintenance and precautions" (p.135). • To prevent discs from...
When using a "Memory Stick Duo" with a USB cable etc., be sure to insert the "Memory Stick Duo" into ...insert the connector plug forcibly in the wrong direction, the terminal may cause malfunctions. Doing so might cause your camcorder. Black point White, red, blue or green point • Exposing the LCD screen, the viewfinder, or...24) or the ACCESS lamp (p.28) is not dustproofed, dripproofed or waterproofed. Viewfinder LCD screen Battery • The camcorder is on the LCD screen and the viewfinder. See "Maintenance and precautions" (p.135). • To prevent discs from...
Operating Guide
Page 12
...77 Settings while recording on a disc or other basic settings (REC MODE/LCD/VF SET/USB SPEED, etc.) TIME/LANGU 81 (CLOCK SET/AREA SET/LANGUAGE, etc.) Customizing Personal Menu 82 Editing on DVD Handycam Copying the still images 84 Deleting still images from the "Memory Stick Duo 86 Editing ...the original data 87 Creating the Playlist 88 Playing the Playlist 91 Dubbing, Printing Dubbing to VCR/DVD devices 92 Recording images from a TV or ...
...77 Settings while recording on a disc or other basic settings (REC MODE/LCD/VF SET/USB SPEED, etc.) TIME/LANGU 81 (CLOCK SET/AREA SET/LANGUAGE, etc.) Customizing Personal Menu 82 Editing on DVD Handycam Copying the still images 84 Deleting still images from the "Memory Stick Duo 86 Editing ...the original data 87 Creating the Playlist 88 Playing the Playlist 91 Dubbing, Printing Dubbing to VCR/DVD devices 92 Recording images from a TV or ...
Operating Guide
Page 15
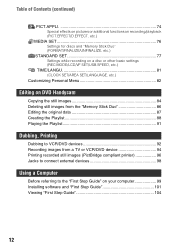
...enabling you to share your precious moments with family and friends. ** Finalizing: a process to make it possible to view. Enjoying with your DVD Handycam A recorded disc can be played back on a wide TV with complete panoramic effect. Playback on widescreen TV and home theater (p.44, 52)... and effects to create your DVD Handycam allows you want to play back recorded and finalized** discs on a home theater. Discs are also recorded with 5.1ch surround sound to edit and copy (p.99) Picture Package, the software supplied with Hi-Speed USB (USB 2.0) provide even faster image transfer...
...enabling you to share your precious moments with family and friends. ** Finalizing: a process to make it possible to view. Enjoying with your DVD Handycam A recorded disc can be played back on a wide TV with complete panoramic effect. Playback on widescreen TV and home theater (p.44, 52)... and effects to create your DVD Handycam allows you want to play back recorded and finalized** discs on a home theater. Discs are also recorded with 5.1ch surround sound to edit and copy (p.99) Picture Package, the software supplied with Hi-Speed USB (USB 2.0) provide even faster image transfer...
Operating Guide
Page 20
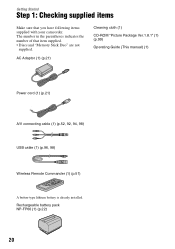
...; Discs and "Memory Stick Duo" are not supplied. The number in the parentheses indicates the number of that you have following items supplied with your camcorder. AC Adaptor (1) (p.21) Cleaning cloth (1) CD-ROM "Picture Package Ver.1.8.1" (1) (p.99) Operating Guide (This manual) (1) Power cord (1) (p.21) A/V connecting cable (1) (p.52, 92, 94, 98...
...; Discs and "Memory Stick Duo" are not supplied. The number in the parentheses indicates the number of that you have following items supplied with your camcorder. AC Adaptor (1) (p.21) Cleaning cloth (1) CD-ROM "Picture Package Ver.1.8.1" (1) (p.99) Operating Guide (This manual) (1) Power cord (1) (p.21) A/V connecting cable (1) (p.52, 92, 94, 98...

Operating Guide
Page 66
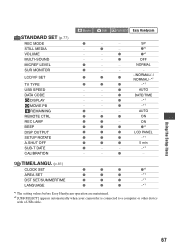
... OFF OFF ON - OFF - - Setup items Available setup items (z) vary depending on the operating mode. z - z z z z - OFF z - - ON z z z z z z z z z z z - z z - z -*2 z - - z - - The following settings are made automatically during Easy Handycam operation (p.33). z z - z - - - EFFECT REC CTRL USB SELECT DEMO MODE MEDIA SET (p.76) FORMAT FINALIZE UNFINALIZE DISC TITLE FORMAT 66 Movie Still PLAY/EDIT Easy...
... OFF OFF ON - OFF - - Setup items Available setup items (z) vary depending on the operating mode. z - z z z z - OFF z - - ON z z z z z z z z z z z - z z - z -*2 z - - z - - The following settings are made automatically during Easy Handycam operation (p.33). z z - z - - - EFFECT REC CTRL USB SELECT DEMO MODE MEDIA SET (p.76) FORMAT FINALIZE UNFINALIZE DISC TITLE FORMAT 66 Movie Still PLAY/EDIT Easy...
Operating Guide
Page 67
... z z z -*1 z z z 5 min z - - -*1 - - z - z z*1 - - z -*1 z - - TIME/LANGU. (p.81) CLOCK SET z z z z*1 AREA SET z z z -*1 DST SET/SUMMERTIME z z z -*1 LANGUAGE z z z -*1 *1 The setting values before Easy Handycam operation are maintained. *2 [USB SELECT] appears automatically when your camcorder is connected to a computer or other device with a USB cable. STANDARD SET (p.77) REC MODE STILL MEDIA VOLUME MULTI-SOUND MICREF LEVEL SUR MONITOR LCD/VF...
... z z z -*1 z z z 5 min z - - -*1 - - z - z z*1 - - z -*1 z - - TIME/LANGU. (p.81) CLOCK SET z z z z*1 AREA SET z z z -*1 DST SET/SUMMERTIME z z z -*1 LANGUAGE z z z -*1 *1 The setting values before Easy Handycam operation are maintained. *2 [USB SELECT] appears automatically when your camcorder is connected to a computer or other device with a USB cable. STANDARD SET (p.77) REC MODE STILL MEDIA VOLUME MULTI-SOUND MICREF LEVEL SUR MONITOR LCD/VF...
Operating Guide
Page 75
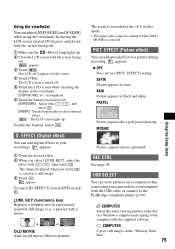
... LCD off . 5 Touch the LCD screen while checking the display in the disc on a computer when connecting your camcorder to your recordings. appears. EFFECT], touch [OFF] in sepia. PICT. SEPIA Picture appears in step 1. USB SELECT You can view pictures on a Windows computer and copying to select a desired effect. : The LCD screen...
... LCD off . 5 Touch the LCD screen while checking the display in the disc on a computer when connecting your camcorder to your recordings. appears. EFFECT], touch [OFF] in sepia. PICT. SEPIA Picture appears in step 1. USB SELECT You can view pictures on a Windows computer and copying to select a desired effect. : The LCD screen...
Operating Guide
Page 76
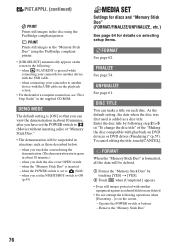
... make a title on selecting setup items. FORMAT See page 62. DEMO MODE The default setting is pressed while connecting your camcorder to another device with the USB cable on the screen. - MEDIA SET Settings for discs and "Memory Stick Duo" (FORMAT/FINALIZE/UNFINALIZE, etc.) See...Guide" in situations such as a disc title. PRINT Prints still images in the disc using the PictBridge compliant printer. • [USB SELECT] automatically appears on DVD devices or DVD drives (Finalizing)" (p.57). when the "Memory Stick Duo" is added as those described below. - Operate the POWER switch or...
... make a title on selecting setup items. FORMAT See page 62. DEMO MODE The default setting is pressed while connecting your camcorder to another device with the USB cable on the screen. - MEDIA SET Settings for discs and "Memory Stick Duo" (FORMAT/FINALIZE/UNFINALIZE, etc.) See...Guide" in situations such as a disc title. PRINT Prints still images in the disc using the PictBridge compliant printer. • [USB SELECT] automatically appears on DVD devices or DVD drives (Finalizing)" (p.57). when the "Memory Stick Duo" is added as those described below. - Operate the POWER switch or...

Operating Guide
Page 77
... a single-sided disc. VOLUME See page 43. Select [LOW] when you play back audio recorded using other basic settings (REC MODE/LCD/VF SET/USB SPEED, etc.) The default settings are marked with dual sound or stereo sound. B NORMAL Records various surround sounds, converting them into the same level....select an image quality of scenes may be degraded, or scenes with quick movements may shorten. This setting is applied for both sides. • Your camcorder has a VBR encoding system (p.17) so when you set the POWER switch to [STEREO] when you record an object that moves fast, the time...
... a single-sided disc. VOLUME See page 43. Select [LOW] when you play back audio recorded using other basic settings (REC MODE/LCD/VF SET/USB SPEED, etc.) The default settings are marked with dual sound or stereo sound. B NORMAL Records various surround sounds, converting them into the same level....select an image quality of scenes may be degraded, or scenes with quick movements may shorten. This setting is applied for both sides. • Your camcorder has a VBR encoding system (p.17) so when you set the POWER switch to [STEREO] when you record an object that moves fast, the time...

Operating Guide
Page 78
... intensity x VF B.LIGHT You can adjust the brightness of the viewfinder. B AUTO Sends data by switching automatically between the Hi-Speed USB (USB 2.0) and the speed corresponding to USB 1.1 (full speed transfer). B NORMAL Standard brightness. TV TYPE See page 52. STANDARD SET (continued) LCD/VF SET The recorded ... the camera setting data of recorded images. x LCD BRIGHT You can select data transfer speed used to transfer data to your camcorder to AC Adaptor, [BRIGHT] is automatically selected for the setting. • When you select [BRIGHT], battery life is not displayed.
... intensity x VF B.LIGHT You can adjust the brightness of the viewfinder. B AUTO Sends data by switching automatically between the Hi-Speed USB (USB 2.0) and the speed corresponding to USB 1.1 (full speed transfer). B NORMAL Standard brightness. TV TYPE See page 52. STANDARD SET (continued) LCD/VF SET The recorded ... the camera setting data of recorded images. x LCD BRIGHT You can select data transfer speed used to transfer data to your camcorder to AC Adaptor, [BRIGHT] is automatically selected for the setting. • When you select [BRIGHT], battery life is not displayed.
Operating Guide
Page 96
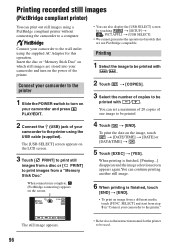
...Select the image to be printed with /. 2 Touch t [COPIES]. 3 Select the number of copies to be printed. 2 Connect the (USB) jack of your camcorder to the printer using the USB cable (supplied). When connection is complete, (PictBridge connecting) appears on the image, touch t [DATE/TIME] t [DATE] or [DAY... printer without connecting the camcorder to the printer." SELECT] and start from a "Memory Stick Duo." Connect your camcorder to a computer. t [USB SELECT]. • We cannot guarantee the operation of models that are stored into your camcorder and turn on the power...
...Select the image to be printed with /. 2 Touch t [COPIES]. 3 Select the number of copies to be printed. 2 Connect the (USB) jack of your camcorder to the printer using the USB cable (supplied). When connection is complete, (PictBridge connecting) appears on the image, touch t [DATE/TIME] t [DATE] or [DAY... printer without connecting the camcorder to the printer." SELECT] and start from a "Memory Stick Duo." Connect your camcorder to a computer. t [USB SELECT]. • We cannot guarantee the operation of models that are stored into your camcorder and turn on the power...
Operating Guide
Page 97
... a still image recorded with a device other devices that have a file size of model or manufacturer. 97 Dubbing, Printing Disconnect the USB cable (supplied) from your camcorder. • Still images recorded by other than 2304 × 1728 pixels cannot be printed. • PictBridge is an industry standard ... Refer to a digital video camera or digital still camera, regardless of 2MB or more, or are larger than your camcorder. • If the printer stops working, disconnect the USB cable (supplied), turn the printer off . • Some printer models may not be cut off and on the ...
... a still image recorded with a device other devices that have a file size of model or manufacturer. 97 Dubbing, Printing Disconnect the USB cable (supplied) from your camcorder. • Still images recorded by other than 2304 × 1728 pixels cannot be printed. • PictBridge is an industry standard ... Refer to a digital video camera or digital still camera, regardless of 2MB or more, or are larger than your camcorder. • If the printer stops working, disconnect the USB cable (supplied), turn the printer off . • Some printer models may not be cut off and on the ...

Operating Guide
Page 98
To remove an accessory, loosen the screw, and then press down and push it takes precedence over the internal microphone (p.44). 2 Shoe cover 3 (USB) jack (p.96, 99) 4 REMOTE jack • Connect other optional accessories. 5 A/V (audio/video) jack (p.52, 92, 94) 6 DC IN jack (p.21) 98 Refer also to the ... cover. 3456...Open the jack cover. 1 Active Interface Shoe The Active Interface Shoe supplies power to optional accessories such as you are recording with your camcorder.
To remove an accessory, loosen the screw, and then press down and push it takes precedence over the internal microphone (p.44). 2 Shoe cover 3 (USB) jack (p.96, 99) 4 REMOTE jack • Connect other optional accessories. 5 A/V (audio/video) jack (p.52, 92, 94) 6 DC IN jack (p.21) 98 Refer also to the ... cover. 3456...Open the jack cover. 1 Active Interface Shoe The Active Interface Shoe supplies power to optional accessories such as you are recording with your camcorder.
Operating Guide
Page 99
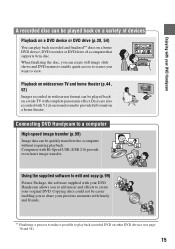
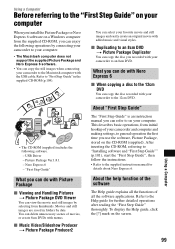
..."First Step Guide" is an instruction manual you can select your favorite movie and still images and easily create an original movie with your camcorder to the 12cm DVD. This describes basic operations, from thumbnails. Nero Express 6 - You can refer to on your computer. Using a Computer • The... do with Nero Express 6 x When copying a disc to the 12cm DVD You can delete unnecessary scenes of movies, or create 8cm DVDs with menus. To display the Help guide, click the [?] mark on the screen. 99 USB Driver - Refer to the Help guide for details about Nero Express 6. ...
..."First Step Guide" is an instruction manual you can select your favorite movie and still images and easily create an original movie with your camcorder to the 12cm DVD. This describes basic operations, from thumbnails. Nero Express 6 - You can refer to on your computer. Using a Computer • The... do with Nero Express 6 x When copying a disc to the 12cm DVD You can delete unnecessary scenes of movies, or create 8cm DVDs with menus. To display the Help guide, click the [?] mark on the screen. 99 USB Driver - Refer to the Help guide for details about Nero Express 6. ...
Operating Guide
Page 100
... Windows XP Home Edition / Windows XP Professional Standard installation is based on DirectX technology. It is not compatible with it, connect your camcorder with Hi-Speed USB (USB 2.0). Operation is not assured if the above OS has been upgraded. OS: Mac OS 9.1/9.2 or Mac OS X (v10.1/v10.2/ ...v10.3/v10.4) Others: (USB) port (This must be provided as standard) • Your camcorder is compatible with the USB cable instead of using a "Memory Stick PRO Duo" and your computer is necessary to have DirectX installed...
... Windows XP Home Edition / Windows XP Professional Standard installation is based on DirectX technology. It is not compatible with it, connect your camcorder with Hi-Speed USB (USB 2.0). Operation is not assured if the above OS has been upgraded. OS: Mac OS 9.1/9.2 or Mac OS X (v10.1/v10.2/ ...v10.3/v10.4) Others: (USB) port (This must be provided as standard) • Your camcorder is compatible with the USB cable instead of using a "Memory Stick PRO Duo" and your computer is necessary to have DirectX installed...
Operating Guide
Page 105
...operation. • This is set to ON. A motor sound is heard in the camcorder when the disc cover is not a malfunction. Turn off while recording or communicating with another device via USB cable. Cancel Easy Handycam operation (p.33). If the functions still do not work , press the RESET button ... RESET button, all settings, including the clock setting, are reset, except the Personal Menu items.) • The temperature of your Sony dealer. Overall operations/Easy Handycam The camcorder does not operate even when the power is extremely high. Buttons do not work . • During Easy...
...operation. • This is set to ON. A motor sound is heard in the camcorder when the disc cover is not a malfunction. Turn off while recording or communicating with another device via USB cable. Cancel Easy Handycam operation (p.33). If the functions still do not work , press the RESET button ... RESET button, all settings, including the clock setting, are reset, except the Personal Menu items.) • The temperature of your Sony dealer. Overall operations/Easy Handycam The camcorder does not operate even when the power is extremely high. Buttons do not work . • During Easy...
Operating Guide
Page 118
...[SONY DDX-C1002 USB Device] appears in [DVD/CD-ROM drives], [Generic volume] in [Storage volumes], and [USB Mass Storage Device] in the disc, the computer does not recognize your camcorder and leave it again firmly. • Disconnect USB ...camcorder. • Disconnect the cable from the computer and camcorder, then connect it for a while in Easy Handycam operation. When editing the images in [Universal Serial Bus controllers] respectively. Cancel Easy Handycam operation (p.33) to unfinalize. • You cannot unfinalize a DVD-R/DVD-RW (VR mode)/DVD+RW (p.61). • Your camcorder...
...[SONY DDX-C1002 USB Device] appears in [DVD/CD-ROM drives], [Generic volume] in [Storage volumes], and [USB Mass Storage Device] in the disc, the computer does not recognize your camcorder and leave it again firmly. • Disconnect USB ...camcorder. • Disconnect the cable from the computer and camcorder, then connect it for a while in Easy Handycam operation. When editing the images in [Universal Serial Bus controllers] respectively. Cancel Easy Handycam operation (p.33) to unfinalize. • You cannot unfinalize a DVD-R/DVD-RW (VR mode)/DVD+RW (p.61). • Your camcorder...

Operating Guide
Page 119
...Manager]. When all the devices appear, the USB driver is installed correctly. 4 Double-click [Driver] t [Setup.exe]. For Windows 2000 1 Click [Start], [Settings], then [Control Panel]. 2 Click [System]. If any of these devices are not shown, install USB driver. 1 Place the supplied CD-ROM in... [Universal Serial Bus controllers] respectively. The [Device Manager] window appears. 5 Make sure that [SONY DDX-C1002 USB Device] appears in [DVD/CD-ROM drives], [Generic volume] in [Storage volumes], and [USB Mass Storage Device] in the disc drive on your computer. 2 Double-click [My Computer]. 3...
...Manager]. When all the devices appear, the USB driver is installed correctly. 4 Double-click [Driver] t [Setup.exe]. For Windows 2000 1 Click [Start], [Settings], then [Control Panel]. 2 Click [System]. If any of these devices are not shown, install USB driver. 1 Place the supplied CD-ROM in... [Universal Serial Bus controllers] respectively. The [Device Manager] window appears. 5 Make sure that [SONY DDX-C1002 USB Device] appears in [DVD/CD-ROM drives], [Generic volume] in [Storage volumes], and [USB Mass Storage Device] in the disc drive on your computer. 2 Double-click [My Computer]. 3...
Operating Guide
Page 120
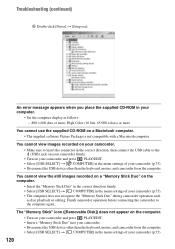
... as disc playback or editing. Finish camcorder operation before connecting the camcorder to the (USB) jack on your camcorder (p.75). 120 An error message appears when you place the supplied CD-ROM in the correct direction, then connect the USB cable to the computer again. You cannot... use the supplied CD-ROM on your camcorder and press PLAY/EDIT. • Select [USB SELECT] t [ COMPUTER] in the menu settings of your camcorder (p.75). • Disconnect the USB device other than the keyboard, mouse, and camcorder from the computer. • Select [USB SELECT] t [ COMPUTER] in the menu...
... as disc playback or editing. Finish camcorder operation before connecting the camcorder to the (USB) jack on your camcorder (p.75). 120 An error message appears when you place the supplied CD-ROM in the correct direction, then connect the USB cable to the computer again. You cannot... use the supplied CD-ROM on your camcorder and press PLAY/EDIT. • Select [USB SELECT] t [ COMPUTER] in the menu settings of your camcorder (p.75). • Disconnect the USB device other than the keyboard, mouse, and camcorder from the computer. • Select [USB SELECT] t [ COMPUTER] in the menu...
Operating Guide
Page 121
... Handycam with USB connected] or [Cannot cancel Easy Handycam with Hi-Speed USB (USB 2.0), it does not effect to the images or sounds transferred to your computer. • Depending on the screen of your camcorder. You cannot copy the disc to a computer not compatible with USB connected] appears on the computer you connect your camcorder to the 12cm DVD...
... Handycam with USB connected] or [Cannot cancel Easy Handycam with Hi-Speed USB (USB 2.0), it does not effect to the images or sounds transferred to your computer. • Depending on the screen of your camcorder. You cannot copy the disc to a computer not compatible with USB connected] appears on the computer you connect your camcorder to the 12cm DVD...


