Operating Guide
Page 2
...the presence of important operating and maintenance (servicing) instructions in the U.S.A. You can help preserve our environment by returning your Sony dealer regarding recycling of optical instruments with this product. Serial No. CAUTION The use of rechargeable batteries, call toll free 1-...used rechargeable batteries to the collection and recycling location nearest you have any questions about this manual thoroughly, and retain it for the FCC related matters only. DCR-DVD Serial No. For more information regarding this product will increase eye hazard. "Battery ...
...the presence of important operating and maintenance (servicing) instructions in the U.S.A. You can help preserve our environment by returning your Sony dealer regarding recycling of optical instruments with this product. Serial No. CAUTION The use of rechargeable batteries, call toll free 1-...used rechargeable batteries to the collection and recycling location nearest you have any questions about this manual thoroughly, and retain it for the FCC related matters only. DCR-DVD Serial No. For more information regarding this product will increase eye hazard. "Battery ...
Operating Guide
Page 3
...with Part 15 of Conformity Trade Name: SONY Model No.: DCR-DVD403 Responsible Party:Sony Electronics Inc. Increase the separation between the equipment and receiver. - Operation is subject to radio communications. Reorient or relocate the receiving antenna. - "Operating guide" (This manual) - Address: 16450 W. Telephone No.:... by the following parts. Telephone No.: 858-942-2230 This device complies with the limits for using the camcorder • Do not hold the camcorder by one or more of the FCC Rules. Address: 16450 W. Operation is subject to the following two ...
...with Part 15 of Conformity Trade Name: SONY Model No.: DCR-DVD403 Responsible Party:Sony Electronics Inc. Increase the separation between the equipment and receiver. - Operation is subject to radio communications. Reorient or relocate the receiving antenna. - "Operating guide" (This manual) - Address: 16450 W. Telephone No.:... by the following parts. Telephone No.: 858-942-2230 This device complies with the limits for using the camcorder • Do not hold the camcorder by one or more of the FCC Rules. Address: 16450 W. Operation is subject to the following two ...
Operating Guide
Page 4
... to apply mechanical shock or vibration to the camcorder. • Before connecting your camcorder to another device with a Carl Zeiss lens, which was developed jointly by Carl Zeiss, in Germany, and Sony Corporation, and produces superior images. Be careful ...manual • The images of the camcorder, storage media, etc. • TV color systems differ depending on a DVD-R. 4 Use a DVD-RW/DVD+RW (not supplied) for trial recording (p.13). • Compensation for illustrating the operating procedures. You cannot dub copyright protected software on the model DCR-DVD403. On this manual...
... to apply mechanical shock or vibration to the camcorder. • Before connecting your camcorder to another device with a Carl Zeiss lens, which was developed jointly by Carl Zeiss, in Germany, and Sony Corporation, and produces superior images. Be careful ...manual • The images of the camcorder, storage media, etc. • TV color systems differ depending on a DVD-R. 4 Use a DVD-RW/DVD+RW (not supplied) for trial recording (p.13). • Compensation for illustrating the operating procedures. You cannot dub copyright protected software on the model DCR-DVD403. On this manual...
Operating Guide
Page 11
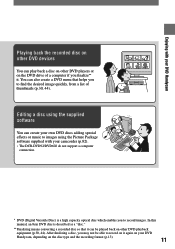
... can create your own DVD discs adding special effects or music to images using the Picture Package software supplied with your DVD Handycam Playing back the recorded disc on other DVD devices You can play back a disc on other DVD playback equipment (p.30, 44). In... this manual, an 8cm DVD disc is a high capacity optical disc which enables you to record images. After finalizing a disc, you finalize** it. Enjoying with your camcorder (p.82). • The DCR-DVD92/DVD602 do not support a computer connection. * DVD (...
... can create your own DVD discs adding special effects or music to images using the Picture Package software supplied with your DVD Handycam Playing back the recorded disc on other DVD devices You can play back a disc on other DVD playback equipment (p.30, 44). In... this manual, an 8cm DVD disc is a high capacity optical disc which enables you to record images. After finalizing a disc, you finalize** it. Enjoying with your camcorder (p.82). • The DCR-DVD92/DVD602 do not support a computer connection. * DVD (...
Operating Guide
Page 13
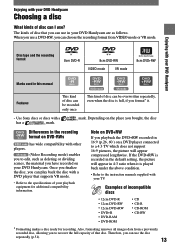
... does not support 16:9 pictures, the picture will appear in 4:3 ratio when it . • Use Sony discs or discs with a has a mark. When you use a DVD-RW, you can use in your DVD Handycam are as deleting or dividing scenes, the material you can play back the disc with a DVD player...) enables you bought, the disc Differences in 16:9 (p.26, 60 ) on your DVD Handycam. mark. Also, formatting removes all images data from VIDEO mode or VR mode. If the DVD+RW is recorded in this manual Features This kind of disc can be overwritten repeatedly, even when the disc is played...
... does not support 16:9 pictures, the picture will appear in 4:3 ratio when it . • Use Sony discs or discs with a has a mark. When you use a DVD-RW, you can use in your DVD Handycam are as deleting or dividing scenes, the material you can play back the disc with a DVD player...) enables you bought, the disc Differences in 16:9 (p.26, 60 ) on your DVD Handycam. mark. Also, formatting removes all images data from VIDEO mode or VR mode. If the DVD+RW is recorded in this manual Features This kind of disc can be overwritten repeatedly, even when the disc is played...
Operating Guide
Page 16
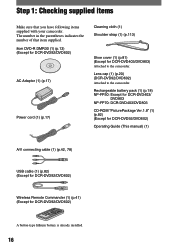
... pack (1) (p.18) NP-FP50: Except for DCR-DVD403/ DVD803 NP-FP70: DCR-DVD403/DVD803 CD-ROM "PicturePackage Ver.1.8" (1) (p.82) (Except for DCR-DVD92/DVD602) Operating Guide (This manual) (1) A/V connecting cable (1) (p.42, 78) USB cable (1) (p.82) (Except for DCR-DVD92/DVD602) Wireless Remote Commander (1) (p.41) (Except for DCR-DVD403/DVD803) Attached to the camcorder. Step 1: Checking supplied items Make sure that...
... pack (1) (p.18) NP-FP50: Except for DCR-DVD403/ DVD803 NP-FP70: DCR-DVD403/DVD803 CD-ROM "PicturePackage Ver.1.8" (1) (p.82) (Except for DCR-DVD92/DVD602) Operating Guide (This manual) (1) A/V connecting cable (1) (p.42, 78) USB cable (1) (p.82) (Except for DCR-DVD92/DVD602) Wireless Remote Commander (1) (p.41) (Except for DCR-DVD403/DVD803) Attached to the camcorder. Step 1: Checking supplied items Make sure that...
Operating Guide
Page 26
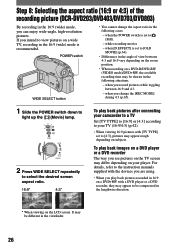
...up the (Movie) lamp. when the POWER switch is recommended. To play back pictures after connecting your camcorder to a TV Set [TV TYPE] to [16:9] or [4:3] according to your player. when [D.EFFECT...is set to [OLD MOVIE] (p.64). • Differences in the angle of the recording picture (DCR-DVD203/DVD403/DVD703/DVD803) By recording in the 16:9 (wide) mode is set to select the desired screen ...RW, the available recording time may appear to (Still). - For details, refer to the instruction manuals supplied with a DVD player or a DVD recorder, they may be shorter in the lengthwise direction...
...up the (Movie) lamp. when the POWER switch is recommended. To play back pictures after connecting your camcorder to a TV Set [TV TYPE] to [16:9] or [4:3] according to your player. when [D.EFFECT...is set to [OLD MOVIE] (p.64). • Differences in the angle of the recording picture (DCR-DVD203/DVD403/DVD703/DVD803) By recording in the 16:9 (wide) mode is set to select the desired screen ...RW, the available recording time may appear to (Still). - For details, refer to the instruction manuals supplied with a DVD player or a DVD recorder, they may be shorter in the lengthwise direction...
Operating Guide
Page 31
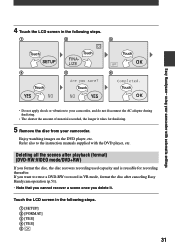
Deleting all the scenes after canceling Easy Handycam operation (p.51). • Note that you cannot recover a scene once you format the disc, the disc recovers recording used capacity and is reusable for finalizing. 5 Remove the disc from your camcorder. 4 Touch the LCD screen in the following steps....after playback (format) (DVD-RW:VIDEO mode/DVD+RW) If you delete it takes for recording thereafter. Refer also to the instruction manuals supplied with automatic settings • Do not apply shock or vibration to record in the following steps. ...
Deleting all the scenes after canceling Easy Handycam operation (p.51). • Note that you cannot recover a scene once you format the disc, the disc recovers recording used capacity and is reusable for finalizing. 5 Remove the disc from your camcorder. 4 Touch the LCD screen in the following steps....after playback (format) (DVD-RW:VIDEO mode/DVD+RW) If you delete it takes for recording thereafter. Refer also to the instruction manuals supplied with automatic settings • Do not apply shock or vibration to record in the following steps. ...
Operating Guide
Page 34
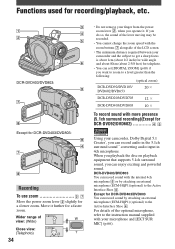
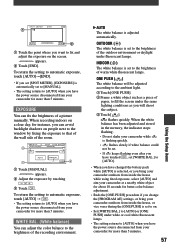
... screen. • The minimum distance required between your camcorder, Dolby Digital 5.1 Creater*, you want to zoom to a level greater than the following: (optical zoom) DCR-DVD92/DVD103/ DVD602/DVD653 20 × DCR-DVD203/DVD703 12 × DCR-DVD403/DVD803 10 × To record sound with more presence... the power zoom lever slightly for DCR-DVD403/DVD803 You can record audio in the 5.1ch surround sound** converting audio input in 4ch microphone. Wider range of the optional microphone, refer to the instruction manual supplied with the internal 4ch microphone or...
... screen. • The minimum distance required between your camcorder, Dolby Digital 5.1 Creater*, you want to zoom to a level greater than the following: (optical zoom) DCR-DVD92/DVD103/ DVD602/DVD653 20 × DCR-DVD203/DVD703 12 × DCR-DVD403/DVD803 10 × To record sound with more presence... the power zoom lever slightly for DCR-DVD403/DVD803 You can record audio in the 5.1ch surround sound** converting audio input in 4ch microphone. Wider range of the optional microphone, refer to the instruction manual supplied with the internal 4ch microphone or...
Operating Guide
Page 35
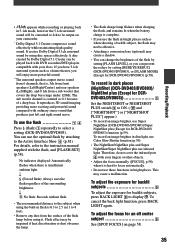
.../NightShot plus and Super NightShot/Super NightShot plus (Except for DCR-DVD403/DVD803) (p.58). To adjust the exposure for backlit subjects To adjust the exposure for an off center subject See [SPOT FOCUS] on your camcorder. * Dolby Digital 5.1 Creater compresses sound effectively while maintaining high...the flash lamp before using the built-in flash is 0.3 to 2.5 m (1 to the instruction manual supplied with your fingers or other objects. • Adjust the focus manually ([FOCUS], p.58) when it . The sub woofer channel is hard to ON. ( and ["NIGHTSHOT"] or...
.../NightShot plus and Super NightShot/Super NightShot plus (Except for DCR-DVD403/DVD803) (p.58). To adjust the exposure for backlit subjects To adjust the exposure for an off center subject See [SPOT FOCUS] on your camcorder. * Dolby Digital 5.1 Creater compresses sound effectively while maintaining high...the flash lamp before using the built-in flash is 0.3 to 2.5 m (1 to the instruction manual supplied with your fingers or other objects. • Adjust the focus manually ([FOCUS], p.58) when it . The sub woofer channel is hard to ON. ( and ["NIGHTSHOT"] or...
Operating Guide
Page 40
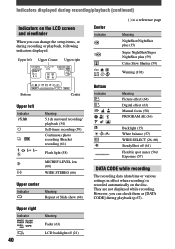
... of Slide show (64) Upper right Indicator 40 Meaning Fader (63) LCD backlight off (21) Bottom Indicator Meaning Picture effect (64) Digital effect (63) Manual focus (58) PROGRAM AE (56) Backlight (35) White balance (57) WIDE SELECT (26, 60) SteadyShot off (61) Flexible spot meter (56)/ Exposure (57...
... of Slide show (64) Upper right Indicator 40 Meaning Fader (63) LCD backlight off (21) Bottom Indicator Meaning Picture effect (64) Digital effect (63) Manual focus (58) PROGRAM AE (56) Backlight (35) White balance (57) WIDE SELECT (26, 60) SteadyShot off (61) Flexible spot meter (56)/ Exposure (57...
Operating Guide
Page 42
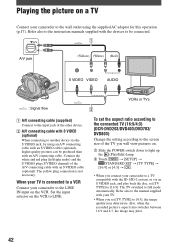
When your TV is not necessary. VCRs or TVs To set the aspect ratio according to the connected TV (16:9/4:3) (DCR-DVD203/DVD403/DVD703/ DVD803) Change the setting according to the screen size of the TV you will view pictures on. Slide the POWER switch down ...full mode automatically. Set the input selector on the VCR to [4:3], the image quality may jitter. 42 Refer also to the manual supplied with your TV. • When you connect your camcorder to a TV compatible with an S VIDEO cable (optional), higher quality pictures can be connected. The yellow plug connection is ...
When your TV is not necessary. VCRs or TVs To set the aspect ratio according to the connected TV (16:9/4:3) (DCR-DVD203/DVD403/DVD703/ DVD803) Change the setting according to the screen size of the TV you will view pictures on. Slide the POWER switch down ...full mode automatically. Set the input selector on the VCR to [4:3], the image quality may jitter. 42 Refer also to the manual supplied with your TV. • When you connect your camcorder to a TV compatible with an S VIDEO cable (optional), higher quality pictures can be connected. The yellow plug connection is ...

Operating Guide
Page 48
... have been installed on your computer. 1 Insert the finalized disc into the DVD devices. 2 Play back the disc. For details, refer to the instruction manuals of your computer. 2 Play back the disc using a DVD playback application. • The disc may not be disabled on some DVD players. • Still ... supplied with the CD-ROM (Except for an instant between the scenes, or some computers. Photomovie • The disc cannot be played back, freezes for DCR-DVD92/ DVD602). 48 Playing back a disc on DVD players, etc. • Do not use the 8cm CD adaptor with an 8cm DVD as it ...
... have been installed on your computer. 1 Insert the finalized disc into the DVD devices. 2 Play back the disc. For details, refer to the instruction manuals of your computer. 2 Play back the disc using a DVD playback application. • The disc may not be disabled on some DVD players. • Still ... supplied with the CD-ROM (Except for an instant between the scenes, or some computers. Photomovie • The disc cannot be played back, freezes for DCR-DVD92/ DVD602). 48 Playing back a disc on DVD players, etc. • Do not use the 8cm CD adaptor with an 8cm DVD as it ...
Operating Guide
Page 57
...;xing the exposure to that of the wall side of the room. Touch [MANUAL]. When the white balance has been adjusted and stored in the memory, the indicator stops flashing. • Do not shake your camcorder while is flashing quickly. • flashes slowly if white balance could not...
...;xing the exposure to that of the wall side of the room. Touch [MANUAL]. When the white balance has been adjusted and stored in the memory, the indicator stops flashing. • Do not shake your camcorder while is flashing quickly. • flashes slowly if white balance could not...

Operating Guide
Page 58
...flash (DCR-DVD403/DVD803) or an external flash (optional) that is about 1 cm (about 1/2 inch) for wide angle and about 80 cm (about 2 5/8 feet) for telephoto. • The setting returns to [AUTO] when you have the power source disconnected from your camcorder for more than ...][END]. • If you set [SPOT FOCUS], [FOCUS] is automatically set to [MANUAL]. • The setting returns to [AUTO] when you have the power source disconnected from your camcorder for more than 5 minutes. CAMERA SET (continued) AUTO SHUTTER Automatically activates the electronic shutter to...
...flash (DCR-DVD403/DVD803) or an external flash (optional) that is about 1 cm (about 1/2 inch) for wide angle and about 80 cm (about 2 5/8 feet) for telephoto. • The setting returns to [AUTO] when you have the power source disconnected from your camcorder for more than ...][END]. • If you set [SPOT FOCUS], [FOCUS] is automatically set to [MANUAL]. • The setting returns to [AUTO] when you have the power source disconnected from your camcorder for more than 5 minutes. CAMERA SET (continued) AUTO SHUTTER Automatically activates the electronic shutter to...
Operating Guide
Page 59
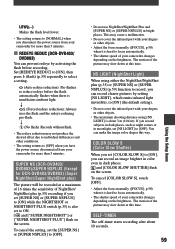
... to [ON] (the default setting). • Do not cover the infrared port with your fingers or other objects. • Adjust the focus manually ([FOCUS], p.58) when it is about 10 seconds. 59 Using the Setup items COLOR SLOW S (Color Slow Shutter) When you set to [ON],...) Makes the flash level lower. • The setting returns to [NORMAL] when you disconnect the power source from your camcorder for more than 5 minutes. REDEYE REDUC (DCR-DVD403/ DVD803) You can make the image color deeper this way. and [COLOR SLOW SHUTTER] flash on the screen. The ...
... to [ON] (the default setting). • Do not cover the infrared port with your fingers or other objects. • Adjust the focus manually ([FOCUS], p.58) when it is about 10 seconds. 59 Using the Setup items COLOR SLOW S (Color Slow Shutter) When you set to [ON],...) Makes the flash level lower. • The setting returns to [NORMAL] when you disconnect the power source from your camcorder for more than 5 minutes. REDEYE REDUC (DCR-DVD403/ DVD803) You can make the image color deeper this way. and [COLOR SLOW SHUTTER] flash on the screen. The ...
Operating Guide
Page 61
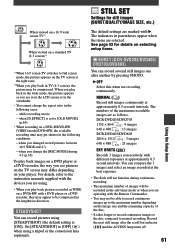
... [D.EFFECT] is [ON]). For details, refer to the instruction manuals supplied with a DVD player or a DVD recorder, they may ...change the aspect ratio in the wide mode, the picture appears as follows; DCR-DVD203/DVD703 1152 × 864 : 4 images 640 × 480 : 13 images DCR-DVD403/DVD803 2016 × 1512 : 3 images 640 × 480 : 21 ...- BRKTG ( ) Records 3 images consecutively with . STILL SET Settings for details on selecting setup items. BURST (DCR-DVD203/DVD403/ DVD703/DVD803) You can record pictures using [STEADYSHOT] (the default setting is set to [OLD MOVIE] (p.64). ...
... [D.EFFECT] is [ON]). For details, refer to the instruction manuals supplied with a DVD player or a DVD recorder, they may ...change the aspect ratio in the wide mode, the picture appears as follows; DCR-DVD203/DVD703 1152 × 864 : 4 images 640 × 480 : 13 images DCR-DVD403/DVD803 2016 × 1512 : 3 images 640 × 480 : 21 ...- BRKTG ( ) Records 3 images consecutively with . STILL SET Settings for details on selecting setup items. BURST (DCR-DVD203/DVD403/ DVD703/DVD803) You can record pictures using [STEADYSHOT] (the default setting is set to [OLD MOVIE] (p.64). ...
Operating Guide
Page 66
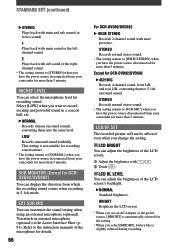
...[LOW] when you want to record exciting and powerful sound in 5.1ch mode. You attach an external microphone (optional) to the instruction manuals of the LCD screen's backlight. NORMAL Standard brightness. LCD/VF SET The recorded picture will not be affected even when you ...You can adjust the brightness of the microphone for details. 66 For DCR-DVD92/DVD602 WIDE STEREO Records 2 channel sound with Touch . /. LCD BL LEVEL You can display the direction from your camcorder for more than 5 minutes. Except for more than 5 minutes. ...
...[LOW] when you want to record exciting and powerful sound in 5.1ch mode. You attach an external microphone (optional) to the instruction manuals of the LCD screen's backlight. NORMAL Standard brightness. LCD/VF SET The recorded picture will not be affected even when you ...You can adjust the brightness of the microphone for details. 66 For DCR-DVD92/DVD602 WIDE STEREO Records 2 channel sound with Touch . /. LCD BL LEVEL You can display the direction from your camcorder for more than 5 minutes. Except for more than 5 minutes. ...
Operating Guide
Page 78
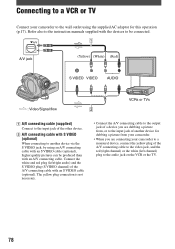
... jack, by using the supplied AC adaptor for this operation (p.17). Refer also to the instruction manuals supplied with the devices to another device for dubbing a picture from your camcorder. • When you are connecting your camcorder to the audio jack on the VCR or the TV. 78 Connecting to a VCR or TV... Connect your camcorder to a monaural device, connect the yellow plug of the A/V connecting cable to the video jack, and the red (right channel) or the white (left /right ...
... jack, by using the supplied AC adaptor for this operation (p.17). Refer also to the instruction manuals supplied with the devices to another device for dubbing a picture from your camcorder. • When you are connecting your camcorder to the audio jack on the VCR or the TV. 78 Connecting to a VCR or TV... Connect your camcorder to a monaural device, connect the yellow plug of the A/V connecting cable to the video jack, and the red (right channel) or the white (left /right ...
Operating Guide
Page 79
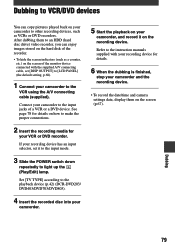
....) on the screen of a VCR or a DVD device. Refer to the playback device (p.42) (DCR-DVD203/ DVD403/DVD703/DVD803). 4 Insert the recorded disc into your camcorder. 5 Start the playback on your camcorder, and record it to the input mode. 3 Slide the POWER switch down repeatedly to light up the... (Play/Edit) lamp. Set [TV TYPE] according to the instruction manuals supplied with the ...
....) on the screen of a VCR or a DVD device. Refer to the playback device (p.42) (DCR-DVD203/ DVD403/DVD703/DVD803). 4 Insert the recorded disc into your camcorder. 5 Start the playback on your camcorder, and record it to the input mode. 3 Slide the POWER switch down repeatedly to light up the... (Play/Edit) lamp. Set [TV TYPE] according to the instruction manuals supplied with the ...


