Operating Instructions
Page 1
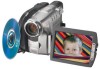
Serial No. Model No. DCR-DVD301 ©2004 Sony Corporation TM SERIES Record the serial number in the space provided below. Serial No. Refer to these numbers whenever you call upon your Sony dealer regarding this manual thoroughly, and retain it for future reference. DCR-DVD301 Model No. Owner's Record The model and serial numbers are located on the bottom. Operating Instructions [US] 2-186-668-11 (1) Digital Video Camera Recorder Operating Instructions Before operating the unit, please read this product. AC-
Serial No. Model No. DCR-DVD301 ©2004 Sony Corporation TM SERIES Record the serial number in the space provided below. Serial No. Refer to these numbers whenever you call upon your Sony dealer regarding this manual thoroughly, and retain it for future reference. DCR-DVD301 Model No. Owner's Record The model and serial numbers are located on the bottom. Operating Instructions [US] 2-186-668-11 (1) Digital Video Camera Recorder Operating Instructions Before operating the unit, please read this product. AC-
Operating Instructions
Page 3
... limits are cautioned that any changes or modifications not expressly approved in this equipment. Certain countries or regions may cause harmful interference to operate this manual could void your local authority. 3 Reorient or relocate the receiving antenna. - However, there is connected. - Increase the separation between the equipment and receiver...
... limits are cautioned that any changes or modifications not expressly approved in this equipment. Certain countries or regions may cause harmful interference to operate this manual could void your local authority. 3 Reorient or relocate the receiving antenna. - However, there is connected. - Increase the separation between the equipment and receiver...
Operating Instructions
Page 10
... for other players Finalizing a disc 64 Changing the disc title 67 Playing back a disc on a DVD player, etc 69 Playing back a disc on your DVD Handycam 8 Getting Started Using this manual 12 Checking the supplied accessories ..... 14 Step 1 Preparing the power source ... 15 Installing/removing the ... wide-screen TV - 16:9 Wide mode 48 Adjusting the white balance manually 50 Shooting techniques to prepare and use your camcorder ...... 56 Choosing and viewing a recording - Review 55 Deleting the last scene (DVD-RWs only 55 Viewing the recordings Playing a disc on a computer with...
... for other players Finalizing a disc 64 Changing the disc title 67 Playing back a disc on a DVD player, etc 69 Playing back a disc on your DVD Handycam 8 Getting Started Using this manual 12 Checking the supplied accessories ..... 14 Step 1 Preparing the power source ... 15 Installing/removing the ... wide-screen TV - 16:9 Wide mode 48 Adjusting the white balance manually 50 Shooting techniques to prepare and use your camcorder ...... 56 Choosing and viewing a recording - Review 55 Deleting the last scene (DVD-RWs only 55 Viewing the recordings Playing a disc on a computer with...
Operating Instructions
Page 12
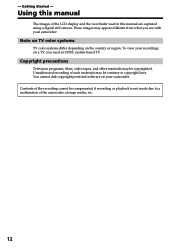
...etc. 12 Note on TV color systems TV color systems differ depending on a TV, you see with your camcorder. Unauthorized recording of the LCD display and the viewfinder used in this manual are captured using a digital still camera. These images may appear different from what you need an NTSC system-...based TV. Getting Started - To view your recordings on the country or region. You cannot dub copyright protected software on your camcorder. Using this manual The images of such materials may be compensated if recording or playback is not made due to copyright laws. -
...etc. 12 Note on TV color systems TV color systems differ depending on a TV, you see with your camcorder. Unauthorized recording of the LCD display and the viewfinder used in this manual are captured using a digital still camera. These images may appear different from what you need an NTSC system-...based TV. Getting Started - To view your recordings on the country or region. You cannot dub copyright protected software on your camcorder. Using this manual The images of such materials may be compensated if recording or playback is not made due to copyright laws. -
Operating Instructions
Page 13
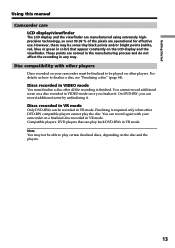
... finalize a disc after all the recording is required only when other players. You can play back DVD-RWs in VR mode. Note You may be played on your camcorder on a finalized disc recorded in VR mode. For details on a disc recorded in VIDEO mode once you can ...in color) that can record again with other players Discs recorded on other DVD-RW compatible players cannot play certain finalized discs, depending on the LCD display and the viewfinder. Getting Started Using this manual Camcorder care LCD display/viewfinder The LCD display and the viewfinder are manufactured using ...
... finalize a disc after all the recording is required only when other players. You can play back DVD-RWs in VR mode. Note You may be played on your camcorder on a finalized disc recorded in VR mode. For details on a disc recorded in VIDEO mode once you can ...in color) that can record again with other players Discs recorded on other DVD-RW compatible players cannot play certain finalized discs, depending on the LCD display and the viewfinder. Getting Started Using this manual Camcorder care LCD display/viewfinder The LCD display and the viewfinder are manufactured using ...
Operating Instructions
Page 20
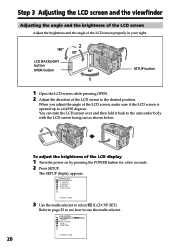
...; 1 SETUP button 1 Open the LCD screen while pressing OPEN. 2 Adjust the direction of the LCD screen to the camcorder body with the LCD screen facing out as shown below. RETURN 20 [ SETUP ] : END MANUAL SET PROGRAM AE P EFFECT D EFFECT WHT BAL AUTO SHTR [ SETUP ] : END 3 Use the multi-selector to select (LCD...
...; 1 SETUP button 1 Open the LCD screen while pressing OPEN. 2 Adjust the direction of the LCD screen to the camcorder body with the LCD screen facing out as shown below. RETURN 20 [ SETUP ] : END MANUAL SET PROGRAM AE P EFFECT D EFFECT WHT BAL AUTO SHTR [ SETUP ] : END 3 Use the multi-selector to select (LCD...
Operating Instructions
Page 32
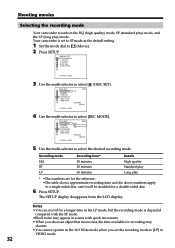
... in the LP mode, but the recording mode is set the recording mode to select [REC MODE]. The SETUP display disappears from the LCD display. MANUAL SET PROGRAM AE P EFFECT D EFFECT WHT BAL AUTO SHTR [ SETUP ] : END 3 Use the multi-selector to select DISC SET REC MODE FORMAT FINALIZE ...UNFINALIZE DISC TITLE RETURN STBY SP REMAIN [30min] [ SETUP ] : END (DISC SET). 4 Use the multi-selector to [LP] in VIDEO mode. 32 Your camcorder is degraded compared with the SP mode. •Block noise may appear in scenes with quick movement. •When you shoot an object that moves...
... in the LP mode, but the recording mode is set the recording mode to select [REC MODE]. The SETUP display disappears from the LCD display. MANUAL SET PROGRAM AE P EFFECT D EFFECT WHT BAL AUTO SHTR [ SETUP ] : END 3 Use the multi-selector to select DISC SET REC MODE FORMAT FINALIZE ...UNFINALIZE DISC TITLE RETURN STBY SP REMAIN [30min] [ SETUP ] : END (DISC SET). 4 Use the multi-selector to [LP] in VIDEO mode. 32 Your camcorder is degraded compared with the SP mode. •Block noise may appear in scenes with quick movement. •When you shoot an object that moves...
Operating Instructions
Page 38
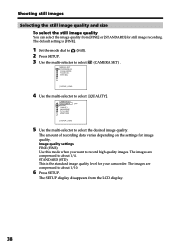
... END 5 Use the multi-selector to about 1/10. 6 Press SETUP. The amount of recording data varies depending on the settings for your camcorder. The images are compressed to about 1/4. Image quality settings FINE (FINE): Use this mode when you want to select [QUALITY]. The SETUP display disappears... QUALITY IMAGESIZE N. STANDARD (STD): This is [FINE]. 1 Set the mode dial to (Still). 2 Press SETUP. 3 Use the multi-selector to select MANUAL SET PROGRAM AE FLASH MODE FLASH LVL WHT BAL (CAMERA SET) . [ SETUP ] : END 4 Use the multi-selector to record high quality images. ...
... END 5 Use the multi-selector to about 1/10. 6 Press SETUP. The amount of recording data varies depending on the settings for your camcorder. The images are compressed to about 1/4. Image quality settings FINE (FINE): Use this mode when you want to select [QUALITY]. The SETUP display disappears... QUALITY IMAGESIZE N. STANDARD (STD): This is [FINE]. 1 Set the mode dial to (Still). 2 Press SETUP. 3 Use the multi-selector to select MANUAL SET PROGRAM AE FLASH MODE FLASH LVL WHT BAL (CAMERA SET) . [ SETUP ] : END 4 Use the multi-selector to record high quality images. ...
Operating Instructions
Page 39
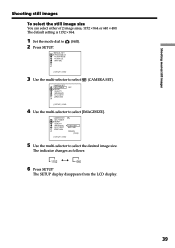
... CAMERA SET SELFTIMER BURST QUALITY IMAGESIZE N. LIGHT RETURN OFF (CAMERA SET). [ SETUP ] : END 4 Use the multi-selector to select CAMERA SET SELFTIMER BURST QUALITY IMAGESIZE N. MANUAL SET PROGRAM AE FLASH MODE FLASH LVL WHT BAL (Still). [ SETUP ] : END 3 Use the multi-selector to select [IMAGESIZE].
... CAMERA SET SELFTIMER BURST QUALITY IMAGESIZE N. LIGHT RETURN OFF (CAMERA SET). [ SETUP ] : END 4 Use the multi-selector to select CAMERA SET SELFTIMER BURST QUALITY IMAGESIZE N. MANUAL SET PROGRAM AE FLASH MODE FLASH LVL WHT BAL (Still). [ SETUP ] : END 3 Use the multi-selector to select [IMAGESIZE].
Operating Instructions
Page 41
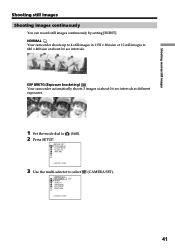
S. LIGHT RETURN OFF [ SETUP ] : END (CAMERA SET). 41 NORMAL Your camcorder shoots up to 4 still images in 1152 × 864 size or 12 still images in 640 × 480 size at different exposures. 1 Set the mode ... Shooting still images Shooting images continuously You can record still images continuously by setting [BURST]. EXP BRKTG (Exposure bracketing) Your camcorder automatically shoots 3 images at about 0.6 sec intervals at about 0.6 sec intervals. MANUAL SET PROGRAM AE FLASH MODE FLASH LVL WHT BAL (Still). [ SETUP ] : END 3 Use the multi-selector to 2 Press SETUP...
S. LIGHT RETURN OFF [ SETUP ] : END (CAMERA SET). 41 NORMAL Your camcorder shoots up to 4 still images in 1152 × 864 size or 12 still images in 640 × 480 size at different exposures. 1 Set the mode ... Shooting still images Shooting images continuously You can record still images continuously by setting [BURST]. EXP BRKTG (Exposure bracketing) Your camcorder automatically shoots 3 images at about 0.6 sec intervals at about 0.6 sec intervals. MANUAL SET PROGRAM AE FLASH MODE FLASH LVL WHT BAL (Still). [ SETUP ] : END 3 Use the multi-selector to 2 Press SETUP...

Operating Instructions
Page 43
.... indicator appears on the LCD display. To cancel BACK LIGHT Press BACK LIGHT again. when recording dark pictures (e.g. BACK LIGHT button Adjusting the exposure manually Adjust the exposure manually in the following cases: - BACK LIGHT When you press EXPOSURE when shooting with a light background, use the backlight. night scenes). when the subject...
.... indicator appears on the LCD display. To cancel BACK LIGHT Press BACK LIGHT again. when recording dark pictures (e.g. BACK LIGHT button Adjusting the exposure manually Adjust the exposure manually in the following cases: - BACK LIGHT When you press EXPOSURE when shooting with a light background, use the backlight. night scenes). when the subject...
Operating Instructions
Page 44
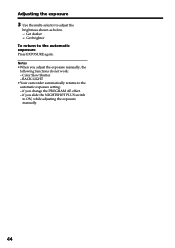
BACK LIGHT •Your camcorder automatically returns to the automatic exposure Press EXPOSURE again. Color Slow Shutter - if you slide the NIGHTSHOT PLUS switch to ON, while adjusting the exposure manually. 44 if you change the PROGRAM AE effect. - Adjusting the exposure 3 Use the multi-selector to adjust the brightness shown as below. -: Get darker +: Get brighter To return to the automatic exposure setting: - Notes •When you adjust the exposure manually, the following functions do not work: -
BACK LIGHT •Your camcorder automatically returns to the automatic exposure Press EXPOSURE again. Color Slow Shutter - if you slide the NIGHTSHOT PLUS switch to ON, while adjusting the exposure manually. 44 if you change the PROGRAM AE effect. - Adjusting the exposure 3 Use the multi-selector to adjust the brightness shown as below. -: Get darker +: Get brighter To return to the automatic exposure setting: - Notes •When you adjust the exposure manually, the following functions do not work: -
Operating Instructions
Page 45
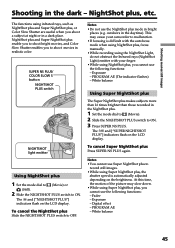
... NightShot plus , the shutter speed is difficult with the autofocus mode when using NightShot plus, focus manually. •While recording using the NightShot Light, do not obstruct the Infrared rays (NightShot Light) emitter with your camcorder to OFF. Fader - outdoors in the dark - Exposure - Exposure - The and ["SUPER NIGHTSHOT PLUS"] indicators flash...
... NightShot plus , the shutter speed is difficult with the autofocus mode when using NightShot plus, focus manually. •While recording using the NightShot Light, do not obstruct the Infrared rays (NightShot Light) emitter with your camcorder to OFF. Fader - outdoors in the dark - Exposure - Exposure - The and ["SUPER NIGHTSHOT PLUS"] indicators flash...
Operating Instructions
Page 48
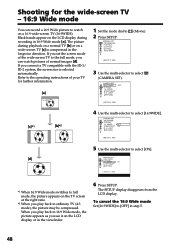
... selected automatically. Refer to the operating instructions of the wide-screen TV to full mode, the picture appears on a 16:9 wide-screen TV (16:9WIDE). MANUAL SET PROGRAM AE P EFFECT D EFFECT WHT BAL AUTO SHTR (Movie). [ SETUP ] : END 3 Use the multi-selector to select [16:9WIDE]. LIGHT RETURN OFF ON [ SETUP...
... selected automatically. Refer to the operating instructions of the wide-screen TV to full mode, the picture appears on a 16:9 wide-screen TV (16:9WIDE). MANUAL SET PROGRAM AE P EFFECT D EFFECT WHT BAL AUTO SHTR (Movie). [ SETUP ] : END 3 Use the multi-selector to select [16:9WIDE]. LIGHT RETURN OFF ON [ SETUP...
Operating Instructions
Page 50
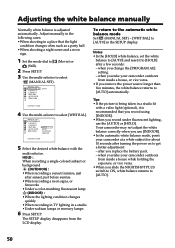
...;When recording a sunset/sunrise, just after a few seconds: - To return to the automatic white balance mode Set (MANUAL SET) - [WHT BAL] to select [WHT BAL]. Your camcorder may not adjust the white balance correctly when you remove the power source longer than five minutes, the white balance returns... in a studio lit with the multi-selector. when you take your camcorder outdoors from inside a house while holding the exposure, or vice versa. •When you take your camcorder outdoors from the LCD display. MANUAL SET PROGRAM AE P EFFECT D EFFECT WHT BAL AUTO SHTR RETURN AUTO...
...;When recording a sunset/sunrise, just after a few seconds: - To return to the automatic white balance mode Set (MANUAL SET) - [WHT BAL] to select [WHT BAL]. Your camcorder may not adjust the white balance correctly when you remove the power source longer than five minutes, the white balance returns... in a studio lit with the multi-selector. when you take your camcorder outdoors from inside a house while holding the exposure, or vice versa. •When you take your camcorder outdoors from the LCD display. MANUAL SET PROGRAM AE P EFFECT D EFFECT WHT BAL AUTO SHTR RETURN AUTO...
Operating Instructions
Page 51
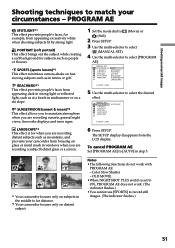
... or golf. BEACH&SKI*1 This effect prevents people's faces from appearing dark in strong light or reflected light, such as people or flowers. MANUAL SET PROGRAM AE P EFFECT D EFFECT WHT BAL AUTO SHTR RETURN AUTO SPOTLIGHT PORTRAIT SPORTS BEACH&SKI SUNSETMOON LANDSCAPE [ SETUP ] : END 5...shake on fastmoving subjects such as mountains, and prevents your circumstances - Color Slow Shutter - Shooting movies/still images Shooting techniques to match your camcorder from focusing on glass or metal mesh in windows when you are recording a subject behind glass or a screen. 1 Set the mode dial...
... or golf. BEACH&SKI*1 This effect prevents people's faces from appearing dark in strong light or reflected light, such as people or flowers. MANUAL SET PROGRAM AE P EFFECT D EFFECT WHT BAL AUTO SHTR RETURN AUTO SPOTLIGHT PORTRAIT SPORTS BEACH&SKI SUNSETMOON LANDSCAPE [ SETUP ] : END 5...shake on fastmoving subjects such as mountains, and prevents your circumstances - Color Slow Shutter - Shooting movies/still images Shooting techniques to match your camcorder from focusing on glass or metal mesh in windows when you are recording a subject behind glass or a screen. 1 Set the mode dial...
Operating Instructions
Page 52
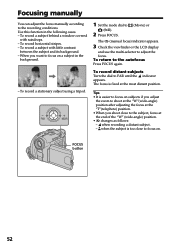
.... - To record a stationary subject using a tripod. FAR NEAR 1 Set the mode dial to (Still). 2 Press FOCUS. (Movie) or The 9 (manual focus) indicator appears. 3 Check the viewfinder or the LCD display and use the multi-selector to FAR until the indicator appears. The focus is fixed... subject in the following cases. - when the subject is easier to the subject, focus at the most distant position. Focusing manually You can adjust the focus manually according to the autofocus Press FOCUS again. Use this function in the background. - To record a subject with raindrops. -
.... - To record a stationary subject using a tripod. FAR NEAR 1 Set the mode dial to (Still). 2 Press FOCUS. (Movie) or The 9 (manual focus) indicator appears. 3 Check the viewfinder or the LCD display and use the multi-selector to FAR until the indicator appears. The focus is fixed... subject in the following cases. - when the subject is easier to the subject, focus at the most distant position. Focusing manually You can adjust the focus manually according to the autofocus Press FOCUS again. Use this function in the background. - To record a subject with raindrops. -
Operating Instructions
Page 54
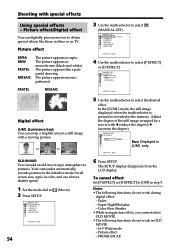
... the multi-selector to select [P EFFECT] or [D EFFECT]. MANUAL SET D EFFECT LUMI. only. [ SETUP ] : END 6 Press SETUP. Super NightShot plus - Your camcorder automatically records pictures in the letterbox mode for all screen size, sepia in sepia. MANUAL SET PROGRAM AE P EFFECT D EFFECT WHT BAL AUTO SHTR ...in films or on TV. To cancel effect Set [P EFFECT] or [D EFFECT] to obtain special effects like a pale pastel drawing. MANUAL SET D EFFECT OFF LUMI . The picture appears mosaicpatterned. Bars: Displayed in a still image with a moving picture. PASTEL MOSAIC Digital effect...
... the multi-selector to select [P EFFECT] or [D EFFECT]. MANUAL SET D EFFECT LUMI. only. [ SETUP ] : END 6 Press SETUP. Super NightShot plus - Your camcorder automatically records pictures in the letterbox mode for all screen size, sepia in sepia. MANUAL SET PROGRAM AE P EFFECT D EFFECT WHT BAL AUTO SHTR ...in films or on TV. To cancel effect Set [P EFFECT] or [D EFFECT] to obtain special effects like a pale pastel drawing. MANUAL SET D EFFECT OFF LUMI . The picture appears mosaicpatterned. Bars: Displayed in a still image with a moving picture. PASTEL MOSAIC Digital effect...
Operating Instructions
Page 67
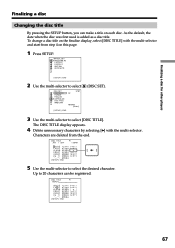
As the default, the date when the disc was first used is added as a disc title. DISC TITLE P1 BEACH [ SETUP ] : END 67 MANUAL SET PROGRAM AE P EFFECT D EFFECT WHT BAL AUTO SHTR [ SETUP ] : END 2 Use the multi-selector to select DISC SET REC MODE FORMAT FINALIZE UNFINALIZE DISC ...
As the default, the date when the disc was first used is added as a disc title. DISC TITLE P1 BEACH [ SETUP ] : END 67 MANUAL SET PROGRAM AE P EFFECT D EFFECT WHT BAL AUTO SHTR [ SETUP ] : END 2 Use the multi-selector to select DISC SET REC MODE FORMAT FINALIZE UNFINALIZE DISC ...
Operating Instructions
Page 110
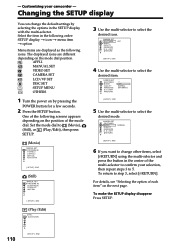
... EXP BRKTG [ SETUP ] : END 5 Use the multi-selector to (Movie), (Still), or (Play/Edit), then press SETUP. (Movie) MANUAL SET PROGRAM AE P EFFECT D EFFECT WHT BAL AUTO SHTR [ SETUP ] : END (Still) MANUAL SET PROGRAM AE FLASH MODE FLASH LVL WHT BAL [ SETUP ] : END (Play/Edit) APPLI. For details, see "Selecting the... the mode dial. The displayed icons are displayed as the following screens appears depending on the position of the multi-selector to confirm your camcorder - S. SLIDE SHOW 3 Use the multi-selector to 5. CAMERA SET SELFTIMER BURST QUALITY IMAGESIZE N. -
... EXP BRKTG [ SETUP ] : END 5 Use the multi-selector to (Movie), (Still), or (Play/Edit), then press SETUP. (Movie) MANUAL SET PROGRAM AE P EFFECT D EFFECT WHT BAL AUTO SHTR [ SETUP ] : END (Still) MANUAL SET PROGRAM AE FLASH MODE FLASH LVL WHT BAL [ SETUP ] : END (Play/Edit) APPLI. For details, see "Selecting the... the mode dial. The displayed icons are displayed as the following screens appears depending on the position of the multi-selector to confirm your camcorder - S. SLIDE SHOW 3 Use the multi-selector to 5. CAMERA SET SELFTIMER BURST QUALITY IMAGESIZE N. -


