Operating Instructions
Page 10
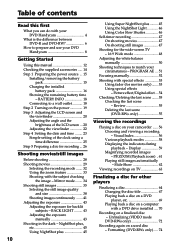
...10 Using Super NightShot plus ......... 45 Using the NightShot Light 46 Using Color Slow Shutter 46 Self-timer recording 47 On shooting movies 47 On shooting still images 47 Shooting for the wide-screen TV - 16:9 Wide mode 48 Adjusting the white balance manually 50 Shooting techniques to match your camcorder...zoom) .. 61 Playing still images automatically - BATTERY INFO 18 Connecting to prepare and use your DVD Handycam 8 Getting Started Using this first What you can do with a DVD drive installed .... 70 Recording on the power 19 Step 3 Adjusting the LCD screen and the ...
...10 Using Super NightShot plus ......... 45 Using the NightShot Light 46 Using Color Slow Shutter 46 Self-timer recording 47 On shooting movies 47 On shooting still images 47 Shooting for the wide-screen TV - 16:9 Wide mode 48 Adjusting the white balance manually 50 Shooting techniques to match your camcorder...zoom) .. 61 Playing still images automatically - BATTERY INFO 18 Connecting to prepare and use your DVD Handycam 8 Getting Started Using this first What you can do with a DVD drive installed .... 70 Recording on the power 19 Step 3 Adjusting the LCD screen and the ...
Operating Instructions
Page 25
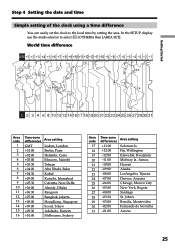
... difference You can easily set the clock to select (OTHERS) then [AREA SET] . World time difference Getting Started 1 2 3 4 6 8 10 12 13 14 16 17 18 19 20 21 22 23 24 25 26 27 29 30 31 Area code...30 +04:00 +04:30 +05:00 +05:30 +06:00 +06:30 +07:00 +08:00 +09:00 +09:30 +10:00 Area setting Lisbon, London Berlin, Paris Helsinki, Cairo Moscow, Nairobi Tehran Abu Dhabi, Baku Kabul Karachi, Islamabad Calcutta, New Delhi Almaty, Dhaka...20 21 22 23 24 25 26 27 28 29 30 31 Time-zone differences +11:00 +12:00 -12:00 -11:00 -10:00 -09:00 -08:00 -07:00 -06:00 -05:00 -04:00 -03:30 -03:00 -02:00 -01...
... difference You can easily set the clock to select (OTHERS) then [AREA SET] . World time difference Getting Started 1 2 3 4 6 8 10 12 13 14 16 17 18 19 20 21 22 23 24 25 26 27 29 30 31 Area code...30 +04:00 +04:30 +05:00 +05:30 +06:00 +06:30 +07:00 +08:00 +09:00 +09:30 +10:00 Area setting Lisbon, London Berlin, Paris Helsinki, Cairo Moscow, Nairobi Tehran Abu Dhabi, Baku Kabul Karachi, Islamabad Calcutta, New Delhi Almaty, Dhaka...20 21 22 23 24 25 26 27 28 29 30 31 Time-zone differences +11:00 +12:00 -12:00 -11:00 -10:00 -09:00 -08:00 -07:00 -06:00 -05:00 -04:00 -03:30 -03:00 -02:00 -01...
Operating Instructions
Page 33
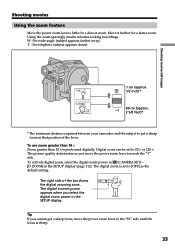
...] as you select the digital zoom power in that position of the bar shows W T the digital zooming zone. To use zoom greater than 10 × Zoom greater than 10 × is set to the "W" side until the focus is sharp. 33 The digital zoom is performed digitally. The digital zooming zone appears...
...] as you select the digital zoom power in that position of the bar shows W T the digital zooming zone. To use zoom greater than 10 × Zoom greater than 10 × is set to the "W" side until the focus is sharp. 33 The digital zoom is performed digitally. The digital zooming zone appears...
Operating Instructions
Page 38
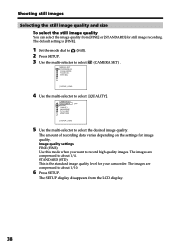
The default setting is the standard image quality level for your camcorder. CAMERA SET SELFTIMER BURST QUALITY IMAGESIZE N. Image quality settings FINE (FINE): Use this mode when you want to select the desired image quality. The SETUP ... to record high quality images. The amount of recording data varies depending on the settings for still image recording. The images are compressed to about 1/10. 6 Press SETUP.
The default setting is the standard image quality level for your camcorder. CAMERA SET SELFTIMER BURST QUALITY IMAGESIZE N. Image quality settings FINE (FINE): Use this mode when you want to select the desired image quality. The SETUP ... to record high quality images. The amount of recording data varies depending on the settings for still image recording. The images are compressed to about 1/10. 6 Press SETUP.
Operating Instructions
Page 46
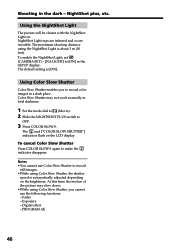
... to (Movie). 2 Slide the NIGHTSHOT PLUS switch to OFF. 3 Press COLOR SLOW S. The maximum shooting distance using Color Slow Shutter, the shutter speed is about 3 m (10 feet). To cancel Color Slow Shutter Press COLOR SLOW S again to [ON] in a dark place. Fader - Color Slow Shutter may slow down. •While using...
... to (Movie). 2 Slide the NIGHTSHOT PLUS switch to OFF. 3 Press COLOR SLOW S. The maximum shooting distance using Color Slow Shutter, the shutter speed is about 3 m (10 feet). To cancel Color Slow Shutter Press COLOR SLOW S again to [ON] in a dark place. Fader - Color Slow Shutter may slow down. •While using...
Operating Instructions
Page 47
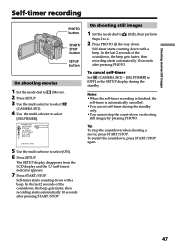
...-selector to select [ON]. 6 Press SETUP. In the last 2 seconds of the countdown, the beep gets faster, then recording starts automatically 10 seconds after pressing START/STOP. The SETUP display disappears from the LCD display and the (self-timer) indicator appears. 7 Press START/STOP. In... the last 2 seconds of the countdown, the beep gets faster, then recording starts automatically 10 seconds after pressing PHOTO. LIGHT RETURN OFF ON [ SETUP ] : END 5 Use the multi-selector to select [SELFTIMER]. On shooting still images 1...
...-selector to select [ON]. 6 Press SETUP. In the last 2 seconds of the countdown, the beep gets faster, then recording starts automatically 10 seconds after pressing START/STOP. The SETUP display disappears from the LCD display and the (self-timer) indicator appears. 7 Press START/STOP. In... the last 2 seconds of the countdown, the beep gets faster, then recording starts automatically 10 seconds after pressing PHOTO. LIGHT RETURN OFF ON [ SETUP ] : END 5 Use the multi-selector to select [SELFTIMER]. On shooting still images 1...
Operating Instructions
Page 50
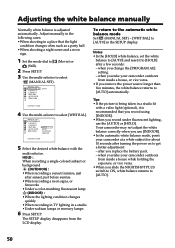
...Still). 2 Press SETUP. 3 Use the multi-selector to select [WHT BAL]. Your camcorder may not adjust the white balance correctly when you replace the battery pack. - when you take your camcorder outdoors from inside a house while holding the exposure, or vice versa. •When... [INDOOR]. •When you record under fluorescent lighting, use [INDOOR]. •In the automatic white balance mode, point your camcorder at a white subject for about 10 seconds after sunset, just before sunrise •When recording a neon signs, or fireworks •Under a color-matching fluorescent lamp ...
...Still). 2 Press SETUP. 3 Use the multi-selector to select [WHT BAL]. Your camcorder may not adjust the white balance correctly when you replace the battery pack. - when you take your camcorder outdoors from inside a house while holding the exposure, or vice versa. •When... [INDOOR]. •When you record under fluorescent lighting, use [INDOOR]. •In the automatic white balance mode, point your camcorder at a white subject for about 10 seconds after sunset, just before sunrise •When recording a neon signs, or fireworks •Under a color-matching fluorescent lamp ...
Operating Instructions
Page 58
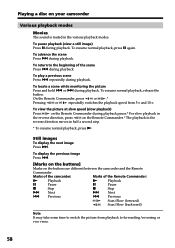
... (forward) Scan/Slow (backward) Note It may take some time to switch the picture from 5 ✕ and 10 ✕. or > during playback. Marks of the camcorder: Marks of the scene Press . To play a previous scene Press . To view the picture at slow speed (...beginning of the Remote Commander: N Playback N Playback X Pause X Pause x Stop x Stop > Next > Next . Previous . Playing a disc on your camcorder Various playback modes Movies The sound is muted in half a second step. * To resume normal playback, press N. To resume normal playback, press X again....
... (forward) Scan/Slow (backward) Note It may take some time to switch the picture from 5 ✕ and 10 ✕. or > during playback. Marks of the camcorder: Marks of the scene Press . To play a previous scene Press . To view the picture at slow speed (...beginning of the Remote Commander: N Playback N Playback X Pause X Pause x Stop x Stop > Next > Next . Previous . Playing a disc on your camcorder Various playback modes Movies The sound is muted in half a second step. * To resume normal playback, press N. To resume normal playback, press X again....

Operating Instructions
Page 69
... JAN 1 2004 2 : 44PM JAN 1 2004 3 : 15PM JAN 1 2004 3 : 38PM JAN 1 2004 4 : 02PM JAN 1 2004 4 : 26PM 1/2 JAN 1 2004 4 : 45PM Recorded date JAN 1 2004 10 : 30AM JAN 1 2004 4 : 50PM JAN 1 2004 5 : 05PM JAN 1 2004 5 : 10PM JAN 1 2004 5 : 30PM JAN 1 2004 5 : 32PM 2/2 JAN 1 2004 4 : 55PM Movies A movie ... back a disc recorded in menu display on players that can play back a finalized disc recorded in every three seconds. To play back DVD-Rs or DVD-RWs. Select the scene to be played back in maximum). Finalizing a disc for other players, the still images must be converted into...
... JAN 1 2004 2 : 44PM JAN 1 2004 3 : 15PM JAN 1 2004 3 : 38PM JAN 1 2004 4 : 02PM JAN 1 2004 4 : 26PM 1/2 JAN 1 2004 4 : 45PM Recorded date JAN 1 2004 10 : 30AM JAN 1 2004 4 : 50PM JAN 1 2004 5 : 05PM JAN 1 2004 5 : 10PM JAN 1 2004 5 : 30PM JAN 1 2004 5 : 32PM 2/2 JAN 1 2004 4 : 55PM Movies A movie ... back a disc recorded in menu display on players that can play back a finalized disc recorded in every three seconds. To play back DVD-Rs or DVD-RWs. Select the scene to be played back in maximum). Finalizing a disc for other players, the still images must be converted into...
Operating Instructions
Page 72
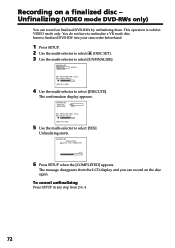
Unfinalizing (VIDEO mode DVD-RWs only) You can record on the disc again. UNFINALIZE EXECUTE RETURN READY EST. The confirmation display appears. UNFINALIZE EXECUTE RETURN NO YES EST. PROCESS ... TIME : 22sec RECORDED AREA : [ SETUP ] : END 4 Use the multi-selector to select [UNFINALIZE]. Recording on finalized DVD-RWs by unfinalizing them. The message disappears from 2 to 4. 72 Unfinalizing starts. Insert a finalized DVD-RW into your camcorder beforehand. 1 Press SETUP. 2 Use the multi-selector to select (DISC SET). 3 Use the multi-selector to select...
Unfinalizing (VIDEO mode DVD-RWs only) You can record on the disc again. UNFINALIZE EXECUTE RETURN READY EST. The confirmation display appears. UNFINALIZE EXECUTE RETURN NO YES EST. PROCESS ... TIME : 22sec RECORDED AREA : [ SETUP ] : END 4 Use the multi-selector to select [UNFINALIZE]. Recording on finalized DVD-RWs by unfinalizing them. The message disappears from 2 to 4. 72 Unfinalizing starts. Insert a finalized DVD-RW into your camcorder beforehand. 1 Press SETUP. 2 Use the multi-selector to select (DISC SET). 3 Use the multi-selector to select...
Operating Instructions
Page 74
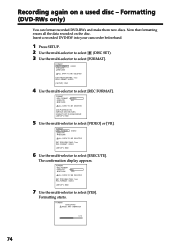
Insert a recorded DVD-RW into your camcorder beforehand. 1 Press SETUP. 2 Use the multi-selector to select (DISC SET). 3 Use ... Use the multi-selector to select [VIDEO] or [VR]. The confirmation display appears. FORMAT EXECUTING AVOID ANY VIBRATION 0:10 74 FORMAT REC FORMAT EXECUTE RETURN VIDEO ALL DATA TO BE DELETED EST. Formatting starts. FORMAT REC FORMAT EXECUTE RETURN ...NO YES ALL DATA TO BE DELETED EST. Recording again on the disc. CANNOT EDIT IN CAMCORDER [ SETUP ] : END 5 Use the multi-selector to select [EXECUTE]. FORMAT REC FORMAT EXECUTE RETURN VIDEO ...
Insert a recorded DVD-RW into your camcorder beforehand. 1 Press SETUP. 2 Use the multi-selector to select (DISC SET). 3 Use ... Use the multi-selector to select [VIDEO] or [VR]. The confirmation display appears. FORMAT EXECUTING AVOID ANY VIBRATION 0:10 74 FORMAT REC FORMAT EXECUTE RETURN VIDEO ALL DATA TO BE DELETED EST. Formatting starts. FORMAT REC FORMAT EXECUTE RETURN ...NO YES ALL DATA TO BE DELETED EST. Recording again on the disc. CANNOT EDIT IN CAMCORDER [ SETUP ] : END 5 Use the multi-selector to select [EXECUTE]. FORMAT REC FORMAT EXECUTE RETURN VIDEO ...

Operating Instructions
Page 75
...You can record on the disc again. Tips •It takes about 10 seconds to format a DVD-RW in VIDEO mode, and about 40 seconds to format a DVD-RW in VR mode. •When you format a finalized disc, you can format DVD-RWs only. VR mode: finalized. VIDEO mode: unfinalized - You can... To cancel formatting Press SETUP in VR mode. 75 The FORMAT display disappears from DVD-Rs. You cannot delete any step from 2 to your camcorder is formatted and you will have a disc in one of your camcorder during formatting, the disc may not be formatted correctly or damaged, and can record ...
...You can record on the disc again. Tips •It takes about 10 seconds to format a DVD-RW in VIDEO mode, and about 40 seconds to format a DVD-RW in VR mode. •When you format a finalized disc, you can format DVD-RWs only. VR mode: finalized. VIDEO mode: unfinalized - You can... To cancel formatting Press SETUP in VR mode. 75 The FORMAT display disappears from DVD-Rs. You cannot delete any step from 2 to your camcorder is formatted and you will have a disc in one of your camcorder during formatting, the disc may not be formatted correctly or damaged, and can record ...
Operating Instructions
Page 101
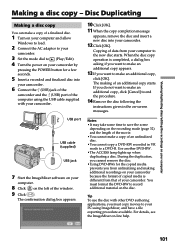
...disc. 1 Turn on your computer and allow Windows to load. 2 Connect the AC adaptor to your camcorder. 3 Set the mode dial to make a copy of an unfinalized disc. •You cannot copy a DVD-RW recorded in the on-screen messages. During the duplication, you cannot remove the disc. •...to make an additional copy, click [OK]. The confirmation dialog box appears. 10 Click [OK]. 11 When the copy completion message appears, remove the disc and insert a new disc into your camcorder. 6 Connect the (USB) jack of the camcorder and the (USB) port of the window. 9 Click . USB port USB...
...disc. 1 Turn on your computer and allow Windows to load. 2 Connect the AC adaptor to your camcorder. 3 Set the mode dial to make a copy of an unfinalized disc. •You cannot copy a DVD-RW recorded in the on-screen messages. During the duplication, you cannot remove the disc. •...to make an additional copy, click [OK]. The confirmation dialog box appears. 10 Click [OK]. 11 When the copy completion message appears, remove the disc and insert a new disc into your camcorder. 6 Connect the (USB) jack of the camcorder and the (USB) port of the window. 9 Click . USB port USB...
Operating Instructions
Page 112
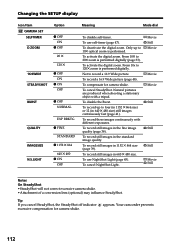
...). Tip If you cancel SteadyShot, the SteadyShot off indicator excessive compensation for camera-shake. To activate the digital zoom. From 10✕ to 10✕ optical zoom is performed. To record still images in the standard image quality. Changing the SETUP display Icon/Item CAMERA... shake. •Attachment of a conversion lens (optional) may influence SteadyShot. To cancel NightShot Light . To compensate for camera-shake. Your camcorder prevents 112 Only up to record a 16:9 Wide picture. To record still images in 640 ✕ 480 size. To disable the Burst...
...). Tip If you cancel SteadyShot, the SteadyShot off indicator excessive compensation for camera-shake. To activate the digital zoom. From 10✕ to 10✕ optical zoom is performed. To record still images in the standard image quality. Changing the SETUP display Icon/Item CAMERA... shake. •Attachment of a conversion lens (optional) may influence SteadyShot. To cancel NightShot Light . To compensate for camera-shake. Your camcorder prevents 112 Only up to record a 16:9 Wide picture. To record still images in 640 ✕ 480 size. To disable the Burst...
Operating Instructions
Page 115
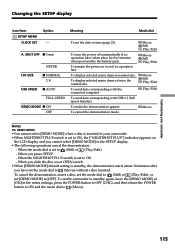
...(CHG), and then return the POWER button to ON and the mode dial to (Movie). 115 To display selected menu items in your camcorder Changing the SETUP display Icon/Item SETUP MENU CLOCK SET Option - To send data corresponding with the connected computer. To cancel the demonstration ... cancel the demonstration, insert a disc, set the mode dial to (Still) or (Play/Edit), or set to [OFF]. Customizing your camcorder. •When NIGHTSHOT PLUS switch is standby, the demonstration starts about 10 minutes after you have taken place for five minutes when powered by the battery pack.
...(CHG), and then return the POWER button to ON and the mode dial to (Movie). 115 To display selected menu items in your camcorder Changing the SETUP display Icon/Item SETUP MENU CLOCK SET Option - To send data corresponding with the connected computer. To cancel the demonstration ... cancel the demonstration, insert a disc, set the mode dial to (Still) or (Play/Edit), or set to [OFF]. Customizing your camcorder. •When NIGHTSHOT PLUS switch is standby, the demonstration starts about 10 minutes after you have taken place for five minutes when powered by the battery pack.
Operating Instructions
Page 120
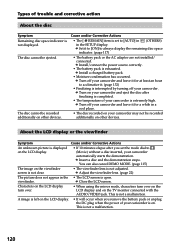
... a disc and the demonstration stops. viewfinder. c Close the LCD screen. A image is displayed on the LCD display. • If 10 minutes elapse after finalizing is completed. • The temperature of your camcorder may not be ejected. About the LCD display or the viewfinder Symptom Cause and/or Corrective Actions An unknown picture...
... a disc and the demonstration stops. viewfinder. c Close the LCD screen. A image is displayed on the LCD display. • If 10 minutes elapse after finalizing is completed. • The temperature of your camcorder may not be ejected. About the LCD display or the viewfinder Symptom Cause and/or Corrective Actions An unknown picture...
Operating Instructions
Page 125
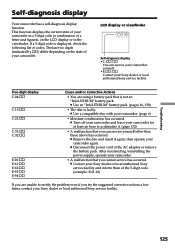
... leave your Sony dealer or local authorized Sony service facility. c Disconnect the power cord of codes. This function displays the current state of your camcorder as a 5-digit code (a combination of a letter and figures), on the state of the 5-digit code. (example: E:61:10) If you are using a battery pack that you try the suggested...
... leave your Sony dealer or local authorized Sony service facility. c Disconnect the power cord of codes. This function displays the current state of your camcorder as a 5-digit code (a combination of a letter and figures), on the state of the 5-digit code. (example: E:61:10) If you are using a battery pack that you try the suggested...
Operating Instructions
Page 130
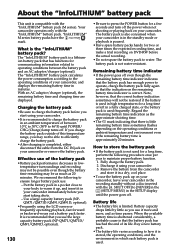
...approximate shooting time. •The E mark indicating that there is that has functions for communicating information related to operating conditions between 10°C to 30°C (50°F to 86°F) until the power goes off even though the remaining battery time ...camcorder. •It is recommended to water. Note, however, that the correct battery indication sometimes will not be as much as 20 minutes. Fully charge the battery pack. 2. When the available battery time is shortened considerably, a probable cause is little remaining battery time sometimes flashes depending on DVD...
...approximate shooting time. •The E mark indicating that there is that has functions for communicating information related to operating conditions between 10°C to 30°C (50°F to 86°F) until the power goes off even though the remaining battery time ...camcorder. •It is recommended to water. Note, however, that the correct battery indication sometimes will not be as much as 20 minutes. Fully charge the battery pack. 2. When the available battery time is shortened considerably, a probable cause is little remaining battery time sometimes flashes depending on DVD...
Operating Instructions
Page 135
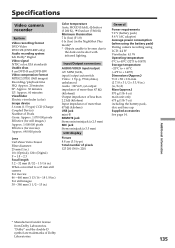
... only) Audio recording system 2ch Dolby* Digital Video signal NTSC color, EIA standards Usable discs 8 cm DVD-R and DVD-RW Video compression format MPEG2/JPEG (Still images) Recording/playback time HQ: Approx. 20 minutes SP: Approx. 30 minutes LP: Approx. 60 minutes ... Effective (for still images ): Approx. 1 000 000 pixels Effective (for movies): Approx. 690 000 pixels Lens Carl Zeiss Vario-Tessar Filter diameter: 25 mm (1 in.) 10× (Optical), 120× (Digital) F = 1.8 - 2.3 Focal length 3.2 - 32 mm (5/32 - 1 5/16 in.) When converted to a 35 mm still camera For movies: 46 - 460 mm ...
... only) Audio recording system 2ch Dolby* Digital Video signal NTSC color, EIA standards Usable discs 8 cm DVD-R and DVD-RW Video compression format MPEG2/JPEG (Still images) Recording/playback time HQ: Approx. 20 minutes SP: Approx. 30 minutes LP: Approx. 60 minutes ... Effective (for still images ): Approx. 1 000 000 pixels Effective (for movies): Approx. 690 000 pixels Lens Carl Zeiss Vario-Tessar Filter diameter: 25 mm (1 in.) 10× (Optical), 120× (Digital) F = 1.8 - 2.3 Focal length 3.2 - 32 mm (5/32 - 1 5/16 in.) When converted to a 35 mm still camera For movies: 46 - 460 mm ...


