Operating Instructions
Page 5
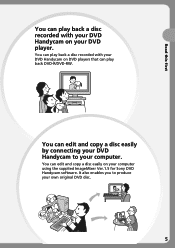
You can edit and copy a disc easily by connecting your DVD Handycam to produce your computer. It also enables you to your own original DVD disc. 5 You can play back a disc recorded with your DVD Handycam on your computer using the supplied ImageMixer Ver.1.5 for Sony DVD Handycam software. You can edit and copy a disc easily on DVD players that can play back DVD-R/DVD-RW. Read this first You can play back a disc recorded with your DVD Handycam on your DVD player.
You can edit and copy a disc easily by connecting your DVD Handycam to produce your computer. It also enables you to your own original DVD disc. 5 You can play back a disc recorded with your DVD Handycam on your computer using the supplied ImageMixer Ver.1.5 for Sony DVD Handycam software. You can edit and copy a disc easily on DVD players that can play back DVD-R/DVD-RW. Read this first You can play back a disc recorded with your DVD Handycam on your DVD player.
Operating Instructions
Page 92
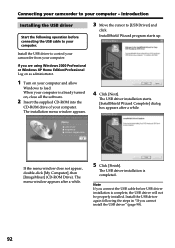
... The menu window appears after a while. The USB driver installation is already turned on your computer and allow Windows to control your camcorder from your computer - Install the USB driver again following operation before USB driver installation is complete, the USB driver will not be properly... the supplied CD-ROM into the CD-ROM drive of your computer. If the menu window does not appear, double-click [My Computer], then [ImageMixer] (CD-ROM Drive). Note If you cannot install the USB driver" (page 98). 92 InstallShield Wizard program starts up. 4 Click [Next]. ...
... The menu window appears after a while. The USB driver installation is already turned on your computer and allow Windows to control your camcorder from your computer - Install the USB driver again following operation before USB driver installation is complete, the USB driver will not be properly... the supplied CD-ROM into the CD-ROM drive of your computer. If the menu window does not appear, double-click [My Computer], then [ImageMixer] (CD-ROM Drive). Note If you cannot install the USB driver" (page 98). 92 InstallShield Wizard program starts up. 4 Click [Next]. ...
Operating Instructions
Page 93
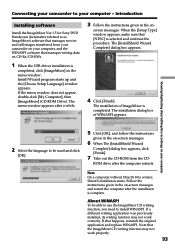
... procedure. Introduction Installing software Install the ImageMixer Ver.1.5 for Sony DVD Handycam (hereinafter referred to install WINASPI. Follow the instructions given in the on the menu window. The installation dialog box of ImageMixer is completed, click [ImageMixer] on -screen messages and restart the computer after the computer restarts. Connecting your camcorder to your computer 2 Select the language...
... procedure. Introduction Installing software Install the ImageMixer Ver.1.5 for Sony DVD Handycam (hereinafter referred to install WINASPI. Follow the instructions given in the on the menu window. The installation dialog box of ImageMixer is completed, click [ImageMixer] on -screen messages and restart the computer after the computer restarts. Connecting your camcorder to your computer 2 Select the language...
Operating Instructions
Page 98
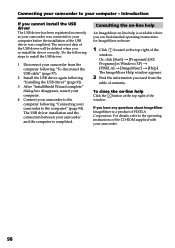
...install the driver correctly. Connecting your camcorder to your camcorder to the computer" (page 94). The incorrect data of the USB driver will be deleted when you have any questions about ImageMixer ImageMixer is a product of contents. The ImageMixer Help window appears. 2 Find the...click [Start] t [Programs] ([All Programs] in Windows XP) t [PIXELA] t [ImageMixer] t [Help]. For details, refer to your camcorder. 98 The USB driver installation and the connection between your camcorder and the computer is available where you need from the computer following "To disconnect the USB cable...
...install the driver correctly. Connecting your camcorder to your camcorder to the computer" (page 94). The incorrect data of the USB driver will be deleted when you have any questions about ImageMixer ImageMixer is a product of contents. The ImageMixer Help window appears. 2 Find the...click [Start] t [Programs] ([All Programs] in Windows XP) t [PIXELA] t [ImageMixer] t [Help]. For details, refer to your camcorder. 98 The USB driver installation and the connection between your camcorder and the computer is available where you need from the computer following "To disconnect the USB cable...
Operating Instructions
Page 99
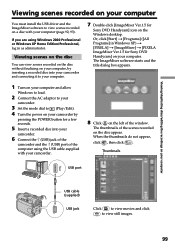
.../Edit). 4 Turn the power on your camcorder by inserting a recorded disc into your camcorder. 6 Connect the (USB) jack of the camcorder and the (USB) port of the computer using Windows 2000 Professional or Windows XP Home Edition/Professional, log in Windows XP) t [PIXELA] t [ImageMixer] t [PIXELA ImageMixer Ver.1.5 for Sony DVD Handycam] icon on the Windows desktop. The thumbnails...
.../Edit). 4 Turn the power on your camcorder by inserting a recorded disc into your camcorder. 6 Connect the (USB) jack of the camcorder and the (USB) port of the computer using Windows 2000 Professional or Windows XP Home Edition/Professional, log in Windows XP) t [PIXELA] t [ImageMixer] t [PIXELA ImageMixer Ver.1.5 for Sony DVD Handycam] icon on the Windows desktop. The thumbnails...
Operating Instructions
Page 101
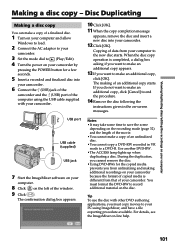
... the ImageMixer software on your camcorder. For details, see the ImageMixer on the left of data from your camcorder. 12 Click [OK]. Copying of the window. 9 Click . Use another DVD-RW. •The ACCESS lamp lights up when duplicating a disc. You must copy movies to your camcorder. 3... the copy completion message appears, remove the disc and insert a new disc into your camcorder. 6 Connect the (USB) jack of the camcorder and the (USB) port of the computer using ImageMixer, and have a file exporting procedure available. The making additional recordings on the disc....
... the ImageMixer software on your camcorder. For details, see the ImageMixer on the left of data from your camcorder. 12 Click [OK]. Copying of the window. 9 Click . Use another DVD-RW. •The ACCESS lamp lights up when duplicating a disc. You must copy movies to your camcorder. 3... the copy completion message appears, remove the disc and insert a new disc into your camcorder. 6 Connect the (USB) jack of the camcorder and the (USB) port of the computer using ImageMixer, and have a file exporting procedure available. The making additional recordings on the disc....

Operating Instructions
Page 145
......... 24, 116 Delete 55, 89 DEMO 115 Digital effect 54 Digital zoom 33 Disc dubbing 106 Disc title 67 Disc 6 DISPLAY 59 Divide 84, 87 DVD-R 6 DVD-RW 6 E EXP BRKTG 41 EXPOSURE 43 F, G, H FADER 53 Fade in/out 53 Finalize 64 FINE 38 Flash 111 Folder 71 FOCUS 52 Format ...74 Full charge 17 Grip belt 28 HiFi SOUND 114 HQ 32 I, J, K, L ImageMixer 93, 99 Image quality 38, 112 Image size 39, 112 "InfoLITHIUM" battery ...... 130 Infrared ray emitter 139 Intelligent accessory shoe .... 139 JPEG 40 LANDSCAPE...
......... 24, 116 Delete 55, 89 DEMO 115 Digital effect 54 Digital zoom 33 Disc dubbing 106 Disc title 67 Disc 6 DISPLAY 59 Divide 84, 87 DVD-R 6 DVD-RW 6 E EXP BRKTG 41 EXPOSURE 43 F, G, H FADER 53 Fade in/out 53 Finalize 64 FINE 38 Flash 111 Folder 71 FOCUS 52 Format ...74 Full charge 17 Grip belt 28 HiFi SOUND 114 HQ 32 I, J, K, L ImageMixer 93, 99 Image quality 38, 112 Image size 39, 112 "InfoLITHIUM" battery ...... 130 Infrared ray emitter 139 Intelligent accessory shoe .... 139 JPEG 40 LANDSCAPE...

