Operating Instructions
Page 2
... use . Use of controls or adjustments or performance of Conformity Trade Name: SONY Model No.: DCR-DVD101 Responsible Party:Sony Electronics Inc. Bernardo Dr, San Diego, CA 92127 U.S.A. Your Handycam is loaded with advanced features, but at the same time it is subject ...procedures other than those specified herein may cause undesired operation. 2 With your Handycam, you can help preserve our environment by returning your purchase of rechargeable batteries, call : Sony Customer Information Center 1-800-222-SONY (7669) The number below is intended to alert the user to come....
... use . Use of controls or adjustments or performance of Conformity Trade Name: SONY Model No.: DCR-DVD101 Responsible Party:Sony Electronics Inc. Bernardo Dr, San Diego, CA 92127 U.S.A. Your Handycam is loaded with advanced features, but at the same time it is subject ...procedures other than those specified herein may cause undesired operation. 2 With your Handycam, you can help preserve our environment by returning your purchase of rechargeable batteries, call : Sony Customer Information Center 1-800-222-SONY (7669) The number below is intended to alert the user to come....
Operating Instructions
Page 3
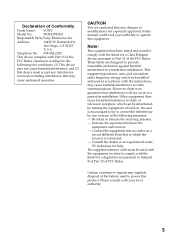
... with the limits for a digital device pursuant to radio communications. Address: 16450 W. Telephone No.: 858-942-2230 This device complies with Part 15 of the battery used with the equipment in accordance with the limits for help. Note: This equipment has been tested and found to comply with the instructions, may... off and on a circuit different from that interference will not occur in this device must be determined by one or more of Conformity Trade Name: SONY Model No.: DCR-DVD201 Responsible Party:Sony Electronics Inc.
... with the limits for a digital device pursuant to radio communications. Address: 16450 W. Telephone No.: 858-942-2230 This device complies with Part 15 of the battery used with the equipment in accordance with the limits for help. Note: This equipment has been tested and found to comply with the instructions, may... off and on a circuit different from that interference will not occur in this device must be determined by one or more of Conformity Trade Name: SONY Model No.: DCR-DVD201 Responsible Party:Sony Electronics Inc.
Operating Instructions
Page 10
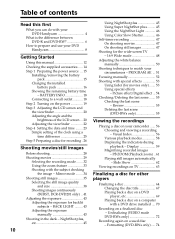
... 50 Shooting techniques to match your camcorder ...... 56 Choosing and viewing a ...DVD-RWs only) ..... 74 Mirror mode ........ 34 Shooting still images 35 Selecting the still image quality and size 38 Shooting images continuously (BURST, DCR-DVD201...DVD Handycam 4 What is the difference between DVD-R and DVD-RW 6 How to prepare and use your DVD Handycam 8 Getting Started Using this manual 12 Checking the supplied accessories ..... 14 Step 1 Preparing the power source ... 15 Installing/removing the battery pack 15 Charging the installed battery pack 16 Showing the remaining battery...
... 50 Shooting techniques to match your camcorder ...... 56 Choosing and viewing a ...DVD-RWs only) ..... 74 Mirror mode ........ 34 Shooting still images 35 Selecting the still image quality and size 38 Shooting images continuously (BURST, DCR-DVD201...DVD Handycam 4 What is the difference between DVD-R and DVD-RW 6 How to prepare and use your DVD Handycam 8 Getting Started Using this manual 12 Checking the supplied accessories ..... 14 Step 1 Preparing the power source ... 15 Installing/removing the battery pack 15 Charging the installed battery pack 16 Showing the remaining battery...
Operating Instructions
Page 11
... your camcorder Changing the SETUP display 110 Selecting the option of each item .. 111 Troubleshooting Types of trouble and corrective action 118 Self-diagnosis display 125 Warning indicators 126 Warning messages 127 Additional information About the disc 129 About the "InfoLITHIUM" battery pack ... 98 Viewing scenes recorded on your camcorder - Introduction 91 System requirements 91 Installing the USB driver 92 Installing software 93 Connecting your camcorder to a movie file - Playlist 76 Registering movies or still images in VR mode (DVD-RWs only) Selecting the playing order ...
... your camcorder Changing the SETUP display 110 Selecting the option of each item .. 111 Troubleshooting Types of trouble and corrective action 118 Self-diagnosis display 125 Warning indicators 126 Warning messages 127 Additional information About the disc 129 About the "InfoLITHIUM" battery pack ... 98 Viewing scenes recorded on your camcorder - Introduction 91 System requirements 91 Installing the USB driver 92 Installing software 93 Connecting your camcorder to a movie file - Playlist 76 Registering movies or still images in VR mode (DVD-RWs only) Selecting the playing order ...
Operating Instructions
Page 14
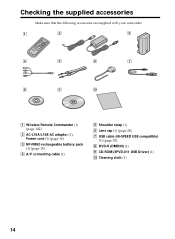
Cleaning cloth (1) 14 Checking the supplied accessories Make sure that the following accessories are supplied with your camcorder. 1 2 3 4 5 6 7 8 9 0 1 Wireless Remote Commander (1) (page 142) 2 AC-L15A/L15B AC adaptor (1), Power cord (1) (page 16) 3 NP-FM50 rechargeable battery pack (1) (page 15) 4 A/V connecting cable (1) 5 Shoulder strap (1) 6 Lens cap (1) (page 28) 7 USB cable (Hi-SPEED USB compatible) (1) (page 92) 8 DVD-R (DMR30) (1) 9 CD-ROM (SPVD-011 USB Driver) (1) q;
Cleaning cloth (1) 14 Checking the supplied accessories Make sure that the following accessories are supplied with your camcorder. 1 2 3 4 5 6 7 8 9 0 1 Wireless Remote Commander (1) (page 142) 2 AC-L15A/L15B AC adaptor (1), Power cord (1) (page 16) 3 NP-FM50 rechargeable battery pack (1) (page 15) 4 A/V connecting cable (1) 5 Shoulder strap (1) 6 Lens cap (1) (page 28) 7 USB cable (Hi-SPEED USB compatible) (1) (page 92) 8 DVD-R (DMR30) (1) 9 CD-ROM (SPVD-011 USB Driver) (1) q;

Operating Instructions
Page 15
Getting Started Step 1 Preparing the power source Installing/removing the battery pack To install the battery pack, slide it in and up in the direction of the arrow until it clicks. To remove the battery pack 1 Slide the battery pack in the direction of arrow while pressing the battery release button. 2 Slide the battery pack down. 1 2 BATT release button 15
Getting Started Step 1 Preparing the power source Installing/removing the battery pack To install the battery pack, slide it in and up in the direction of the arrow until it clicks. To remove the battery pack 1 Slide the battery pack in the direction of arrow while pressing the battery release button. 2 Slide the battery pack down. 1 2 BATT release button 15
Operating Instructions
Page 16
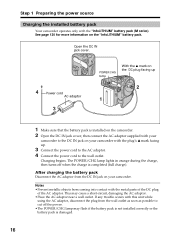
... plug of the AC adaptor. Step 1 Preparing the power source Charging the installed battery pack Your camcorder operates only with your camcorder to the DC IN jack on your camcorder. See page 130 for more information on your camcorder with the plug's v mark facing up. 3 Connect the power cord to the... AC adaptor. 4 Connect the power cord to cut off when the charge is installed on the camcorder. 2 Open the DC IN jack cover, then connect the AC adaptor supplied with the "InfoLITHIUM" battery pack (M ...
... plug of the AC adaptor. Step 1 Preparing the power source Charging the installed battery pack Your camcorder operates only with your camcorder to the DC IN jack on your camcorder. See page 130 for more information on your camcorder with the plug's v mark facing up. 3 Connect the power cord to the... AC adaptor. 4 Connect the power cord to cut off when the charge is installed on the camcorder. 2 Open the DC IN jack cover, then connect the AC adaptor supplied with the "InfoLITHIUM" battery pack (M ...
Operating Instructions
Page 17
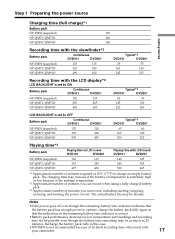
... 120 NP-QM71/QM71D 335 300 NP-QM91/QM91D 505 455 Typical*3 DVD101 DVD201 65 60 165 150 250 225 Playing time*2 Battery pack Playing time on the remaining battery time indicator is correct. •Battery pack performance decreases in this case. •NP-FM30 is extremely high or...screen DVD101 DVD201 Playing time with LCD closed DVD101 DVD201 NP-FM50 (supplied) 130 115 140 125 NP-QM71/QM71D 315 285 340 305 NP-QM91/QM91D 475 430 520 465 *1 Approximate number of its short recording time when used with your camcorder. 17 The actual battery life ...
... 120 NP-QM71/QM71D 335 300 NP-QM91/QM91D 505 455 Typical*3 DVD101 DVD201 65 60 165 150 250 225 Playing time*2 Battery pack Playing time on the remaining battery time indicator is correct. •Battery pack performance decreases in this case. •NP-FM30 is extremely high or...screen DVD101 DVD201 Playing time with LCD closed DVD101 DVD201 NP-FM50 (supplied) 130 115 140 125 NP-QM71/QM71D 315 285 340 305 NP-QM91/QM91D 475 430 520 465 *1 Approximate number of its short recording time when used with your camcorder. 17 The actual battery life ...
Operating Instructions
Page 18
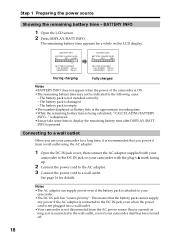
...While the remaining battery time is ON. •The remaining battery time may take some time to display the remaining battery time after DISPLAY/BATT INFO is attached to your camcorder with your camcorder to a wall outlet. BATTERY INFO BATTERY CHARGE LEVEL 0% 50% 100% BATTERY INFO BATTERY CHARGE LEVEL ...SCREEN : 120 min VIEWFINDER : 135 min During charging Fully charged Notes •BATTERY INFO does not appear when the power of the camcorder is being calculated, "CALCULATING BATTERY INFO..." The battery pack is empty. •The number displayed as it from a wall outlet ...
...While the remaining battery time is ON. •The remaining battery time may take some time to display the remaining battery time after DISPLAY/BATT INFO is attached to your camcorder with your camcorder to a wall outlet. BATTERY INFO BATTERY CHARGE LEVEL 0% 50% 100% BATTERY INFO BATTERY CHARGE LEVEL ...SCREEN : 120 min VIEWFINDER : 135 min During charging Fully charged Notes •BATTERY INFO does not appear when the power of the camcorder is being calculated, "CALCULATING BATTERY INFO..." The battery pack is empty. •The number displayed as it from a wall outlet ...

Operating Instructions
Page 21
...; : Get Darker + : Get Brighter The LCD screen brightness is adjusted. 6 Press SETUP. Select (LCD/VF SET) then [LCD B.L.] in the SETUP display when using the battery pack (page 113). •The [LCD BRIGHT], [LCD B.L.] and [LCD COLOR] settings do not affect the brightness of the image when you turn off the... LCD back light, the icon appears on the LCD display. 21 When you use the camcorder outdoors, set it to OFF so that the battery pack lasts longer. •When you are recording. •The backlight of the LCD screen is set to select [LCD BRIGHT...
...; : Get Darker + : Get Brighter The LCD screen brightness is adjusted. 6 Press SETUP. Select (LCD/VF SET) then [LCD B.L.] in the SETUP display when using the battery pack (page 113). •The [LCD BRIGHT], [LCD B.L.] and [LCD COLOR] settings do not affect the brightness of the image when you turn off the... LCD back light, the icon appears on the LCD display. 21 When you use the camcorder outdoors, set it to OFF so that the battery pack lasts longer. •When you are recording. •The backlight of the LCD screen is set to select [LCD BRIGHT...
Operating Instructions
Page 22
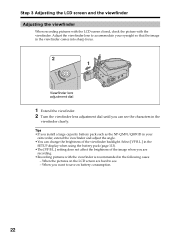
...lens to see the characters in the SETUP display when using the battery pack (page 113). •The [VF B.L.] setting does not affect the brightness of the viewfinder backlight. Tips •If you install a large capacity battery pack such as the NP-QM91/QM91D in your eyesight so ...that the image in the following cases: - When you are hard to accommodate your camcorder, extend the viewfinder and adjust the angle. •You can see ....
...lens to see the characters in the SETUP display when using the battery pack (page 113). •The [VF B.L.] setting does not affect the brightness of the viewfinder backlight. Tips •If you install a large capacity battery pack such as the NP-QM91/QM91D in your eyesight so ...that the image in the following cases: - When you are hard to accommodate your camcorder, extend the viewfinder and adjust the angle. •You can see ....
Operating Instructions
Page 23
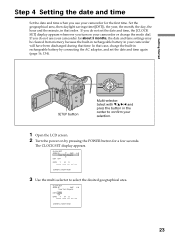
...Step 4 Setting the date and time Set the date and time when you use your camcorder for about 3 months, the date and time settings may be cleared from memory because the built-in rechargeable battery in your camcorder will have been discharged during that case, charge the built-in rechargeable... battery by pressing the POWER button for the first time. The CLOCK SET display appears. CLOCK SET ...
...Step 4 Setting the date and time Set the date and time when you use your camcorder for about 3 months, the date and time settings may be cleared from memory because the built-in rechargeable battery in your camcorder will have been discharged during that case, charge the built-in rechargeable... battery by pressing the POWER button for the first time. The CLOCK SET display appears. CLOCK SET ...
Operating Instructions
Page 27
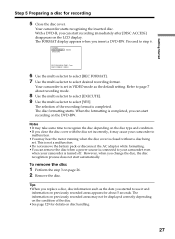
...;Do not remove the battery pack or disconnect the AC adaptor while formatting. •You can remove the disc when a power source is connected to your camcorder even when your camcorder to malfunction. •You may not be displayed correctly depending on the DVD-RW. The information on...mode as the date you can start automatically. Your camcorder is completed, you replace a disc, disc information such as the default setting. Refer to page 7 about 5 seconds. The disc formatting starts. However, when you insert a DVD-RW. Tips •When you can start recording immediately...
...;Do not remove the battery pack or disconnect the AC adaptor while formatting. •You can remove the disc when a power source is connected to your camcorder even when your camcorder to malfunction. •You may not be displayed correctly depending on the DVD-RW. The information on...mode as the date you can start automatically. Your camcorder is completed, you replace a disc, disc information such as the default setting. Refer to page 7 about 5 seconds. The disc formatting starts. However, when you insert a DVD-RW. Tips •When you can start recording immediately...
Operating Instructions
Page 28
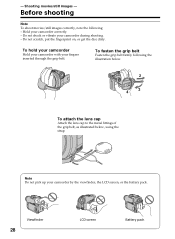
... through the grip belt. - To fasten the grip belt Fasten the grip belt firmly following : - To hold your camcorder Hold your camcorder with your camcorder by the viewfinder, the LCD screen, or the battery pack. Hold your camcorder during shooting. - Before shooting Note To shoot movies/still images correctly, note the following the illustration below... belt, as illustrated below, using the strap. Do not scratch, put the fingerprint on, or get the disc dirty. Do not shock or vibrate your camcorder correctly. - Viewfinder 28 LCD screen Battery pack
... through the grip belt. - To fasten the grip belt Fasten the grip belt firmly following : - To hold your camcorder Hold your camcorder with your camcorder by the viewfinder, the LCD screen, or the battery pack. Hold your camcorder during shooting. - Before shooting Note To shoot movies/still images correctly, note the following the illustration below... belt, as illustrated below, using the strap. Do not scratch, put the fingerprint on, or get the disc dirty. Do not shock or vibrate your camcorder correctly. - Viewfinder 28 LCD screen Battery pack
Operating Instructions
Page 29
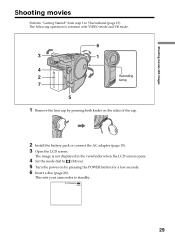
... 29 Shooting movies/still images Shooting movies Perform "Getting Started" from step 1 to (Movie). 5 Turn the power on the sides of the cap. 2 Install the battery pack or connect the AC adaptor (page 15). 3 Open the LCD screen. The image is common with VIDEO mode and VR mode. 6 3 1 4 2 Recording lamp 7 5 1 Remove...
... 29 Shooting movies/still images Shooting movies Perform "Getting Started" from step 1 to (Movie). 5 Turn the power on the sides of the cap. 2 Install the battery pack or connect the AC adaptor (page 15). 3 Open the LCD screen. The image is common with VIDEO mode and VR mode. 6 3 1 4 2 Recording lamp 7 5 1 Remove...
Operating Instructions
Page 30
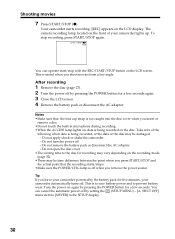
... be damaged. - This is not caught into the disc cover when you leave your camcorder automatically turns off . - Do not apply shock or shake the camcorder. - SHUT OFF] menu item to prevent battery wear. After recording 1 Remove the disc (page 27). 2 Turn the power off...3 Close the LCD screen. 4 Remove the battery pack or disconnect the AC adaptor. Take note of your camcorder lights up. Shooting movies 7 Press START/STOP (z). Your camcorder starts recording. [REC] appears on again by the battery pack for five minutes, your camcorder powered by pressing the POWER button for a ...
... be damaged. - This is not caught into the disc cover when you leave your camcorder automatically turns off . - Do not apply shock or shake the camcorder. - SHUT OFF] menu item to prevent battery wear. After recording 1 Remove the disc (page 27). 2 Turn the power off...3 Close the LCD screen. 4 Remove the battery pack or disconnect the AC adaptor. Take note of your camcorder lights up. Shooting movies 7 Press START/STOP (z). Your camcorder starts recording. [REC] appears on again by the battery pack for five minutes, your camcorder powered by pressing the POWER button for a ...
Operating Instructions
Page 31
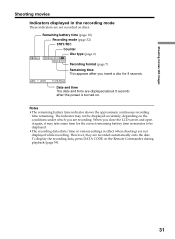
...2004 11:23:45AM Date and time The date and time are displayed about 5 seconds after you insert a disc for the correct remaining battery time in minutes to be displayed accurately, depending on the Remote Commander during playback (page 59). 31 However, they are not displayed while... it may not be displayed. •The recording data (date/time or various settings in effect when shooting) are recorded automatically onto the disc. Remaining battery time (page 18) Recording mode (page 32) STBY/REC Counter Disc type (page 6) 40min REC 0:00:01 -R [30min] VIDEO Recording format (...
...2004 11:23:45AM Date and time The date and time are displayed about 5 seconds after you insert a disc for the correct remaining battery time in minutes to be displayed accurately, depending on the Remote Commander during playback (page 59). 31 However, they are not displayed while... it may not be displayed. •The recording data (date/time or various settings in effect when shooting) are recorded automatically onto the disc. Remaining battery time (page 18) Recording mode (page 32) STBY/REC Counter Disc type (page 6) 40min REC 0:00:01 -R [30min] VIDEO Recording format (...
Operating Instructions
Page 35
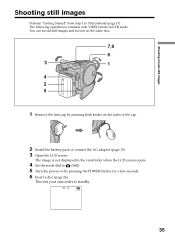
The image is common with VIDEO mode and VR mode. This sets your camcorder to (Still). 5 Turn the power on the sides of the cap. 2 Install the battery pack or connect the AC adaptor (page 15). 3 Open the LCD screen. Shooting movies/still images Shooting still images Perform "Getting Started" from step 1 to...
The image is common with VIDEO mode and VR mode. This sets your camcorder to (Still). 5 Turn the power on the sides of the cap. 2 Install the battery pack or connect the AC adaptor (page 15). 3 Open the LCD screen. Shooting movies/still images Shooting still images Perform "Getting Started" from step 1 to...
Operating Instructions
Page 37
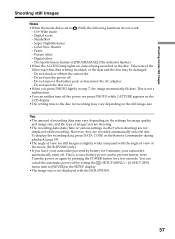
...battery wear. Color Slow Shutter - Picture effect - Take note of [PROGRAM AE] (The indicator flashes.) •When the ACCESS lamp lights on, data is not displayed with the angle of view of recording data may be damaged. - Do not shock or vibrate the camcorder. - Tips •The amount of the movie (DCR-DVD201... only). •If you leave your camcorder powered by pressing the POWER button for 5 minutes, your camcorder automatically turns off . - Turn the power on the disc...
...battery wear. Color Slow Shutter - Picture effect - Take note of [PROGRAM AE] (The indicator flashes.) •When the ACCESS lamp lights on, data is not displayed with the angle of view of recording data may be damaged. - Do not shock or vibrate the camcorder. - Tips •The amount of the movie (DCR-DVD201... only). •If you leave your camcorder powered by pressing the POWER button for 5 minutes, your camcorder automatically turns off . - Turn the power on the disc...
Operating Instructions
Page 50
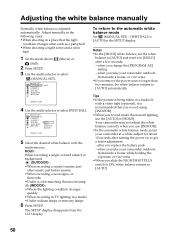
... white balance correctly when you change the [PROGRAM AE] setting. - when you take your camcorder outdoors from inside a house while holding the exposure, or vice versa. •When you replace the battery pack. - The SETUP display disappears from inside a house, or vice versa. •If... you record under fluorescent lighting, use [INDOOR]. •In the automatic white balance mode, point your camcorder outdoors from the LCD display. Notes •...
... white balance correctly when you change the [PROGRAM AE] setting. - when you take your camcorder outdoors from inside a house while holding the exposure, or vice versa. •When you replace the battery pack. - The SETUP display disappears from inside a house, or vice versa. •If... you record under fluorescent lighting, use [INDOOR]. •In the automatic white balance mode, point your camcorder outdoors from the LCD display. Notes •...


