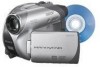

Operating Guide
Page 3
... power company. If you are provided for future reference. Overloading Do not overload wall outlets, extension cords or convenience receptacles beyond their capacity, since this manual for necessary ventilation. Attachments Do not use attachments not recommended by placing the set in a confined space, such as they may cause hazards. Cleaning Unplug...
... power company. If you are provided for future reference. Overloading Do not overload wall outlets, extension cords or convenience receptacles beyond their capacity, since this manual for necessary ventilation. Attachments Do not use attachments not recommended by placing the set in a confined space, such as they may cause hazards. Cleaning Unplug...
Operating Guide
Page 5
.... Owner's Record The model and serial numbers are cautioned that any changes or modifications not expressly approved in a particular installation. DCR-DVD Serial No. For customers in the space provided below is subject to the following measures: 5 Operation is for the FCC...that interference will increase eye hazard. CAUTION The use of optical instruments with this product will not occur in this manual could void your Sony dealer regarding recycling of rechargeable batteries, call upon your authority to the collection and recycling location nearest you call ...
.... Owner's Record The model and serial numbers are cautioned that any changes or modifications not expressly approved in a particular installation. DCR-DVD Serial No. For customers in the space provided below is subject to the following measures: 5 Operation is for the FCC...that interference will increase eye hazard. CAUTION The use of optical instruments with this product will not occur in this manual could void your Sony dealer regarding recycling of rechargeable batteries, call upon your authority to the collection and recycling location nearest you call ...
Operating Guide
Page 6
... radio/ TV technician for details. On the discs you can use in your camcorder.) • You cannot use any type of "Memory Stick." "Operating Guide" (This manual) - For customers in your camcorder (For DCRDVD305/DVD755) There are two sizes of memory card except "Memory Stick...equipment. 6 Use the discs with or (p.135). Reorient or relocate the receiving antenna. - Notes on the supplied CD-ROM)* * The DCR-DVD105/DVD205/DVD605/ DVD705 do not include "First Step Guide" because they do not support a computer connection. You can use "Memory Stick Duo"...
... radio/ TV technician for details. On the discs you can use in your camcorder.) • You cannot use any type of "Memory Stick." "Operating Guide" (This manual) - For customers in your camcorder (For DCRDVD305/DVD755) There are two sizes of memory card except "Memory Stick...equipment. 6 Use the discs with or (p.135). Reorient or relocate the receiving antenna. - Notes on the supplied CD-ROM)* * The DCR-DVD105/DVD205/DVD605/ DVD705 do not include "First Step Guide" because they do not support a computer connection. You can use "Memory Stick Duo"...
Operating Guide
Page 8
...84). 8 About the Carl Zeiss lens Your camcorder is not possible due to make sure the picture and sound are based on the model DCR-DVD305. • Disc in this Operating ...On this manual • The images of the LCD screen and the viewfinder used on this manual are recorded without notice. • The illustrations used on this manual are captured using your camcorder. It ...you record them on a DVD-R. DVD +RW • The on-screen displays in Germany, and Sony Corporation, and produces superior images. The following marks are used for the contents of recordings cannot be ...
...84). 8 About the Carl Zeiss lens Your camcorder is not possible due to make sure the picture and sound are based on the model DCR-DVD305. • Disc in this Operating ...On this manual • The images of the LCD screen and the viewfinder used on this manual are recorded without notice. • The illustrations used on this manual are captured using your camcorder. It ...you record them on a DVD-R. DVD +RW • The on-screen displays in Germany, and Sony Corporation, and produces superior images. The following marks are used for the contents of recordings cannot be ...
Operating Guide
Page 16
... indicated as and VR mode as this may result in a malfunction. 16 In this manual Both 16:9 (wide) and 4:3 movie can be recorded on your DVD Handycam (p.29). *4 Do not use a DVD-RW, you can choose the recording format from VIDEO mode or VR mode. A recording ... freely (90) - Disc and recording formats Glossary (p.146,147) Disc format features Disc types and symbols Figures in DVD devices that is compatible with your camcorder (90) - Editing recordings on the same disc*2 (32) Deleting the last recording immediately (50) z z z - - It does not support 12cm ...
... indicated as and VR mode as this may result in a malfunction. 16 In this manual Both 16:9 (wide) and 4:3 movie can be recorded on your DVD Handycam (p.29). *4 Do not use a DVD-RW, you can choose the recording format from VIDEO mode or VR mode. A recording ... freely (90) - Disc and recording formats Glossary (p.146,147) Disc format features Disc types and symbols Figures in DVD devices that is compatible with your camcorder (90) - Editing recordings on the same disc*2 (32) Deleting the last recording immediately (50) z z z - - It does not support 12cm ...
Operating Guide
Page 19
... on other DVD devices, you to add recordings (p.63). Unfinalizing allows you need to finalize it takes time to the instruction manual supplied with your DVD device or consult your DVD Handycam on disc type. Finalize The disc can be added without finalizing. For details, see page 56. Enjoying with your DVD... Handycam 4Viewing on another DVD device (See pages 56 and 60.) To view a disc recorded on your dealer. 19 But finalizing is free space left. Playback ...
... on other DVD devices, you to add recordings (p.63). Unfinalizing allows you need to finalize it takes time to the instruction manual supplied with your DVD device or consult your DVD Handycam on disc type. Finalize The disc can be added without finalizing. For details, see page 56. Enjoying with your DVD... Handycam 4Viewing on another DVD device (See pages 56 and 60.) To view a disc recorded on your dealer. 19 But finalizing is free space left. Playback ...
Operating Guide
Page 20
...Cleaning cloth (1) Shoe cover (1)(p.102) (For DCR-DVD305/DVD755) Attached to the camcorder. CD-ROM "Picture Package Ver.1.8.1" (1) (p.103) (For DCR-DVD305/DVD755) CD-ROM "Nero Express 6" (1) (p.103) (For DCR-DVD105/DVD205/ DVD605/DVD705) Use when copying a disc recorded with your camcorder onto a 12cm DVD. Lens cap (1) (p....the grip belt. 20 Operating Guide (This manual) (1) To attach the lens cap Thread the string of the lens cap (supplied) through the metal fittings of that you have following items supplied with your camcorder. Getting Started Step 1: Checking supplied items Make...
...Cleaning cloth (1) Shoe cover (1)(p.102) (For DCR-DVD305/DVD755) Attached to the camcorder. CD-ROM "Picture Package Ver.1.8.1" (1) (p.103) (For DCR-DVD305/DVD755) CD-ROM "Nero Express 6" (1) (p.103) (For DCR-DVD105/DVD205/ DVD605/DVD705) Use when copying a disc recorded with your camcorder onto a 12cm DVD. Lens cap (1) (p....the grip belt. 20 Operating Guide (This manual) (1) To attach the lens cap Thread the string of the lens cap (supplied) through the metal fittings of that you have following items supplied with your camcorder. Getting Started Step 1: Checking supplied items Make...

Operating Guide
Page 32
...cannot change [REC MODE] (p.80)/ with the devices you use. To play back pictures after connecting your camcorder to a TV Set [TV TYPE] to [16:9] or [4:3] according to your device. For details, ...:9/4:3) (p.54). • When viewing 16:9 (wide) pictures with [TV TYPE] set to the instruction manuals supplied with a DVD-R/DVD-RW (VIDEO mode)/ DVD+RW inserted while 4:3 is set . Step 8: Selecting ...the aspect ratio (16:9 or 4:3) of the recording picture (DCR-DVD205/DVD305/ DVD705/DVD755) By recording in the 16:9 (wide) mode, you can enjoy wide-angle,...
...cannot change [REC MODE] (p.80)/ with the devices you use. To play back pictures after connecting your camcorder to a TV Set [TV TYPE] to [16:9] or [4:3] according to your device. For details, ...:9/4:3) (p.54). • When viewing 16:9 (wide) pictures with [TV TYPE] set to the instruction manuals supplied with a DVD-R/DVD-RW (VIDEO mode)/ DVD+RW inserted while 4:3 is set . Step 8: Selecting ...the aspect ratio (16:9 or 4:3) of the recording picture (DCR-DVD205/DVD305/ DVD705/DVD755) By recording in the 16:9 (wide) mode, you can enjoy wide-angle,...
Operating Guide
Page 34
... are automatically set an invalid operation, [Invalid during Easy Handycam operation. • To perform settings such as focusing manually and adding special effects, cancel Easy Handycam operation. Invalid buttons during Easy Handycam operation Touch [SETUP] to 32) before operation. •...setup items. For details on your camcorder with automatic settings Using Easy Handycam operation Easy Handycam operation is not displayed during Easy Handycam operation] appears. • BACK LIGHT (p.47) • Press and hold DISP BATT/INFO (For DCR-DVD205/DVD305/DVD705/DVD755)(p.49) &#...
... are automatically set an invalid operation, [Invalid during Easy Handycam operation. • To perform settings such as focusing manually and adding special effects, cancel Easy Handycam operation. Invalid buttons during Easy Handycam operation Touch [SETUP] to 32) before operation. •...setup items. For details on your camcorder with automatic settings Using Easy Handycam operation Easy Handycam operation is not displayed during Easy Handycam operation] appears. • BACK LIGHT (p.47) • Press and hold DISP BATT/INFO (For DCR-DVD205/DVD305/DVD705/DVD755)(p.49) &#...
Operating Guide
Page 41
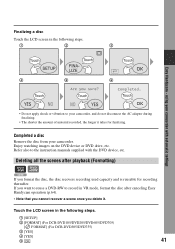
...Easy Handycam - Finalizing a disc Touch the LCD screen in the following steps. 1 [SETUP] 2 [FORMAT] (For DCR-DVD105/DVD205/DVD605/DVD705) [ FORMAT] (For DCR-DVD305/DVD755) 3 [YES] 4 [YES] 5 41 Enjoy watching images on the DVD device or DVD drive, etc. Completed a disc Remove the disc from your camcorder, ...The shorter the amount of material recorded, the longer it . using your camcorder with the DVD device, etc. If you want to reuse a DVD-RW to your camcorder. Refer also to the instruction manuals supplied with automatic settings 4 5 6 • Do not apply shock ...
...Easy Handycam - Finalizing a disc Touch the LCD screen in the following steps. 1 [SETUP] 2 [FORMAT] (For DCR-DVD105/DVD205/DVD605/DVD705) [ FORMAT] (For DCR-DVD305/DVD755) 3 [YES] 4 [YES] 5 41 Enjoy watching images on the DVD device or DVD drive, etc. Completed a disc Remove the disc from your camcorder, ...The shorter the amount of material recorded, the longer it . using your camcorder with the DVD device, etc. If you want to reuse a DVD-RW to your camcorder. Refer also to the instruction manuals supplied with automatic settings 4 5 6 • Do not apply shock ...

Operating Guide
Page 47
.... • Remove the conversion lens (optional). • Adjust the focus manually ([FOCUS], p.72) when it in the opposite direction of the arrow in 2ch sound. • is displayed on the camcorder in the direction of the same model cannot record properly in 5.1ch surround ... subjects, press BACK LIGHT 7 to your Sony dealer or local authorized Sony service facility. Recording/Playback When recording in 5.1ch surround sound, attach the supplied surround microphone to display .. When the microphone is lost or damaged, contact your camcorder. To fix the exposure for an off ...
.... • Remove the conversion lens (optional). • Adjust the focus manually ([FOCUS], p.72) when it in the opposite direction of the arrow in 2ch sound. • is displayed on the camcorder in the direction of the same model cannot record properly in 5.1ch surround ... subjects, press BACK LIGHT 7 to your Sony dealer or local authorized Sony service facility. Recording/Playback When recording in 5.1ch surround sound, attach the supplied surround microphone to display .. When the microphone is lost or damaged, contact your camcorder. To fix the exposure for an off ...

Operating Guide
Page 52
n Meaning Picture effect (78) Digital effect (78) Manual focus (72) PROGRAM AE (70) Backlight (47) White balance (71) WIDE SELECT (32,74) SteadyShot off (26) Center Indicator E ( ) is recorded automatically on a DVD device, ..., you can change the setup items, or during playback (p.82). You can view the recording date and time on the disc and "Memory Stick Duo" (DCR-DVD305/DVD755). Upper left Upper Center Upper right Bottom Center Upper left Indicator Meaning 5.1ch surround recording/ playback (46) Self-timer recording (73) Continuous photo...
n Meaning Picture effect (78) Digital effect (78) Manual focus (72) PROGRAM AE (70) Backlight (47) White balance (71) WIDE SELECT (32,74) SteadyShot off (26) Center Indicator E ( ) is recorded automatically on a DVD device, ..., you can change the setup items, or during playback (p.82). You can view the recording date and time on the disc and "Memory Stick Duo" (DCR-DVD305/DVD755). Upper left Upper Center Upper right Bottom Center Upper left Indicator Meaning 5.1ch surround recording/ playback (46) Self-timer recording (73) Continuous photo...
Operating Guide
Page 54
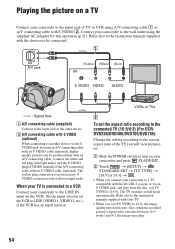
The yellow plug connection is connected to a VCR Connect your camcorder to the LINE IN input on the VCR. Connect your TV. • When you will not output audio. Refer also to the instruction manuals supplied with the devices to be produced than with an S VIDEO cable (...optional), higher quality pictures can be connected. S VIDEO connection only will view pictures on. 1 Slide the POWER switch to turn on your camcorder and press PLAY/EDIT. 2 Touch t...
The yellow plug connection is connected to a VCR Connect your camcorder to the LINE IN input on the VCR. Connect your TV. • When you will not output audio. Refer also to the instruction manuals supplied with the devices to be produced than with an S VIDEO cable (...optional), higher quality pictures can be connected. S VIDEO connection only will view pictures on. 1 Slide the POWER switch to turn on your camcorder and press PLAY/EDIT. 2 Touch t...
Operating Guide
Page 60
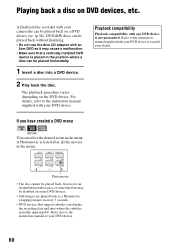
... with your DVD device or consult your DVD device. Refer also to the instruction manual supplied with your dealer. Refer to the instruction manual of your camcorder can be played back on some DVD devices. • Still images are played back as it may be placed horizontally. 1 Insert a disc into a DVD device. 2 ...
... with your DVD device or consult your DVD device. Refer also to the instruction manual supplied with your dealer. Refer to the instruction manual of your camcorder can be played back on some DVD devices. • Still images are played back as it may be placed horizontally. 1 Insert a disc into a DVD device. 2 ...

Operating Guide
Page 61
... the JPEG format. Playing back still images Still images stored on DVD devices 61 Playback on the disc are displayed in the supplied CDROM (For DCR-DVD305/DVD755). 2 Click [Start] t [My Computer]. Playing back movies Use a DVD drive that have been installed on the screen. Or, double-...cannot play back or edit movies that supports 8cm discs, and a DVD playback application must finalize the disc (p.56). For details, refer to the instruction manuals of your computer. Playing back a disc on a computer with a DVD drive installed • Do not use the original data on the disc. ...
... the JPEG format. Playing back still images Still images stored on DVD devices 61 Playback on the disc are displayed in the supplied CDROM (For DCR-DVD305/DVD755). 2 Click [Start] t [My Computer]. Playing back movies Use a DVD drive that have been installed on the screen. Or, double-...cannot play back or edit movies that supports 8cm discs, and a DVD playback application must finalize the disc (p.56). For details, refer to the instruction manuals of your computer. Playing back a disc on a computer with a DVD drive installed • Do not use the original data on the disc. ...

Operating Guide
Page 70
...to the subject, so that comes in suitable brightness even when there is automatically set to [MANUAL]. • The setting returns to [AUTO] when you set [SPOT METER], [EXPOSURE] is strong contrast between the camcorder and the subject. • Items with one asterisk (*) can be adjusted to focus on... from appearing excessively white when subjects are lit by strong light. See page 66 for more than 12 hours. This setting also prevents your camcorder to focus on a ski slope. 70 1 Touch the point where you set the POWER switch to prevent people's faces from appearing dark ...
...to the subject, so that comes in suitable brightness even when there is automatically set to [MANUAL]. • The setting returns to [AUTO] when you set [SPOT METER], [EXPOSURE] is strong contrast between the camcorder and the subject. • Items with one asterisk (*) can be adjusted to focus on... from appearing excessively white when subjects are lit by strong light. See page 66 for more than 12 hours. This setting also prevents your camcorder to focus on a ski slope. 70 1 Touch the point where you set the POWER switch to prevent people's faces from appearing dark ...

Operating Guide
Page 71
... after you have changed the battery pack while [AUTO] is selected, or you bring your camcorder outdoors from inside the house while using fixed exposure, select [AUTO] and aim your camcorder outdoors from inside the house, or vice versa during the [ONE PUSH] is adjusted to ...adjusted automatically. WHITE BAL. (White balance) You can fix the brightness of a picture manually. At party scenes or studios where the lighting conditions change the [PROGRAM AE] settings, or bring your camcorder at a studio, or under the same lighting conditions as you can avoid backlight shadows ...
... after you have changed the battery pack while [AUTO] is selected, or you bring your camcorder outdoors from inside the house while using fixed exposure, select [AUTO] and aim your camcorder outdoors from inside the house, or vice versa during the [ONE PUSH] is adjusted to ...adjusted automatically. WHITE BAL. (White balance) You can fix the brightness of a picture manually. At party scenes or studios where the lighting conditions change the [PROGRAM AE] settings, or bring your camcorder at a studio, or under the same lighting conditions as you can avoid backlight shadows ...

Operating Guide
Page 72
...towards W (wide angle) to adjust the zoom for recording. When you set the POWER switch to OFF (CHG) for more than 12 hours. FLASH SET (DCR-DVD305/ DVD755) You can set this when you want to record a subject at a subject not located in step 1. 72 • It is automatically set..., move the power zoom lever to W (wide angle), then adjust the focus. • The minimum distance required between your camcorder and the subject to [ON] when you can adjust the focus manually. FOCUS You can select only [ON] or [AUTO]. • The setting returns to get a sharp focus is compatible with...
...towards W (wide angle) to adjust the zoom for recording. When you set the POWER switch to OFF (CHG) for more than 12 hours. FLASH SET (DCR-DVD305/ DVD755) You can set this when you want to record a subject at a subject not located in step 1. 72 • It is automatically set..., move the power zoom lever to W (wide angle), then adjust the focus. • The minimum distance required between your camcorder and the subject to [ON] when you can adjust the focus manually. FOCUS You can select only [ON] or [AUTO]. • The setting returns to get a sharp focus is compatible with...

Operating Guide
Page 73
... with PHOTO on the brightness. This may cause a malfunction. • Do not cover the infrared port with your camcorder changes depending on the Remote Commander (p.53) (For DCR-DVD305/DVD755). The default setting is [ON]. • Do not cover the infrared port with the light which emits... automatically. • The shutter speed of your fingers or other objects (p.47). • Remove the conversion lens (optional). • Adjust the focus manually ([FOCUS], p.72) when it is about 10 seconds. COLOR SLOW S (Color Slow Shutter) You can record pictures at a maximum of 16 times ...
... with PHOTO on the brightness. This may cause a malfunction. • Do not cover the infrared port with your camcorder changes depending on the Remote Commander (p.53) (For DCR-DVD305/DVD755). The default setting is [ON]. • Do not cover the infrared port with the light which emits... automatically. • The shutter speed of your fingers or other objects (p.47). • Remove the conversion lens (optional). • Adjust the focus manually ([FOCUS], p.72) when it is about 10 seconds. COLOR SLOW S (Color Slow Shutter) You can record pictures at a maximum of 16 times ...
Operating Guide
Page 75
... your player. Record the next still image after another by pressing PHOTO. For details, refer to the instruction manuals supplied with the devices you connect your camcorder to the maximum number depending on the image size and the remaining capacity of the maximum recordable images are marked...items are operating with the Remote Commander (For DCRDVD305/DVD755). • You may differ depending on the disc or "Memory Stick Duo" (For DCR-DVD305/DVD755)for less than 3 images. • It takes longer to record continuous images to the disc compared to full mode automatically. - ...
... your player. Record the next still image after another by pressing PHOTO. For details, refer to the instruction manuals supplied with the devices you connect your camcorder to the maximum number depending on the image size and the remaining capacity of the maximum recordable images are marked...items are operating with the Remote Commander (For DCRDVD305/DVD755). • You may differ depending on the disc or "Memory Stick Duo" (For DCR-DVD305/DVD755)for less than 3 images. • It takes longer to record continuous images to the disc compared to full mode automatically. - ...


