Operating Guide
Page 6
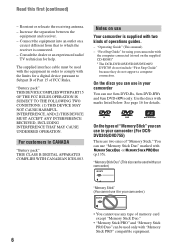
... MAY CAUSE UNDESIRED OPERATION. Notes on the supplied CD-ROM)* * The DCR-DVD105/DVD205/DVD605/ DVD705 do not include "First Step Guide" because they do not support a computer connection. Use the discs with the limits for using your camcorder (For DCRDVD305/DVD755) There are two sizes of FCC Rules. You can...memory card except "Memory Stick Duo." • "Memory Stick PRO" and "Memory Stick PRO Duo" can use Your camcorder is connected. - On the discs you can use in your camcorder You can use 8cm DVD-Rs, 8cm DVD-RWs and 8cm DVD+RWs only. The supplied interface cable must be ...
... MAY CAUSE UNDESIRED OPERATION. Notes on the supplied CD-ROM)* * The DCR-DVD105/DVD205/DVD605/ DVD705 do not include "First Step Guide" because they do not support a computer connection. Use the discs with the limits for using your camcorder (For DCRDVD305/DVD755) There are two sizes of FCC Rules. You can...memory card except "Memory Stick Duo." • "Memory Stick PRO" and "Memory Stick PRO Duo" can use Your camcorder is connected. - On the discs you can use in your camcorder You can use 8cm DVD-Rs, 8cm DVD-RWs and 8cm DVD+RWs only. The supplied interface cable must be ...
Operating Guide
Page 7
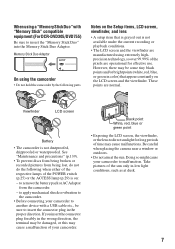
...• A setup item that appear constantly on : - to apply mechanical shock or vibration to the camcorder. • Before connecting your camcorder to another device with "Memory Stick" compatible equipment (For DCR-DVD305/DVD755) Be sure to insert the connector plug in the proper direction. When using a "Memory ...Exposing the LCD screen, the viewfinder, or the lens to direct sunlight for effective use. Viewfinder LCD screen Battery • The camcorder is on the LCD screen and the viewfinder. If you insert the connector plug forcibly in low light conditions, such as at ...
...• A setup item that appear constantly on : - to apply mechanical shock or vibration to the camcorder. • Before connecting your camcorder to another device with "Memory Stick" compatible equipment (For DCR-DVD305/DVD755) Be sure to insert the connector plug in the proper direction. When using a "Memory ...Exposing the LCD screen, the viewfinder, or the lens to direct sunlight for effective use. Viewfinder LCD screen Battery • The camcorder is on the LCD screen and the viewfinder. If you insert the connector plug forcibly in low light conditions, such as at ...
Operating Guide
Page 12
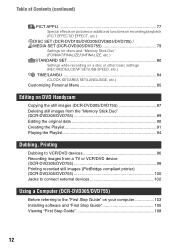
...additional functions on recording/playback (PICT.EFFECT/D.EFFECT, etc.) DISC SET (DCR-DVD105/DVD205/DVD605/DVD705) / MEDIA SET (DCR-DVD305/DVD755 79 Settings for discs and "Memory Stick Duo" (FORMAT/FINALIZE... Personal Menu 85 Editing on DVD Handycam Copying the still images (DCR-DVD305/DVD755 87 Deleting still images from the "Memory Stick Duo" (DCR-DVD305/DVD755 89 Editing the original... VCR/DVD device (DCR-DVD305/DVD755 98 Printing recorded still images (PictBridge compliant printer) (DCR-DVD305/DVD755 100 Jacks to connect external devices 102 Using a Computer (DCR-DVD305/DVD755) Before ...
...additional functions on recording/playback (PICT.EFFECT/D.EFFECT, etc.) DISC SET (DCR-DVD105/DVD205/DVD605/DVD705) / MEDIA SET (DCR-DVD305/DVD755 79 Settings for discs and "Memory Stick Duo" (FORMAT/FINALIZE... Personal Menu 85 Editing on DVD Handycam Copying the still images (DCR-DVD305/DVD755 87 Deleting still images from the "Memory Stick Duo" (DCR-DVD305/DVD755 89 Editing the original... VCR/DVD device (DCR-DVD305/DVD755 98 Printing recorded still images (PictBridge compliant printer) (DCR-DVD305/DVD755 100 Jacks to connect external devices 102 Using a Computer (DCR-DVD305/DVD755) Before ...
Operating Guide
Page 15
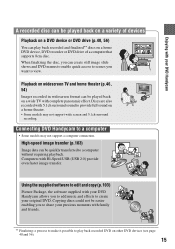
... also recorded with 5.1ch surround sound to a computer • Some models may not support wide screen and 5.1ch surround recording. Connecting DVD Handycam to provide full sound on a wide TV with complete panoramic effect. Computers with family and friends. ** Finalizing: a process to ...make it possible to a computer without requiring playback. Enjoying with your DVD Handycam A recorded disc can be played back on a variety of a computer that supports 8cm disc. High-speed image transfer (p.103) Image data ...
... also recorded with 5.1ch surround sound to a computer • Some models may not support wide screen and 5.1ch surround recording. Connecting DVD Handycam to provide full sound on a wide TV with complete panoramic effect. Computers with family and friends. ** Finalizing: a process to ...make it possible to a computer without requiring playback. Enjoying with your DVD Handycam A recorded disc can be played back on a variety of a computer that supports 8cm disc. High-speed image transfer (p.103) Image data ...

Operating Guide
Page 18
... (See page 20 to 32.) Select the disc that best suits your DVD Handycam (See pages 38 and 44) You can also connect it to do after recording? You can delete or edit You can be played back even without finalizing 2Shooting, deleting and editing You cannot (See ... images repeatedly What would you have just anytime (p.90). The disc can be played back on various DVD devices * Select the mode on your DVD Handycam Playing back disc on the right page 18 Deleting and editing images in your DVD...
... (See page 20 to 32.) Select the disc that best suits your DVD Handycam (See pages 38 and 44) You can also connect it to do after recording? You can delete or edit You can be played back even without finalizing 2Shooting, deleting and editing You cannot (See ... images repeatedly What would you have just anytime (p.90). The disc can be played back on various DVD devices * Select the mode on your DVD Handycam Playing back disc on the right page 18 Deleting and editing images in your DVD...
Operating Guide
Page 20
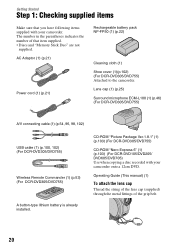
... Shoe cover (1)(p.102) (For DCR-DVD305/DVD755) Attached to the camcorder. CD-ROM "Picture Package Ver.1.8.1" (1) (p.103) (For DCR-DVD305/DVD755) CD-ROM "Nero Express 6" (1) (p.103) (For DCR-DVD105/DVD205/ DVD605/DVD705) Use when copying a disc recorded with your camcorder onto a 12cm DVD. The.... Lens cap (1) (p.25) Surround microphone ECM-L100 (1) (p.46) (For DCR-DVD305/DVD755) A/V connecting cable (1) (p.54, 96, 98, 102) USB cable (1) (p.100, 102) (For DCR-DVD305/DVD755) Wireless Remote Commander (1) (p.53) (For DCR-DVD305/DVD755) A button-type lithium battery is already installed.
... Shoe cover (1)(p.102) (For DCR-DVD305/DVD755) Attached to the camcorder. CD-ROM "Picture Package Ver.1.8.1" (1) (p.103) (For DCR-DVD305/DVD755) CD-ROM "Nero Express 6" (1) (p.103) (For DCR-DVD105/DVD205/ DVD605/DVD705) Use when copying a disc recorded with your camcorder onto a 12cm DVD. The.... Lens cap (1) (p.25) Surround microphone ECM-L100 (1) (p.46) (For DCR-DVD305/DVD755) A/V connecting cable (1) (p.54, 96, 98, 102) USB cable (1) (p.100, 102) (For DCR-DVD305/DVD755) Wireless Remote Commander (1) (p.53) (For DCR-DVD305/DVD755) A button-type lithium battery is already installed.
Operating Guide
Page 21
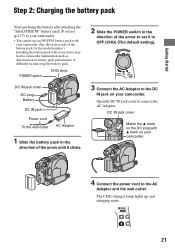
DC IN jack cover Match the v mark on the DC plug with v mark on your camcorder. (See the reverse side of the battery pack for the model number.) Installing the battery pack with your camcorder. 4 Connect the power cord to the AC Adaptor and the wall outlet. The CHG (charge) lamp lights up and... difficulty in the direction of the arrow to set it to OFF (CHG) (The default setting). 3 Connect the AC Adaptor to the DC IN jack on your camcorder. Open the DC IN jack cover to connect the AC Adaptor. POWER switch CHG lamp DC IN jack cover DC plug Battery DC IN jack...
DC IN jack cover Match the v mark on the DC plug with v mark on your camcorder. (See the reverse side of the battery pack for the model number.) Installing the battery pack with your camcorder. 4 Connect the power cord to the AC Adaptor and the wall outlet. The CHG (charge) lamp lights up and... difficulty in the direction of the arrow to set it to OFF (CHG) (The default setting). 3 Connect the AC Adaptor to the DC IN jack on your camcorder. Open the DC IN jack cover to connect the AC Adaptor. POWER switch CHG lamp DC IN jack cover DC plug Battery DC IN jack...
Operating Guide
Page 22
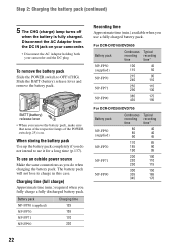
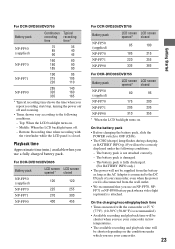
... POWER switch (p.25) is fully charged. To use a fully charged battery pack. For DCR-DVD105/DVD605 Battery pack Continuous Typical recording recording time time* NP-FP50 (supplied) 100 045 115...240 110 NP-FP71 255 115 290 130 NP-FP90 385 175 435 195 For DCR-DVD205/DVD705 Battery pack Continuous Typical recording recording time time* NP-FP50 (supplied) 080... The CHG (charge) lamp turns off when the battery is on your camcorder. • Disconnect the AC Adaptor holding both your camcorder and the DC plug. Charging time (full charge) Approximate time (min.)...
... POWER switch (p.25) is fully charged. To use a fully charged battery pack. For DCR-DVD105/DVD605 Battery pack Continuous Typical recording recording time time* NP-FP50 (supplied) 100 045 115...240 110 NP-FP71 255 115 290 130 NP-FP90 385 175 435 195 For DCR-DVD205/DVD705 Battery pack Continuous Typical recording recording time time* NP-FP50 (supplied) 080... The CHG (charge) lamp turns off when the battery is on your camcorder. • Disconnect the AC Adaptor holding both your camcorder and the DC plug. Charging time (full charge) Approximate time (min.)...
Operating Guide
Page 23
...turns off and zooming. • Times shown vary according to the DC IN jack of your camcorder. 23 Getting Started For DCR-DVD105/DVD605 Battery pack LCD screen LCD screen opened* closed NP-FP50 (supplied) 105 120 NP-...be shorter depending on . - The battery pack is not attached correctly. - Bottom: Recording time when recording with the camcorder at 25 °C (77°F). (10-30°C (50-86°F) is recommended.) • Available recording .../playback time • Times measured with the viewfinder while the LCD panel is connected to the following conditions. -
...turns off and zooming. • Times shown vary according to the DC IN jack of your camcorder. 23 Getting Started For DCR-DVD105/DVD605 Battery pack LCD screen LCD screen opened* closed NP-FP50 (supplied) 105 120 NP-...be shorter depending on . - The battery pack is not attached correctly. - Bottom: Recording time when recording with the camcorder at 25 °C (77°F). (10-30°C (50-86°F) is recommended.) • Available recording .../playback time • Times measured with the viewfinder while the LCD panel is connected to the following conditions. -
Operating Guide
Page 24
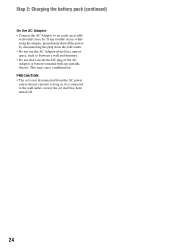
... • The set is not disconnected from the wall outlet. • Do not use the AC Adaptor placed in a narrow space, such as it is connected to an easily accessible wall outlet close by disconnecting the plug from the AC power source (house current) as long as between a wall and furniture... the AC Adaptor or battery terminal with any metallic objects. This may cause a malfunction. Step 2: Charging the battery pack (continued) On the AC Adaptor • Connect the AC Adaptor to the wall outlet, even if the set itself has been turned off the power by .
... • The set is not disconnected from the wall outlet. • Do not use the AC Adaptor placed in a narrow space, such as it is connected to an easily accessible wall outlet close by disconnecting the plug from the AC power source (house current) as long as between a wall and furniture... the AC Adaptor or battery terminal with any metallic objects. This may cause a malfunction. Step 2: Charging the battery pack (continued) On the AC Adaptor • Connect the AC Adaptor to the wall outlet, even if the set itself has been turned off the power by .
Operating Guide
Page 29
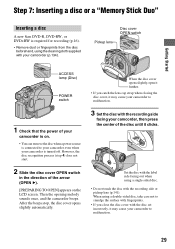
...). • Remove dust or fingerprints from the disc beforehand, using the cleaning cloth supplied with the disc set incorrectly, it may cause your camcorder to malfunction. 3 Set the disc with the recording side or pickup lens (p.141). However, the disc recognition process (step 4) does not... on . • You can remove the disc when a power source is connected to your camcorder even when your camcorder, then press the center of your camcorder (p.134). Then the opening melody sounds once, and the camcorder beeps. Set the disc with the label side facing out when using a single...
...). • Remove dust or fingerprints from the disc beforehand, using the cleaning cloth supplied with the disc set incorrectly, it may cause your camcorder to malfunction. 3 Set the disc with the recording side or pickup lens (p.141). However, the disc recognition process (step 4) does not... on . • You can remove the disc when a power source is connected to your camcorder even when your camcorder, then press the center of your camcorder (p.134). Then the opening melody sounds once, and the camcorder beeps. Set the disc with the label side facing out when using a single...

Operating Guide
Page 32
...+RW inserted while 4:3 is set. MODE ON 32 * When viewing on the LCD screen. Step 8: Selecting the aspect ratio (16:9 or 4:3) of the recording picture (DCR-DVD205/DVD305/ DVD705/DVD755) By recording in the 16:9 (wide) mode, you can enjoy wide-angle, high-resolution pictures. • If you intend to view... arrow to light up the (Movie) lamp. while recording movies - when you change the aspect ratio in the following situations. - To play back pictures after connecting your camcorder to a TV Set [TV TYPE] to [16:9] or [4:3] according to your device. when using a DVD+RW -
...+RW inserted while 4:3 is set. MODE ON 32 * When viewing on the LCD screen. Step 8: Selecting the aspect ratio (16:9 or 4:3) of the recording picture (DCR-DVD205/DVD305/ DVD705/DVD755) By recording in the 16:9 (wide) mode, you can enjoy wide-angle, high-resolution pictures. • If you intend to view... arrow to light up the (Movie) lamp. while recording movies - when you change the aspect ratio in the following situations. - To play back pictures after connecting your camcorder to a TV Set [TV TYPE] to [16:9] or [4:3] according to your device. when using a DVD+RW -
Operating Guide
Page 40
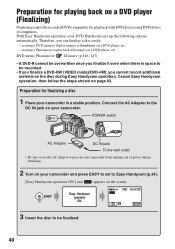
... Connect the AC Adaptor to prevent your camcorder from running out of computers. creating a DVD menu to display images as thumbnails on your camcorder and press EASY to set to be finalized. 40 Preparation for playing back on page 63. Cancel Easy Handycam ... DVD compatible for finalizing a disc 1 Place your DVD Handycam sets up the following options automatically. Preparation for playback with DVD devices and DVD drives of power during Easy Handycam operation. With Easy Handycam operation, your camcorder in a stable position. DVD menu, Photomovie Glossary (p.146...
... Connect the AC Adaptor to prevent your camcorder from running out of computers. creating a DVD menu to display images as thumbnails on your camcorder and press EASY to set to be finalized. 40 Preparation for playing back on page 63. Cancel Easy Handycam ... DVD compatible for finalizing a disc 1 Place your DVD Handycam sets up the following options automatically. Preparation for playback with DVD devices and DVD drives of power during Easy Handycam operation. With Easy Handycam operation, your camcorder in a stable position. DVD menu, Photomovie Glossary (p.146...

Operating Guide
Page 49
... Touch to OFF (CHG), then press DISP/BATT INFO qs. The default setting is connected, it takes precedence over the internal microphone (For DCR-DVD305/ DVD755)(p.102). 8 Remote sensor (For DCR-DVD305/ DVD755) Point the Remote Commander (p.53) towards the remote sensor to the 20...Wide angle)/T (Telephoto). To turn off the operation confirmation beep 6 See [BEEP] on the screen to extend the indication to operate your camcorder. Remaining battery (approx.) Recording capacity (approx.) 49 Recording/playback To check the remaining battery .... Press the button while BATTERY INFO appears ...
... Touch to OFF (CHG), then press DISP/BATT INFO qs. The default setting is connected, it takes precedence over the internal microphone (For DCR-DVD305/ DVD755)(p.102). 8 Remote sensor (For DCR-DVD305/ DVD755) Point the Remote Commander (p.53) towards the remote sensor to the 20...Wide angle)/T (Telephoto). To turn off the operation confirmation beep 6 See [BEEP] on the screen to extend the indication to operate your camcorder. Remaining battery (approx.) Recording capacity (approx.) 49 Recording/playback To check the remaining battery .... Press the button while BATTERY INFO appears ...

Operating Guide
Page 52
... (70) Backlight (47) White balance (71) WIDE SELECT (32,74) SteadyShot off (26) Center Indicator E ( ) is recorded automatically on the disc and "Memory Stick Duo" (DCR-DVD305/DVD755). You can change the setup items, or during playback (p.82). They are not displayed while recording. Indicators displayed during recording/playback (continued) Indicators... date and time on a DVD device, etc. (p.60, [SUB-T DATE], P84). 52 Meaning NightShot plus (47) Super NightShot plus (73) Color Slow Shutter (73) PictBridge connecting (100) Warning (127) Bottom Indicator 9 .
... (70) Backlight (47) White balance (71) WIDE SELECT (32,74) SteadyShot off (26) Center Indicator E ( ) is recorded automatically on the disc and "Memory Stick Duo" (DCR-DVD305/DVD755). You can change the setup items, or during playback (p.82). They are not displayed while recording. Indicators displayed during recording/playback (continued) Indicators... date and time on a DVD device, etc. (p.60, [SUB-T DATE], P84). 52 Meaning NightShot plus (47) Super NightShot plus (73) Color Slow Shutter (73) PictBridge connecting (100) Warning (127) Bottom Indicator 9 .
Operating Guide
Page 54
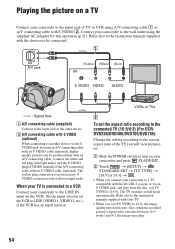
...set [TV TYPE] to the screen aspect ratio of the A/V connecting cable with an S VIDEO cable (optional). The yellow plug connection is connected to a VCR Connect your camcorder to LINE (VIDEO 1, VIDEO 2, etc.), if the VCR has an input selector. When your camcorder and press PLAY/EDIT. 2 Touch t [SETUP] t STANDARD... input on your TV is not necessary. Refer also to the instruction manuals supplied with your TV. • When you connect your camcorder to be produced than with the devices to the wall outlet using the supplied AC Adaptor for this operation (p.21). A/V jack...
...set [TV TYPE] to the screen aspect ratio of the A/V connecting cable with an S VIDEO cable (optional). The yellow plug connection is connected to a VCR Connect your camcorder to LINE (VIDEO 1, VIDEO 2, etc.), if the VCR has an input selector. When your camcorder and press PLAY/EDIT. 2 Touch t [SETUP] t STANDARD... input on your TV is not necessary. Refer also to the instruction manuals supplied with your TV. • When you connect your camcorder to be produced than with the devices to the wall outlet using the supplied AC Adaptor for this operation (p.21). A/V jack...
Operating Guide
Page 55
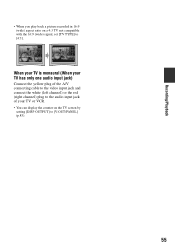
When your TV is monaural (When your TV has only one audio input jack) Connect the yellow plug of the A/V connecting cable to the video input jack and connect the white (left channel) or the red (right channel) plug to the audio input jack of your TV or VCR. • You can display the counter on a 4:3 TV not compatible with the 16:9 (wide) signal, set [TV TYPE] to [V-OUT/PANEL] (p.83). 55 Recording/Playback • When you play back a picture recorded in 16:9 (wide) aspect ratio on the TV screen by setting [DISP OUTPUT] to [4:3].
When your TV is monaural (When your TV has only one audio input jack) Connect the yellow plug of the A/V connecting cable to the video input jack and connect the white (left channel) or the red (right channel) plug to the audio input jack of your TV or VCR. • You can display the counter on a 4:3 TV not compatible with the 16:9 (wide) signal, set [TV TYPE] to [V-OUT/PANEL] (p.83). 55 Recording/Playback • When you play back a picture recorded in 16:9 (wide) aspect ratio on the TV screen by setting [DISP OUTPUT] to [4:3].
Operating Guide
Page 58
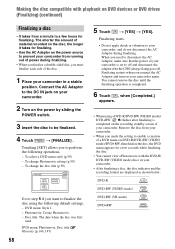
...the adaptor after finalizing is completed. 6 Touch , when [Completed.] appears. • When using the following operations. - Connect the AC Adaptor to the DC IN jack on your camcorder again. Making the disc compatible with playback on DVD devices or DVD drives (Finalizing) (continued) Finalizing a disc •... (p.146, 147) 58 5 Touch t [YES] t [YES]. To change the disc title (p.59) Go to step 5 if you connect the AC Adaptor and turn on your camcorder. 2 Turn on the power by sliding the POWER switch. 3 Insert the disc to finalize the disc using a DVD-R/DVD-RW (VIDEO...
...the adaptor after finalizing is completed. 6 Touch , when [Completed.] appears. • When using the following operations. - Connect the AC Adaptor to the DC IN jack on your camcorder again. Making the disc compatible with playback on DVD devices or DVD drives (Finalizing) (continued) Finalizing a disc •... (p.146, 147) 58 5 Touch t [YES] t [YES]. To change the disc title (p.59) Go to step 5 if you connect the AC Adaptor and turn on your camcorder. 2 Turn on the power by sliding the POWER switch. 3 Insert the disc to finalize the disc using a DVD-R/DVD-RW (VIDEO...
Operating Guide
Page 63
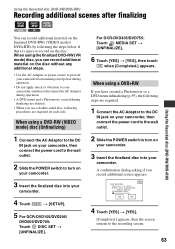
... following steps are required. 1 Connect the AC Adaptor to the DC IN jack on your camcorder, then connect the power cord to the wall outlet. 2 Slide the POWER switch to turn on your camcorder. 3 Insert the finalized disc into your camcorder, and do not disconnect the ... scenes appears. 4 Touch [YES] t [YES]. [Completed.] appears, then the screen returns to turn on your camcorder. 3 Insert the finalized disc into your camcorder. 4 Touch t [SETUP]. 5 For DCR-DVD105/DVD205/ DVD605/DVD705: Touch DISC SET t [UNFINALIZE]. Using the Recorded disc (DVD-RW/DVD+RW) Recording additional ...
... following steps are required. 1 Connect the AC Adaptor to the DC IN jack on your camcorder, then connect the power cord to the wall outlet. 2 Slide the POWER switch to turn on your camcorder. 3 Insert the finalized disc into your camcorder, and do not disconnect the ... scenes appears. 4 Touch [YES] t [YES]. [Completed.] appears, then the screen returns to turn on your camcorder. 3 Insert the finalized disc into your camcorder. 4 Touch t [SETUP]. 5 For DCR-DVD105/DVD205/ DVD605/DVD705: Touch DISC SET t [UNFINALIZE]. Using the Recorded disc (DVD-RW/DVD+RW) Recording additional ...
Operating Guide
Page 64
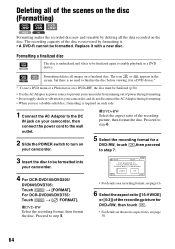
... disc must be finalized again to be formatted. Proceed to finalize the disc before viewing it with a new disc. For DCR-DVD305/DVD755: Touch t [ FORMAT]. The icon or appears in Camcorder VIDEO VR OK • For details on a recording format, see page 16. 6 Select the aspect ratio ([16:9... the screen, but there is required on each side. 1 Connect the AC Adaptor to the DC IN jack on your camcorder, then connect the power cord to the wall outlet. 2 Slide the POWER switch to turn on your camcorder. 4 For DCR-DVD105/DVD205/ DVD605/DVD705: Touch t [FORMAT]. xDVD-RW Select ...
... disc must be finalized again to be formatted. Proceed to finalize the disc before viewing it with a new disc. For DCR-DVD305/DVD755: Touch t [ FORMAT]. The icon or appears in Camcorder VIDEO VR OK • For details on a recording format, see page 16. 6 Select the aspect ratio ([16:9... the screen, but there is required on each side. 1 Connect the AC Adaptor to the DC IN jack on your camcorder, then connect the power cord to the wall outlet. 2 Slide the POWER switch to turn on your camcorder. 4 For DCR-DVD105/DVD205/ DVD605/DVD705: Touch t [FORMAT]. xDVD-RW Select ...


