
Operating Instructions
Page 6
...JPEG Image Files... 53 Adjusting the Delay Between the Picture and Sound 57 Restricting Playback of the Disc........... 58 Changing the System Settings by Using the Setup Display 60 Tuner Presetting Radio Stations 67 Listening to the Radio 68 Control for HDMI/External Audio Device Using the Control ...for HDMI Function for "BRAVIA" Sync 70 Using the DIGITAL MEDIA PORT Adapter 72 Using an S-AIR Product 73 Other Operations Getting Optimal ...
...JPEG Image Files... 53 Adjusting the Delay Between the Picture and Sound 57 Restricting Playback of the Disc........... 58 Changing the System Settings by Using the Setup Display 60 Tuner Presetting Radio Stations 67 Listening to the Radio 68 Control for HDMI/External Audio Device Using the Control ...for HDMI Function for "BRAVIA" Sync 70 Using the DIGITAL MEDIA PORT Adapter 72 Using an S-AIR Product 73 Other Operations Getting Optimal ...
Operating Instructions
Page 10
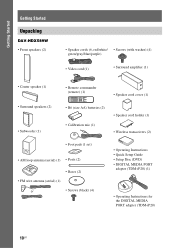
Getting Started Getting Started Unpacking DAV-HDX589W • Front speakers (2) • Speaker cords (6, red/white/ • Screws (with washer) (4) green/gray/blue/purple) • Video cord (1) • Surround amplifier (1) •...• AM loop antenna (aerial) (1) • Posts (2) • Bases (2) • FM wire antenna (aerial) (1) or • Screws (black) (4) • Operating Instructions • Quick Setup Guide • Setup Disc (DVD) • DIGITAL MEDIA PORT adapter (TDM-iP20) (1) • Operating Instructions for the DIGITAL MEDIA PORT adapter (TDM-iP20) 10US
Getting Started Getting Started Unpacking DAV-HDX589W • Front speakers (2) • Speaker cords (6, red/white/ • Screws (with washer) (4) green/gray/blue/purple) • Video cord (1) • Surround amplifier (1) •...• AM loop antenna (aerial) (1) • Posts (2) • Bases (2) • FM wire antenna (aerial) (1) or • Screws (black) (4) • Operating Instructions • Quick Setup Guide • Setup Disc (DVD) • DIGITAL MEDIA PORT adapter (TDM-iP20) (1) • Operating Instructions for the DIGITAL MEDIA PORT adapter (TDM-iP20) 10US
Operating Instructions
Page 11
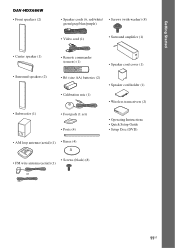
Getting Started DAV-HDX686W • Front speakers (2) • Speaker cords (6, red/white/ • Screws (with washer) (8) green/gray/blue/purple) • Video cord (1) • Surround amplifier (1) &#...batteries (2) • Calibration mic (1) • Speaker cord holder (1) • Wireless transceivers (2) • Subwoofer (1) • Foot pads (1 set) • Posts (4) • Operating Instructions • Quick Setup Guide • Setup Disc (DVD) • AM loop antenna (aerial) (1) • Bases (4) • Screws (black) (8) • FM wire antenna (aerial) (1) or 11US
Getting Started DAV-HDX686W • Front speakers (2) • Speaker cords (6, red/white/ • Screws (with washer) (8) green/gray/blue/purple) • Video cord (1) • Surround amplifier (1) &#...batteries (2) • Calibration mic (1) • Speaker cord holder (1) • Wireless transceivers (2) • Subwoofer (1) • Foot pads (1 set) • Posts (4) • Operating Instructions • Quick Setup Guide • Setup Disc (DVD) • AM loop antenna (aerial) (1) • Bases (4) • Screws (black) (8) • FM wire antenna (aerial) (1) or 11US
Operating Instructions
Page 35
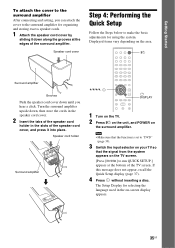
...that the function is set to "DVD" (page 39). 3 Switch the input selector on your TV so that the signal from the system appears on -screen display appears. 35US Displayed items vary depending on the surround amplifier. "/1 Surround amplifier Grooves Push the speaker cord cover down...If this message does not appear, recall the Quick Setup display (page 37). 4 Press without inserting a disc. Speaker cord cover Step 4: Performing the Quick Setup Follow the Steps below to make the basic adjustments for using the system. The Setup Display for selecting the language used in the slots...
...that the function is set to "DVD" (page 39). 3 Switch the input selector on your TV so that the signal from the system appears on -screen display appears. 35US Displayed items vary depending on the surround amplifier. "/1 Surround amplifier Grooves Push the speaker cord cover down...If this message does not appear, recall the Quick Setup display (page 37). 4 Press without inserting a disc. Speaker cord cover Step 4: Performing the Quick Setup Follow the Steps below to make the basic adjustments for using the system. The Setup Display for selecting the language used in the slots...

Operating Instructions
Page 36
...(page 61) • [4:3 LETTER BOX] or [4:3 PAN SCAN]: For a 4:3 standard TV (page 61) The Setup Display for the Control for selecting the speaker formation appears. 36US HDMI SETUP HDMI RESOLUTION: CONTROL FOR HDMI: VOLUME LIMIT: YCBCR/RGB(HDMI): AUDIO(HDMI): JPEG RESOLUTION: AUTO(1920x1080p) ON ON OFF...(not supplied). For details, see "Getting Optimal Surround Sound for a Room" (page 79). 9 Connect the calibration mic (supplied) to off. The Setup Display for HDMI function is set to the A.CAL MIC jack on . • [OFF]: The Control for selecting the aspect ratio of each speaker should...
...(page 61) • [4:3 LETTER BOX] or [4:3 PAN SCAN]: For a 4:3 standard TV (page 61) The Setup Display for the Control for selecting the speaker formation appears. 36US HDMI SETUP HDMI RESOLUTION: CONTROL FOR HDMI: VOLUME LIMIT: YCBCR/RGB(HDMI): AUDIO(HDMI): JPEG RESOLUTION: AUTO(1920x1080p) ON ON OFF...(not supplied). For details, see "Getting Optimal Surround Sound for a Room" (page 79). 9 Connect the calibration mic (supplied) to off. The Setup Display for HDMI function is set to the A.CAL MIC jack on . • [OFF]: The Control for selecting the aspect ratio of each speaker should...

Operating Instructions
Page 37
...HDMI RESOLUTION], then press . 7 Press X/x to select the desired setting, then press . • [AUTO (1920 × 1080p)]: The system outputs the optimal video signal for [SETUP] appear. 94( 99) 1( 1) T 0: 01: 08 DVD VIDEO CUSTOM CUSTOM QUICK 4 Press X/x to the operating instructions supplied with an...to select [YES], then press . 10 Press C/c to select [HDMI SETUP], then press . Give consideration to select [SETUP], then press . To select the type of video signal output from the status of the system. The Control Menu display appears on the TV screen. 3 Press X/x ...
...HDMI RESOLUTION], then press . 7 Press X/x to select the desired setting, then press . • [AUTO (1920 × 1080p)]: The system outputs the optimal video signal for [SETUP] appear. 94( 99) 1( 1) T 0: 01: 08 DVD VIDEO CUSTOM CUSTOM QUICK 4 Press X/x to the operating instructions supplied with an...to select [YES], then press . 10 Press C/c to select [HDMI SETUP], then press . Give consideration to select [SETUP], then press . To select the type of video signal output from the status of the system. The Control Menu display appears on the TV screen. 3 Press X/x ...

Operating Instructions
Page 38
...area, [720 × 480/576p] may appear. The options for [SETUP] appear. 4 Press X/x to select the desired setting, then press . [OFF]: The system does not output progressive signals. The system outputs a progressive signal for displaying TV images which reduces flickering and sharpens ...mode. the TV is in the front panel display. 2 Press DISPLAY while the system is connected via jacks other than the COMPONENT VIDEO OUT jacks. [ON]: The system outputs progressive signals. The options for [VIDEO SETUP] appear. 6 Press X/x to select [PROGRESSIVE (COMPONENT OUT)], then press ....
...area, [720 × 480/576p] may appear. The options for [SETUP] appear. 4 Press X/x to select the desired setting, then press . [OFF]: The system does not output progressive signals. The system outputs a progressive signal for displaying TV images which reduces flickering and sharpens ...mode. the TV is in the front panel display. 2 Press DISPLAY while the system is connected via jacks other than the COMPONENT VIDEO OUT jacks. [ON]: The system outputs progressive signals. The options for [VIDEO SETUP] appear. 6 Press X/x to select [PROGRESSIVE (COMPONENT OUT)], then press ....

Operating Instructions
Page 48
...lead). • For a DVD-VR, VIDEO CD, Super Audio CD, CD, DATA CD, or DATA DVD, the system remembers the resume playback point for up to 10 discs. Note • Depending on the Setup Display. - For details, see "[MULTI-DISC RESUME] (DVD VIDEO/VIDEO CD only)" (page 65). 48US "RESUME" ...appears in [SYSTEM SETUP] to stop the disc, the system may not resume playback from that you played before with some discs. you change the parental control level. - you stopped the disc in ...
...lead). • For a DVD-VR, VIDEO CD, Super Audio CD, CD, DATA CD, or DATA DVD, the system remembers the resume playback point for up to 10 discs. Note • Depending on the Setup Display. - For details, see "[MULTI-DISC RESUME] (DVD VIDEO/VIDEO CD only)" (page 65). 48US "RESUME" ...appears in [SYSTEM SETUP] to stop the disc, the system may not resume playback from that you played before with some discs. you change the parental control level. - you stopped the disc in ...

Operating Instructions
Page 55
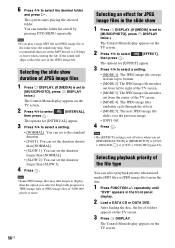
... a folder Press H to the previous folder by displaying the image browser Press PICTURE NAVI. To return to select a folder. repeatedly until "DVD" appears in [HDMI SETUP] to view, then press . You can play a slide show . Note • You cannot rotate the JPEG image file when you want to [(1920 × 1080i...
... a folder Press H to the previous folder by displaying the image browser Press PICTURE NAVI. To return to select a folder. repeatedly until "DVD" appears in [HDMI SETUP] to view, then press . You can play a slide show . Note • You cannot rotate the JPEG image file when you want to [(1920 × 1080i...
Operating Instructions
Page 56
...a setting. • [MODE 1]: The JPEG image file sweeps in the disc. 1 Press FUNCTION +/- Sony recommends that you play a large MP3 file and JPEG image file at the same time, the sound may ...Off. 4 Press . The Control Menu display appears on /off by pressing DVD MENU repeatedly. The system starts playing the selected folder. Note • Some JPEG image files may skip. Selecting the slide ...display appears on the TV screen. 3 Press DISPLAY. repeatedly until "DVD" appears in [HDMI SETUP] to select the desired folder and press H. After loading the disc, the list of folders ...
...a setting. • [MODE 1]: The JPEG image file sweeps in the disc. 1 Press FUNCTION +/- Sony recommends that you play a large MP3 file and JPEG image file at the same time, the sound may ...Off. 4 Press . The Control Menu display appears on /off by pressing DVD MENU repeatedly. The system starts playing the selected folder. Note • Some JPEG image files may skip. Selecting the slide ...display appears on the TV screen. 3 Press DISPLAY. repeatedly until "DVD" appears in [HDMI SETUP] to select the desired folder and press H. After loading the disc, the list of folders ...

Operating Instructions
Page 58
...registering a new password appears. The area is in the front panel display. 2 Press DISPLAY while the system is selected. repeatedly until "DVD" appears in stop mode. The options for [SYSTEM SETUP] appear. 6 Press X/x to select [PARENTAL CONTROL t], then press . PARENTAL CONTROL LEVEL: OFF STANDARD...press . x When you have not entered a password The display for [STANDARD] are displayed. 11 Press X/x to select [SYSTEM SETUP], then press . The selection items for entering the password appears. 7 Enter or re-enter your 4-digit password using the number buttons, then...
...registering a new password appears. The area is in the front panel display. 2 Press DISPLAY while the system is selected. repeatedly until "DVD" appears in stop mode. The options for [SYSTEM SETUP] appear. 6 Press X/x to select [PARENTAL CONTROL t], then press . PARENTAL CONTROL LEVEL: OFF STANDARD...press . x When you have not entered a password The display for [STANDARD] are displayed. 11 Press X/x to select [SYSTEM SETUP], then press . The selection items for entering the password appears. 7 Enter or re-enter your 4-digit password using the number buttons, then...

Operating Instructions
Page 59
...using the number buttons, then press . 8 Press X/x to 6 of "Restricting Playback of the Disc" (page 58). The options for [SYSTEM SETUP] appear. 6 Press X/x to select [SETUP], then press . The options for [SETUP] appear. 4 Press X/x to [OFF] in stop mode. The display for which [PARENTAL CONTROL] is in Step 11. The display ... number buttons, then press . Changing the password 1 Press FUNCTION +/- When you are asked to enter your password Press C before you to select [SYSTEM SETUP], then press . The Setup Display appears. 5 Press X/x to enter a new 4-digit password.
...using the number buttons, then press . 8 Press X/x to 6 of "Restricting Playback of the Disc" (page 58). The options for [SYSTEM SETUP] appear. 6 Press X/x to select [SETUP], then press . The options for [SETUP] appear. 4 Press X/x to [OFF] in stop mode. The display for which [PARENTAL CONTROL] is in Step 11. The display ... number buttons, then press . Changing the password 1 Press FUNCTION +/- When you are asked to enter your password Press C before you to select [SYSTEM SETUP], then press . The Setup Display appears. 5 Press X/x to enter a new 4-digit password.

Operating Instructions
Page 60
...: ENGLISH ENGLISH ORIGINAL AUDIO FOLLOW 60US Setup items The Setup Display appears. 5 Press X/x to select the setup item, then press . • [LANGUAGE SETUP] (page 60) • [VIDEO SETUP] (page 61) • [HDMI SETUP] (page 62) • [AUDIO SETUP] (page 64) • [SYSTEM SETUP] (page 64) • [SPEAKER SETUP] (page 65) Example: [VIDEO SETUP] Selected item VIDEO SETUP TV TYPE: PROGRESSIVE (COMPONENT OUT...
...: ENGLISH ENGLISH ORIGINAL AUDIO FOLLOW 60US Setup items The Setup Display appears. 5 Press X/x to select the setup item, then press . • [LANGUAGE SETUP] (page 60) • [VIDEO SETUP] (page 61) • [HDMI SETUP] (page 62) • [AUDIO SETUP] (page 64) • [SYSTEM SETUP] (page 64) • [SPEAKER SETUP] (page 65) Example: [VIDEO SETUP] Selected item VIDEO SETUP TV TYPE: PROGRESSIVE (COMPONENT OUT...

Operating Instructions
Page 61
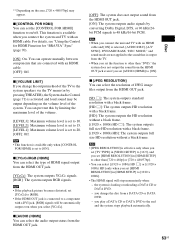
...[ORIGINAL], the language given priority on the disc, the language may be selected automatically). Note • When you connect a 4:3 standard TV. VIDEO SETUP TV TYPE: PROGRESSIVE (COMPONENT OUT): 4:3 OUTPUT: BLACK LEVEL: BLACK LEVEL (COMPONENT OUT): PAUSE MODE: 16:9 OFF FULL ON OFF AUTO x [...below. 1 Select [ON], then press . For details, see "Does your TV accept progressive signals?" (page 38). [OFF]: The system outputs interlace signals. [ON]: The system outputs progressive signals. When you select [OTHERS t] in [MENU], [AUDIO], or [SUBTITLE] that is not recorded on the DVD VIDEO,...
...[ORIGINAL], the language given priority on the disc, the language may be selected automatically). Note • When you connect a 4:3 standard TV. VIDEO SETUP TV TYPE: PROGRESSIVE (COMPONENT OUT): 4:3 OUTPUT: BLACK LEVEL: BLACK LEVEL (COMPONENT OUT): PAUSE MODE: 16:9 OFF FULL ON OFF AUTO x [...below. 1 Select [ON], then press . For details, see "Does your TV accept progressive signals?" (page 38). [OFF]: The system outputs interlace signals. [ON]: The system outputs progressive signals. When you select [OTHERS t] in [MENU], [AUDIO], or [SUBTITLE] that is not recorded on the DVD VIDEO,...

Operating Instructions
Page 62
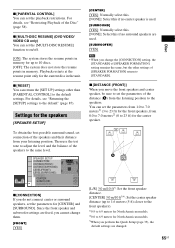
...the black level of the output signal to the standard level. [ON]: You can raise the standard black level. The system outputs a progressive signal for HDMI [HDMI SETUP] HDMI SETUP HDMI RESOLUTION: CONTROL FOR HDMI: VOLUME LIMIT: YCBCR/RGB(HDMI): AUDIO(HDMI): JPEG RESOLUTION: AUTO(1920x1080p) ON LEVEL2 ... SD x [HDMI RESOLUTION] You can select the type of video signal that the screen is not effective when the system outputs a progressive signal. [OFF]: You can set [TV TYPE] in [VIDEO SETUP] to [16:9]. If you can adjust the aspect ratio to select [YES], then press . x [PAUSE MODE...
...the black level of the output signal to the standard level. [ON]: You can raise the standard black level. The system outputs a progressive signal for HDMI [HDMI SETUP] HDMI SETUP HDMI RESOLUTION: CONTROL FOR HDMI: VOLUME LIMIT: YCBCR/RGB(HDMI): AUDIO(HDMI): JPEG RESOLUTION: AUTO(1920x1080p) ON LEVEL2 ... SD x [HDMI RESOLUTION] You can select the type of video signal that the screen is not effective when the system outputs a progressive signal. [OFF]: You can set [TV TYPE] in [VIDEO SETUP] to [16:9]. If you can adjust the aspect ratio to select [YES], then press . x [PAUSE MODE...
Operating Instructions
Page 63
...and TV with a DVI jack, [RGB] signals will stop momentarily when: - the system is activated and loud sound may appear. x [VOLUME LIMIT] If you set [HDMI RESOLUTION] in [HDMI SETUP] to the system speakers via the TV menu (or by limiting the maximum level of the TV to other...for "BRAVIA" Sync" (page 70). [ON]: On. Note • If the playback picture becomes distorted, set [HDMI RESOLUTION] in [VIDEO SETUP] to [16:9], and you set [AUDIO (HDMI)] to a component with an HDMI cable and [ON] is connected to [ON]. You can prevent this by pressing THEATER), the System Audio ...
...and TV with a DVI jack, [RGB] signals will stop momentarily when: - the system is activated and loud sound may appear. x [VOLUME LIMIT] If you set [HDMI RESOLUTION] in [HDMI SETUP] to the system speakers via the TV menu (or by limiting the maximum level of the TV to other...for "BRAVIA" Sync" (page 70). [ON]: On. Note • If the playback picture becomes distorted, set [HDMI RESOLUTION] in [VIDEO SETUP] to [16:9], and you set [AUDIO (HDMI)] to a component with an HDMI cable and [ON] is connected to [ON]. You can prevent this by pressing THEATER), the System Audio ...
Operating Instructions
Page 64
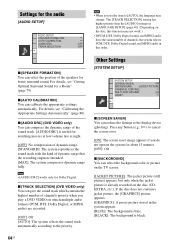
... and MPEG audio have the same number of channels priority when you set the item to the display device (ghosting). Other Settings [SYSTEM SETUP] SYSTEM SETUP SCREEN SAVER: ON BACKGROUND: JACKET PICTURE PARENTAL CONTROL: MULTI-DISC RESUME: ON RESET: x [SCREEN SAVER] You can compress the ...sound track automatically according to cancel the screen saver. [ON]: The screen saver image appears if you do not operate the system for the audio [AUDIO SETUP] AUDIO SETUP SPEAKER FORMATION: AUTO CALIBRATION: AUDIO DRC: TRACK SELECTION: Note • When you play a DVD VIDEO on the disc ...
... and MPEG audio have the same number of channels priority when you set the item to the display device (ghosting). Other Settings [SYSTEM SETUP] SYSTEM SETUP SCREEN SAVER: ON BACKGROUND: JACKET PICTURE PARENTAL CONTROL: MULTI-DISC RESUME: ON RESET: x [SCREEN SAVER] You can compress the ...sound track automatically according to cancel the screen saver. [ON]: The screen saver image appears if you do not operate the system for the audio [AUDIO SETUP] AUDIO SETUP SPEAKER FORMATION: AUTO CALIBRATION: AUDIO DRC: TRACK SELECTION: Note • When you play a DVD VIDEO on the disc ...
Operating Instructions
Page 65
... 23 ft) for the center speaker. You can set connection of the speakers and their distance from your listening position. For details, see "Returning the [SETUP] settings to the default" (page 87). x [RESET] You can return the [SET UP] settings other settings of [SPEAKER FORMATION] return to [STANDARD...unit. A [L/R] 3.0 m/10 ft3): Set the front speaker distance. [CENTER] 3.0 m/10 ft3)4): Set the center speaker distance (up to 10 discs. [OFF]: The system does not store the resume points in memory. x [PARENTAL CONTROL] You can set the [MULTI-DISC RESUME] function to on/off. [ON]: The...
... 23 ft) for the center speaker. You can set connection of the speakers and their distance from your listening position. For details, see "Returning the [SETUP] settings to the default" (page 87). x [RESET] You can return the [SET UP] settings other settings of [SPEAKER FORMATION] return to [STANDARD...unit. A [L/R] 3.0 m/10 ft3): Set the front speaker distance. [CENTER] 3.0 m/10 ft3)4): Set the center speaker distance (up to 10 discs. [OFF]: The system does not store the resume points in memory. x [PARENTAL CONTROL] You can set the [MULTI-DISC RESUME] function to on/off. [ON]: The...

Operating Instructions
Page 66
... remote. • To return to the default setting. Be sure to set [TEST TONE] to [ON] for North American models. 2)When you perform the Quick Setup (page 35), the default settings are not placed at one of all front and surround speakers are changed. 3)This item appears when you set the... not place the surround speakers farther away from 0.0 to 7.0 meters1) (0 to [YES] in the [CONNECTION] setting. Tip • To adjust the volume of the [SPEAKER SETUP] items, the test tone is emitted from -6.0 dB to +6.0 dB.
... remote. • To return to the default setting. Be sure to set [TEST TONE] to [ON] for North American models. 2)When you perform the Quick Setup (page 35), the default settings are not placed at one of all front and surround speakers are changed. 3)This item appears when you set the... not place the surround speakers farther away from 0.0 to 7.0 meters1) (0 to [YES] in the [CONNECTION] setting. Tip • To adjust the volume of the [SPEAKER SETUP] items, the test tone is emitted from -6.0 dB to +6.0 dB.
Operating Instructions
Page 71
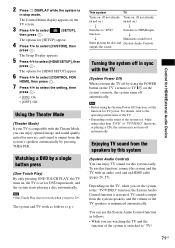
...sound via this function, connect the system and the TV with an audio cord and an HDMI cable (pages 26, 27). Using the Theater Mode (Theater Mode) If your TV is output from the speakers by using the System Power Off function, set for [HDMI SETUP] appear. 6 Press X/x to... select [CONTROL FOR HDMI], then press . 7 Press X/x to select [HDMI SETUP], then press . The system and TV work when you set the system to select [SETUP], ...
...sound via this function, connect the system and the TV with an audio cord and an HDMI cable (pages 26, 27). Using the Theater Mode (Theater Mode) If your TV is output from the speakers by using the System Power Off function, set for [HDMI SETUP] appear. 6 Press X/x to... select [CONTROL FOR HDMI], then press . 7 Press X/x to select [HDMI SETUP], then press . The system and TV work when you set the system to select [SETUP], ...

