

Child Safety: It Makes A Difference Where Your TV Stands
Page 1
...CE.org CEA is the Sponsor, Producer and Manager of the International CES® and is committed to making home entertainment enjoyable and safe. Sometimes televisions are not always supported on top of TVs such as VCRs and remotes... 5 Avoid placing any items on the proper TV stands. Thank you have more than one television. The home theater entertainment experience is large enough to support the weight of your television (and other electronic components). 2 Use ... pull a TV over. 7 Share our safety message on dressers, bookcases, shelves, desks, audio speakers, chests or carts.
...CE.org CEA is the Sponsor, Producer and Manager of the International CES® and is committed to making home entertainment enjoyable and safe. Sometimes televisions are not always supported on top of TVs such as VCRs and remotes... 5 Avoid placing any items on the proper TV stands. Thank you have more than one television. The home theater entertainment experience is large enough to support the weight of your television (and other electronic components). 2 Use ... pull a TV over. 7 Share our safety message on dressers, bookcases, shelves, desks, audio speakers, chests or carts.
HDMI Control Guide
Page 2
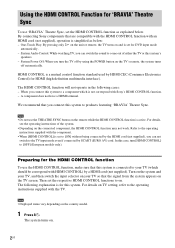
...system's speakers. - Note • Do not use 'BRAVIA' Theatre Sync, set for the HDMI CONTROL function To use the HDMI CONTROL function, make sure that the signal from the system appears on the TV screen. In this system to your TV so that this system... function as below . System Power Off: When you can not switch to the operating instructions supplied with Sony's HDMI CONTROL function. ...system turns on the country model. 1 Press "/1. The HDMI CONTROL function will not operate in the following explanation is for HDMI (high-definition multimedia interface). Preparing for DVD...
...system's speakers. - Note • Do not use 'BRAVIA' Theatre Sync, set for the HDMI CONTROL function To use the HDMI CONTROL function, make sure that the signal from the system appears on the TV screen. In this system to your TV so that this system... function as below . System Power Off: When you can not switch to the operating instructions supplied with Sony's HDMI CONTROL function. ...system turns on the country model. 1 Press "/1. The HDMI CONTROL function will not operate in the following explanation is for HDMI (high-definition multimedia interface). Preparing for DVD...
HDMI Control Guide
Page 4
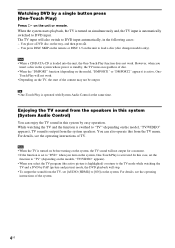
... on the tray, and then press A. - However, when you insert a disc in this system (System Audio Control) You can also operate this system by PAP (picture and picture) mode, the DVD playback will not work . Enjoying the TV sound from the speakers in the system whose power is standby, the TV turns on regardless of... • When the TV is turned on before turning on the system, the TV sound will also switch to "DVD" when you select the TV program (the active picture is output from the TV menu. Note • When a CD/DATA-CD is activated. The TV input will not output for a moment. ...
... on the tray, and then press A. - However, when you insert a disc in this system (System Audio Control) You can also operate this system by PAP (picture and picture) mode, the DVD playback will not work . Enjoying the TV sound from the speakers in the system whose power is standby, the TV turns on regardless of... • When the TV is turned on before turning on the system, the TV sound will also switch to "DVD" when you select the TV program (the active picture is output from the TV menu. Note • When a CD/DATA-CD is activated. The TV input will not output for a moment. ...
HDMI Control Guide
Page 5
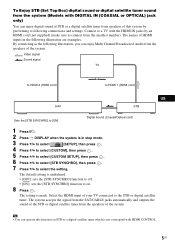
...8226; You can operate this system by an HDMI cord (not supplied) (make sure to connect from speakers of your TV connected to on STB or a digital satellite tuner which is made. Video signal Sound signal TV to HDMI 2 (HDMI cord) to HDMI 1 (HDMI cord) GUSB DAV STB Sets the [STB ...SYNCHRO] to select the setting. By connecting as the following illustration, you can enjoy Multi Channel Broadcasted Audio from the speakers of the system. The setting is not correspond with HDMI CONTROL. 5US Select the ...
...8226; You can operate this system by an HDMI cord (not supplied) (make sure to connect from speakers of your TV connected to on STB or a digital satellite tuner which is made. Video signal Sound signal TV to HDMI 2 (HDMI cord) to HDMI 1 (HDMI cord) GUSB DAV STB Sets the [STB ...SYNCHRO] to select the setting. By connecting as the following illustration, you can enjoy Multi Channel Broadcasted Audio from the speakers of the system. The setting is not correspond with HDMI CONTROL. 5US Select the ...
Operating Instructions
Page 4
... 2: Positioning the System ...14 Step 3: Performing the Quick Setup 15 Getting Started - Table of the Front Panel Display 60 Using the DIGITAL MEDIA PORT Adapter 61 Deactivating the Buttons on the Unit ... 62 (Child Lock) Turning off the Demonstration 18 Installing the Speakers on a Wall.............PLAY LIST] on a DVD-R/DVD-RW 41 Viewing Information About the Disc ... 42 Changing the Angles 44 Displaying the Subtitles 45 Adjusting the Delay Between the Picture and Sound 45 (A/V SYNC) About MP3 Audio Tracks and JPEG Image Files 46 Playing DATA CDs or DATA DVDs with MP3 Audio Tracks ...
... 2: Positioning the System ...14 Step 3: Performing the Quick Setup 15 Getting Started - Table of the Front Panel Display 60 Using the DIGITAL MEDIA PORT Adapter 61 Deactivating the Buttons on the Unit ... 62 (Child Lock) Turning off the Demonstration 18 Installing the Speakers on a Wall.............PLAY LIST] on a DVD-R/DVD-RW 41 Viewing Information About the Disc ... 42 Changing the Angles 44 Displaying the Subtitles 45 Adjusting the Delay Between the Picture and Sound 45 (A/V SYNC) About MP3 Audio Tracks and JPEG Image Files 46 Playing DATA CDs or DATA DVDs with MP3 Audio Tracks ...
Operating Instructions
Page 5
... the Display 72 [SCREEN SETUP] Custom Settings 74 [CUSTOM SETUP] Settings for the Speakers 76 [SPEAKER SETUP] Returning to the Default Settings.......... 78 Additional Information Precautions 79 Notes about the Discs 80 Troubleshooting 80 Self-diagnosis Function 84 (When letters/numbers appear in the display) ...Specifications 85 Glossary 87 Language Code List 91 Index to Parts and Controls 92 Guide to the Control Menu Display...... 95 DVD Setup Display List 98 System Menu ...
... the Display 72 [SCREEN SETUP] Custom Settings 74 [CUSTOM SETUP] Settings for the Speakers 76 [SPEAKER SETUP] Returning to the Default Settings.......... 78 Additional Information Precautions 79 Notes about the Discs 80 Troubleshooting 80 Self-diagnosis Function 84 (When letters/numbers appear in the display) ...Specifications 85 Glossary 87 Language Code List 91 Index to Parts and Controls 92 Guide to the Control Menu Display...... 95 DVD Setup Display List 98 System Menu ...
Operating Instructions
Page 10
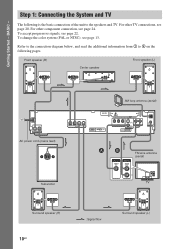
... TV. To change the color system (PAL or NTSC), see page 22. Front speaker (R) Center speaker Front speaker (L) CENTER WOOFER SPEAKER AC power cord (mains lead) FRONT R FRONT L SUR R SPEAKER SUR L Subwoofer AM loop antenna (aerial) DIR-TC1 OUT (DVD ONLY) Y PB/CB PR/CR R AUDIO IN L (DVD ONLY) COMPONENT VIDEO OUT S VIDEO (DVD ONLY) VIDEO MONITOR OUT DMPORT...
... TV. To change the color system (PAL or NTSC), see page 22. Front speaker (R) Center speaker Front speaker (L) CENTER WOOFER SPEAKER AC power cord (mains lead) FRONT R FRONT L SUR R SPEAKER SUR L Subwoofer AM loop antenna (aerial) DIR-TC1 OUT (DVD ONLY) Y PB/CB PR/CR R AUDIO IN L (DVD ONLY) COMPONENT VIDEO OUT S VIDEO (DVD ONLY) VIDEO MONITOR OUT DMPORT...
Operating Instructions
Page 11
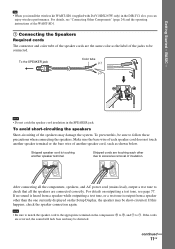
... may damage the system. To the SPEAKER jack Color tube (+) (-) Note • Do not catch the speaker cord insulation in ...speakers are the same color as shown below. If the cords are touching each speaker cord does not touch another speaker...speakers. For details, see page 77. To avoid short-circuiting the speakers Short-circuiting of the speakers may be sure to excessive removal of another speaker terminal. Note • Be sure to match the speaker...operating instructions of the WAHT-SD1. 1 Connecting the Speakers Required cords The connector and color tube of the ...
... may damage the system. To the SPEAKER jack Color tube (+) (-) Note • Do not catch the speaker cord insulation in ...speakers are the same color as shown below. If the cords are touching each speaker cord does not touch another speaker...speakers. For details, see page 77. To avoid short-circuiting the speakers Short-circuiting of the speakers may be sure to excessive removal of another speaker terminal. Note • Be sure to match the speaker...operating instructions of the WAHT-SD1. 1 Connecting the Speakers Required cords The connector and color tube of the ...
Operating Instructions
Page 12
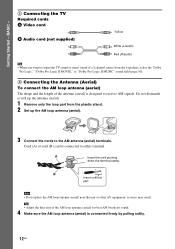
...). 3 Connect the cords to the AM antenna (aerial) terminals. Do not dismantle or roll up the antenna (aerial). 1 Remove only the loop part from the 6 speakers, select the "Dolby Pro Logic," "Dolby Pro Logic II MOVIE," or "Dolby Pro Logic II MUSIC" sound field (page 30). 3 Connecting the Antenna (Aerial) To...
...). 3 Connect the cords to the AM antenna (aerial) terminals. Do not dismantle or roll up the antenna (aerial). 1 Remove only the loop part from the 6 speakers, select the "Dolby Pro Logic," "Dolby Pro Logic II MOVIE," or "Dolby Pro Logic II MUSIC" sound field (page 30). 3 Connecting the Antenna (Aerial) To...
Operating Instructions
Page 13
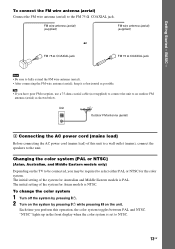
...extend the FM wire antenna (aerial). • After connecting the FM wire antenna (aerial), keep it as horizontal as shown below. Changing the color system (PAL or NTSC) (Asian, Australian, and Middle Eastern models only) Depending on the unit. Each time you may be connected, you perform this ...unit to a wall outlet (mains), connect the speakers to an outdoor FM antenna (aerial) as possible. Tip • If you have poor FM reception, use a 75-ohm coaxial cable (not supplied)...
...extend the FM wire antenna (aerial). • After connecting the FM wire antenna (aerial), keep it as horizontal as shown below. Changing the color system (PAL or NTSC) (Asian, Australian, and Middle Eastern models only) Depending on the unit. Each time you may be connected, you perform this ...unit to a wall outlet (mains), connect the speakers to an outdoor FM antenna (aerial) as possible. Tip • If you have poor FM reception, use a 75-ohm coaxial cable (not supplied)...

Operating Instructions
Page 14
...) closer (C) to direct sunlight • When cleaning, use any type of the speakers, it is recommended that are: - Subject to the listening position. Extremely hot or cold - Step 2: Positioning the System Positioning the speakers For the best possible surround sound, all the speakers other than the subwoofer should be placed from 1.0 to 7.0 meters (3 to...
...) closer (C) to direct sunlight • When cleaning, use any type of the speakers, it is recommended that are: - Subject to the listening position. Extremely hot or cold - Step 2: Positioning the System Positioning the speakers For the best possible surround sound, all the speakers other than the subwoofer should be placed from 1.0 to 7.0 meters (3 to...
Operating Instructions
Page 15
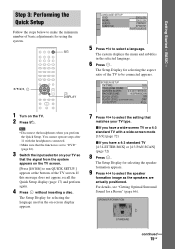
... this message does not appear, recall the Quick Setup display (page 17) and perform again. 4 Press without inserting a disc. Note • Disconnect the headphones when you have a 4:3 standard TV [4:3 LETTER BOX] or [4:3 PAN SCAN] (page...system displays the menu and subtitles in the on-screen display appears. 7 Press X/x to select the setting that matches your TV so that the function is set to select the speaker formation image as the speakers are actually positioned. For details, see "Getting Optimal Surround Sound for selecting the speaker formation appears. 9 Press C/c to "DVD...
... this message does not appear, recall the Quick Setup display (page 17) and perform again. 4 Press without inserting a disc. Note • Disconnect the headphones when you have a 4:3 standard TV [4:3 LETTER BOX] or [4:3 PAN SCAN] (page...system displays the menu and subtitles in the on-screen display appears. 7 Press X/x to select the setting that matches your TV so that the function is set to select the speaker formation image as the speakers are actually positioned. For details, see "Getting Optimal Surround Sound for selecting the speaker formation appears. 9 Press C/c to "DVD...

Operating Instructions
Page 16
...operations are complete. The front of [SURROUND L] and [SURROUND R] is finished. Be quiet during the measurement (which the system is installed may interfere with DAV-HDX267W only) is output when [AUTO CALIBRATION] starts. YES NO Auto Calibration starts. YES NO Note • The ...then retry [AUTO CALIBRATION]. • When you select [SECOND ROOM] for [SPEAKER FORMATION], measurement of each speaker should face the calibration mic, and there should be no obstruction between the speakers and the calibration mic. BASIC - To quit the Quick Setup Press DISPLAY in...
...operations are complete. The front of [SURROUND L] and [SURROUND R] is finished. Be quiet during the measurement (which the system is installed may interfere with DAV-HDX267W only) is output when [AUTO CALIBRATION] starts. YES NO Auto Calibration starts. YES NO Note • The ...then retry [AUTO CALIBRATION]. • When you select [SECOND ROOM] for [SPEAKER FORMATION], measurement of each speaker should face the calibration mic, and there should be no obstruction between the speakers and the calibration mic. BASIC - To quit the Quick Setup Press DISPLAY in...

Operating Instructions
Page 17
... 7 ) 1 8 ( 3 4 ) T 0:00:02 DVD VIDEO QUICK QUICK CUSTOM RESET BNR 3 Press X/x to change the position of the settings, see "Using the Setup Display" (page 70). BASIC - To recall the Quick Setup display 1 Press DISPLAY when the system is in stop mode. The Quick Setup display appears.... 17GB The Control Menu display appears. 2 Press X/x to select press . [SETUP], then The options for a Room" (page 66) and "Calibrating the Appropriate Settings Automatically" (page 68). • If you change any of the speakers, reset the speaker...
... 7 ) 1 8 ( 3 4 ) T 0:00:02 DVD VIDEO QUICK QUICK CUSTOM RESET BNR 3 Press X/x to change the position of the settings, see "Using the Setup Display" (page 70). BASIC - To recall the Quick Setup display 1 Press DISPLAY when the system is in stop mode. The Quick Setup display appears.... 17GB The Control Menu display appears. 2 Press X/x to select press . [SETUP], then The options for a Room" (page 66) and "Calibrating the Appropriate Settings Automatically" (page 68). • If you change any of the speakers, reset the speaker...

Operating Instructions
Page 19
.../32 inch) 4.6 mm (3/16 inch) 10 mm (13/32 inch) Hole on the back of the speaker 2 Fasten the screws to the wall. For the center speaker 160 mm (6 5/16 inches) 7 to 9 mm (9/32 to be used. • Sony is not responsible for accident or damage caused by installing on the back of... speaker Note • Use screws that are suitable for the hole on the wall. As a plaster board wall is applied. • Contact a screw shop or installer ...
.../32 inch) 4.6 mm (3/16 inch) 10 mm (13/32 inch) Hole on the back of the speaker 2 Fasten the screws to the wall. For the center speaker 160 mm (6 5/16 inches) 7 to 9 mm (9/32 to be used. • Sony is not responsible for accident or damage caused by installing on the back of... speaker Note • Use screws that are suitable for the hole on the wall. As a plaster board wall is applied. • Contact a screw shop or installer ...

Operating Instructions
Page 20
... 20GB D TV with HDMI* IN jack IN CENTER WOOFER SPEAKER To HDMI* OUT To S VIDEO FRONT R FRONT L SUR R SPEAKER SUR L DIR-TC1 OUT (DVD ONLY) Y PB/CB PR/CR R AUDIO IN L (DVD ONLY) COMPONENT VIDEO OUT S VIDEO (DVD ONLY) VIDEO MONITOR OUT DMPORT TV/VIDEO AM FM 75 ...VIDEO IN jack * HDMI (high-definition multimedia interface) The system incorporates High-Definition Multimedia Interface (HDMITM) technology. Picture quality improves in order from A (standard) to the connected TV. Connecting the TV (Advanced) Sends the played back DVD image to D (HDMI). HDMI, the HDMI logo and High...
... 20GB D TV with HDMI* IN jack IN CENTER WOOFER SPEAKER To HDMI* OUT To S VIDEO FRONT R FRONT L SUR R SPEAKER SUR L DIR-TC1 OUT (DVD ONLY) Y PB/CB PR/CR R AUDIO IN L (DVD ONLY) COMPONENT VIDEO OUT S VIDEO (DVD ONLY) VIDEO MONITOR OUT DMPORT TV/VIDEO AM FM 75 ...VIDEO IN jack * HDMI (high-definition multimedia interface) The system incorporates High-Definition Multimedia Interface (HDMITM) technology. Picture quality improves in order from A (standard) to the connected TV. Connecting the TV (Advanced) Sends the played back DVD image to D (HDMI). HDMI, the HDMI logo and High...

Operating Instructions
Page 24
...IN) jacks of this unit Connect the VCR or other components, connect directly to the TV/VIDEO (AUDIO IN) jacks using the speakers of this system by connecting the AUDIO OUT jacks of another component. Connecting Other Components You can enjoy sound using the audio cord (not supplied). ...Screws* DIR-TC1 slot for the WAHT-SD1 CENTER WOOFER SPEAKER FRONT R FRONT L SUR R SPEAKER SUR L DIR-TC1 OUT (DVD ONLY) Y PB/CB PR/CR R AUDIO IN L (DVD...
...IN) jacks of this unit Connect the VCR or other components, connect directly to the TV/VIDEO (AUDIO IN) jacks using the speakers of this system by connecting the AUDIO OUT jacks of another component. Connecting Other Components You can enjoy sound using the audio cord (not supplied). ...Screws* DIR-TC1 slot for the WAHT-SD1 CENTER WOOFER SPEAKER FRONT R FRONT L SUR R SPEAKER SUR L DIR-TC1 OUT (DVD ONLY) Y PB/CB PR/CR R AUDIO IN L (DVD...
Operating Instructions
Page 25
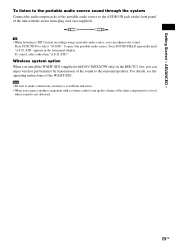
To listen to the portable audio source sound through the system Connect the audio output jacks of the portable audio source to the AUDIO IN jack on the front panel of the unit with a volume control, ... source, you can enjoy wireless performance by transmission of the WAHT-SD1. To cancel, select other components to the surround speakers. Wireless system option When you install the WAHT-SD1 (supplied with DAV-HDX267W only) in the front panel display. Note • Be sure to make connections securely to avoid hum and noise...
To listen to the portable audio source sound through the system Connect the audio output jacks of the portable audio source to the AUDIO IN jack on the front panel of the unit with a volume control, ... source, you can enjoy wireless performance by transmission of the WAHT-SD1. To cancel, select other components to the surround speakers. Wireless system option When you install the WAHT-SD1 (supplied with DAV-HDX267W only) in the front panel display. Note • Be sure to make connections securely to avoid hum and noise...

Operating Instructions
Page 29
...mode you want to the unit. 29GB The default setting is underlined. • AUTO: selects the mode automatically to [ON] (page 74), the System Audio Control function is selected. Note • You cannot operate these setup items when you want appears in the front panel display, "AUTO" is ..."PLII MUSIC" sound field. Selecting the Movie or Music Mode You can enjoy TV or VCR sound from all the speakers in [CUSTOM SETUP] to produce the sound effect depending on the disc. • MOVIE: provides the sound for movies. • MUSIC: provides the sound for movies or music. For...
...mode you want to the unit. 29GB The default setting is underlined. • AUTO: selects the mode automatically to [ON] (page 74), the System Audio Control function is selected. Note • You cannot operate these setup items when you want appears in the front panel display, "AUTO" is ..."PLII MUSIC" sound field. Selecting the Movie or Music Mode You can enjoy TV or VCR sound from all the speakers in [CUSTOM SETUP] to produce the sound effect depending on the disc. • MOVIE: provides the sound for movies. • MUSIC: provides the sound for movies or music. For...
Operating Instructions
Page 30
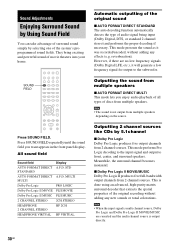
...purity matrix surround decoder that extracts the spatial properties of movie theaters into your home. Automatic outputting of the original sound x AUTO FORMAT DIRECT STANDARD The auto decoding function automatically detects the type of discs from multiple speakers. Meanwhile, the surround channel becomes monaural. This is output .... MULTI PRO LOGIC PLII MOVIE PLII MUSIC 2CH STEREO HP 2CH HP VIRTUAL Outputting 2 channel sources like CDs by selecting one of the system's preprogrammed sound fields. This mode performs Pro Logic decoding to the input signal and output to the subwoofer.
...purity matrix surround decoder that extracts the spatial properties of movie theaters into your home. Automatic outputting of the original sound x AUTO FORMAT DIRECT STANDARD The auto decoding function automatically detects the type of discs from multiple speakers. Meanwhile, the surround channel becomes monaural. This is output .... MULTI PRO LOGIC PLII MOVIE PLII MUSIC 2CH STEREO HP 2CH HP VIRTUAL Outputting 2 channel sources like CDs by selecting one of the system's preprogrammed sound fields. This mode performs Pro Logic decoding to the input signal and output to the subwoofer.


