
Operating Instructions
Page 11
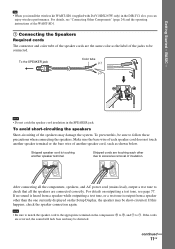
... and may damage the system. To the SPEAKER jack Color tube (+) (-) Note • Do not catch the speaker cord insulation in the DIR-TC1 slot, you can enjoy wireless performance. For details on the components: 3 to 3, and # to excessive removal of another speaker terminal. For details, see...If this , be distorted. Tip • When you install the wireless kit WAHT-SD1 (supplied with DAV-HDX267W only) in the SPEAKER jack. If no sound is heard from a speaker other due to #. After connecting all the components, speakers, and AC power cord (mains lead), output a test tone ...
... and may damage the system. To the SPEAKER jack Color tube (+) (-) Note • Do not catch the speaker cord insulation in the DIR-TC1 slot, you can enjoy wireless performance. For details on the components: 3 to 3, and # to excessive removal of another speaker terminal. For details, see...If this , be distorted. Tip • When you install the wireless kit WAHT-SD1 (supplied with DAV-HDX267W only) in the SPEAKER jack. If no sound is heard from a speaker other due to #. After connecting all the components, speakers, and AC power cord (mains lead), output a test tone ...

Operating Instructions
Page 16
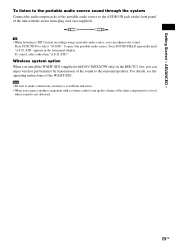
...and there should be no obstruction between the speakers and the calibration mic. To quit the Quick Setup Press DISPLAY in the measurement area and making noise during the measurement. BASIC - Note • When the wireless kit WAHT-SD1 (supplied with measurement. 13 ...to select [YES]. AUDIO IN / A.CAL MIC Calibration mic 12 Press . Be quiet during the measurement (which the system is installed may interfere with DAV-HDX267W only) is finished. Start measurement? All connections and setup operations are complete. YES NO Auto Calibration starts. Getting Started...
...and there should be no obstruction between the speakers and the calibration mic. To quit the Quick Setup Press DISPLAY in the measurement area and making noise during the measurement. BASIC - Note • When the wireless kit WAHT-SD1 (supplied with measurement. 13 ...to select [YES]. AUDIO IN / A.CAL MIC Calibration mic 12 Press . Be quiet during the measurement (which the system is installed may interfere with DAV-HDX267W only) is finished. Start measurement? All connections and setup operations are complete. YES NO Auto Calibration starts. Getting Started...
Operating Instructions
Page 25
...Wireless system option When you install the WAHT-SD1 (supplied with a volume control, turn up the volume of the sound to avoid hum and noise. • When you connect another component with DAV-HDX267W only) in the front panel display. STD" appears in the DIR-TC1 slot, you can enjoy wireless... performance by transmission of the other than "A.F.D. Note • Be sure to make connections securely to the surround speakers. STD." To cancel...
...Wireless system option When you install the WAHT-SD1 (supplied with a volume control, turn up the volume of the sound to avoid hum and noise. • When you connect another component with DAV-HDX267W only) in the front panel display. STD" appears in the DIR-TC1 slot, you can enjoy wireless... performance by transmission of the other than "A.F.D. Note • Be sure to make connections securely to the surround speakers. STD." To cancel...
Operating Instructions
Page 67
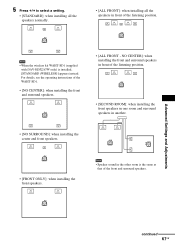
...SURROUND]: when installing the center and front speakers. • [FRONT ONLY]: when installing the front speakers. NO CENTER]: when installing the front and surround speakers in front of the listening position. Note • When the wireless kit WAHT-SD1 (supplied with DAV-HDX267W only) is the same as that... of the WAHT-SD1. • [NO CENTER]: when installing the front and surround speakers. • [ALL FRONT...
...SURROUND]: when installing the center and front speakers. • [FRONT ONLY]: when installing the front speakers. NO CENTER]: when installing the front and surround speakers in front of the listening position. Note • When the wireless kit WAHT-SD1 (supplied with DAV-HDX267W only) is the same as that... of the WAHT-SD1. • [NO CENTER]: when installing the front and surround speakers. • [ALL FRONT...

Operating Instructions
Page 68
... Menu display appears. 3 Press X/x to select [SPEAKER FORMATION], then press . 1 ( 4 4 ) 3 ( 2 8 ) T 0:03:04 SPEAKER FORMATION SPEAKER FORMATION AUTO CALIBRATION DVD VIDEO 4 Press X/x to [STANDARD]. Note • Loud test sound is installed, [STANDARD (WIRED)] appears. The options for [AUTO CALIBRATION] appear. Tip • When the wireless kit WAHT-SD1 (supplied with DAV-HDX267W only) is output when [AUTO...
... Menu display appears. 3 Press X/x to select [SPEAKER FORMATION], then press . 1 ( 4 4 ) 3 ( 2 8 ) T 0:03:04 SPEAKER FORMATION SPEAKER FORMATION AUTO CALIBRATION DVD VIDEO 4 Press X/x to [STANDARD]. Note • Loud test sound is installed, [STANDARD (WIRED)] appears. The options for [AUTO CALIBRATION] appear. Tip • When the wireless kit WAHT-SD1 (supplied with DAV-HDX267W only) is output when [AUTO...


