
Limited Warranty (US Only)
Page 1
... parts for one (1) year. To obtain warranty service, you . Proof of purchase in the form of a bill of sale or receipted invoice which vary from the date of purchase, if this Product (including any Sony authorized service facility. LABOR: For a period of one (1) year. 4-557-172-02 General Stereo/Hifi Components/Tape Decks ® CD Players/Mini Disc Players/Audio Systems...
... parts for one (1) year. To obtain warranty service, you . Proof of purchase in the form of a bill of sale or receipted invoice which vary from the date of purchase, if this Product (including any Sony authorized service facility. LABOR: For a period of one (1) year. 4-557-172-02 General Stereo/Hifi Components/Tape Decks ® CD Players/Mini Disc Players/Audio Systems...
Operating Instructions
Page 2
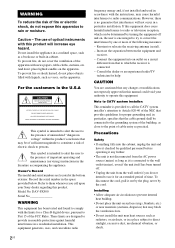
... any changes or modifications not expressly approved in this manual could void your Sony dealer regarding this product will not occur in a particular installation. Refer to Part 15 of the FCC Rules. DAV-FX500 Serial No WARNING This equipment has been tested and found to comply with this product. Reorient or relocate the receiving antenna (aerial). - Note to CATV system installer: This...
... any changes or modifications not expressly approved in this manual could void your Sony dealer regarding this product will not occur in a particular installation. Refer to Part 15 of the FCC Rules. DAV-FX500 Serial No WARNING This equipment has been tested and found to comply with this product. Reorient or relocate the receiving antenna (aerial). - Note to CATV system installer: This...

Operating Instructions
Page 4
... Playing Audio Tracks and Images as a Slide Show with Sound 53 Playing VIDEO CDs with PBC Functions (Ver.2.0 55 (PBC Playback) Tuner Functions Presetting Radio Stations 56 Listening to the Radio 57 Listening to the XM Radio 58 Presetting XM Radio channels 60 Other Operations Controlling the TV with the Supplied Remote 62 Using the THEATRE SYNC Function 63 Using the Sound Effect 64 Using the Sleep Timer 65 ADVANCED - Step 1: Assembling the Speakers 10 Step 2: Connecting the System...
... Playing Audio Tracks and Images as a Slide Show with Sound 53 Playing VIDEO CDs with PBC Functions (Ver.2.0 55 (PBC Playback) Tuner Functions Presetting Radio Stations 56 Listening to the Radio 57 Listening to the XM Radio 58 Presetting XM Radio channels 60 Other Operations Controlling the TV with the Supplied Remote 62 Using the THEATRE SYNC Function 63 Using the Sound Effect 64 Using the Sleep Timer 65 ADVANCED - Step 1: Assembling the Speakers 10 Step 2: Connecting the System...
Operating Instructions
Page 5
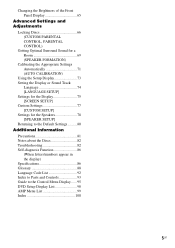
... Panel Display 65 Advanced Settings and Adjustments Locking Discs 66 (CUSTOM PARENTAL CONTROL, PARENTAL CONTROL) Getting Optimal Surround Sound for a Room 69 (SPEAKER FORMATION) Calibrating the Appropriate Settings Automatically 71 (AUTO CALIBRATION) Using the Setup Display 73 Setting the Display or Sound Track Language 74 [LANGUAGE SETUP] Settings for the Display 75 [SCREEN SETUP] Custom Settings 77 [CUSTOM SETUP] Settings for the Speakers 78 [SPEAKER SETUP] Returning to the Default Settings.......... 80 Additional Information Precautions 81 Notes about the Discs 82 Troubleshooting...
... Panel Display 65 Advanced Settings and Adjustments Locking Discs 66 (CUSTOM PARENTAL CONTROL, PARENTAL CONTROL) Getting Optimal Surround Sound for a Room 69 (SPEAKER FORMATION) Calibrating the Appropriate Settings Automatically 71 (AUTO CALIBRATION) Using the Setup Display 73 Setting the Display or Sound Track Language 74 [LANGUAGE SETUP] Settings for the Display 75 [SCREEN SETUP] Custom Settings 77 [CUSTOM SETUP] Settings for the Speakers 78 [SPEAKER SETUP] Returning to the Default Settings.......... 80 Additional Information Precautions 81 Notes about the Discs 82 Troubleshooting...

Operating Instructions
Page 19
... turn the volume down. FRONT L : 16ft 4.8m 0.0dB FRONT R : 16ft 4.8m 0.0dB CENTER : 16ft 4.8m + 1.0dB SUBWOOFER : 16ft 4.8m + 4.0dB SURROUND L : 10ft 3.0m - 2.0dB SURROUND R : 10ft 3.0m - 2.0dB If OK, unplug calibration mic and select YES. Measurement complete. The Control Menu appears. 2 Press X/x to change the position of the speakers, reset the speaker settings. The Quick Setup display appears. 19US BASIC - 10 Connect the calibration mic to the A.CAL MIC jack on the front panel...
... turn the volume down. FRONT L : 16ft 4.8m 0.0dB FRONT R : 16ft 4.8m 0.0dB CENTER : 16ft 4.8m + 1.0dB SUBWOOFER : 16ft 4.8m + 4.0dB SURROUND L : 10ft 3.0m - 2.0dB SURROUND R : 10ft 3.0m - 2.0dB If OK, unplug calibration mic and select YES. Measurement complete. The Control Menu appears. 2 Press X/x to change the position of the speakers, reset the speaker settings. The Quick Setup display appears. 19US BASIC - 10 Connect the calibration mic to the A.CAL MIC jack on the front panel...

Operating Instructions
Page 30
... 2 (AUDIO IN) jacks (analog connection) and TV/VCR 2 (OPTICAL DIGITAL IN) jack (digital connection) at the same time, the digital connection takes priority. Refer to the AUDIO IN jack on the rear of the system changes in the following sequence. The AMP menu turns off. 30US Changing the input level of the sound from the sound of the other components connected to select a setting. • ATT ON: attenuates the input level. repeatedly until "ATTENUATE" appears in the front panel display. Press FUNCTION...
... 2 (AUDIO IN) jacks (analog connection) and TV/VCR 2 (OPTICAL DIGITAL IN) jack (digital connection) at the same time, the digital connection takes priority. Refer to the AUDIO IN jack on the rear of the system changes in the following sequence. The AMP menu turns off. 30US Changing the input level of the sound from the sound of the other components connected to select a setting. • ATT ON: attenuates the input level. repeatedly until "ATTENUATE" appears in the front panel display. Press FUNCTION...

Operating Instructions
Page 31
... front panel display. The default setting is displayed in this system. Press MOVIE/MUSIC during playback. MOVIE/ MUSIC Basic Operations FUNCTION +/- 1 Press FUNCTION +/- For details of a 2 channel source from all the speakers in the front panel display. 31US Tip • When the movie or music mode is selected, "MOVIE" or "MUSIC" is underlined. • AUTO: selects the mode automatically to output the TV sound or stereo sound of sound field, see "TV Hookup (Advanced)" (page 22) and "Other Component Hookup" (page...
... front panel display. The default setting is displayed in this system. Press MOVIE/MUSIC during playback. MOVIE/ MUSIC Basic Operations FUNCTION +/- 1 Press FUNCTION +/- For details of a 2 channel source from all the speakers in the front panel display. 31US Tip • When the movie or music mode is selected, "MOVIE" or "MUSIC" is underlined. • AUTO: selects the mode automatically to output the TV sound or stereo sound of sound field, see "TV Hookup (Advanced)" (page 22) and "Other Component Hookup" (page...

Operating Instructions
Page 32
... low frequency signals (Dolby Digital LFE, etc.), it was recorded/encoded, without adding any effects (e.g. ST. x Dolby Pro Logic II MOVIE/MUSIC Dolby Pro Logic II produces five full-bandwidth output channels from multiple speakers. This mode presents the sound as it will generate a low frequency signal for output to front, center, and surround speakers. All sound field Sound field AUTO FORMAT DIRECT STANDARD AUTO FORMAT DIRECT MULTI Dolby Pro Logic Dolby Pro Logic II MOVIE Dolby Pro Logic II MUSIC CINEMA STUDIO EX A CINEMA...
... low frequency signals (Dolby Digital LFE, etc.), it was recorded/encoded, without adding any effects (e.g. ST. x Dolby Pro Logic II MOVIE/MUSIC Dolby Pro Logic II produces five full-bandwidth output channels from multiple speakers. This mode presents the sound as it will generate a low frequency signal for output to front, center, and surround speakers. All sound field Sound field AUTO FORMAT DIRECT STANDARD AUTO FORMAT DIRECT MULTI Dolby Pro Logic Dolby Pro Logic II MOVIE Dolby Pro Logic II MUSIC CINEMA STUDIO EX A CINEMA...
Operating Instructions
Page 38
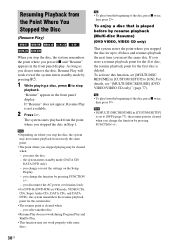
As long as you do not remove the disc, Resume Play will work properly with some discs. you disconnect the AC power cord (mains lead). • For DVD-Rs/DVD-RWs in Step 1. If you select another disc. • Resume Play does not work during Program Play and Shuffle Play. • This function may not work even if the system enters standby mode by pressing "/1. 1 While playing a disc, press x to [ON]. Tip • To...
As long as you do not remove the disc, Resume Play will work properly with some discs. you disconnect the AC power cord (mains lead). • For DVD-Rs/DVD-RWs in Step 1. If you select another disc. • Resume Play does not work during Program Play and Shuffle Play. • This function may not work even if the system enters standby mode by pressing "/1. 1 While playing a disc, press x to [ON]. Tip • To...

Operating Instructions
Page 63
... 9* COMPONENT 1 CLEAR* COMPONENT 2 PICTURE NAVI* COMPONENT 3 AUDIO* COMPONENT 4 SUBTITLE* HDMI 1 ANGLE* HDMI 2 SOUND FIELD* HDMI 3 continued 63US Preparing for the THEATRE SYNC function Other Operations Register the TV's input source connected to this system (see the instructions of the buttons above. • The TV mode turns off when you do not operate the remote for the TV's input source connected to this system, changes the system mode to "DVD," and then switches the TV's input source you used to use some of your SONY TV and this system. Press...
... 9* COMPONENT 1 CLEAR* COMPONENT 2 PICTURE NAVI* COMPONENT 3 AUDIO* COMPONENT 4 SUBTITLE* HDMI 1 ANGLE* HDMI 2 SOUND FIELD* HDMI 3 continued 63US Preparing for the THEATRE SYNC function Other Operations Register the TV's input source connected to this system (see the instructions of the buttons above. • The TV mode turns off when you do not operate the remote for the TV's input source connected to this system, changes the system mode to "DVD," and then switches the TV's input source you used to use some of your SONY TV and this system. Press...

Operating Instructions
Page 71
...ear level using a tripod, etc. (not supplied). Note • In order to enjoy the surround sound after you need to select [AUTO CALIBRATION], then press . A. The options for [AUTO CALIBRATION] appear. You cannot turn the volume down. The Control Menu appears. 3 Press X/x to select [SPEAKER FORMATION], then press . 1 ( 4 4 ) 3 ( 2 8 ) T 0:03:04 SPEAKER FORMATION SPEAKER FORMATION AUTO CALIBRATION DVD VIDEO Advanced Settings and Adjustments 4 Press X/x to connect the supplied calibration mic. • The front panel display indicates the selected [SPEAKER FORMATION]. AUTO CALIBRATION...
...ear level using a tripod, etc. (not supplied). Note • In order to enjoy the surround sound after you need to select [AUTO CALIBRATION], then press . A. The options for [AUTO CALIBRATION] appear. You cannot turn the volume down. The Control Menu appears. 3 Press X/x to select [SPEAKER FORMATION], then press . 1 ( 4 4 ) 3 ( 2 8 ) T 0:03:04 SPEAKER FORMATION SPEAKER FORMATION AUTO CALIBRATION DVD VIDEO Advanced Settings and Adjustments 4 Press X/x to connect the supplied calibration mic. • The front panel display indicates the selected [SPEAKER FORMATION]. AUTO CALIBRATION...

Operating Instructions
Page 72
... correctly connected. - front and surround speakers are not correctly connected. - FRONT L : 16ft 4.8m 0.0dB FRONT R : 16ft 4.8m 0.0dB CENTER : 16ft 4.8m + 1.0dB SUBWOOFER : 16ft 4.8m + 4.0dB SURROUND L : 10ft 3.0m - 2.0dB SURROUND R : 10ft 3.0m - 2.0dB If OK, unplug calibration mic and select YES. During the measurement, test signals are connected. - Check speaker connection. See page 78. do not press any button. - do not change the function. - do not change the disc. - the...
... correctly connected. - front and surround speakers are not correctly connected. - FRONT L : 16ft 4.8m 0.0dB FRONT R : 16ft 4.8m 0.0dB CENTER : 16ft 4.8m + 1.0dB SUBWOOFER : 16ft 4.8m + 4.0dB SURROUND L : 10ft 3.0m - 2.0dB SURROUND R : 10ft 3.0m - 2.0dB If OK, unplug calibration mic and select YES. During the measurement, test signals are connected. - Check speaker connection. See page 78. do not press any button. - do not change the function. - do not change the disc. - the...
Operating Instructions
Page 77
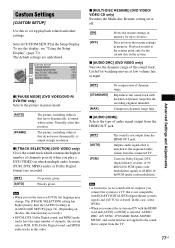
... [AUDIO] settings in [LANGUAGE SETUP] (page 74). (Depending on the disc, this function may change. x [AUDIO DRC] (DVD VIDEO only) Narrows the dynamic range of the sound track. Reproduces the sound track with DOLBY DIGITAL/DTS (digital theater system) signals and [AUTO] is selected, AUDIO DRC, A/V SYNC, DYNAMIC BASS, MOVIE/ MUSIC, and sound field are not applied to the sound that the recording engineer intended. x [AUDIO (HDMI)] Selects the type of audio signal output from the HDMI OUT jack. [OFF] [AUTO] [PCM] The sound is output from...
... [AUDIO] settings in [LANGUAGE SETUP] (page 74). (Depending on the disc, this function may change. x [AUDIO DRC] (DVD VIDEO only) Narrows the dynamic range of the sound track. Reproduces the sound track with DOLBY DIGITAL/DTS (digital theater system) signals and [AUTO] is selected, AUDIO DRC, A/V SYNC, DYNAMIC BASS, MOVIE/ MUSIC, and sound field are not applied to the sound that the recording engineer intended. x [AUDIO (HDMI)] Selects the type of audio signal output from the HDMI OUT jack. [OFF] [AUTO] [PCM] The sound is output from...

Operating Instructions
Page 78
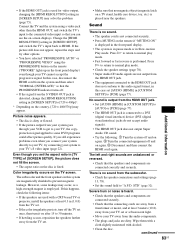
... default settings are underlined. For details, see "Using the Setup Display" (page 73). Then use the test tone to adjust the level and the balance of the speakers you have connected and their distance from 0.0 to 7.0 meters2) (0 to the same level. Since the front speaker and subwoofer setting is fixed, you cannot change them. [FRONT] [YES] [CENTER] [YES]: Normally select this. [NONE]: Select this if no center speaker is used. [SURROUND] [YES]: Normally select this. [NONE]: Select...
... default settings are underlined. For details, see "Using the Setup Display" (page 73). Then use the test tone to adjust the level and the balance of the speakers you have connected and their distance from 0.0 to 7.0 meters2) (0 to the same level. Since the front speaker and subwoofer setting is fixed, you cannot change them. [FRONT] [YES] [CENTER] [YES]: Normally select this. [NONE]: Select this if no center speaker is used. [SURROUND] [YES]: Normally select this. [NONE]: Select...

Operating Instructions
Page 82
... if service personnel changes some parts during repair, these parts may rise considerably inside the car. • After playing, store the disc in direct sunlight as a label or ring. 82US Troubleshooting If you can only play back a standard circular disc. This system can view pictures from the center out. • Do not use this case, return the setting to interlace format (the default setting) (page 24). • Re-connect the connecting cord securely...
... if service personnel changes some parts during repair, these parts may rise considerably inside the car. • After playing, store the disc in direct sunlight as a label or ring. 82US Troubleshooting If you can only play back a standard circular disc. This system can view pictures from the center out. • Do not use this case, return the setting to interlace format (the default setting) (page 24). • Re-connect the connecting cord securely...
Operating Instructions
Page 83
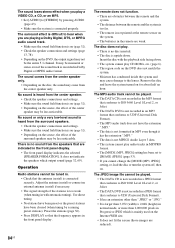
... the speakers. Change the [HDMI RESOLUTION] setting in [SCREEN SETUP] to your TV cannot accept the progressive signal. Picture noise appears. • The disc is dirty or flawed. • If the picture output from the audio components. • The plugs and jacks are used for video output, changing the [HDMI RESOLUTION] setting in Slow-motion Play mode. Press H to return to HDMI. In this happens, check the following : 1 Turn the system off and on again. 2 Turn the connected...
... the speakers. Change the [HDMI RESOLUTION] setting in [SCREEN SETUP] to your TV cannot accept the progressive signal. Picture noise appears. • The disc is dirty or flawed. • If the picture output from the audio components. • The plugs and jacks are used for video output, changing the [HDMI RESOLUTION] setting in Slow-motion Play mode. Press H to return to HDMI. In this happens, check the following : 1 Turn the system off and on again. 2 Turn the connected...
Operating Instructions
Page 84
... the disc, the sound may come from the center speaker. • Check the speaker connections and settings. • Make sure the sound field function is on (page 32). • Depending on the source, the effect of the surround speakers may be less noticeable. No sound or only a very low-level sound is heard from the speakers that the frequency appears in the front panel display. • The front panel display indicates the selected [SPEAKER FORMATION]. Preset the stations...
... the disc, the sound may come from the center speaker. • Check the speaker connections and settings. • Make sure the sound field function is on (page 32). • Depending on the source, the effect of the surround speakers may be less noticeable. No sound or only a very low-level sound is heard from the speakers that the frequency appears in the front panel display. • The front panel display indicates the selected [SPEAKER FORMATION]. Preset the stations...
Operating Instructions
Page 100
... Component Hookup 26 P PARENTAL CONTROL 67 Parental Control 90 PAUSE MODE 77 PBC Playback 55 PICTURE NAVI 37, 52 PLAY LIST 44 Playback Control (PBC) 90 Program Play 39 PROGRESSIVE AUTO 24 Progressive format 24, 90 PROGRESSIVE VIDEO 24 Q Quick Setup 18 R Radio 57 Radio Stations 56 C. 71, 88 DATA CD 51 DATA DVD 51 DEMO 20 Demonstration 20 Digital Cinema Auto Calibration 71, 88 Digital Cinema Sound 33 100US Digital connection 27 Digital Direct Twin Drive Subwoofer 88 DIMMER 65 DISC...
... Component Hookup 26 P PARENTAL CONTROL 67 Parental Control 90 PAUSE MODE 77 PBC Playback 55 PICTURE NAVI 37, 52 PLAY LIST 44 Playback Control (PBC) 90 Program Play 39 PROGRESSIVE AUTO 24 Progressive format 24, 90 PROGRESSIVE VIDEO 24 Q Quick Setup 18 R Radio 57 Radio Stations 56 C. 71, 88 DATA CD 51 DATA DVD 51 DEMO 20 Demonstration 20 Digital Cinema Auto Calibration 71, 88 Digital Cinema Sound 33 100US Digital connection 27 Digital Direct Twin Drive Subwoofer 88 DIMMER 65 DISC...

Marketing Specifications
Page 1
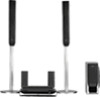
DAV-FX500 DVD Dream® System Key Features 5 Disc DVD/CD/SA-CD Player with HDMI™ Output 1000W Total System Power (143Watts x 5 (3Ohms, 1KHz,
DAV-FX500 DVD Dream® System Key Features 5 Disc DVD/CD/SA-CD Player with HDMI™ Output 1000W Total System Power (143Watts x 5 (3Ohms, 1KHz,
Marketing Specifications
Page 2
... Audio Digital Input(s): 1 (Rear) Component Video (Y/Pb/Pr ) Input(s): 1 (Rear) Component Video (Y/Pb/Pr) Output(s): 1 (Rear) Composite Video Input(s): 2 (Rear) Composite Video Output(s): 1 (Rear) Headphone Input(s): 3.5mm HDMI™ Connection Output(s): 1 (Rear) S-Video Input(s): 1 (Rear) Power Power Requirements: AC120V, 60Hz Power Consumption (in Operation): 160W Power Consumption (in Standby): Less than 0.3W Tuner Audio Station Preset(s): 10 AM, 20 FM Tuner Type: AM/FM Inputs and Outputs Antenna Terminal(s): Yes (FM: 75 ohm) Front Speaker Speaker Woofer(s): 7 x 10 cm Speaker System...
... Audio Digital Input(s): 1 (Rear) Component Video (Y/Pb/Pr ) Input(s): 1 (Rear) Component Video (Y/Pb/Pr) Output(s): 1 (Rear) Composite Video Input(s): 2 (Rear) Composite Video Output(s): 1 (Rear) Headphone Input(s): 3.5mm HDMI™ Connection Output(s): 1 (Rear) S-Video Input(s): 1 (Rear) Power Power Requirements: AC120V, 60Hz Power Consumption (in Operation): 160W Power Consumption (in Standby): Less than 0.3W Tuner Audio Station Preset(s): 10 AM, 20 FM Tuner Type: AM/FM Inputs and Outputs Antenna Terminal(s): Yes (FM: 75 ohm) Front Speaker Speaker Woofer(s): 7 x 10 cm Speaker System...


