Operating Instructions
Page 3
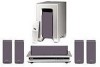
... the plug, never by pressing the "/1 button (the STANDBY indicator lights up in the system. • At high volume, over long periods of time. Welcome! In this product meets the ENERGY STAR® guidelines for purchasing Sony DVD Home Theatre System. Also, do not intend to use it for about... 30 minutes before operating it for about half an hour until the moisture evaporates. • When you move the system, take out any further. • The unit...
... the plug, never by pressing the "/1 button (the STANDBY indicator lights up in the system. • At high volume, over long periods of time. Welcome! In this product meets the ENERGY STAR® guidelines for purchasing Sony DVD Home Theatre System. Also, do not intend to use it for about... 30 minutes before operating it for about half an hour until the moisture evaporates. • When you move the system, take out any further. • The unit...
Operating Instructions
Page 19
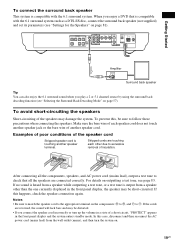
... correctly. If this case, disconnect and then reconnect the AC power cord (mains lead) from a speaker other due to #. When you enjoy a DVD that all the components, speakers, and AC power cord (mains lead), output a test tone to follow these precautions when connecting the speakers. To prevent...mains), and then turn up the volume in a state of each other than the one currently displayed in the front panel display and the system enters standby mode. Notes • Be sure to match the speaker cord to the appropriate terminal on page 81). For details on outputting a test tone...
... correctly. If this case, disconnect and then reconnect the AC power cord (mains lead) from a speaker other due to #. When you enjoy a DVD that all the components, speakers, and AC power cord (mains lead), output a test tone to follow these precautions when connecting the speakers. To prevent...mains), and then turn up the volume in a state of each other than the one currently displayed in the front panel display and the system enters standby mode. Notes • Be sure to match the speaker cord to the appropriate terminal on page 81). For details on outputting a test tone...

Operating Instructions
Page 20
.... 20US 10 mm AWG #22. • Before attaching a new cable, strip off 10 mm (13/32 in the front panel display and the system enters standby mode. Note that the two outside black cords or the cords marked with a line should be attached to another cable. Tips • You can use... a different speaker cable, you connect the subwoofer cord incorrectly or turn the system on. Detaching Catcher With the catcher facing down, press and hold ...
.... 20US 10 mm AWG #22. • Before attaching a new cable, strip off 10 mm (13/32 in the front panel display and the system enters standby mode. Note that the two outside black cords or the cords marked with a line should be attached to another cable. Tips • You can use... a different speaker cable, you connect the subwoofer cord incorrectly or turn the system on. Detaching Catcher With the catcher facing down, press and hold ...

Operating Instructions
Page 30
... loading the disc. Refer to the disc stocker 1, press DISC1 Z. Press the Z button of the system. Disc1-5/Z/ Disc slot indicators Adjust the volume "/1 STANDBY indicator FUNCTION Connect headphones 4 Press DISC1-5 Z. "NO DISC" appears in the front panel display. 6... Press H on the remote or on your disc. To load other discs, press DISC SKIP on . Adjust the volume on the DVD or VIDEO CD, some operations may be different or restricted. The system...
... loading the disc. Refer to the disc stocker 1, press DISC1 Z. Press the Z button of the system. Disc1-5/Z/ Disc slot indicators Adjust the volume "/1 STANDBY indicator FUNCTION Connect headphones 4 Press DISC1-5 Z. "NO DISC" appears in the front panel display. 6... Press H on the remote or on your disc. To load other discs, press DISC SKIP on . Adjust the volume on the DVD or VIDEO CD, some operations may be different or restricted. The system...

Operating Instructions
Page 31
... system enters standby mode and the STANDBY indicator lights up ). To cancel standby mode Press "/1 once. To remove the disc Press DISC1-5 Z on the desired disc system. * You cannot pause during JPEG playback. or >. Playing Discs After following the instructions on the menu. (DVD: page 33), (VIDEO CD: page 33). Additional operations DISC SKIP ./> H X x MUTING VOL...
... system enters standby mode and the STANDBY indicator lights up ). To cancel standby mode Press "/1 once. To remove the disc Press DISC1-5 Z on the desired disc system. * You cannot pause during JPEG playback. or >. Playing Discs After following the instructions on the menu. (DVD: page 33), (VIDEO CD: page 33). Additional operations DISC SKIP ./> H X x MUTING VOL...

Operating Instructions
Page 32
...mode. - "RESUME" appears in Step 1. you change the setting on where you stop the disc, the system may not resume playback from exactly the same point. • The point where you stop playback. The system starts playback from the point where you stopped the disc in the front panel display, so you... disc. If "RESUME" does not appear, Resume Play is cleared if: - you do not remove the disc, Resume Play will work even if the system enters standby mode by pressing "/1. As long as you change the play from the point where you can restart the disc from the beginning of the disc...
...mode. - "RESUME" appears in Step 1. you change the setting on where you stop the disc, the system may not resume playback from exactly the same point. • The point where you stop playback. The system starts playback from the point where you stopped the disc in the front panel display, so you... disc. If "RESUME" does not appear, Resume Play is cleared if: - you do not remove the disc, Resume Play will work even if the system enters standby mode by pressing "/1. As long as you change the play from the point where you can restart the disc from the beginning of the disc...
Operating Instructions
Page 88
...problem persist, consult your TV, the copyprotection signal applied to [INTERLACE] (page 79). 88US • When [PROGRESSIVE] is performed. The STANDBY indicator flashes. If you still experience problems even when you can view pictures from the audio components. • The plugs and jacks are ...try connecting your nearest Sony dealer. There is compatible with alcohol. • Clean the disc. Power The power is not turned on the TV is not set [COMPONENT OUT] to some DVD programs could affect picture quality. Even though you using the system, use this troubleshooting ...
...problem persist, consult your TV, the copyprotection signal applied to [INTERLACE] (page 79). 88US • When [PROGRESSIVE] is performed. The STANDBY indicator flashes. If you still experience problems even when you can view pictures from the audio components. • The plugs and jacks are ...try connecting your nearest Sony dealer. There is compatible with alcohol. • Clean the disc. Power The power is not turned on the TV is not set [COMPONENT OUT] to some DVD programs could affect picture quality. Even though you using the system, use this troubleshooting ...

Operating Instructions
Page 97
Index to Parts and Controls For more information, refer to the pages indicated in parentheses. Front Panel A [/1 (power) switch/STANDBY indicator (30) B DISC1-5 Z (eject)/indicators (30) C (remote sensor) (13) D Front panel display (98) E PHONES (on the side of the system) jack (30) F VOLUME +/- (30, 83) G ./> (31, 33) H x (stop) (31) I (play/pause) (30) J FUNCTION (30, 70, 73) K Disc slot (30) Additional Information 97US
Index to Parts and Controls For more information, refer to the pages indicated in parentheses. Front Panel A [/1 (power) switch/STANDBY indicator (30) B DISC1-5 Z (eject)/indicators (30) C (remote sensor) (13) D Front panel display (98) E PHONES (on the side of the system) jack (30) F VOLUME +/- (30, 83) G ./> (31, 33) H x (stop) (31) I (play/pause) (30) J FUNCTION (30, 70, 73) K Disc slot (30) Additional Information 97US
Operating Instructions
Page 101
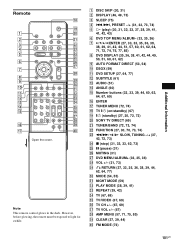
...I AUTO FORMAT DIRECT (53, 54) J DSGX (59) K DVD SETUP (27, 64, 77) L SUBTITLE (61) M AUDIO (51) N ANGLE (60) O Number buttons (33, 33, 39, 44, 60, 62, 64, 67, 69) P ENTER Q TUNER MENU (72, 74) R TV [/1 (on/standby) (67) S "/1 (standby) (27, 30, 72, 73) T SONY TV DIRECT (69) U TUNER/BAND (72, 73, 74) ...V FUNCTION (27, 30, 70, 73, 74) W m/M/ / SLOW, TUNING -/+ (37, 43, 72, 73) X x (stop) (31, 32, 33, 62, 73) Y X (pause) (31) Z MUTING (31) wj DVD MENU/ALBUM+ (33, 35, 36) wk VOL...
...I AUTO FORMAT DIRECT (53, 54) J DSGX (59) K DVD SETUP (27, 64, 77) L SUBTITLE (61) M AUDIO (51) N ANGLE (60) O Number buttons (33, 33, 39, 44, 60, 62, 64, 67, 69) P ENTER Q TUNER MENU (72, 74) R TV [/1 (on/standby) (67) S "/1 (standby) (27, 30, 72, 73) T SONY TV DIRECT (69) U TUNER/BAND (72, 73, 74) ...V FUNCTION (27, 30, 70, 73, 74) W m/M/ / SLOW, TUNING -/+ (37, 43, 72, 73) X x (stop) (31, 32, 33, 62, 73) Y X (pause) (31) Z MUTING (31) wj DVD MENU/ALBUM+ (33, 35, 36) wk VOL...


