Operating Manual
Page 13
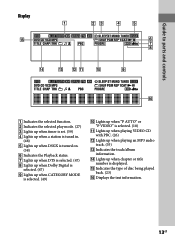
Display Guide to parts and controls Indicates the selected function. Indicates the selected play mode. (27) Lights up when timer is set. (59) Lights up when a station is tuned in. (48) Lights up when DSGX is turned on. (58) Indicates the Playback status. Lights up when DTS is selected. (47) Lights up when Dolby Digital is selected. (47) Lights up when CATEGORY MODE is selected. (49) Lights up...
Display Guide to parts and controls Indicates the selected function. Indicates the selected play mode. (27) Lights up when timer is set. (59) Lights up when a station is tuned in. (48) Lights up when DSGX is turned on. (58) Indicates the Playback status. Lights up when DTS is selected. (47) Lights up when Dolby Digital is selected. (47) Lights up when CATEGORY MODE is selected. (49) Lights up...
Operating Manual
Page 17
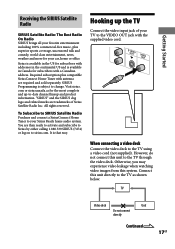
... the VIDEO OUT jack with the supplied video cord. Hooking up -to-date channel lineup and product information. com or siriuscanada.ca for subscribers with a Canadian address. TV Video deck Unit Do not connect directly Continued 17GB Getting Started Receiving the SIRIUS Satellite Radio SIRIUS Satellite Radio: The Best Radio On Radio SIRIUS brings all your favorite entertainment including 100% commercial-free music, plus compatible SiriusConnect Home Tuner with antenna...
... the VIDEO OUT jack with the supplied video cord. Hooking up -to-date channel lineup and product information. com or siriuscanada.ca for subscribers with a Canadian address. TV Video deck Unit Do not connect directly Continued 17GB Getting Started Receiving the SIRIUS Satellite Radio SIRIUS Satellite Radio: The Best Radio On Radio SIRIUS brings all your favorite entertainment including 100% commercial-free music, plus compatible SiriusConnect Home Tuner with antenna...
Operating Manual
Page 19
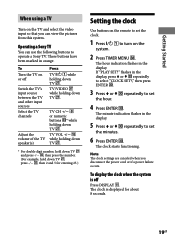
... . TV/VIDEO while holding down TV . * For double digit number, hold down TV and press -/-- , then press the number. (For example, hold down TV . If "PLAY SET?" To display the clock when the system is displayed for entering 25.) Setting the clock Use buttons on the remote to set the clock. 1 Press to operate a Sony TV. These buttons have been marked...
... . TV/VIDEO while holding down TV . * For double digit number, hold down TV and press -/-- , then press the number. (For example, hold down TV . If "PLAY SET?" To display the clock when the system is displayed for entering 25.) Setting the clock Use buttons on the remote to set the clock. 1 Press to operate a Sony TV. These buttons have been marked...
Operating Manual
Page 21
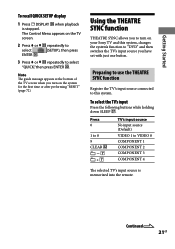
... TV's input source No input source (Default) VIDEO 1 to this system, changes the system's function to select "QUICK," then press ENTER . Getting Started To recall QUICK SETUP display 1 Press DISPLAY when playback is memorized into the remote. Continued 21GB Preparing to use the THEATRE SYNC function Register the TV's input source connected to VIDEO 8 COMPONENT 1 COMPONENT 2 COMPONENT 3 COMPONENT 4 The selected TV's input source is stopped. Using the THEATRE SYNC function THEATRE SYNC allows you have set with just one button. The Control Menu appears...
... TV's input source No input source (Default) VIDEO 1 to this system, changes the system's function to select "QUICK," then press ENTER . Getting Started To recall QUICK SETUP display 1 Press DISPLAY when playback is memorized into the remote. Continued 21GB Preparing to use the THEATRE SYNC function Register the TV's input source connected to VIDEO 8 COMPONENT 1 COMPONENT 2 COMPONENT 3 COMPONENT 4 The selected TV's input source is stopped. Using the THEATRE SYNC function THEATRE SYNC allows you have set with just one button. The Control Menu appears...
Operating Manual
Page 23
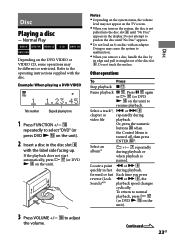
... edge and pull it straight out of the disc slot . Or, press the numeric buttons when the Control Menu is turned off, then press ENTER 2). Example: When playing a DVD VIDEO Title number Elapsed playing time 1 Press FUNCTION +/ repeatedly to adjust the volume. Pause playback . Locate a point quickly in the display. Refer to normal playback, press (or...
... edge and pull it straight out of the disc slot . Or, press the numeric buttons when the Control Menu is turned off, then press ENTER 2). Example: When playing a DVD VIDEO Title number Elapsed playing time 1 Press FUNCTION +/ repeatedly to adjust the volume. Pause playback . Locate a point quickly in the display. Refer to normal playback, press (or...
Operating Manual
Page 26
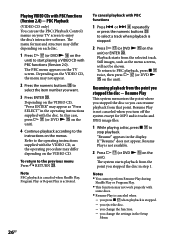
... eject the disc. you change the function. you change the settings in the Setup Menu. 26GB Depending on the VIDEO CD, the menu may not appear. 2 Press the numeric buttons to select the item number you turn off the system except for MP3 audio tracks and JPEG image files. 1 While playing a disc, press to stop playback. To return to the instructions on the...
... eject the disc. you change the function. you change the settings in the Setup Menu. 26GB Depending on the VIDEO CD, the menu may not appear. 2 Press the numeric buttons to select the item number you turn off the system except for MP3 audio tracks and JPEG image files. 1 While playing a disc, press to stop playback. To return to the instructions on the...
Operating Manual
Page 44
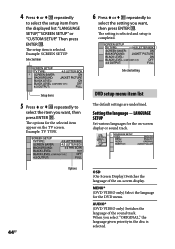
... the DVD menu. Selected setting Setup items 5 Press or repeatedly to select the setup item from the displayed list: "LANGUAGE SETUP,""SCREEN SETUP" or "CUSTOM SETUP." When you want , then press ENTER . MENU* (DVD VIDEO only) Select the language for the on-screen display or sound track. 44GB Options OSD (On-Screen Display) Switches the language of the sound track. The setup item is selected. The setting is selected and setup is completed. AUDIO* (DVD VIDEO only) Switches...
... the DVD menu. Selected setting Setup items 5 Press or repeatedly to select the setup item from the displayed list: "LANGUAGE SETUP,""SCREEN SETUP" or "CUSTOM SETUP." When you want , then press ENTER . MENU* (DVD VIDEO only) Select the language for the on-screen display or sound track. 44GB Options OSD (On-Screen Display) Switches the language of the sound track. The setup item is selected. The setting is selected and setup is completed. AUDIO* (DVD VIDEO only) Switches...
Operating Manual
Page 45
... "AUDIO," enter a language code from the "Language code list" (page 82) using the numeric buttons . However, depending on the upper and lower portions of the screen. 4:3 PAN SCAN2): Select this when you connect a 4:3 screen TV. If you connect a 4:3 screen TV. SCREEN SAVER The screen saver will help prevent your display device from the video jacks other than 15 minutes. BLACK LEVEL Select the black level (setup level) for more than COMPONENT VIDEO OUT jacks. Use...
... "AUDIO," enter a language code from the "Language code list" (page 82) using the numeric buttons . However, depending on the upper and lower portions of the screen. 4:3 PAN SCAN2): Select this when you connect a 4:3 screen TV. If you connect a 4:3 screen TV. SCREEN SAVER The screen saver will help prevent your display device from the video jacks other than 15 minutes. BLACK LEVEL Select the black level (setup level) for more than COMPONENT VIDEO OUT jacks. Use...
Operating Manual
Page 47
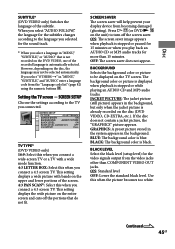
... of channels, the system selects the audio sound tracks in "LANGUAGE SETUP". The "TRACK SELECTION" setting has higher priority than the "AUDIO" settings in the order from PCM, DTS, Dolby Digital, to MPEG. 2) When you play back a DVD VIDEO on the disc, this function may change. Playback starts at night. AUDIO DRC3) (Dynamic Range Compression) (DVD VIDEO and DVD-R/-RW in the system. MAX: Narrows the dynamic range fully. 1) If each audio sound track has the same number of dynamic range...
... of channels, the system selects the audio sound tracks in "LANGUAGE SETUP". The "TRACK SELECTION" setting has higher priority than the "AUDIO" settings in the order from PCM, DTS, Dolby Digital, to MPEG. 2) When you play back a DVD VIDEO on the disc, this function may change. Playback starts at night. AUDIO DRC3) (Dynamic Range Compression) (DVD VIDEO and DVD-R/-RW in the system. MAX: Narrows the dynamic range fully. 1) If each audio sound track has the same number of dynamic range...

Operating Manual
Page 48
.... See "Hooking up in the display. Scanning stops automatically when a station is tuned in, "ST" lights up the system" (page 14) for details about connection. 1 Select "XM" or "SIRIUS." To stop , press TUNING +/ repeatedly to tune in the station you change the AM tuning interval The factory setting for same areas). Before using the system, connect the XM Mini-Tuner and Home Dock or the SiriusConnect Home tuner to the system. Use buttons on...
.... See "Hooking up in the display. Scanning stops automatically when a station is tuned in, "ST" lights up the system" (page 14) for details about connection. 1 Select "XM" or "SIRIUS." To stop , press TUNING +/ repeatedly to tune in the station you change the AM tuning interval The factory setting for same areas). Before using the system, connect the XM Mini-Tuner and Home Dock or the SiriusConnect Home tuner to the system. Use buttons on...

Operating Manual
Page 50
... station. You cannot operate CATEGORY +/ in preset tuning mode. If you want. The password is set . 50GB To delete the numbers you use this function for the first time (see "Listening to certain channels using your current 4-digit password using the numeric buttons . "Old Code" appears. 4 Enter your own password. appears and the new password is set. You can restrict access to satellite radio" (page 48). 3 Press DVD/TUNER MENU...
... station. You cannot operate CATEGORY +/ in preset tuning mode. If you want. The password is set . 50GB To delete the numbers you use this function for the first time (see "Listening to certain channels using your current 4-digit password using the numeric buttons . "Old Code" appears. 4 Enter your own password. appears and the new password is set. You can restrict access to satellite radio" (page 48). 3 Press DVD/TUNER MENU...

Operating Manual
Page 64
... optional component (portable audio player, etc.). COMPONENT VIDEO OUT jacks Connect the component video input jacks of an optional digital component (such as amplifier). If your system, you can enjoy 5.1 channel sound, if the connected amplifier equipped with each component. You can enjoy higher quality video images when you select the S VIDEO. DIGITAL OUT jack Connect the digital optical input jack of the TV or projector. Note Sound is output only when the system function is set to the operating instructions provided with Dolby Digital or DTS decoder. Hooking...
... optional component (portable audio player, etc.). COMPONENT VIDEO OUT jacks Connect the component video input jacks of an optional digital component (such as amplifier). If your system, you can enjoy 5.1 channel sound, if the connected amplifier equipped with each component. You can enjoy higher quality video images when you select the S VIDEO. DIGITAL OUT jack Connect the digital optical input jack of the TV or projector. Note Sound is output only when the system function is set to the operating instructions provided with Dolby Digital or DTS decoder. Hooking...

Operating Manual
Page 65
See "Hooking up optional components" (page 64). 2 Connect the speakers to the operating instructions supplied with the connected amplifier. 3 Start playing a multi channel source, such as a DVD VIDEO. 4 Select the audio format you want. See "Changing the sound" (page 25). 65GB Other Operations Enjoying the multi channel sound with a decoder. For the speakers placement, refer to an optional amplifier equipped with the optional amplifier 1 Connect the digital optical cord.
See "Hooking up optional components" (page 64). 2 Connect the speakers to the operating instructions supplied with the connected amplifier. 3 Start playing a multi channel source, such as a DVD VIDEO. 4 Select the audio format you want. See "Changing the sound" (page 25). 65GB Other Operations Enjoying the multi channel sound with a decoder. For the speakers placement, refer to an optional amplifier equipped with the optional amplifier 1 Connect the digital optical cord.
Operating Manual
Page 68
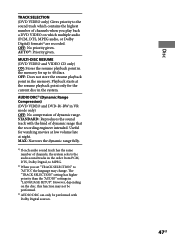
... may take more time than usual if: the number of the operations above. You cannot perform some of albums or tracks on the TV screen. Playback starts automatically. The DVD VIDEO features an auto playback function. Refer to start from the first track. The system is in Progressive JPEG mode which is mainly used on the Internet website...
... may take more time than usual if: the number of the operations above. You cannot perform some of albums or tracks on the TV screen. Playback starts automatically. The DVD VIDEO features an auto playback function. Refer to start from the first track. The system is in Progressive JPEG mode which is mainly used on the Internet website...
Operating Manual
Page 70
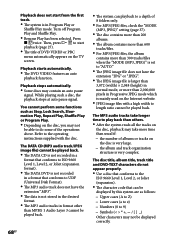
... S Video cord, connect directly to the TV. In this case, set to interlace format (the default setting) (page 18). Even if your TV is compatible with a new one. Make sure you connect the unit to the video input jack of the image may be changed . Multilingual tracks are not recorded on -screen display in "OSD" under "SCREEN SETUP" in the Setup Menu when you play back video...
... S Video cord, connect directly to the TV. In this case, set to interlace format (the default setting) (page 18). Even if your TV is compatible with a new one. Make sure you connect the unit to the video input jack of the image may be changed . Multilingual tracks are not recorded on -screen display in "OSD" under "SCREEN SETUP" in the Setup Menu when you play back video...

Operating Manual
Page 71
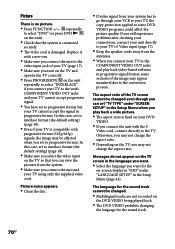
... a day. Tuner The radio presetting is canceled. The power cord is not good. Redo "Listening to the operating instructions supplied with the connected component and start playing. Continued 71GB Additional Information A stereo FM program cannot be turned off. The DVD VIDEO prohibits turning off the surrounding electrical equipment. The subtitles cannot be received in the display) Set the proper band and frequency (page 48). Connect the antenna properly...
... a day. Tuner The radio presetting is canceled. The power cord is not good. Redo "Listening to the operating instructions supplied with the connected component and start playing. Continued 71GB Additional Information A stereo FM program cannot be turned off. The DVD VIDEO prohibits turning off the surrounding electrical equipment. The subtitles cannot be received in the display) Set the proper band and frequency (page 48). Connect the antenna properly...
Operating Manual
Page 72
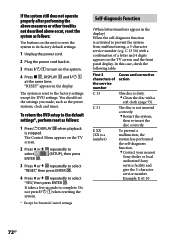
..., reset the system as follows: Use buttons on the unit to reset the system to its factory default settings. 1 Unplug the power cord. 2 Plug the power cord back in. 3 Press to complete. It takes a few seconds to turn on the system. 4 Press , DISPLAY and at the same time. The Control Menu appears on the TV screen and the front panel display. Example: E 61 10 72GB First 3 characters of a letter and 4 digits...
..., reset the system as follows: Use buttons on the unit to reset the system to its factory default settings. 1 Unplug the power cord. 2 Plug the power cord back in. 3 Press to complete. It takes a few seconds to turn on the system. 4 Press , DISPLAY and at the same time. The Control Menu appears on the TV screen and the front panel display. Example: E 61 10 72GB First 3 characters of a letter and 4 digits...
Operating Manual
Page 76
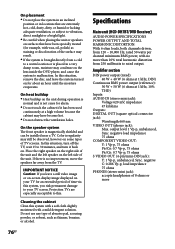
... Specifications Main unit (HCD-DH7BT/DVD Receiver) AUDIO POWER SPECIFICATIONS POWER OUTPUT AND TOTAL HARMONIC DISTORTION: With 6 ohm loads, both channels driven, from the TV. On the speaker system The front speaker is no more In this situation, turn it has been used continuously at 1 kHz, 10% THD) Inputs: AUDIO IN (stereo mini jack): Voltage 620 mV, impedance 47 kilohms Outputs: DIGITAL OUT (square optical connector jack): Wavelength 660 nm VIDEO OUT (phono jack): Max. rated 50 watts per channel minimum RMS power...
... Specifications Main unit (HCD-DH7BT/DVD Receiver) AUDIO POWER SPECIFICATIONS POWER OUTPUT AND TOTAL HARMONIC DISTORTION: With 6 ohm loads, both channels driven, from the TV. On the speaker system The front speaker is no more In this situation, turn it has been used continuously at 1 kHz, 10% THD) Inputs: AUDIO IN (stereo mini jack): Voltage 620 mV, impedance 47 kilohms Outputs: DIGITAL OUT (square optical connector jack): Wavelength 660 nm VIDEO OUT (phono jack): Max. rated 50 watts per channel minimum RMS power...
Marketing Specifications
Page 1
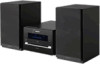
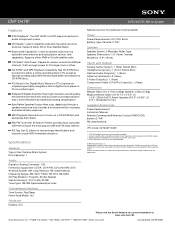
CMT-DH7BT DVD Playback4 SAT Ready2 Bluetooth® Connectivity3 100 Watts Total Power (50W x2) New Innovative Design CD-R/RW1 and MP3 Playback Capability PC Audio In for Digital Music Players or PC's S-Master® Digital Amplifier Bass Reflex Speaker Design AM/FM Tuner with 30 Station Presets ID3 Tag Display (ver.2) DVD/SAT/BT Micro System
CMT-DH7BT DVD Playback4 SAT Ready2 Bluetooth® Connectivity3 100 Watts Total Power (50W x2) New Innovative Design CD-R/RW1 and MP3 Playback Capability PC Audio In for Digital Music Players or PC's S-Master® Digital Amplifier Bass Reflex Speaker Design AM/FM Tuner with 30 Station Presets ID3 Tag Display (ver.2) DVD/SAT/BT Micro System
Marketing Specifications
Page 2
... Antenna Frequency Range: AM: 530-1710kHz FM: 87.5-108.0MHz CD Play Mode(s): Program, Shuffle, Repeat Station Preset(s): 30 (10 AM, 20 FM) Tuner Type: FM/AM Superheterodyne Tuner Convenience Features Timer Events: Play/Sleep Power Save Mode: Yes Hardware Display: LCD Remote Control: Yes (Remote Commander®) Power Power Requirements: AC 120V, 60 Hz Battery Type: Remote: 2 "AA" Speaker Speaker System: 2 Way Bass Reflex Type Speaker Dimensions: 1.6" (4cm) Tweeter Woofer(s): 5.9" (15cm) Inputs and Outputs Analog Audio Input(s): 1 (Rear, Stereo Mini) Headphone Input(s): 1 (Front, Stereo Mini...
... Antenna Frequency Range: AM: 530-1710kHz FM: 87.5-108.0MHz CD Play Mode(s): Program, Shuffle, Repeat Station Preset(s): 30 (10 AM, 20 FM) Tuner Type: FM/AM Superheterodyne Tuner Convenience Features Timer Events: Play/Sleep Power Save Mode: Yes Hardware Display: LCD Remote Control: Yes (Remote Commander®) Power Power Requirements: AC 120V, 60 Hz Battery Type: Remote: 2 "AA" Speaker Speaker System: 2 Way Bass Reflex Type Speaker Dimensions: 1.6" (4cm) Tweeter Woofer(s): 5.9" (15cm) Inputs and Outputs Analog Audio Input(s): 1 (Rear, Stereo Mini) Headphone Input(s): 1 (Front, Stereo Mini...


