Primary User Manual
Page 4
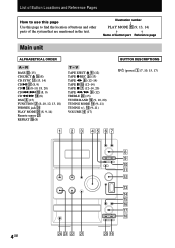
...-14) TAPE X 0 (12-14) TAPE x 7 (12-14, 20) TAPE m/M 9 (12) TREBLE ws (15) TUNER BAND qs (9, 10, 20) TUNING MODE qf (9-11) TUNING +/- qd (9-11) VOLUME 4 (17) BUTTON DESCRIPTIONS @/1 (power) 1 (7, 10, 15, 17) 1 2 3 45 6 7 Z x Y 8 m M z X 9 0 qa ?/1 qs qd qf qg Z x qh u m .... ql 4GB M > qj qk wf wd ws wa w; Illustration number r PLAY MODE qg (9, 13, 14) R R Name of the system that are mentioned in the text. List of Button Locations and Reference Pages How to use this page Use this page to find the location...
...-14) TAPE X 0 (12-14) TAPE x 7 (12-14, 20) TAPE m/M 9 (12) TREBLE ws (15) TUNER BAND qs (9, 10, 20) TUNING MODE qf (9-11) TUNING +/- qd (9-11) VOLUME 4 (17) BUTTON DESCRIPTIONS @/1 (power) 1 (7, 10, 15, 17) 1 2 3 45 6 7 Z x Y 8 m M z X 9 0 qa ?/1 qs qd qf qg Z x qh u m .... ql 4GB M > qj qk wf wd ws wa w; Illustration number r PLAY MODE qg (9, 13, 14) R R Name of the system that are mentioned in the text. List of Button Locations and Reference Pages How to use this page Use this page to find the location...
Primary User Manual
Page 15
... . The start time, the stopping time, "TUNER", and the preset station appear in the display. To Check the settings Turn off the system. Sound Adjustment Adjusting the sound Generating a more dynamic sound (Dynamic Sound Generator) Press DSG. Press TIMER SELECT on the remote. Adjusting the ...treble Turn TREBLE. When the recording starts, the volume level is turned off . The settings that were last used will remain in effect when you turn the timer on the remote. Press...
... . The start time, the stopping time, "TUNER", and the preset station appear in the display. To Check the settings Turn off the system. Sound Adjustment Adjusting the sound Generating a more dynamic sound (Dynamic Sound Generator) Press DSG. Press TIMER SELECT on the remote. Adjusting the ...treble Turn TREBLE. When the recording starts, the volume level is turned off . The settings that were last used will remain in effect when you turn the timer on the remote. Press...
Primary User Manual
Page 17
...by repeating step 6. 8 Press ./> on the remote repeatedly until the music source you have set the timer, the time settings will be in the system's memory until the Sleep Timer Function is turned off the timer Do this Press TIMER SELECT on the remote repeatedly until "c DAILY" disappears from a ...the CD tracks" on page 9). • Tape: Load a tape with the side you want (see "Listening to the radio" on page 11). 2 Adjust the volume. 3 Press TIMER SET on the remote. 4 Press ./> on the remote repeatedly until "SET DAILY" appears in turn, then the original display returns. 10 Press @/1 ...
...by repeating step 6. 8 Press ./> on the remote repeatedly until the music source you have set the timer, the time settings will be in the system's memory until the Sleep Timer Function is turned off the timer Do this Press TIMER SELECT on the remote repeatedly until "c DAILY" disappears from a ...the CD tracks" on page 9). • Tape: Load a tape with the side you want (see "Listening to the radio" on page 11). 2 Adjust the volume. 3 Press TIMER SET on the remote. 4 Press ./> on the remote repeatedly until "SET DAILY" appears in turn, then the original display returns. 10 Press @/1 ...
Primary User Manual
Page 19
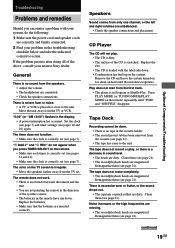
...21). • The tape has come to the unit. Demagnetize them (see page 7). Optional Components/Troubleshooting Troubleshooting Problems and remedies Should you press TIMER SELECT on for about an hour until "PGM... or the left and right volumes are not pointing the remote in the remote have run down . • Condensation has built up in the system. The color on the remote.... • The capstans or pinch rollers are correctly and firmly connected. 2 Find your nearest Sony dealer. continued 19GB The tape does not erase completely. • The record/playback heads are inserted...
...21). • The tape has come to the unit. Demagnetize them (see page 7). Optional Components/Troubleshooting Troubleshooting Problems and remedies Should you press TIMER SELECT on for about an hour until "PGM... or the left and right volumes are not pointing the remote in the remote have run down . • Condensation has built up in the system. The color on the remote.... • The capstans or pinch rollers are correctly and firmly connected. 2 Find your nearest Sony dealer. continued 19GB The tape does not erase completely. • The record/playback heads are inserted...

Primary User Manual
Page 21
...long as this may be changed only at a large volume, the cabinet temperature of the top, side and bottom rises considerably. On placement • Do not place the system in an inclined position. • Do not place the system in locations where it any questions or problems concerning ... checked by the plug. too frequently. Additional Information Precautions On operating voltage Before operating the system, check that the operating voltage of your system is identical with the voltage of your nearest Sony dealer. Before placing a cassette in the tape deck Take up in the tape. For details...
...long as this may be changed only at a large volume, the cabinet temperature of the top, side and bottom rises considerably. On placement • Do not place the system in an inclined position. • Do not place the system in locations where it any questions or problems concerning ... checked by the plug. too frequently. Additional Information Precautions On operating voltage Before operating the system, check that the operating voltage of your system is identical with the voltage of your nearest Sony dealer. Before placing a cassette in the tape deck Take up in the tape. For details...


