Specifications
Page 1
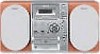
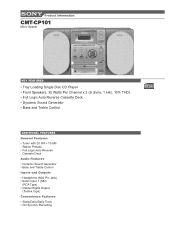
... CMT-CP101 Micro System KEY FEATURES • Tray Loading Single Disc CD Player • Front Speakers: 35 Watts Per Channel x 2 (6 ohms, 1 kHz, 10% THD) • Full Logic Auto Reverse Cassette Deck • Dynamic Sound Generator • Bass and Treble Control ADDITIONAL FEATURES General Features • Tuner with 20 FM + 10 AM Station Presets • Full Logic Auto Reverse Cassette Deck Audio Features • Dynamic Sound Generator • Bass and Treble Control Inputs and Outputs • Headphone (Mini Pin Jack) • Audio Input...
... CMT-CP101 Micro System KEY FEATURES • Tray Loading Single Disc CD Player • Front Speakers: 35 Watts Per Channel x 2 (6 ohms, 1 kHz, 10% THD) • Full Logic Auto Reverse Cassette Deck • Dynamic Sound Generator • Bass and Treble Control ADDITIONAL FEATURES General Features • Tuner with 20 FM + 10 AM Station Presets • Full Logic Auto Reverse Cassette Deck Audio Features • Dynamic Sound Generator • Bass and Treble Control Inputs and Outputs • Headphone (Mini Pin Jack) • Audio Input...
Specifications
Page 2
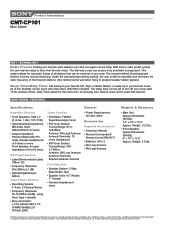
... a user can be set to manually tune and store the radio frequency of Sony. Sleep Timer/Daily Timer Fall asleep to your favorite CD, Tape, or Radio Station, or wake up to 16 ohms. CD Player Section • Laser(Semiconductor Laser): 780nm CD • Frequency Response: 2Hz-20kHz (±1 dB) • Optical Digital Output: 660nm Tape Player Section • Recording System: 4 Track, 2 Channel Stereo • Frequency Response: 50-13,000Hz (±3dB), using Sony...
... a user can be set to manually tune and store the radio frequency of Sony. Sleep Timer/Daily Timer Fall asleep to your favorite CD, Tape, or Radio Station, or wake up to 16 ohms. CD Player Section • Laser(Semiconductor Laser): 780nm CD • Frequency Response: 2Hz-20kHz (±1 dB) • Optical Digital Output: 660nm Tape Player Section • Recording System: 4 Track, 2 Channel Stereo • Frequency Response: 50-13,000Hz (±3dB), using Sony...

Primary User Manual
Page 1
Refer to them whenever you call upon your Sony dealer regarding this product. 4-239-402-11 (2) Micro Hi-Fi Component System Operating Instructions Owner's Record The model and serial numbers are located at the rear. CMT-CP101 © 2002 Sony Corporation Record the serial number in the space provided below. Model No. Serial No.
Refer to them whenever you call upon your Sony dealer regarding this product. 4-239-402-11 (2) Micro Hi-Fi Component System Operating Instructions Owner's Record The model and serial numbers are located at the rear. CMT-CP101 © 2002 Sony Corporation Record the serial number in the space provided below. Model No. Serial No.

Primary User Manual
Page 2
...radio frequency energy and, if not installed and used in this manual could void your authority to Part 15 of important operating and maintenance (servicing) instructions in a confined space, such as vases, on a circuit different from that may cause harmful interference to persons. This symbol is connected. - CAUTION The use...shock, do not expose the unit to Article 820-40 of optical instruments with general house waste, dispose of cable entry as practical. This appliance is intended to alert the user to CATV system installer: This reminder is a U.S. To prevent fire, do not...
...radio frequency energy and, if not installed and used in this manual could void your authority to Part 15 of important operating and maintenance (servicing) instructions in a confined space, such as vases, on a circuit different from that may cause harmful interference to persons. This symbol is connected. - CAUTION The use...shock, do not expose the unit to Article 820-40 of optical instruments with general house waste, dispose of cable entry as practical. This appliance is intended to alert the user to CATV system installer: This reminder is a U.S. To prevent fire, do not...
Primary User Manual
Page 3
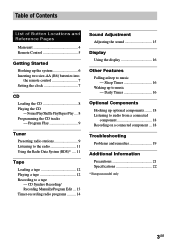
Table of Contents List of Button Locations and Reference Pages Main unit 4 Remote Control 5 Getting Started Hooking up to music - Program Play 9 Tuner Presetting radio stations 9 Listening to the radio 11 Using the Radio Data System (RDS)* .... 11 Tape Loading a tape 12 Playing a tape 12 Recording to music - CD Synchro Recording/ Recording Manually/Program Edit ... 13 Timer-recording radio programs ......... 14 Sound Adjustment Adjusting the sound 15 Display Using the display 16 Other Features Falling asleep to a tape -- Sleep Timer 16 Waking up...
Table of Contents List of Button Locations and Reference Pages Main unit 4 Remote Control 5 Getting Started Hooking up to music - Program Play 9 Tuner Presetting radio stations 9 Listening to the radio 11 Using the Radio Data System (RDS)* .... 11 Tape Loading a tape 12 Playing a tape 12 Recording to music - CD Synchro Recording/ Recording Manually/Program Edit ... 13 Timer-recording radio programs ......... 14 Sound Adjustment Adjusting the sound 15 Display Using the display 16 Other Features Falling asleep to a tape -- Sleep Timer 16 Waking up...
Primary User Manual
Page 4
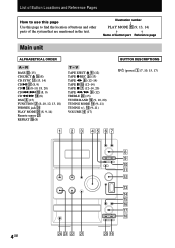
... w; ql 4GB qd (9-11) VOLUME 4 (17) BUTTON DESCRIPTIONS @/1 (power) 1 (7, 10, 15, 17) 1 2 3 45 6 7 Z x Y 8 m M z X 9 0 qa ?/1 qs qd qf qg Z x qh u m . R BASS wd (15) CD EJECT Z qg (8) CD SYNC qa (13, 14) CD u qj (8, 9) CD x qh (8-10, 18, 20) CD ./> qk (8, 9) CD m/M qk (8) DSG 3 (15) FUNCTION 2 (8-10, 12, 13, 18) PHONES jack wf PLAY MODE w; (8, 9, 14) Remote sensor wa REPEAT ql (8) T - List...
... w; ql 4GB qd (9-11) VOLUME 4 (17) BUTTON DESCRIPTIONS @/1 (power) 1 (7, 10, 15, 17) 1 2 3 45 6 7 Z x Y 8 m M z X 9 0 qa ?/1 qs qd qf qg Z x qh u m . R BASS wd (15) CD EJECT Z qg (8) CD SYNC qa (13, 14) CD u qj (8, 9) CD x qh (8-10, 18, 20) CD ./> qk (8, 9) CD m/M qk (8) DSG 3 (15) FUNCTION 2 (8-10, 12, 13, 18) PHONES jack wf PLAY MODE w; (8, 9, 14) Remote sensor wa REPEAT ql (8) T - List...
Primary User Manual
Page 7
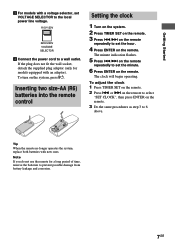
... remote control e EE e Setting the clock 1 Turn on the system. 2 Press TIMER SET on the remote. 3 Press ./> on the remote repeatedly to set the minute. 6 Press ENTER on the remote repeatedly to set VOLTAGE SELECTOR to the local power line voltage. 110V-120V 220V-240V VOLTAGE SELECTOR 4 Connect the power cord to 6 above. The minute indication flashes. 5 Press ./> on the remote. Tip When the remote no longer operates the system, replace...
... remote control e EE e Setting the clock 1 Turn on the system. 2 Press TIMER SET on the remote. 3 Press ./> on the remote repeatedly to set the minute. 6 Press ENTER on the remote repeatedly to set VOLTAGE SELECTOR to the local power line voltage. 110V-120V 220V-240V VOLTAGE SELECTOR 4 Connect the power cord to 6 above. The minute indication flashes. 5 Press ./> on the remote. Tip When the remote no longer operates the system, replace...
Primary User Manual
Page 9
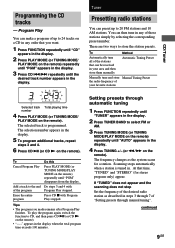
... u (or CD N on the remote). The frequency changes as described in steps 3 through 7 of your area and then store them manually Automatic Tuning Preset Manually tune and store Manual Tuning Preset the radio frequency of "Setting presets through automatic tuning 1 Press FUNCTION repeatedly until "TUNER" appears in . Programming the CD tracks -- PGM 3 243 Selected track Total playing time number 4 Press PLAY MODE (or TUNING MODE/ PLAY MODE on the remote). The selected track is tuned in the display. 2 Press TUNER BAND to store the...
... u (or CD N on the remote). The frequency changes as described in steps 3 through 7 of your area and then store them manually Automatic Tuning Preset Manually tune and store Manual Tuning Preset the radio frequency of "Setting presets through automatic tuning 1 Press FUNCTION repeatedly until "TUNER" appears in . Programming the CD tracks -- PGM 3 243 Selected track Total playing time number 4 Press PLAY MODE (or TUNING MODE/ PLAY MODE on the remote). The selected track is tuned in the display. 2 Press TUNER BAND to store the...

Primary User Manual
Page 10
... stations. A preset number flashes. The station is factory-preset to stop scanning. preset number To change the AM tuning interval (Except for the European, Middle Eastern and Philippine models) The AM tuning interval is stored to the selected preset number. 8 Repeat steps 2 through 7 to preset other stations. To reset the interval, tune in any AM station first, then turn off the system. Stop setting presets Press TUNING MODE (or TUNING MODE/PLAY MODE on the remote. Press and hold TUNING - Tip Press TUNING MODE (or TUNING MODE/PLAY MODE...
... stations. A preset number flashes. The station is factory-preset to stop scanning. preset number To change the AM tuning interval (Except for the European, Middle Eastern and Philippine models) The AM tuning interval is stored to the selected preset number. 8 Repeat steps 2 through 7 to preset other stations. To reset the interval, tune in any AM station first, then turn off the system. Stop setting presets Press TUNING MODE (or TUNING MODE/PLAY MODE on the remote. Press and hold TUNING - Tip Press TUNING MODE (or TUNING MODE/PLAY MODE...
Primary User Manual
Page 11
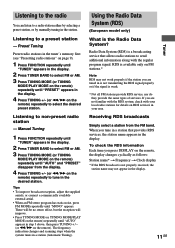
... a radio station either by selecting a preset station, or by manually tuning in the display. 11GB CTuDn/Teurner Tips • To improve broadcast reception, adjust the supplied aerials, or connect a commercially available external aerial. • When an FM stereo program has static noise, press FM MODE repeatedly until "AUTO" appears in step 3 above, then press TUNING + / - (or m/M on the remote, the display changes cyclically as follows: Station name* t Frequency t Clock display * If...
... a radio station either by selecting a preset station, or by manually tuning in the display. 11GB CTuDn/Teurner Tips • To improve broadcast reception, adjust the supplied aerials, or connect a commercially available external aerial. • When an FM stereo program has static noise, press FM MODE repeatedly until "AUTO" appears in step 3 above, then press TUNING + / - (or m/M on the remote, the display changes cyclically as follows: Station name* t Frequency t Clock display * If...
Primary User Manual
Page 13
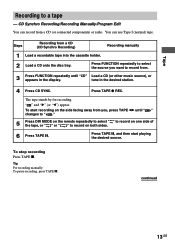
... (or other music source), or appears in the desired station. 4 Press CD SYNC. Steps Recording from a CD (or connected components) or radio. tune in the display. CD Synchro Recording/Recording Manually/Program Edit You can use Type I (normal) tape. Press FUNCTION repeatedly to a tape -- Press TAPE z REC. Tip For recording manually: To pause recording, press TAPE X. The tape stands by for recording. continued 13GB To start playing the desired source. To...
... (or other music source), or appears in the desired station. 4 Press CD SYNC. Steps Recording from a CD (or connected components) or radio. tune in the display. CD Synchro Recording/Recording Manually/Program Edit You can use Type I (normal) tape. Press FUNCTION repeatedly to a tape -- Press TAPE z REC. Tip For recording manually: To pause recording, press TAPE X. The tape stands by for recording. continued 13GB To start playing the desired source. To...
Primary User Manual
Page 14
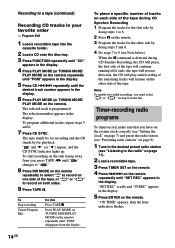
... TAPE Y until " " changes to " ." 8 Press DIR MODE on the remote repeatedly to select " " to the radio" on page 11). 2 Load a recordable tape. 3 Press TIMER SET on the remote. 4 Press ./> on the remote repeatedly until the desired track number appears in the display. 6 Press PLAY MODE (or TUNING MODE/ PLAY MODE on the remote) repeatedly until "PGM" appears in the display. 5 Press CD ./> repeatedly until "SET REC" appears in the desired preset radio station (see...
... TAPE Y until " " changes to " ." 8 Press DIR MODE on the remote repeatedly to select " " to the radio" on page 11). 2 Load a recordable tape. 3 Press TIMER SET on the remote. 4 Press ./> on the remote repeatedly until the desired track number appears in the display. 6 Press PLAY MODE (or TUNING MODE/ PLAY MODE on the remote) repeatedly until "PGM" appears in the display. 5 Press CD ./> repeatedly until "SET REC" appears in the desired preset radio station (see...
Primary User Manual
Page 15
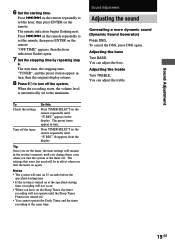
... volume level is automatically set the minute, then press ENTER on the remote repeatedly until "c REC" disappears from the display. To cancel the DSG, press DSG again. You can adjust the bass. To Check the settings Turn off . The preset items appear in the system's memory until the Sleep Timer Function is turned on at the same time. 15GB The settings that were last used will...
... volume level is automatically set the minute, then press ENTER on the remote repeatedly until "c REC" disappears from the display. To cancel the DSG, press DSG again. You can adjust the bass. To Check the settings Turn off . The preset items appear in the system's memory until the Sleep Timer Function is turned on at the same time. 15GB The settings that were last used will...
Primary User Manual
Page 16
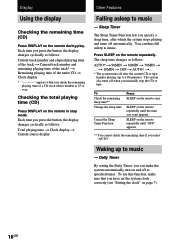
... button, the display changes cyclically as follows: AUTO* t 90MIN t 80MIN t 70MIN t ... t 10MIN t OFF t AUTO* t ... * The system turns off after which the system stops playing and turns off automatically. SLEEP on page 7). 16GB To use this function, make the system automatically turn on the remote repeatedly until the time you can thus fall asleep to music - Press SLEEP on the remote in stop the CD or tape. Daily Timer By setting...
... button, the display changes cyclically as follows: AUTO* t 90MIN t 80MIN t 70MIN t ... t 10MIN t OFF t AUTO* t ... * The system turns off after which the system stops playing and turns off automatically. SLEEP on page 7). 16GB To use this function, make the system automatically turn on the remote repeatedly until the time you can thus fall asleep to music - Press SLEEP on the remote in stop the CD or tape. Daily Timer By setting...
Primary User Manual
Page 17
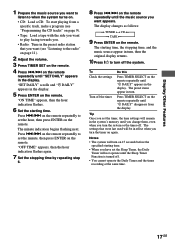
... change them, even when you have set the hour, then press ENTER on the remote repeatedly to turn on the remote repeatedly until the music source you want to play facing towards you. • Radio: Tune in the preset radio station that were last used will remain in the system's memory until "c DAILY" disappears from a specific track, make a program (see "Listening to the radio" on page 11). 2 Adjust the volume...
... change them, even when you have set the hour, then press ENTER on the remote repeatedly to turn on the remote repeatedly until the music source you want to play facing towards you. • Radio: Tune in the preset radio station that were last used will remain in the system's memory until "c DAILY" disappears from a specific track, make a program (see "Listening to the radio" on page 11). 2 Adjust the volume...
Primary User Manual
Page 18
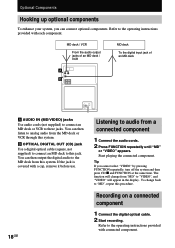
... operating instructions provided with connected component. Optional Components Hooking up optional components To enhance your system, you cannot select "VIDEO" by pressing FUNCTION repeatedly, turn off the system and then press CD x and FUNCTION at the same time. To change from "MD" to audio from this system. Recording on a connected component 1 Connect the digital optical cable. 2 Start recording. MD deck / VCR From the audio output jacks of an MD deck / VCR MD deck To the digital input jack of an MD deck A AUDIO IN (MD/VIDEO) jacks Use audio cords...
... operating instructions provided with connected component. Optional Components Hooking up optional components To enhance your system, you cannot select "VIDEO" by pressing FUNCTION repeatedly, turn off the system and then press CD x and FUNCTION at the same time. To change from "MD" to audio from this system. Recording on a connected component 1 Connect the digital optical cable. 2 Start recording. MD deck / VCR From the audio output jacks of an MD deck / VCR MD deck To the digital input jack of an MD deck A AUDIO IN (MD/VIDEO) jacks Use audio cords...
Primary User Manual
Page 19
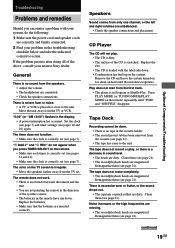
... 12:00") flashes in the system. Replace the CD. • The CD is no tape in the cassette holder. • The record protect tab has been removed from the TV set. General There is loaded with your system, do the following: 1 Make sure the power cord and speaker cords are correctly and firmly connected. 2 Find your nearest Sony dealer. The remote does not work. •...
... 12:00") flashes in the system. Replace the CD. • The CD is no tape in the cassette holder. • The record protect tab has been removed from the TV set. General There is loaded with your system, do the following: 1 Make sure the power cord and speaker cords are correctly and firmly connected. 2 Find your nearest Sony dealer. The remote does not work. •...
Primary User Manual
Page 20
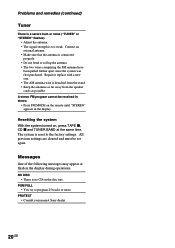
... speaker cords as possible. Resetting the system With the system turned on the disc tray. Repair or replace with a new one. • The AM antenna wire is too weak. The system is reset to program 25 tracks or more. PROTECT • Consult your nearest Sony dealer. 20GB All previous settings are cleared and must be received in stereo. • Press FM MODE on the remote until "STEREO" appears in the display during operations. NO DISC...
... speaker cords as possible. Resetting the system With the system turned on the disc tray. Repair or replace with a new one. • The AM antenna wire is too weak. The system is reset to program 25 tracks or more. PROTECT • Consult your nearest Sony dealer. 20GB All previous settings are cleared and must be received in stereo. • Press FM MODE on the remote until "STEREO" appears in the display during operations. NO DISC...

Primary User Manual
Page 21
.... Dusty or dirty - The tape may damage the system. • Do not use such discs. Should this occur, the system will not be played on this may get entangled in the tape. Demagnetizing the tape heads Demagnetize the tape heads and the metal parts that have any further. • AC power cord must be changed only at a large volume, the cabinet temperature of your...
.... Dusty or dirty - The tape may damage the system. • Do not use such discs. Should this occur, the system will not be played on this may get entangled in the tape. Demagnetizing the tape heads Demagnetize the tape heads and the metal parts that have any further. • AC power cord must be changed only at a large volume, the cabinet temperature of your...
Primary User Manual
Page 22
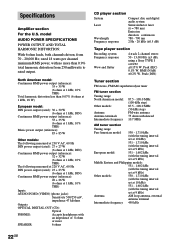
... tuning interval set at 1 kHz, 10% THD) Inputs AUDIO IN MD (VIDEO) (phono jacks): Sensitivity 500/250 mV, impedance 47 kilohms Outputs OPTICAL DIGITAL OUT (CD): Optical PHONES: Accepts headphones with no more 6 ohms CD player section System Laser Wavelength Frequency response Compact disc and digital audio system Semiconductor laser (λ = 780 nm) Emission duration: continuous 780 - 790 nm 2 Hz - 20 kHz (±0.5 dB) Tape player section Recording system Frequency response Wow and flutter 4-track 2-channel stereo...
... tuning interval set at 1 kHz, 10% THD) Inputs AUDIO IN MD (VIDEO) (phono jacks): Sensitivity 500/250 mV, impedance 47 kilohms Outputs OPTICAL DIGITAL OUT (CD): Optical PHONES: Accepts headphones with no more 6 ohms CD player section System Laser Wavelength Frequency response Compact disc and digital audio system Semiconductor laser (λ = 780 nm) Emission duration: continuous 780 - 790 nm 2 Hz - 20 kHz (±0.5 dB) Tape player section Recording system Frequency response Wow and flutter 4-track 2-channel stereo...


