Operating Instructions
Page 5
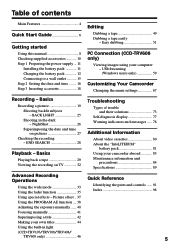
... tape 29 Viewing the recording on pictures 27 Checking the recording - USB Streaming (Windows users only 59 Customizing Your Camcorder Changing the menu settings 67 Recording - Easy dubbing 51 PC Connection (CCD-TRV608 only) Viewing images using your computer - NightShot 26 Superimposing the date...indicators and messages ...... 78 Additional Information About video cassettes 80 About the "InfoLITHIUM" battery pack 81 Using your camcorder abroad 83 Maintenance information and precautions 84 Specifications 89 Advanced Recording Operations Using the wide mode 33 Using the fader...
... tape 29 Viewing the recording on pictures 27 Checking the recording - USB Streaming (Windows users only 59 Customizing Your Camcorder Changing the menu settings 67 Recording - Easy dubbing 51 PC Connection (CCD-TRV608 only) Viewing images using your computer - NightShot 26 Superimposing the date...indicators and messages ...... 78 Additional Information About video cassettes 80 About the "InfoLITHIUM" battery pack 81 Using your camcorder abroad 83 Maintenance information and precautions 84 Specifications 89 Advanced Recording Operations Using the wide mode 33 Using the fader...
Operating Instructions
Page 8
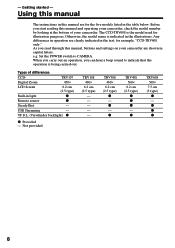
... manual and operating your camcorder, check the model number by looking at the bottom of differences CCD- The CCD-TRV608 is the model used for example, "CCD-TRV608 only." Not provided TRV108 460× 6.2 cm (2.5 type) - - - - - TRV308 460× 6.2 cm (2.5 type) z - z - z TRV608 560× 7.5 cm... z SteadyShot - TRV107 Digital Zoom 450× LCD Screen 6.2 cm (2.5 type) Built-in the table below. VF B.L. (Viewfinder backlight) z z Provided - As you can hear a beep sound to CAMERA. - Getting started - USB Streaming - Otherwise, the model name is being ...
... manual and operating your camcorder, check the model number by looking at the bottom of differences CCD- The CCD-TRV608 is the model used for example, "CCD-TRV608 only." Not provided TRV108 460× 6.2 cm (2.5 type) - - - - - TRV308 460× 6.2 cm (2.5 type) z - z - z TRV608 560× 7.5 cm... z SteadyShot - TRV107 Digital Zoom 450× LCD Screen 6.2 cm (2.5 type) Built-in the table below. VF B.L. (Viewfinder backlight) z z Provided - As you can hear a beep sound to CAMERA. - Getting started - USB Streaming - Otherwise, the model name is being ...
Operating Instructions
Page 10
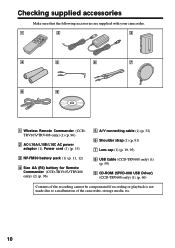
...) battery for Remote Commander (CCD-TRV107/TRV408 only) (2) (p. 96) 5 A/V connecting cable (1) (p. 32) 6 Shoulder strap (1) (p. 91) 7 Lens cap (1) (p. 19, 95) 8 USB Cable (CCD-TRV608 only) (1) (p. 59) 9 CD-ROM (SPVD-008 USB Driver) (CCD-TRV608 only) (1) (p. 60) Contents of the recording cannot be compensated if recording or playback is not made due to a malfunction of the camcorder, storage media, etc...
...) battery for Remote Commander (CCD-TRV107/TRV408 only) (2) (p. 96) 5 A/V connecting cable (1) (p. 32) 6 Shoulder strap (1) (p. 91) 7 Lens cap (1) (p. 19, 95) 8 USB Cable (CCD-TRV608 only) (1) (p. 59) 9 CD-ROM (SPVD-008 USB Driver) (CCD-TRV608 only) (1) (p. 60) Contents of the recording cannot be compensated if recording or playback is not made due to a malfunction of the camcorder, storage media, etc...
Operating Instructions
Page 16
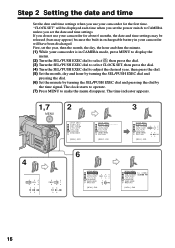
... to CAMERA unless you set the power switch to make the menu disappear. "CLOCK SET" will have been discharged. If you do not use your camcorder for about 6 months, the date and time settings may be displayed each time when you set the date and time settings. The time indicator appears... 1 LTR S I ZE L ANGUAGE DEMO MODE RETURN 12 00 AM [ MENU ] : END 4 2002 JAN 1 12 00 AM 2002 JAN 1 12 00 AM 6 SETUP MENU CLOCK SET USB STREAM AUTO DATE 2002 JUL 4 LTR S I ZE L ANGUAGE DEMO MODE RETURN 12 30 PM [ MENU ] : END SETUP MENU CLOCK SET J UL 4 2002 US B STREAM 12...
... to CAMERA unless you set the power switch to make the menu disappear. "CLOCK SET" will have been discharged. If you do not use your camcorder for about 6 months, the date and time settings may be displayed each time when you set the date and time settings. The time indicator appears... 1 LTR S I ZE L ANGUAGE DEMO MODE RETURN 12 00 AM [ MENU ] : END 4 2002 JAN 1 12 00 AM 2002 JAN 1 12 00 AM 6 SETUP MENU CLOCK SET USB STREAM AUTO DATE 2002 JUL 4 LTR S I ZE L ANGUAGE DEMO MODE RETURN 12 30 PM [ MENU ] : END SETUP MENU CLOCK SET J UL 4 2002 US B STREAM 12...
Operating Instructions
Page 59
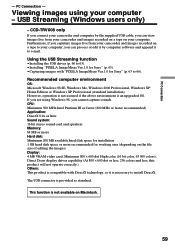
....1.0 for working area (depending on a tape to 66). If you can view images live from your camcorder and images recorded on a tape on Macintosh. 59 The USB connector is an upgraded OS. CPU: Minimum 500 MHz Intel Pentium III or faster (800 MHz or faster... standard. PC Connection - PC Connection - Using the USB Streaming function •Installing the USB driver (p. 60 to 63). •Installing "PIXELA ImageMixer Ver.1.0 for Sony" (p. 63). •Capturing images with DirectX technology, so it to install DirectX. CCD-TRV608 only If you cannot capture sounds. This function is ...
....1.0 for working area (depending on a tape to 66). If you can view images live from your camcorder and images recorded on a tape on Macintosh. 59 The USB connector is an upgraded OS. CPU: Minimum 500 MHz Intel Pentium III or faster (800 MHz or faster... standard. PC Connection - PC Connection - Using the USB Streaming function •Installing the USB driver (p. 60 to 63). •Installing "PIXELA ImageMixer Ver.1.0 for Sony" (p. 63). •Capturing images with DirectX technology, so it to install DirectX. CCD-TRV608 only If you cannot capture sounds. This function is ...
Operating Instructions
Page 60
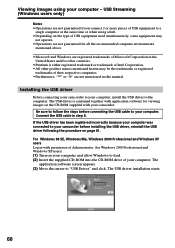
...the cursor to the computer. Installing the USB driver Before connecting your camcorder to your computer. The USB driver installation starts. 60 Be sure to your computer, install the USB driver to "USB Driver" and click. If the USB driver has been registered incorrectly because your ...Professional and Windows XP users Log in with your camcorder before connecting the USB cable to follow the steps before installing the USB driver, reinstall the USB driver following the procedure on your computer - The USB driver is contained together with application software for ...
...the cursor to the computer. Installing the USB driver Before connecting your camcorder to your computer. The USB driver installation starts. 60 Be sure to your computer, install the USB driver to "USB Driver" and click. If the USB driver has been registered incorrectly because your ...Professional and Windows XP users Log in with your camcorder before connecting the USB cable to follow the steps before installing the USB driver, reinstall the USB driver following the procedure on your computer - The USB driver is contained together with application software for ...
Operating Instructions
Page 61
... following procedure to Installing "PIXELA ImageMixer Ver.1.0 for Sony" on your computer - Your computer recognises the camcorder, and the Windows Add Hardware Wizard starts. The Add Hardware Wizard starts three times because three different USB drivers are installed. If you cannot install the USB driver The USB driver has been registered incorrectly as your computer...
... following procedure to Installing "PIXELA ImageMixer Ver.1.0 for Sony" on your computer - Your computer recognises the camcorder, and the Windows Add Hardware Wizard starts. The Add Hardware Wizard starts three times because three different USB drivers are installed. If you cannot install the USB driver The USB driver has been registered incorrectly as your computer...
Operating Instructions
Page 62
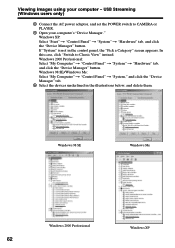
...: Select "Start" t "Control Panel" t "System" t "Hardware" tab, and click the "Device Manager" button. In this case, click "Switch to CAMERA or PLAYER. 4 Open your computer - USB Streaming (Windows users only) 3 Connect the AC power adaptor, and set the POWER switch to Classic View" instead. Windows 2000 Professional: Select "My Computer" t "Control...
...: Select "Start" t "Control Panel" t "System" t "Hardware" tab, and click the "Device Manager" button. In this case, click "Switch to CAMERA or PLAYER. 4 Open your computer - USB Streaming (Windows users only) 3 Connect the AC power adaptor, and set the POWER switch to Classic View" instead. Windows 2000 Professional: Select "My Computer" t "Control...
Operating Instructions
Page 63
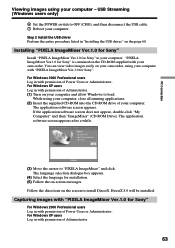
...Adminisitrator. For Windows XP users Log in with your camcorder. Installing "PIXELA ImageMixer Ver.1.0 for Sony" Install "PIXELA ImageMixer Ver.1.0 for Sony" is contained on the CD-ROM supplied with permission...Sony". You can view video images easily on -screen messages. The application software screen appears. For Windows 2000 Professional users Log in with permission of Power Users or Adminisitrator. DirectX 8.0 will be installed. The language selection dialogue box appears. (4) Select the language for installation. (5) Follow the on your camcorder, using your computer. USB...
...Adminisitrator. For Windows XP users Log in with your camcorder. Installing "PIXELA ImageMixer Ver.1.0 for Sony" Install "PIXELA ImageMixer Ver.1.0 for Sony" is contained on the CD-ROM supplied with permission...Sony". You can view video images easily on -screen messages. The application software screen appears. For Windows 2000 Professional users Log in with permission of Power Users or Adminisitrator. DirectX 8.0 will be installed. The language selection dialogue box appears. (4) Select the language for installation. (5) Follow the on your camcorder, using your computer. USB...

Operating Instructions
Page 64
... "Start" t "Program" t "Pixela" t "ImageMixer" t "PIXELA ImageMixer Ver.1.0 for Sony" on a tape appears in the left side of the USB cable to the USB jack on the camcorder and the other end to the USB connector on your camcorder. (4) Set the POWER switch to PLAYER. (5) Select USB STREAM to your camcorder. Preview window (9) Start playing back a tape on your...
... "Start" t "Program" t "Pixela" t "ImageMixer" t "PIXELA ImageMixer Ver.1.0 for Sony" on a tape appears in the left side of the USB cable to the USB jack on the camcorder and the other end to the USB connector on your camcorder. (4) Set the POWER switch to PLAYER. (5) Select USB STREAM to your camcorder. Preview window (9) Start playing back a tape on your...
Operating Instructions
Page 65
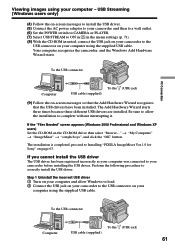
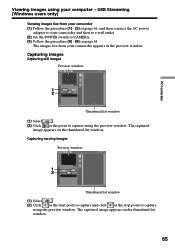
... Select . (2) Click at the start point to capture and click at the point to capture using the preview window. USB Streaming (Windows users only) Viewing images live from your camcorder (1) Follow the procedure (1) - (2) on page 64, and then connect the AC power adaptor to CAMERA. (3) Follow... 64. The captured image appears on the thumbnail list window. 65 The images live from your camcorder and then to a wall outlet. (2) Set the POWER switch to your camcorder appears in the preview window. PC Connection Viewing images using your computer - The captured image appears...
... Select . (2) Click at the start point to capture and click at the point to capture using the preview window. USB Streaming (Windows users only) Viewing images live from your camcorder (1) Follow the procedure (1) - (2) on page 64, and then connect the AC power adaptor to CAMERA. (3) Follow... 64. The captured image appears on the thumbnail list window. 65 The images live from your camcorder and then to a wall outlet. (2) Set the POWER switch to your camcorder appears in the preview window. PC Connection Viewing images using your computer - The captured image appears...
Operating Instructions
Page 66
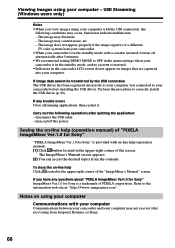
...the image signal is in the camcorder LCD screen do not indicate malfunction: - The ImageMixer's Manual screen appears. (2) You can access the desired topics from the contents. If you view images using your computer with the USB connection, the following operations after ... help (operation manual) of "PIXELA ImageMixer Ver.1.0 for Sony" "PIXELA ImageMixer Ver.1.0 for Sony is a trademark of a different TV color system from your camcorder. •When your computer - To close the on using your camcorder is of PIXELA corporation. Notes on -line help (operation...
...the image signal is in the camcorder LCD screen do not indicate malfunction: - The ImageMixer's Manual screen appears. (2) You can access the desired topics from the contents. If you view images using your computer with the USB connection, the following operations after ... help (operation manual) of "PIXELA ImageMixer Ver.1.0 for Sony" "PIXELA ImageMixer Ver.1.0 for Sony is a trademark of a different TV color system from your camcorder. •When your computer - To close the on using your camcorder is of PIXELA corporation. Notes on -line help (operation...

Operating Instructions
Page 71
... LTR SIZE LANGUAGE DEMO MODE Mode -- To deactivate the USB Streaming function. the tape is set to STBY (Standby) at twice the normal size. ...8226;When you set ORC TO SET, a non-recorded section of about 10 minutes after recording has started. Customizing Your Camcorder Changing the menu settings Notes on ORC setting •Each time you have set the POWER switch to CAMERA without a cassette...the ORC setting will be canceled. To display the information indicators in French. To activate the USB Streaming function. To display the information indicators in Portuguese.
... LTR SIZE LANGUAGE DEMO MODE Mode -- To deactivate the USB Streaming function. the tape is set to STBY (Standby) at twice the normal size. ...8226;When you set ORC TO SET, a non-recorded section of about 10 minutes after recording has started. Customizing Your Camcorder Changing the menu settings Notes on ORC setting •Each time you have set the POWER switch to CAMERA without a cassette...the ORC setting will be canceled. To display the information indicators in French. To activate the USB Streaming function. To display the information indicators in Portuguese.
Operating Instructions
Page 76
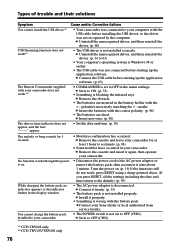
... batteries are inserted in the menu settings. polarities incorrectly matching the + - You cannot charge the battery pack installed to your Sony dealer or local authorized Sony service facility. • The POWER switch is not set to acclimate. (p. 84) • Some troubles have occurred in... settings including the date and time return to OFF (CHG). *1) CCD-TRV608 only *2) CCD-TRV107/TRV408 only 76 c Remove the cassette and leave your camcorder for 5 seconds. c Insert the batteries with the + - c Connect the USB cable before starting up the application software. (p. 63) • ...
... batteries are inserted in the menu settings. polarities incorrectly matching the + - You cannot charge the battery pack installed to your Sony dealer or local authorized Sony service facility. • The POWER switch is not set to acclimate. (p. 84) • Some troubles have occurred in... settings including the date and time return to OFF (CHG). *1) CCD-TRV608 only *2) CCD-TRV107/TRV408 only 76 c Remove the cassette and leave your camcorder for 5 seconds. c Insert the batteries with the + - c Connect the USB cable before starting up the application software. (p. 63) • ...
Operating Instructions
Page 89
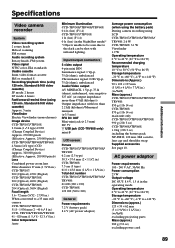
... 2.5 mm) DC 5V USB jack (CCD-TRV608 only) mini-B LCD screen Picture CCD-TRV107/TRV108/TRV308/ TRV408: 6.2 cm (2.5 type) 50.3 × 37.4 mm (2 × 1 1/2 in.) CCD-TRV608: 7.5 cm (3 type) 61.0 × 43.8 mm (2 1/2 × 1 3/4 in.) Total dot number CCD-TRV107/TRV108/TRV308/ TRV408: 61 600 (280 × 220) CCD-TRV608: 123 200 (560 ... to be seen due to the dark can be shot with less than 47 kΩ (kilohms)) Output impedance with infrared lighting. Hi8 cassette, lens cap and shoulder strap Supplied accessories See page 10. AC power adaptor Power requirements 100 - 240 V AC, 50/60...
... 2.5 mm) DC 5V USB jack (CCD-TRV608 only) mini-B LCD screen Picture CCD-TRV107/TRV108/TRV308/ TRV408: 6.2 cm (2.5 type) 50.3 × 37.4 mm (2 × 1 1/2 in.) CCD-TRV608: 7.5 cm (3 type) 61.0 × 43.8 mm (2 1/2 × 1 3/4 in.) Total dot number CCD-TRV107/TRV108/TRV308/ TRV408: 61 600 (280 × 220) CCD-TRV608: 123 200 (560 ... to be seen due to the dark can be shot with less than 47 kΩ (kilohms)) Output impedance with infrared lighting. Hi8 cassette, lens cap and shoulder strap Supplied accessories See page 10. AC power adaptor Power requirements 100 - 240 V AC, 50/60...

Operating Instructions
Page 91
Quick Reference - Quick Reference 91 Identifying the parts and controls Camcorder 1 7 2 8 3 9 4 5 q; 6 1 Eyecup 2 Viewfinder lens adjustment lever (p. 23) 3 V BATT release lever (p. 11) 4 USB connector (p. 61) (CCD-TRV608 only) 5 OPEN button (p. 19) qa 6 SEL/PUSH EXEC dial (p. 16, 67) 7 Power zoom lever (p. 22) 8 POWER switch (p. 19) 9 START/STOP button (p. 19) 0 DC IN jack (p. 12, 15) qa Hooks for shoulder strap (p. 91) Attaching the shoulder strap Attach the shoulder strap supplied with your camcorder to the hooks for the shoulder strap. -
Quick Reference - Quick Reference 91 Identifying the parts and controls Camcorder 1 7 2 8 3 9 4 5 q; 6 1 Eyecup 2 Viewfinder lens adjustment lever (p. 23) 3 V BATT release lever (p. 11) 4 USB connector (p. 61) (CCD-TRV608 only) 5 OPEN button (p. 19) qa 6 SEL/PUSH EXEC dial (p. 16, 67) 7 Power zoom lever (p. 22) 8 POWER switch (p. 19) 9 START/STOP button (p. 19) 0 DC IN jack (p. 12, 15) qa Hooks for shoulder strap (p. 91) Attaching the shoulder strap Attach the shoulder strap supplied with your camcorder to the hooks for the shoulder strap. -
Operating Instructions
Page 98
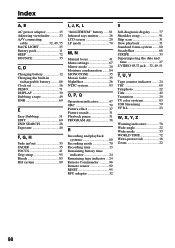
... 69 END SEARCH 28 Exposure 40 F, G, H Fade in/out 35 FADER 35 FOCUS 41 Grip strap 95 Heads 85 Hi8 system 80 I, J, K, L "InfoLITHIUM" battery ..... 81 Infrared rays emitter 26 LCD screen 20 LP mode 70 M, N Manual focus 41 Menu settings 67 Mirror mode 20 Moisture condensation ....... 84 MONOTONE 35 ... S VIDEO OUT jack ... 32, 49, 51 T, U, V Tape counter indicator ........ 24 TBC 69 Telephoto 22 Title 42 Transition 20 TV color systems 83 USB Streaming 59 VF B.L 23 W, X, Y, Z Warning indicators 78 Wide-angle 22 Wide mode 33 WORLD TIME 72 Write-protect tab 18 Zoom 22 98
... 69 END SEARCH 28 Exposure 40 F, G, H Fade in/out 35 FADER 35 FOCUS 41 Grip strap 95 Heads 85 Hi8 system 80 I, J, K, L "InfoLITHIUM" battery ..... 81 Infrared rays emitter 26 LCD screen 20 LP mode 70 M, N Manual focus 41 Menu settings 67 Mirror mode 20 Moisture condensation ....... 84 MONOTONE 35 ... S VIDEO OUT jack ... 32, 49, 51 T, U, V Tape counter indicator ........ 24 TBC 69 Telephoto 22 Title 42 Transition 20 TV color systems 83 USB Streaming 59 VF B.L 23 W, X, Y, Z Warning indicators 78 Wide-angle 22 Wide mode 33 WORLD TIME 72 Write-protect tab 18 Zoom 22 98


