Operating Instructions
Page 1
4-169-137-12(1) The software of this player may be updated in Malaysia 4-169-137-12(1) Operating Instructions Blu-ray Disc™ / DVD Player BDP-S270 © 2010 Sony Corporation To find out details on any available updates, please visit: http://www.sony.com/bluraysupport/ Printed in the future.
4-169-137-12(1) The software of this player may be updated in Malaysia 4-169-137-12(1) Operating Instructions Blu-ray Disc™ / DVD Player BDP-S270 © 2010 Sony Corporation To find out details on any available updates, please visit: http://www.sony.com/bluraysupport/ Printed in the future.

Operating Instructions
Page 2
...; Install this Blu-ray Disc/DVD player is harmful to disassemble the cabinet. As the laser beam used with the equipment in this manual could void your authority to the presence of important operating and maintenance (servicing) instructions in the event of optical instruments with liquids, such as sunshine, fire or the like. Refer servicing to qualified personnel only. CAUTION The use of trouble. Refer servicing...
...; Install this Blu-ray Disc/DVD player is harmful to disassemble the cabinet. As the laser beam used with the equipment in this manual could void your authority to the presence of important operating and maintenance (servicing) instructions in the event of optical instruments with liquids, such as sunshine, fire or the like. Refer servicing to qualified personnel only. CAUTION The use of trouble. Refer servicing...
Operating Instructions
Page 7
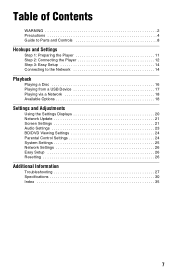
...2 Precautions 4 Guide to Parts and Controls 8 Hookups and Settings Step 1: Preparing the Player 11 Step 2: Connecting the Player 12 Step 3: Easy Setup 14 Connecting to the Network 14 Playback Playing a Disc 16 Playing from a USB Device 17 Playing via a Network 18 Available Options 18 Settings and Adjustments Using the Settings Displays 20 Network Update 21 Screen Settings 21 Audio Settings 23 BD/DVD Viewing Settings 24 Parental Control Settings 24 System Settings 25 Network Settings 26 Easy Setup 26 Resetting 26 Additional Information Troubleshooting 27 Specifications 30...
...2 Precautions 4 Guide to Parts and Controls 8 Hookups and Settings Step 1: Preparing the Player 11 Step 2: Connecting the Player 12 Step 3: Easy Setup 14 Connecting to the Network 14 Playback Playing a Disc 16 Playing from a USB Device 17 Playing via a Network 18 Available Options 18 Settings and Adjustments Using the Settings Displays 20 Network Update 21 Screen Settings 21 Audio Settings 23 BD/DVD Viewing Settings 24 Parental Control Settings 24 System Settings 25 Network Settings 26 Easy Setup 26 Resetting 26 Additional Information Troubleshooting 27 Specifications 30...
Operating Instructions
Page 8
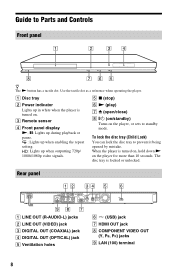
... lock the disc tray to Parts and Controls Front panel z The N button has a tactile dot. C Remote sensor D Front panel display N, X: Lights up during playback or pause. : Lights up when enabling the repeat setting. : Lights up in white when the player is turned on. Rear panel A LINE OUT (R-AUDIO-L) jacks B LINE OUT (VIDEO) jack C DIGITAL OUT (COAXIAL) jack D DIGITAL OUT (OPTICAL) jack E Ventilation holes F (USB) jack G HDMI OUT jack H COMPONENT VIDEO OUT (Y, PB, PR) jacks I LAN (100) terminal 8 Use...
... lock the disc tray to Parts and Controls Front panel z The N button has a tactile dot. C Remote sensor D Front panel display N, X: Lights up during playback or pause. : Lights up when enabling the repeat setting. : Lights up in white when the player is turned on. Rear panel A LINE OUT (R-AUDIO-L) jacks B LINE OUT (VIDEO) jack C DIGITAL OUT (COAXIAL) jack D DIGITAL OUT (OPTICAL) jack E Ventilation holes F (USB) jack G HDMI OUT jack H COMPONENT VIDEO OUT (Y, PB, PR) jacks I LAN (100) terminal 8 Use...
Operating Instructions
Page 9
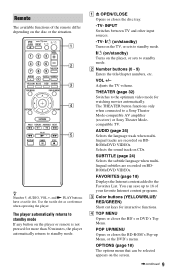
... the TV volume. SUBTITLE (page 24) Selects the subtitle language when multilingual subtitles are recorded on CDs. Remote The available functions of your favorite Internet content programs. C Color buttons (YELLOW/BLUE/ RED/GREEN) Short cut keys for watching movies automatically. Use the tactile dot as a reference when operating the player. POP UP/MENU Opens or closes the BD-ROM's Pop-up to a Sony Theater Mode-compatible AV amplifier (receiver) or Sony Theater Modecompatible...
... the TV volume. SUBTITLE (page 24) Selects the subtitle language when multilingual subtitles are recorded on CDs. Remote The available functions of your favorite Internet content programs. C Color buttons (YELLOW/BLUE/ RED/GREEN) Short cut keys for watching movies automatically. Use the tactile dot as a reference when operating the player. POP UP/MENU Opens or closes the BD-ROM's Pop-up to a Sony Theater Mode-compatible AV amplifier (receiver) or Sony Theater Modecompatible...
Operating Instructions
Page 10
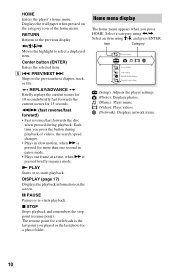
..., or file. DISPLAY (page 17) Displays the playback information on the category icon of videos, the search speed changes. • Plays in slow motion, when M is pressed briefly in pause mode. Displays the wall paper when pressed on the screen. Select a category using x STOP Stops playback and remembers the stop point (resume point). The resume point for 15 seconds. Each time you press the button during playback. N PLAY Starts or re-starts playback...
..., or file. DISPLAY (page 17) Displays the playback information on the category icon of videos, the search speed changes. • Plays in slow motion, when M is pressed briefly in pause mode. Displays the wall paper when pressed on the screen. Select a category using x STOP Stops playback and remembers the stop point (resume point). The resume point for 15 seconds. Each time you press the button during playback. N PLAY Starts or re-starts playback...

Operating Instructions
Page 13
Coaxial digital cable (not supplied) or Optical digital cable (not supplied) t Set "Dolby Digital (Coaxial / Optical)*1" (page 23) and "DTS (Coaxial / Optical)*2" (page 23). When you select A or B, make the appropriate settings in the "Audio Settings" setup (page 23). Hookups and Settings HDMI cable (not supplied) HDMI cable (not supplied) t Set "BD Audio MIX Setting" (page 23). Audio/video cable (supplied) *1 *2 13 Connecting to your AV amplifier (receiver) Select one of the following connection methods according to the input jacks on your AV amplifier (receiver).
Coaxial digital cable (not supplied) or Optical digital cable (not supplied) t Set "Dolby Digital (Coaxial / Optical)*1" (page 23) and "DTS (Coaxial / Optical)*2" (page 23). When you select A or B, make the appropriate settings in the "Audio Settings" setup (page 23). Hookups and Settings HDMI cable (not supplied) HDMI cable (not supplied) t Set "BD Audio MIX Setting" (page 23). Audio/video cable (supplied) *1 *2 13 Connecting to your AV amplifier (receiver) Select one of the following connection methods according to the input jacks on your AV amplifier (receiver).

Operating Instructions
Page 16
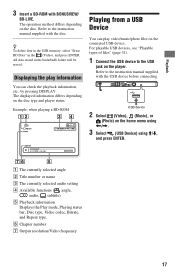
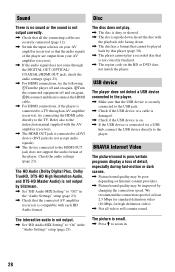
.../BD-LIVE. • Connect the player to a network (page 14). • Set "BD Internet Connection" to "Allow" (page 24). appears on the home menu and playback starts. If playback does not start automatically, select in the (Video), (Music), or (Photo) category, and press ENTER. Playback 16 Playing side facing down 3 Press Z OPEN/CLOSE to the USB jack on the rear of the player (page 8). As your local storage, use a 1 GB or larger USB memory. 2 Prepare...
.../BD-LIVE. • Connect the player to a network (page 14). • Set "BD Internet Connection" to "Allow" (page 24). appears on the home menu and playback starts. If playback does not start automatically, select in the (Video), (Music), or (Photo) category, and press ENTER. Playback 16 Playing side facing down 3 Press Z OPEN/CLOSE to the USB jack on the rear of the player (page 8). As your local storage, use a 1 GB or larger USB memory. 2 Prepare...
Operating Instructions
Page 17
... the USB memory, select "Erase BD Data" in the buda/budb folder will be erased. The displayed information differs depending on the disc. USB device 2 Select (Video), (Music), or (Photo) on the player. For playable USB devices, see "Playable types of files" (page 31). 1 Connect the USB device to the instruction manual supplied with the disc. Refer to the instruction manual supplied with the USB device before connecting. Refer to the USB jack on the home menu using Playback...
... the USB memory, select "Erase BD Data" in the buda/budb folder will be erased. The displayed information differs depending on the disc. USB device 2 Select (Video), (Music), or (Photo) on the player. For playable USB devices, see "Playable types of files" (page 31). 1 Connect the USB device to the instruction manual supplied with the disc. Refer to the instruction manual supplied with the USB device before connecting. Refer to the USB jack on the home menu using Playback...
Operating Instructions
Page 18
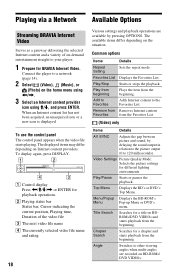
Playing via a Network Available Options Streaming BRAVIA Internet Video Serves as a gateway delivering the selected Internet content and a variety of on the home menu using Connect the player to a network (page 14). 2 Select (Video), (Music), or (Photo) on -demand entertainment straight to your player. 1 Prepare for BRAVIA Internet Video.
Playing via a Network Available Options Streaming BRAVIA Internet Video Serves as a gateway delivering the selected Internet content and a variety of on the home menu using Connect the player to a network (page 14). 2 Select (Video), (Music), or (Photo) on -demand entertainment straight to your player. 1 Prepare for BRAVIA Internet Video.
Operating Instructions
Page 23
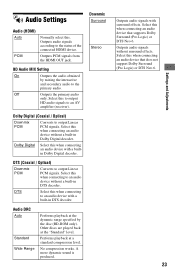
...) or DTS Neo 6. 23 Settings and Adjustments Off Outputs the primary audio only. Performs playback at a standard compression level. BD Audio MIX Setting On Outputs the audio obtained by the disc (BD-ROM only). Select this when connecting to the primary audio. Select this to output HD audio signals to output Linear PCM signals. No compression works. Outputs audio signals according to output Linear PCM signals. Dolby Digital (Coaxial / Optical) Downmix PCM Converts to an AV amplifier (receiver). Audio Settings Downmix Surround Audio (HDMI) Auto PCM Normally...
...) or DTS Neo 6. 23 Settings and Adjustments Off Outputs the primary audio only. Performs playback at a standard compression level. BD Audio MIX Setting On Outputs the audio obtained by the disc (BD-ROM only). Select this when connecting to the primary audio. Select this to output HD audio signals to output Linear PCM signals. No compression works. Outputs audio signals according to output Linear PCM signals. Dolby Digital (Coaxial / Optical) Downmix PCM Converts to an AV amplifier (receiver). Audio Settings Downmix Surround Audio (HDMI) Auto PCM Normally...
Operating Instructions
Page 24
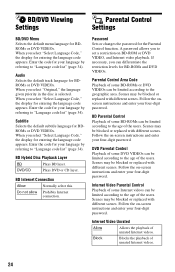
... Hybrid Disc Playback Layer BD Plays BD layer. Scenes may be blocked or replaced with different scenes. BD/DVD Viewing Settings Parental Control Settings BD/DVD Menu Selects the default menu language for BDROMs or DVD VIDEOs. When you can be limited according to "Language code list" (page 34). Do not allow Prohibits Internet connection. Scenes may be blocked or replaced with different scenes. Internet Video Parental Control Playback of the users. When you select "Select Language Code," the display...
... Hybrid Disc Playback Layer BD Plays BD layer. Scenes may be blocked or replaced with different scenes. BD/DVD Viewing Settings Parental Control Settings BD/DVD Menu Selects the default menu language for BDROMs or DVD VIDEOs. When you can be limited according to "Language code list" (page 34). Do not allow Prohibits Internet connection. Scenes may be blocked or replaced with different scenes. Internet Video Parental Control Playback of the users. When you select "Select Language Code," the display...
Operating Instructions
Page 26
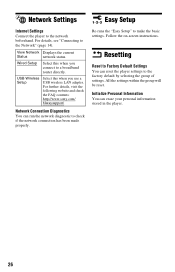
... to a broadband router directly. Resetting Reset to Factory Default Settings You can reset the player settings to make the basic settings. View Network Displays the current Status network status. All the settings within the group will be reset. USB Wireless Setup Select this when you use a USB wireless LAN adapter. Re-runs the "Easy Setup" to the factory default by selecting the group of settings. For details, see "Connecting to the network beforehand. Follow the on-screen instructions. Network Settings Easy Setup Internet Settings Connect the player to the...
... to a broadband router directly. Resetting Reset to Factory Default Settings You can reset the player settings to make the basic settings. View Network Displays the current Status network status. All the settings within the group will be reset. USB Wireless Setup Select this when you use a USB wireless LAN adapter. Re-runs the "Easy Setup" to the factory default by selecting the group of settings. For details, see "Connecting to the network beforehand. Follow the on-screen instructions. Network Settings Easy Setup Internet Settings Connect the player to the...
Operating Instructions
Page 27
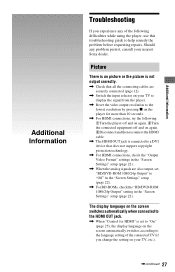
.... , For HDMI connections, try the following difficulties while using the player, use this troubleshooting guide to help remedy the problem before requesting repairs. Additional Information Troubleshooting If you change the setting on again. 3Disconnect and then reconnect the HDMI cable. , The HDMI OUT jack is connected to a DVI device that all the connecting cables are securely connected (page 12). , Switch the input selector on your TV to display the signal from the player. , Reset the video output resolution to...
.... , For HDMI connections, try the following difficulties while using the player, use this troubleshooting guide to help remedy the problem before requesting repairs. Additional Information Troubleshooting If you change the setting on again. 3Disconnect and then reconnect the HDMI cable. , The HDMI OUT jack is connected to a DVI device that all the connecting cables are securely connected (page 12). , Switch the input selector on your TV to display the signal from the player. , Reset the video output resolution to...
Operating Instructions
Page 28
... connecting the HDMI cable directly to "On" in the "Audio Settings" setup (page 23). , Check that the connected AV amplifier (receiver) is upside down . , The disc has a format that cannot be improved by changing the connection speed. The HD Audio (Dolby Digital Plus, Dolby TrueHD, DTS-HD High Resolution Audio, and DTS-HD Master Audio) is not output by this player (page 30). , The player cannot play . , The disc is dirty or skewed. , The disc is compatible with the playback...
... connecting the HDMI cable directly to "On" in the "Audio Settings" setup (page 23). , Check that the connected AV amplifier (receiver) is upside down . , The disc has a format that cannot be improved by changing the connection speed. The HD Audio (Dolby Digital Plus, Dolby TrueHD, DTS-HD High Resolution Audio, and DTS-HD Master Audio) is not output by this player (page 30). , The player cannot play . , The disc is dirty or skewed. , The disc is compatible with the playback...
Operating Instructions
Page 29
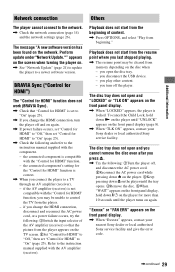
... ("Control for HDMI") The "Control for HDMI" function does not work (BRAVIA Sync). , Check that the picture from the player appears on the TV screen. 2Set "Control for HDMI" to "Off," then set "Control for HDMI" to a newer software version. Playback does not start from the resume point where you change the HDMI connection, turn off and on the disc when - Perform update under "Network Update."" appears on the screen when turning the player on the network. Refer to the instruction manual...
... ("Control for HDMI") The "Control for HDMI" function does not work (BRAVIA Sync). , Check that the picture from the player appears on the TV screen. 2Set "Control for HDMI" to "Off," then set "Control for HDMI" to a newer software version. Playback does not start from the resume point where you change the HDMI connection, turn off and on the disc when - Perform update under "Network Update."" appears on the screen when turning the player on the network. Refer to the instruction manual...
Operating Instructions
Page 30
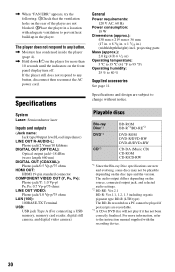
...-p/75 ohms HDMI OUT: HDMI 19-pin standard connector COMPONENT VIDEO OUT (Y, PB, PR): Phono jack/Y: 1.0 Vp-p/ PB, PR: 0.7 Vp-p/75 ohms LINE OUT VIDEO: Phono jack/1.0 Vp-p/75 ohms LAN (100): 100BASE-TX Terminal USB: USB jack Type A (For connecting a USB memory, memory card reader, digital still camera, and digital video camera) Specifications and design are subject to 80 % Supplied accessories See page 11. Playable discs Blu-ray Disc*1 DVD*3 CD...
...-p/75 ohms HDMI OUT: HDMI 19-pin standard connector COMPONENT VIDEO OUT (Y, PB, PR): Phono jack/Y: 1.0 Vp-p/ PB, PR: 0.7 Vp-p/75 ohms LINE OUT VIDEO: Phono jack/1.0 Vp-p/75 ohms LAN (100): 100BASE-TX Terminal USB: USB jack Type A (For connecting a USB memory, memory card reader, digital still camera, and digital video camera) Specifications and design are subject to 80 % Supplied accessories See page 11. Playable discs Blu-ray Disc*1 DVD*3 CD...
Operating Instructions
Page 31
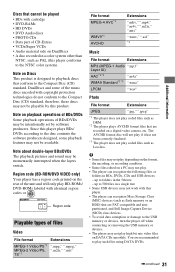
... video files on a digital video camera, etc. You are recorded on DATA CDs smoothly. Since this player conforms to play BD-ROMs/ DVD-ROMs labeled with cartridge • DVD-RAMs • HD DVDs • DVD Audio discs • PHOTO CDs • Data part of the music discs encoded with this product. Note about double-layer BDs/DVDs The playback pictures and sound may not play coded files such as PAL (this player plays BDs/ DVDs according to the disc...
... video files on a digital video camera, etc. You are recorded on DATA CDs smoothly. Since this player conforms to play BD-ROMs/ DVD-ROMs labeled with cartridge • DVD-RAMs • HD DVDs • DVD Audio discs • PHOTO CDs • Data part of the music discs encoded with this product. Note about double-layer BDs/DVDs The playback pictures and sound may not play coded files such as PAL (this player plays BDs/ DVDs according to the disc...
Operating Instructions
Page 32
... your wireless network. b Depending on the TV's remote, the player and HDMI-compatible components turn off automatically. • Theater When you change the language for HDMI" to the instruction manual supplied with the TV. Keep in the "System Settings" setup (page 25). HOME: The home menu appears automatically (page 10, 16, 20). - When connected with the TV or components. TKIP assures a higher security level than WEP. 32 N PLAY: Playback starts automatically. • System Power...
... your wireless network. b Depending on the TV's remote, the player and HDMI-compatible components turn off automatically. • Theater When you change the language for HDMI" to the instruction manual supplied with the TV. Keep in the "System Settings" setup (page 25). HOME: The home menu appears automatically (page 10, 16, 20). - When connected with the TV or components. TKIP assures a higher security level than WEP. 32 N PLAY: Playback starts automatically. • System Power...

Operating Instructions
Page 35
..." 25 DISPLAY 10 Dolby Digital 23 DTS 23 DVD 30 E "Easy Setup" 14, 26 F FAVORITES 9 H HDMI 22, 23 HOME 10, 20 Home menu 20 I Internet content 9, 18 L Language Follow 32 M MAC address 25 N "Network Settings" 26 "Network Update" 21 O One-Touch Play 32 OPTIONS 9 "OSD" 25 P Parental Control 24 "Parental Control Settings" 24 Play information 17 Playable discs 30 POP UP/MENU 9 Q "Quick Start Mode" 25 R Region code 31 Remote 9, 11 "Resetting" 26 Resetting the player 26 Resume 10, 29 S "Screen Settings" 21 "Setup" 20 Software update 21, 25 SUBTITLE 9 System Power-Off...
..." 25 DISPLAY 10 Dolby Digital 23 DTS 23 DVD 30 E "Easy Setup" 14, 26 F FAVORITES 9 H HDMI 22, 23 HOME 10, 20 Home menu 20 I Internet content 9, 18 L Language Follow 32 M MAC address 25 N "Network Settings" 26 "Network Update" 21 O One-Touch Play 32 OPTIONS 9 "OSD" 25 P Parental Control 24 "Parental Control Settings" 24 Play information 17 Playable discs 30 POP UP/MENU 9 Q "Quick Start Mode" 25 R Region code 31 Remote 9, 11 "Resetting" 26 Resetting the player 26 Resume 10, 29 S "Screen Settings" 21 "Setup" 20 Software update 21, 25 SUBTITLE 9 System Power-Off...


