Operation Manual
Page 1
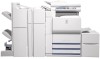
MODEL MX-M550U MX-M620U MX-M700U MX-M550N MX-M620N MX-M700N DIGITAL MULTIFUNCTIONAL SYSTEM OPERATION MANUAL (for general information and copier operation) Page PART 1: GENERAL INFORMATION • BEFORE USING THE PRODUCT 1-1 • MANAGING THE MACHINE 2-1 • PERIPHERAL DEVICES 3-1 PART 2: COPIER OPERATION • MAKING COPIES 4-1 • CONVENIENT COPY FUNCTIONS 5-1 • MACHINE MAINTENANCE (FOR COPYING) 6-1 • DOCUMENT FILING FUNCTION 7-1 •...
MODEL MX-M550U MX-M620U MX-M700U MX-M550N MX-M620N MX-M700N DIGITAL MULTIFUNCTIONAL SYSTEM OPERATION MANUAL (for general information and copier operation) Page PART 1: GENERAL INFORMATION • BEFORE USING THE PRODUCT 1-1 • MANAGING THE MACHINE 2-1 • PERIPHERAL DEVICES 3-1 PART 2: COPIER OPERATION • MAKING COPIES 4-1 • CONVENIENT COPY FUNCTIONS 5-1 • MACHINE MAINTENANCE (FOR COPYING) 6-1 • DOCUMENT FILING FUNCTION 7-1 •...
Operation Manual
Page 2
...the equipment and shall be determined by one or more of the FCC Rules. Model Number: MX-M550U/MX-M550N/MX-M620U/MX-M620N/MX-M700U/MX-M700N MX-M550U J/MX-M620U J/MX-M700U J Declaration of Conformity This device complies with the instructions, may cause harmful interference to correct... (1) This device may cause undersired operation. FOR YOUR RECORDS ... To protect against harmful interference in accordance with Part 15 of Purchase Authorized Sharp Printer Service Department Number WARNING: FCC Regulations state that may not cause harmful interference, and (2) this equipment. ...
...the equipment and shall be determined by one or more of the FCC Rules. Model Number: MX-M550U/MX-M550N/MX-M620U/MX-M620N/MX-M700U/MX-M700N MX-M550U J/MX-M620U J/MX-M700U J Declaration of Conformity This device complies with the instructions, may cause harmful interference to correct... (1) This device may cause undersired operation. FOR YOUR RECORDS ... To protect against harmful interference in accordance with Part 15 of Purchase Authorized Sharp Printer Service Department Number WARNING: FCC Regulations state that may not cause harmful interference, and (2) this equipment. ...
Operation Manual
Page 11
...trays (Types and sizes of the inserter 3-15 ● Misfeed removal 3-17 ● Troubleshooting inserter problems 3-18 SHARP OSA 3-19 APPLICATION COMMUNICATION MODULE (MX- tray 2 2-2 ● Changing the paper size in paper tray 1 - AMX2 3-19 ● Standard ...two-sided copying from the automatic document feeder 2-31 TROUBLESHOOTING 2-32 CHAPTER 3 PERIPHERAL DEVICES FINISHER AND SADDLE STITCH FINISHER 3-2 ● Part names 3-2 ● Specifications 3-2 ● Finishing methods 3-4 ● Finishing modes and finisher functions 3-6 ● Staple cartridge replacement...
...trays (Types and sizes of the inserter 3-15 ● Misfeed removal 3-17 ● Troubleshooting inserter problems 3-18 SHARP OSA 3-19 APPLICATION COMMUNICATION MODULE (MX- tray 2 2-2 ● Changing the paper size in paper tray 1 - AMX2 3-19 ● Standard ...two-sided copying from the automatic document feeder 2-31 TROUBLESHOOTING 2-32 CHAPTER 3 PERIPHERAL DEVICES FINISHER AND SADDLE STITCH FINISHER 3-2 ● Part names 3-2 ● Specifications 3-2 ● Finishing methods 3-4 ● Finishing modes and finisher functions 3-6 ● Staple cartridge replacement...

Operation Manual
Page 13
CHAPTER 1 BEFORE USING THE PRODUCT This chapter contains basic information that should be read before using the product. Page INTRODUCTION 1-2 MAIN FEATURES 1-3 PART NAMES AND FUNCTIONS 1-10 ● Exterior 1-10 ● Interior 1-11 ● Operation panel 1-13 ● Touch panel 1-14 TURNING THE POWER ON AND OFF 1-17 AUDITING MODE 1-18 ● Using the machine when the auditing mode is enabled 1-18 1-1
CHAPTER 1 BEFORE USING THE PRODUCT This chapter contains basic information that should be read before using the product. Page INTRODUCTION 1-2 MAIN FEATURES 1-3 PART NAMES AND FUNCTIONS 1-10 ● Exterior 1-10 ● Interior 1-11 ● Operation panel 1-13 ● Touch panel 1-14 TURNING THE POWER ON AND OFF 1-17 AUDITING MODE 1-18 ● Using the machine when the auditing mode is enabled 1-18 1-1
Operation Manual
Page 22
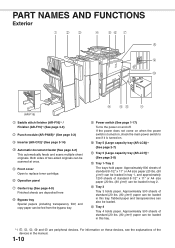
... power switch to replace toner cartridge. 6 Operation panel 7 Center tray (See page 4-9) Finished sheets are peripheral devices. Both sides of the devices in this tray. PART NAMES AND FUNCTIONS Exterior (AR-F15) 1 Saddle stitch finisher (AR-F16)*1 / Finisher (AR-F15)*1 (See page 3-2) 2 Punch module (AR-PN4B)*1 (See page 3-2) 3 Inserter (AR-CF2...
... power switch to replace toner cartridge. 6 Operation panel 7 Center tray (See page 4-9) Finished sheets are peripheral devices. Both sides of the devices in this tray. PART NAMES AND FUNCTIONS Exterior (AR-F15) 1 Saddle stitch finisher (AR-F16)*1 / Finisher (AR-F15)*1 (See page 3-2) 2 Punch module (AR-PN4B)*1 (See page 3-2) 3 Inserter (AR-CF2...
Operation Manual
Page 23
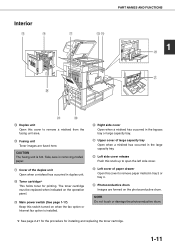
... this switch turned on the photoconductive drum. NOTE Do not touch or damage the photoconductive drum. *2 See page 2-21 for the procedure for printing. Interior PART NAMES AND FUNCTIONS 1 15 Duplex unit Open this cover to remove a misfeed from the fusing unit area. 16 Fusing unit Toner images are formed on...
... this switch turned on the photoconductive drum. NOTE Do not touch or damage the photoconductive drum. *2 See page 2-21 for the procedure for printing. Interior PART NAMES AND FUNCTIONS 1 15 Duplex unit Open this cover to remove a misfeed from the fusing unit area. 16 Fusing unit Toner images are formed on...
Operation Manual
Page 24
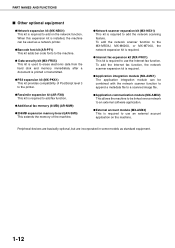
...This kit adds bar code fonts to the machine. ● Data security kit (MX-FRX5) This kit is used as standard equipment. 1-12 PART NAMES AND FUNCTIONS ■ Other optional equipment ●Network expansion kit (MX-NBX1) This kit is required to use the Internet fax function. To add ...the network scanner function to the MX-M550U, MX-M620U, or MX-M700U, the network expansion kit is required...
...This kit adds bar code fonts to the machine. ● Data security kit (MX-FRX5) This kit is used as standard equipment. 1-12 PART NAMES AND FUNCTIONS ■ Other optional equipment ●Network expansion kit (MX-NBX1) This kit is required to use the Internet fax function. To add ...the network scanner function to the MX-M550U, MX-M620U, or MX-M700U, the network expansion kit is required...
Operation Manual
Page 25
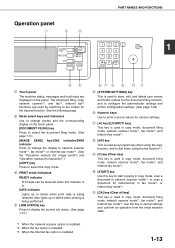
... is installed. 1-13 See the following page. 2 Mode select keys and indicators Use to change modes and the corresponding display on the panel. Operation panel PART NAMES AND FUNCTIONS DOCUMENT FILING IMAGE SEND PRINT READY DATA LINE DATA COPY SYSTEM JOB STATUS SETTINGS LOGOUT 1 1 Touch panel The machine status, messages and...
... is installed. 1-13 See the following page. 2 Mode select keys and indicators Use to change modes and the corresponding display on the panel. Operation panel PART NAMES AND FUNCTIONS DOCUMENT FILING IMAGE SEND PRINT READY DATA LINE DATA COPY SYSTEM JOB STATUS SETTINGS LOGOUT 1 1 Touch panel The machine status, messages and...
Operation Manual
Page 26
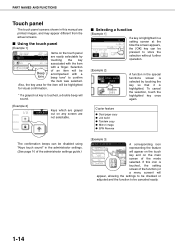
... on the main FILE QUICK FILE 1. 2. 81/2x11 81/2x11 3. 81/2x14 4. 11x17 screen of the administrator settings guide.) [Example 3] READY TO SCAN FOR COPY. PART NAMES AND FUNCTIONS Touch panel The touch panel screens shown in this icon is touched, the setting screen of the function (or a menu screen) will...
... on the main FILE QUICK FILE 1. 2. 81/2x11 81/2x11 3. 81/2x14 4. 11x17 screen of the administrator settings guide.) [Example 3] READY TO SCAN FOR COPY. PART NAMES AND FUNCTIONS Touch panel The touch panel screens shown in this icon is touched, the setting screen of the function (or a menu screen) will...
Operation Manual
Page 27
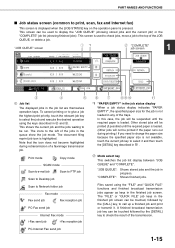
... "COMPLETE". "JOB QUEUE": Shows stored jobs and the job in the job list are themselves operation keys. The document filing reprint job icon is pressed. PART NAMES AND FUNCTIONS ■ Job status screen (common to print, scan, fax and Internet fax) This screen is displayed when the [JOB STATUS] key on...
... "COMPLETE". "JOB QUEUE": Shows stored jobs and the job in the job list are themselves operation keys. The document filing reprint job icon is pressed. PART NAMES AND FUNCTIONS ■ Job status screen (common to print, scan, fax and Internet fax) This screen is displayed when the [JOB STATUS] key on...
Operation Manual
Page 28
PART NAMES AND FUNCTIONS 3 [PRINT JOB] key This displays the print job list of print mode (copying, printing, fax reception, Internet fax reception, and self printing). 4 [...
PART NAMES AND FUNCTIONS 3 [PRINT JOB] key This displays the print job list of print mode (copying, printing, fax reception, Internet fax reception, and self printing). 4 [...

Operation Manual
Page 38
... in the administrator settings (page 11 of a chair or step. This may damage the tray and interfere with the AR-LC6 described on page 2-7. ■ Part names Operation button / Indicator To load paper in the tray with the print side face down on the tray. ● Do not place any objects...
... in the administrator settings (page 11 of a chair or step. This may damage the tray and interfere with the AR-LC6 described on page 2-7. ■ Part names Operation button / Indicator To load paper in the tray with the print side face down on the tray. ● Do not place any objects...
Operation Manual
Page 52
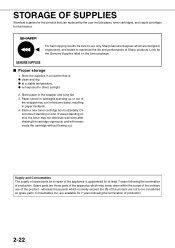
...the finisher. Store paper in packages standing up or out of the wrapper may break down within the scope of the ordinary use only Sharp Genuine Supplies which normally exceed the life of the product are designed, engineered, and tested to be sure to direct sunlight. 2. STORAGE ... on end, the toner may not distribute well even after shaking the cartridge vigorously, and will remain inside the cartridge without flowing out. Spare parts are available for at a stable temperature, ● not exposed to use of the apparatus which may curl or become damp, resulting in a...
...the finisher. Store paper in packages standing up or out of the wrapper may break down within the scope of the ordinary use only Sharp Genuine Supplies which normally exceed the life of the product are designed, engineered, and tested to be sure to direct sunlight. 2. STORAGE ... on end, the toner may not distribute well even after shaking the cartridge vigorously, and will remain inside the cartridge without flowing out. Spare parts are available for at a stable temperature, ● not exposed to use of the apparatus which may curl or become damp, resulting in a...
Operation Manual
Page 54
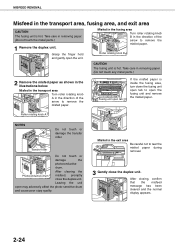
Take care in removing paper. (Do not touch any metal parts.) 2 Remove the misfed paper as shown in the exit area Be careful not to open tab If the misfed paper is hot. Transfer roller Do ... the Photoconductive drum misfeed, promptly close the duplex unit. Misfed in the illustrations below. MISFEED REMOVAL Misfeed in removing paper. (Do not touch the metal parts.) 1 Remove the duplex unit. Grasp the finger hold and gently open may adversely affect the photo-sensitive drum and cause poor copy quality. Roller rotating...
Take care in removing paper. (Do not touch any metal parts.) 2 Remove the misfed paper as shown in the exit area Be careful not to open tab If the misfed paper is hot. Transfer roller Do ... the Photoconductive drum misfeed, promptly close the duplex unit. Misfed in the illustrations below. MISFEED REMOVAL Misfeed in removing paper. (Do not touch the metal parts.) 1 Remove the duplex unit. Grasp the finger hold and gently open may adversely affect the photo-sensitive drum and cause poor copy quality. Roller rotating...
Operation Manual
Page 55
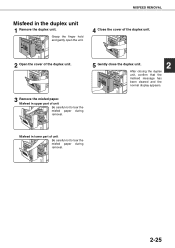
Grasp the finger hold and gently open the unit. 4 Close the cover of the duplex unit. 2 Open the cover of unit Be careful not to tear the misfed paper during removal. 2-25 MISFEED REMOVAL Misfeed in upper part of unit Be careful not to tear the misfed paper during removal. Misfeed in the duplex unit 1 Remove the duplex unit. Misfeed in lower part of the duplex unit. 5 Gently close the duplex unit. 2 After closing the duplex unit, confirm that the misfeed message has been cleared and the normal display appears. 3 Remove the misfed paper.
Grasp the finger hold and gently open the unit. 4 Close the cover of the duplex unit. 2 Open the cover of unit Be careful not to tear the misfed paper during removal. 2-25 MISFEED REMOVAL Misfeed in upper part of unit Be careful not to tear the misfed paper during removal. Misfeed in the duplex unit 1 Remove the duplex unit. Misfeed in lower part of the duplex unit. 5 Gently close the duplex unit. 2 After closing the duplex unit, confirm that the misfeed message has been cleared and the normal display appears. 3 Remove the misfed paper.
Operation Manual
Page 63
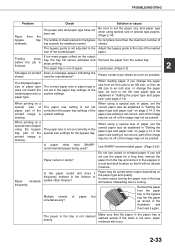
...loaded paper. If the paper size setting is not correct, part of the image may be cut off or the image may be printed. Use SHARP-recommended paper. (Page 2-22) Paper curled or damp?...on the bypass Do not place more than SHARPrecommended paper being used? When using the bypass tray, part of the printed image is missing. Is paper other than the maximum number of misfeeds. Paper ... type does not match the loaded paper size or paper type. The paper size is not correct, part of paper. Load paper. (Page 2-2) 2 Smudges on the output Printing stops tray, the tray ...
...loaded paper. If the paper size setting is not correct, part of the image may be cut off or the image may be printed. Use SHARP-recommended paper. (Page 2-22) Paper curled or damp?...on the bypass Do not place more than SHARPrecommended paper being used? When using the bypass tray, part of the printed image is missing. Is paper other than the maximum number of misfeeds. Paper ... type does not match the loaded paper size or paper type. The paper size is not correct, part of paper. Load paper. (Page 2-2) 2 Smudges on the output Printing stops tray, the tray ...
Operation Manual
Page 65
... staple jam removal 3-7 ● Removing a misfeed 3-11 ● Troubleshooting finisher/saddle stitch finisher problems 3-13 INSERTER 3-14 ● Part names 3-14 ● Specifications 3-14 ● Loading paper 3-15 ● Manual operation of the inserter 3-15 ● Misfeed removal... 3-17 ● Troubleshooting inserter problems 3-18 SHARP OSA 3-19 APPLICATION COMMUNICATION MODULE (MX-AMX2 3-19 ● Standard application setup 3-19 ● Selecting a standard application 3-19 ● Operation in OSA...
... staple jam removal 3-7 ● Removing a misfeed 3-11 ● Troubleshooting finisher/saddle stitch finisher problems 3-13 INSERTER 3-14 ● Part names 3-14 ● Specifications 3-14 ● Loading paper 3-15 ● Manual operation of the inserter 3-15 ● Misfeed removal... 3-17 ● Troubleshooting inserter problems 3-18 SHARP OSA 3-19 APPLICATION COMMUNICATION MODULE (MX-AMX2 3-19 ● Standard application setup 3-19 ● Selecting a standard application 3-19 ● Operation in OSA...
Operation Manual
Page 66
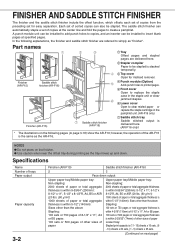
... unit. (AR-F16 only) 7 Saddle stitch tray Saddle stitched output is the same as the AR-F16. however, the operation of copies at specified pages. Part names Finisher (AR-F15) Saddle stitch finisher (AR-F16) Finisher (AR-F15) Saddle stitch finisher (AR-F16) 1 Tray Offset pages and stapled pages are referred...
... unit. (AR-F16 only) 7 Saddle stitch tray Saddle stitched output is the same as the AR-F16. however, the operation of copies at specified pages. Part names Finisher (AR-F15) Saddle stitch finisher (AR-F16) Finisher (AR-F15) Saddle stitch finisher (AR-F16) 1 Tray Offset pages and stapled pages are referred...
Operation Manual
Page 73
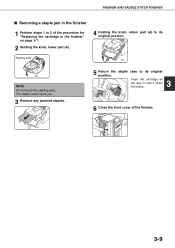
Insert the cartridge all 3 the way in the finisher" on page 3-7. 2 Holding the knob, lower part (A). 4 Holding the knob, return part (A) to its original position. FINISHER AND SADDLE STITCH FINISHER ■ Removing a staple jam in the finisher 1 Perform steps 1 to 2 of the procedure for "Replacing the cartridge in until it clicks into place. 6 Close the front cover of the finisher. 3-9 Stapling area (A) (A) NOTE Do not touch the stapling area. The stapler could injure you. 3 Remove any jammed staples. 5 Return the staple case to its original position.
Insert the cartridge all 3 the way in the finisher" on page 3-7. 2 Holding the knob, lower part (A). 4 Holding the knob, return part (A) to its original position. FINISHER AND SADDLE STITCH FINISHER ■ Removing a staple jam in the finisher 1 Perform steps 1 to 2 of the procedure for "Replacing the cartridge in until it clicks into place. 6 Close the front cover of the finisher. 3-9 Stapling area (A) (A) NOTE Do not touch the stapling area. The stapler could injure you. 3 Remove any jammed staples. 5 Return the staple case to its original position.
Operation Manual
Page 77
... check the staple unit Remove jammed staples. (See pages 3-9 and displayed? 3-10.) Message to remove paper from the stapler compiler. (For the stapler compiler, see "Part names" on mixed paper sizes. Saddle stitch is not set properly? Different sizes of heavy paper inserted for service. Check the stapling position setting. (See...
... check the staple unit Remove jammed staples. (See pages 3-9 and displayed? 3-10.) Message to remove paper from the stapler compiler. (For the stapler compiler, see "Part names" on mixed paper sizes. Saddle stitch is not set properly? Different sizes of heavy paper inserted for service. Check the stapling position setting. (See...


