Operating Guide
Page 36
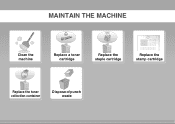
MAINTAIN THE MACHINE Clean the machine Replace a toner cartridge Replace the staple cartridge Replace the stamp cartridge Replace the toner collection container Dispose of punch waste
MAINTAIN THE MACHINE Clean the machine Replace a toner cartridge Replace the staple cartridge Replace the stamp cartridge Replace the toner collection container Dispose of punch waste
Operating Guide
Page 43
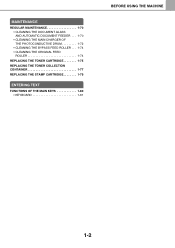
MAINTENANCE REGULAR MAINTENANCE 1-70 • CLEANING THE DOCUMENT GLASS AND AUTOMATIC DOCUMENT FEEDER . . . 1-70 • CLEANING THE MAIN CHARGER OF THE PHOTOCONDUCTIVE DRUM 1-72 • CLEANING THE BYPASS FEED ROLLER . . . 1-74 • CLEANING THE ORIGINAL FEED ROLLER 1-74 REPLACING THE TONER CARTRIDGE 1-75 REPLACING THE TONER COLLECTION CONTAINER 1-77 REPLACING THE STAMP CARTRIDGE 1-79 ENTERING TEXT FUNCTIONS OF THE MAIN KEYS 1-80 • KEYBOARD 1-81 BEFORE USING THE MACHINE 1-2
MAINTENANCE REGULAR MAINTENANCE 1-70 • CLEANING THE DOCUMENT GLASS AND AUTOMATIC DOCUMENT FEEDER . . . 1-70 • CLEANING THE MAIN CHARGER OF THE PHOTOCONDUCTIVE DRUM 1-72 • CLEANING THE BYPASS FEED ROLLER . . . 1-74 • CLEANING THE ORIGINAL FEED ROLLER 1-74 REPLACING THE TONER CARTRIDGE 1-75 REPLACING THE TONER COLLECTION CONTAINER 1-77 REPLACING THE STAMP CARTRIDGE 1-79 ENTERING TEXT FUNCTIONS OF THE MAIN KEYS 1-80 • KEYBOARD 1-81 BEFORE USING THE MACHINE 1-2
Operating Guide
Page 45
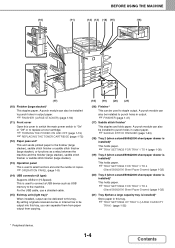
... can also be delivered to this cover to switch the main power switch to "On" or "Off" or to replace a toner cartridge. + TURNING THE POWER ON AND OFF (page 1-15) + REPLACING THE TONER CARTRIDGE (page 1-75) (12) Paper pass unit* This unit sends printed paper to the finisher (large stacker), saddle stitch...
... can also be delivered to this cover to switch the main power switch to "On" or "Off" or to replace a toner cartridge. + TURNING THE POWER ON AND OFF (page 1-15) + REPLACING THE TONER CARTRIDGE (page 1-75) (12) Paper pass unit* This unit sends printed paper to the finisher (large stacker), saddle stitch...
Operating Guide
Page 46
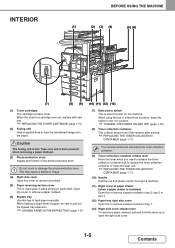
... When using the fax or Internet fax functions, keep this switch in a cartridge runs out, replace with new one. + REPLACING THE TONER CARTRIDGE (page 1-75) (2) Fusing unit Heat is applied here to remove a misfeed. (5) Paper reversing section cover This is used to... onto the paper. Caution The fusing unit is performed. INTERIOR BEFORE USING THE MACHINE (1) (2) (3) (4) (5) (6) (7) (8) (9) (1) Toner cartridges This cartridge contains toner. This may cause a defective image. (4) Right side cover Open this tray to open the right side cover. 1-5 Contents Do not touch...
... When using the fax or Internet fax functions, keep this switch in a cartridge runs out, replace with new one. + REPLACING THE TONER CARTRIDGE (page 1-75) (2) Fusing unit Heat is applied here to remove a misfeed. (5) Paper reversing section cover This is used to... onto the paper. Caution The fusing unit is performed. INTERIOR BEFORE USING THE MACHINE (1) (2) (3) (4) (5) (6) (7) (8) (9) (1) Toner cartridges This cartridge contains toner. This may cause a defective image. (4) Right side cover Open this tray to open the right side cover. 1-5 Contents Do not touch...
Operating Guide
Page 70
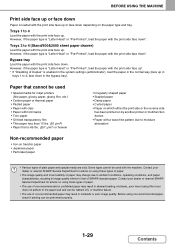
... check if printing can be used • Special media for advice on using these types of paper. • The image quality and toner fusibility of SHARP standard paper. Before using these types of paper. • The use of non-recommended or prohibited paper may result in skewed feeding, misfeeds..., poor toner fusing (the toner does not adhere to the paper well and can be performed properly. 1-29 Contents face down . Paper that ...
... check if printing can be used • Special media for advice on using these types of paper. • The image quality and toner fusibility of SHARP standard paper. Before using these types of paper. • The use of non-recommended or prohibited paper may result in skewed feeding, misfeeds..., poor toner fusing (the toner does not adhere to the paper well and can be performed properly. 1-29 Contents face down . Paper that ...

Operating Guide
Page 80
... not guaranteed on both sides of an envelope. For more information, consult a qualified service technician. • Some operating environments may cause creasing, smudging, misfeeds, poor toner fusing, or machine failure. • Do not use the following envelopes: Envelopes with an incorrectly aligned corner gluing position on the back cannot be used...
... not guaranteed on both sides of an envelope. For more information, consult a qualified service technician. • Some operating environments may cause creasing, smudging, misfeeds, poor toner fusing, or machine failure. • Do not use the following envelopes: Envelopes with an incorrectly aligned corner gluing position on the back cannot be used...

Operating Guide
Page 85
... hinges supporting the automatic document feeder will release and the rear side of the automatic document feeder will be copied black, causing excessive use of toner. 3 Placing a thick book When scanning a thick book or other thick original, follow the steps below to close it . • Take care that your fingers are...
... hinges supporting the automatic document feeder will release and the rear side of the automatic document feeder will be copied black, causing excessive use of toner. 3 Placing a thick book When scanning a thick book or other thick original, follow the steps below to close it . • Take care that your fingers are...

Operating Guide
Page 111
... is stored in the automatic document feeder. Warning Do not use thinner, benzene, or similar volatile cleaning agents to clean the machine and replace the toner cartridge and the toner collection container.
... is stored in the automatic document feeder. Warning Do not use thinner, benzene, or similar volatile cleaning agents to clean the machine and replace the toner cartridge and the toner collection container.
Operating Guide
Page 113
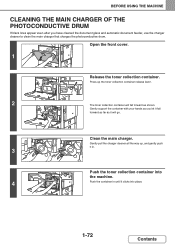
Gently pull the charger cleaner all the way up the toner collection container release lever. 2 The toner collection container will go. Clean the main charger. Press up , and gently push it in. 3 Push the toner collection container into the machine. 4 Push the container in until it will fall... forward as far as it clicks into place. 1-72 Contents Open the front cover. 1 Release the toner collection container. BEFORE USING THE MACHINE CLEANING THE MAIN CHARGER OF THE PHOTOCONDUCTIVE DRUM If black lines appear even after you let it fall ...
Gently pull the charger cleaner all the way up the toner collection container release lever. 2 The toner collection container will go. Clean the main charger. Press up , and gently push it in. 3 Push the toner collection container into the machine. 4 Push the container in until it will fall... forward as far as it clicks into place. 1-72 Contents Open the front cover. 1 Release the toner collection container. BEFORE USING THE MACHINE CLEANING THE MAIN CHARGER OF THE PHOTOCONDUCTIVE DRUM If black lines appear even after you let it fall ...
Operating Guide
Page 116
... and keep one set of the machine. 1-75 Contents Caution • Do not throw a toner cartridge into a fire. Be sure to scan for replacement. • Depending on their side. • If a toner cartridge other than a SHARP-recommended toner cartridge is used, the machine may harden and become faint or the image blurred. Your service...
... and keep one set of the machine. 1-75 Contents Caution • Do not throw a toner cartridge into a fire. Be sure to scan for replacement. • Depending on their side. • If a toner cartridge other than a SHARP-recommended toner cartridge is used, the machine may harden and become faint or the image blurred. Your service...

Operating Guide
Page 117
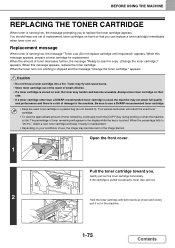
After the toner cartridge is occurring.. 1-76 Contents BEFORE USING THE MACHINE Take out a new toner cartridge from its package and shake it five or six times. 3 Slowly insert the new toner cartridge on the level. 4 Push the cartridge in until it locks securely in place. 5 Keep pushing in the cartridge until it clicks into place. . Close the front cover. Do not open the front cover 6 while this is replaced, the machine automatically enters image adjustment mode.
After the toner cartridge is occurring.. 1-76 Contents BEFORE USING THE MACHINE Take out a new toner cartridge from its package and shake it five or six times. 3 Slowly insert the new toner cartridge on the level. 4 Push the cartridge in until it locks securely in place. 5 Keep pushing in the cartridge until it clicks into place. . Close the front cover. Do not open the front cover 6 while this is replaced, the machine automatically enters image adjustment mode.
Operating Guide
Page 118
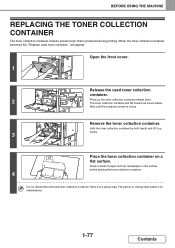
... container release lever. BEFORE USING THE MACHINE REPLACING THE TONER COLLECTION CONTAINER The toner collection container collects excess toner that is produced during printing. Place the toner collection container on the surface before placing the toner collection container. 4 Do not discard the removed toner collection container. will fall forward as newspaper on a flat surface. Store it...
... container release lever. BEFORE USING THE MACHINE REPLACING THE TONER COLLECTION CONTAINER The toner collection container collects excess toner that is produced during printing. Place the toner collection container on the surface before placing the toner collection container. 4 Do not discard the removed toner collection container. will fall forward as newspaper on a flat surface. Store it...

Operating Guide
Page 119
...the direction you removed it in.) 7 Push the toner collection container into the machine. 8 Push the container in step 5 to the side of the toner collection box. 5 Remove carefully, taking care that your clothes are not soiled by toner. BEFORE USING THE MACHINE Remote the cover that ...is attached to the toner collection opening. 6 When attaching the cover, take care that toner does not spill. Close the front cover. 9 1-78 Contents Attach the ...
...the direction you removed it in.) 7 Push the toner collection container into the machine. 8 Push the container in step 5 to the side of the toner collection box. 5 Remove carefully, taking care that your clothes are not soiled by toner. BEFORE USING THE MACHINE Remote the cover that ...is attached to the toner collection opening. 6 When attaching the cover, take care that toner does not spill. Close the front cover. 9 1-78 Contents Attach the ...

Operating Guide
Page 136
Color Mode Special Modes Check the paper to be copied black, causing excessive use of toner. In this event, change the paper (tray), touch the [Paper Select] key. + PAPER TRAYS (page 2-11) Quick File 2 Copy Ratio Original Paper Select 100% Auto 8&#...
Color Mode Special Modes Check the paper to be copied black, causing excessive use of toner. In this event, change the paper (tray), touch the [Paper Select] key. + PAPER TRAYS (page 2-11) Quick File 2 Copy Ratio Original Paper Select 100% Auto 8&#...

Operating Guide
Page 140
... 2-SIDED COPYING USING THE DOCUMENT GLASS Originals Copies COPIER Automatic 2-sided copying of the document size. Closing the automatic document feeder with the tip of toner. Copy Ratio 100% Original Auto 8½x11 Paper Select Auto 8½x11 Plain Preview 2-18 Contents Color Mode Full Color Exposure 2 Auto 1. 8½x11 2. 8½...
... 2-SIDED COPYING USING THE DOCUMENT GLASS Originals Copies COPIER Automatic 2-sided copying of the document size. Closing the automatic document feeder with the tip of toner. Copy Ratio 100% Original Auto 8½x11 Paper Select Auto 8½x11 Plain Preview 2-18 Contents Color Mode Full Color Exposure 2 Auto 1. 8½x11 2. 8½...

Operating Guide
Page 160
BEFORE USING THE MACHINE". After placing the original, be copied black, causing excessive use of toner. Place paper in the bypass tray). 2 When loading a large sheet of the loaded paper will be sure to close the automatic document feeder. Copy Ratio ...
BEFORE USING THE MACHINE". After placing the original, be copied black, causing excessive use of toner. Place paper in the bypass tray). 2 When loading a large sheet of the loaded paper will be sure to close the automatic document feeder. Copy Ratio ...

Operating Guide
Page 237
... and press the [BLACK & WHITE START] key. Place the original face up in a copy to reduce toner consumption. Press the [STOP] key ( ). 2-115 Contents Originals with large black areas (which use a large amount of toner) can only be copied using the document glass to the base screen of copy mode. If you...
... and press the [BLACK & WHITE START] key. Place the original face up in a copy to reduce toner consumption. Press the [STOP] key ( ). 2-115 Contents Originals with large black areas (which use a large amount of toner) can only be copied using the document glass to the base screen of copy mode. If you...
Operating Guide
Page 259
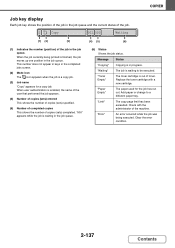
... the job is waiting in the job queue. This number does not appear in keys in progress. "Toner Empty" The toner cartridge is waiting to a different paper tray. Replace the toner cartridge with the administrator of toner. Clear the error condition. 2-137 Contents Check with a new cartridge. "Limit" The copy page limit has been...
... the job is waiting in the job queue. This number does not appear in keys in progress. "Toner Empty" The toner cartridge is waiting to a different paper tray. Replace the toner cartridge with the administrator of toner. Clear the error condition. 2-137 Contents Check with a new cartridge. "Limit" The copy page limit has been...
Operating Guide
Page 342
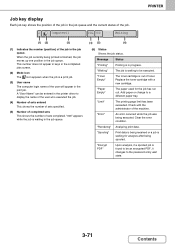
...number does not appear in keys in the completed jobs screen. (2) Mode icon The icon appears when the job is being spooled. Replace the toner cartridge with the administrator of the machine. "Error" An error occurred while the job was being printed is waiting to the password entry wait state... the number of the user will appear in the print job. Message Status "Printing" Printing is out of the job in the job queue. "Toner Empty" The toner cartridge is in the job queue. (4) (5) (6) (6) Status Shows the job status. PRINTER Job key display Each job key shows the position of ...
...number does not appear in keys in the completed jobs screen. (2) Mode icon The icon appears when the job is being spooled. Replace the toner cartridge with the administrator of the machine. "Error" An error occurred while the job was being printed is waiting to the password entry wait state... the number of the user will appear in the print job. Message Status "Printing" Printing is out of the job in the job queue. "Toner Empty" The toner cartridge is in the job queue. (4) (5) (6) (6) Status Shows the job status. PRINTER Job key display Each job key shows the position of ...

Operating Guide
Page 348
... Overlays Font PS Error Information PS Pass-Through Line Width Settings Tab Paper Settings Tandem Print Text To Black Vector To Black Toner Save Document Control Disable Blank Page Print Sharpness Screening Input Resolution Shade Pattern Spool Data Format Printable Area Duplex Style Line Width Unit Minimum Line Width Driver Setting Priority...
... Overlays Font PS Error Information PS Pass-Through Line Width Settings Tab Paper Settings Tandem Print Text To Black Vector To Black Toner Save Document Control Disable Blank Page Print Sharpness Screening Input Resolution Shade Pattern Spool Data Format Printable Area Duplex Style Line Width Unit Minimum Line Width Driver Setting Priority...


