MX-M350N Drum - Sharp
MX-M350N Drum

Related Manual Pages


Similar Questions

Drum Reset
How do I manually reset an Sharp AL 1631 copier. Put in nedw drum and keeps saying needs new
How do I manually reset an Sharp AL 1631 copier. Put in nedw drum and keeps saying needs new
(Posted by lschool 9 years ago)

Drum Unit
while dusting my drum unit as directed a mesh screen blew out of the unit. where does it go can I pu...
while dusting my drum unit as directed a mesh screen blew out of the unit. where does it go can I pu...
(Posted by jeffashleymdinfo 12 years ago)

Could My Drum Be Bad.
I have installed a brand new toner but the print is still very light. Could this be a drum problem. ...
I have installed a brand new toner but the print is still very light. Could this be a drum problem. ...
(Posted by mrluckytattoo 13 years ago)
Related Terms
The following terms were also used when searching for MX-M350N Drum - Sharp:- default password for mx m350n
- download driver for mx-m350n
- driver mx-m350n
- driver sharp mx-m350n
- mx m350n
- mx m350n cartridge
- mx m350n copier
- mx m350n copier manual
- mx m350n cost
- mx m350n default admin password
- mx m350n default password
- mx m350n developer
- mx m350n download
- mx m350n drive wipe
- mx m350n driver
- mx m350n driver download
- mx m350n driver download for windows 8
- mx m350n driver for windows 7
- mx m350n drivers
- mx m350n fax
- mx m350n fax manual
- mx m350n how to scan double sided
- mx m350n instructions how to scan
- mx m350n mac driver
- mx m350n manual
- mx m350n off hook
- mx m350n password
- mx m350n pcl5e driver
- mx m350n pcl6
- mx m350n pcl6 download
- mx m350n pcl6 driver
- mx m350n pdf
- mx m350n price
- mx m350n printer
- mx m350n printer driver
- mx m350n problems
- mx m350n scan settings
- mx m350n scanner
- mx m350n sharp
- mx m350n sharp default password
- mx m350n sharp driver
- mx m350n software
- mx m350n software download
- mx m350n staples
- mx m350n to
- mx m350n toner
- mx m350n toner cartridge
- mx m350n user manual
- mx m350n windows 7 driver
- mx m350n windows 8
- mx m350n windows xp driver
- mx-m350n
- mx-m350n 32 bit driver
- mx-m350n admin password
- mx-m350n black toner
- mx-m350n ce-03
- mx-m350n copier
- mx-m350n default admin password
- mx-m350n default password
- mx-m350n default username and password
- mx-m350n default username password
- mx-m350n driver
- mx-m350n driver download
- mx-m350n driver for windows xp
- mx-m350n driver mac
- mx-m350n driver windows 10
- mx-m350n driver windows 2003
- mx-m350n driver windows 7
- mx-m350n driver windows 8
- mx-m350n driver windows xp
- mx-m350n driver xp
- mx-m350n drivers
- mx-m350n drum
- mx-m350n error codes
- mx-m350n fax
- mx-m350n fax driver
- mx-m350n fax manual
- mx-m350n fax unit
- mx-m350n firmware
- mx-m350n fuser
- mx-m350n image send manual
- mx-m350n mac driver
- mx-m350n manual
- mx-m350n manual pdf
- mx-m350n network settings
- mx-m350n operation manual
- mx-m350n password
- mx-m350n pcl 6 driver
- mx-m350n pcl5e driver
- mx-m350n pcl6
- mx-m350n pcl6 driver
- mx-m350n pdf
- mx-m350n price
- mx-m350n printer
- mx-m350n printer driver
- mx-m350n printer drivers
- mx-m350n problems
- mx-m350n scan to desktop
- mx-m350n scan to email
- mx-m350n scan to email setup
- mx-m350n scan to folder
- mx-m350n scan to network folder
- mx-m350n scanner
- mx-m350n scanner driver
- mx-m350n service manual
- mx-m350n sharp
- mx-m350n sharp driver
- mx-m350n sharp manual
- mx-m350n software
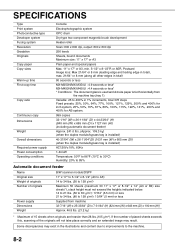
- mx-m350n specifications
- mx-m350n staples
- mx-m350n toner
- mx-m350n toner cartridge
- mx-m350n user guide
- mx-m350n user manual
- mx-m350n user name
- mx-m350n web password
- mx-m350n windows 10 driver
- mx-m350n windows 7 driver
- mx-m350n windows 7 drivers
- mx-m350n xp drivers
- mxm350n
- mxm350n default password
- mxm350n developer
- mxm350n driver
- mxm350n drum
- mxm350n manual
- mxm350n sharp
- mxm350n sharp driver for mac
- mxm350n sharp driver mac
- mxm350n toner
- sharp copier mx-m350n
- sharp copier mxm350n
- sharp mx m350n
- sharp mx m350n cartridge
- sharp mx m350n copier
- sharp mx m350n cost
- sharp mx m350n default admin password
- sharp mx m350n default password
- sharp mx m350n download
- sharp mx m350n drive wipe
- sharp mx m350n driver
- sharp mx m350n driver download
- sharp mx m350n driver download for windows 8
- sharp mx m350n driver for windows 7
- sharp mx m350n drivers
- sharp mx m350n error codes
- sharp mx m350n fax
- sharp mx m350n fax manual
- sharp mx m350n how to scan double sided
- sharp mx m350n instructions how to scan
- sharp mx m350n mac driver
- sharp mx m350n manual
- sharp mx m350n off hook
- sharp mx m350n pcl5e driver
- sharp mx m350n pcl6
- sharp mx m350n pcl6 download
- sharp mx m350n pcl6 driver
- sharp mx m350n price
- sharp mx m350n printer
- sharp mx m350n printer driver
- sharp mx m350n scan settings
- sharp mx m350n software
- sharp mx m350n software download
- sharp mx m350n to
- sharp mx m350n toner
- sharp mx m350n toner cartridge
- sharp mx m350n user manual
- sharp mx m350n windows 7 driver
- sharp mx m350n windows 8
- sharp mx m350n windows xp driver
- sharp mx m350u
- sharp mx-m350n
- sharp mx-m350n 32 bit driver
- sharp mx-m350n admin password
- sharp mx-m350n black toner
- sharp mx-m350n copier
- sharp mx-m350n default admin password
- sharp mx-m350n default password
- sharp mx-m350n default username password
- sharp mx-m350n driver
- sharp mx-m350n driver download
- sharp mx-m350n driver for windows xp
- sharp mx-m350n driver mac
- sharp mx-m350n driver windows 10
- sharp mx-m350n driver windows 7
- sharp mx-m350n driver windows 8
- sharp mx-m350n driver windows xp
- sharp mx-m350n driver xp
- sharp mx-m350n drivers
- sharp mx-m350n error codes
- sharp mx-m350n fax
- sharp mx-m350n fax driver
- sharp mx-m350n fax manual
- sharp mx-m350n fax unit
- sharp mx-m350n image send manual
- sharp mx-m350n mac driver
- sharp mx-m350n manual
- sharp mx-m350n network settings
- sharp mx-m350n operation manual
- sharp mx-m350n password
- sharp mx-m350n pcl5e driver
- sharp mx-m350n pcl6
- sharp mx-m350n pcl6 driver
- sharp mx-m350n price
- sharp mx-m350n printer
- sharp mx-m350n printer driver
- sharp mx-m350n problems
- sharp mx-m350n scan to desktop
- sharp mx-m350n scan to email
- sharp mx-m350n scan to email setup
- sharp mx-m350n scan to network folder
- sharp mx-m350n scanner
- sharp mx-m350n scanner driver
- sharp mx-m350n service manual
- sharp mx-m350n software
- sharp mx-m350n specifications
- sharp mx-m350n toner
- sharp mx-m350n toner cartridge
- sharp mx-m350n user guide
- sharp mx-m350n user manual
- sharp mx-m350n windows 10 driver
- sharp mx-m350n windows 7 driver
- sharp mx-m350u
- sharp mxm350n
- sharp mxm350n copier
- sharp mxm350n driver
- sharp mxm350n manual
- sharp mxm350n staples
- sharp mxm350n toner
- specifications for mxm350n
- toner for mx-m350n
- toner for sharp mx-m350n
- toner for sharp mxm350n