
Operation Guide
Page 41
... supplies Proper storage 1. do not store it standing up , the toner may break down within the scope of the ordinary use only Sharp Genuine Supplies which normally exceed the life of production. Storage of Sharp products. Consumables too, are available for 7 years following the termination ... product, whereas those parts of the machine which may solidify inside the cartridge. Staple cartridge The finisher requires the following staple cartridge: MX-SCX1 (for finisher) Approx. 5000 per cartridge x 3 cartridges Supply of spare parts and consumables The supply of spare parts for ...
... supplies Proper storage 1. do not store it standing up , the toner may break down within the scope of the ordinary use only Sharp Genuine Supplies which normally exceed the life of production. Storage of Sharp products. Consumables too, are available for 7 years following the termination ... product, whereas those parts of the machine which may solidify inside the cartridge. Staple cartridge The finisher requires the following staple cartridge: MX-SCX1 (for finisher) Approx. 5000 per cartridge x 3 cartridges Supply of spare parts and consumables The supply of spare parts for ...

Operation Guide
Page 43
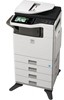
BEFORE USING THE MACHINE REPLACING SUPPLIES AND MAINTENANCE REPLACING THE TONER CARTRIDGES 1-49 REPLACING THE TONER COLLECTION CONTAINER 1-52 REPLACING THE DEVELOPER CARTRIDGE / DRUM CARTRIDGE 1-55 • REPLACING THE DEVELOPER CARTRIDGE 1-55 • REPLACING THE DRUM CARTRIDGE. . . . . . 1-59 • REPLACING THE ...
BEFORE USING THE MACHINE REPLACING SUPPLIES AND MAINTENANCE REPLACING THE TONER CARTRIDGES 1-49 REPLACING THE TONER COLLECTION CONTAINER 1-52 REPLACING THE DEVELOPER CARTRIDGE / DRUM CARTRIDGE 1-55 • REPLACING THE DEVELOPER CARTRIDGE 1-55 • REPLACING THE DRUM CARTRIDGE. . . . . . 1-59 • REPLACING THE ...

Operation Guide
Page 44
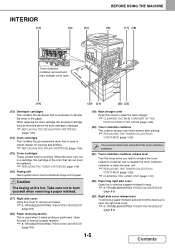
... loading paper larger than 8-1/2" x 11" or A4, be automatically scanned. ☞ PLACING THE ORIGINAL (page 1-36) (2) Front cover Open this cover to replace a toner cartridge. ☞ REPLACING THE TONER CARTRIDGES (page 1-49) (3) Operation panel This is used to power on each side firm (9) Bypass tray Use this chapter before using the fax...
... loading paper larger than 8-1/2" x 11" or A4, be automatically scanned. ☞ PLACING THE ORIGINAL (page 1-36) (2) Front cover Open this cover to replace a toner cartridge. ☞ REPLACING THE TONER CARTRIDGES (page 1-49) (3) Operation panel This is used to power on each side firm (9) Bypass tray Use this chapter before using the fax...
Operation Guide
Page 46
...page 1-49) (16) Fusing unit Heat is hot. Caution The fusing unit is applied here to fuse the transferred image onto the paper. When the toner runs out in trays. ☞ 8. When replacing the drum cartridge, the developer cartridge must be removed before the drum cartridge is replaced. ☞ ... and main charger cover open (19) (20) (21) (22) (23) (13) Developer cartridges This contains the developer that is necessary to transfer the toner to open the right side cover. ☞ 8. Take care not to burn yourself when removing a paper misfeed. (17) Right side cover Open this lever ...
...page 1-49) (16) Fusing unit Heat is hot. Caution The fusing unit is applied here to fuse the transferred image onto the paper. When the toner runs out in trays. ☞ 8. When replacing the drum cartridge, the developer cartridge must be removed before the drum cartridge is replaced. ☞ ... and main charger cover open (19) (20) (21) (22) (23) (13) Developer cartridges This contains the developer that is necessary to transfer the toner to open the right side cover. ☞ 8. Take care not to burn yourself when removing a paper misfeed. (17) Right side cover Open this lever ...
Operation Guide
Page 70
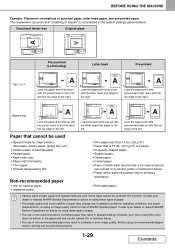
...pattern due to moisture absorption • Perforated paper • Various types of plain paper and special media are sold. Contact your dealer or nearest SHARP Service Department for inkjet printers (fine paper, glossy paper, glossy film, etc.) • Carbon paper or thermal paper • Pasted paper •...using these types of paper. • The use of non-recommended or prohibited paper may result in skewed feeding, misfeeds, poor toner fusing (the toner does not adhere to that is not enabled in image quality inferior to the paper well and can be used • Special media...
...pattern due to moisture absorption • Perforated paper • Various types of plain paper and special media are sold. Contact your dealer or nearest SHARP Service Department for inkjet printers (fine paper, glossy paper, glossy film, etc.) • Carbon paper or thermal paper • Pasted paper •...using these types of paper. • The use of non-recommended or prohibited paper may result in skewed feeding, misfeeds, poor toner fusing (the toner does not adhere to that is not enabled in image quality inferior to the paper well and can be used • Special media...

Operation Guide
Page 76
... loading envelopes, load one envelope at a time. • Do not print on both sides of thickness, such as creasing may cause creasing, smudging, misfeeds, poor toner fusing, or machine failure. Can be used as on .
... loading envelopes, load one envelope at a time. • Do not print on both sides of thickness, such as creasing may cause creasing, smudging, misfeeds, poor toner fusing, or machine failure. Can be used as on .

Operation Guide
Page 79
..." (page 5-49) Open the automatic document feeder. 1 Place the original. Place the original face down in the left center position. If left center position of toner. 3 1-38 Contents Document glass scale mark 2 5-1/2" x 8-1/2" (A5) B5 8-1/2" x 11" (A4) All originals should be sure to place the original on the document glass. Close the...
..." (page 5-49) Open the automatic document feeder. 1 Place the original. Place the original face down in the left center position. If left center position of toner. 3 1-38 Contents Document glass scale mark 2 5-1/2" x 8-1/2" (A5) B5 8-1/2" x 11" (A4) All originals should be sure to place the original on the document glass. Close the...

Operation Guide
Page 90
...copy. ( Change the toner cartridge.) When the message appears in ( ). Change the toner cartridge. ( ) OK Colors that are running low or have run out of toner are indicated in the message display, replace the toner cartridge for replacing supplies such as toner and staple cartridges and ...routine maintenance. REPLACING THE TONER CARTRIDGES Be sure to use the machine without replacing the cartridge...
...copy. ( Change the toner cartridge.) When the message appears in ( ). Change the toner cartridge. ( ) OK Colors that are running low or have run out of toner are indicated in the message display, replace the toner cartridge for replacing supplies such as toner and staple cartridges and ...routine maintenance. REPLACING THE TONER CARTRIDGES Be sure to use the machine without replacing the cartridge...
Operation Guide
Page 91
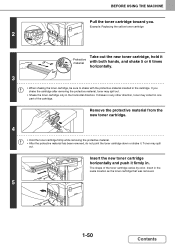
... • After the protective material has been removed, do not point the toner cartridge down or shake it Protective material with both hands, and shake 5 or 6 times horizontally. 3 • When shaking the toner cartridge, be sure to shake with the protective material inserted in the cartridge.... The shape of the cartridge. If you . Example: Replacing the yellow toner cartridge 2 Take out the new toner cartridge, hold it . If shaken in any other direction, toner may spill out. Insert the new toner cartridge horizontally and push it firmly in the same location as the...
... • After the protective material has been removed, do not point the toner cartridge down or shake it Protective material with both hands, and shake 5 or 6 times horizontally. 3 • When shaking the toner cartridge, be sure to shake with the protective material inserted in the cartridge.... The shape of the cartridge. If you . Example: Replacing the yellow toner cartridge 2 Take out the new toner cartridge, hold it . If shaken in any other direction, toner may spill out. Insert the new toner cartridge horizontally and push it firmly in the same location as the...

Operation Guide
Page 92
... cover. Caution • Do not throw a toner cartridge into a fire. do not discard it ready for replacement. When the remaining toner falls to "25-0%", colors in the cartridge to use a SHARP-recommended toner cartridge. • Keep the used toner cartridge in a plastic bag (do not store ...it standing up , the toner may be faint or partially missing when an original...
... cover. Caution • Do not throw a toner cartridge into a fire. do not discard it ready for replacement. When the remaining toner falls to "25-0%", colors in the cartridge to use a SHARP-recommended toner cartridge. • Keep the used toner cartridge in a plastic bag (do not store ...it standing up , the toner may be faint or partially missing when an original...

Operation Guide
Page 93
... on and around the machine to replace the toner collection container. will appear. Follow the procedure below to replace the transfer unit. Open the front cover. 1 Release the used toner container." Toner may spill when the toner collection container is produced during printing. Grasp the... top right of the toner collection container with your right hand and support the bottom left with your left...
... on and around the machine to replace the toner collection container. will appear. Follow the procedure below to replace the transfer unit. Open the front cover. 1 Release the used toner container." Toner may spill when the toner collection container is produced during printing. Grasp the... top right of the toner collection container with your right hand and support the bottom left with your left...

Operation Guide
Page 94
... hands and lift it in place. Caution • Do not throw the toner collection container into a fire. Toner may fly and cause burns. • Store the toner collection container out of the reach of the toner collection container is correctly in a plastic bag and keep it until it stops..., it will not be possible to remove it .) Turn the lock lever on the toner collection container to the left . BEFORE USING THE MACHINE Remove the toner collection container. 3 • If the toner collection container is installed correctly. Close the front cover. 6 Take care that the top...
... hands and lift it in place. Caution • Do not throw the toner collection container into a fire. Toner may fly and cause burns. • Store the toner collection container out of the reach of the toner collection container is correctly in a plastic bag and keep it until it stops..., it will not be possible to remove it .) Turn the lock lever on the toner collection container to the left . BEFORE USING THE MACHINE Remove the toner collection container. 3 • If the toner collection container is installed correctly. Close the front cover. 6 Take care that the top...

Operation Guide
Page 95
If you accidentally touch the toner, immediately wash your clothes. • Do not touch the part soiled with toner of the removed toner collection container. Take measures so that there will be no problem if toner spills on the machine, around the machine, or on your hands. 1-54 Contents BEFORE USING THE MACHINE • Toner may spill when the toner collection container is replaced.
If you accidentally touch the toner, immediately wash your clothes. • Do not touch the part soiled with toner of the removed toner collection container. Take measures so that there will be no problem if toner spills on the machine, around the machine, or on your hands. 1-54 Contents BEFORE USING THE MACHINE • Toner may spill when the toner collection container is replaced.
Operation Guide
Page 96
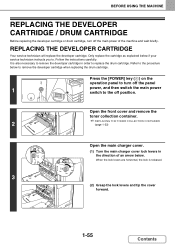
... carefully. It is released. 3 (2) Grasp the lock levers and tip the cover forward. 1-55 Contents Open the front cover and remove the toner collection container. 2 ☞ REPLACING THE TONER COLLECTION CONTAINER (page 1-52) Open the main charger cover. (1) Turn the main charger cover lock levers in order to replace the drum cartridge...
... carefully. It is released. 3 (2) Grasp the lock levers and tip the cover forward. 1-55 Contents Open the front cover and remove the toner collection container. 2 ☞ REPLACING THE TONER COLLECTION CONTAINER (page 1-52) Open the main charger cover. (1) Turn the main charger cover lock levers in order to replace the drum cartridge...

Operation Guide
Page 97
... your hand and completely remove the developer cartridge. • When removing the developer cartridge, grasp it with a new cartridge. • The seal must not be toner on the developer cartridge (3) (3) Pull the developer cartridge out (2) (2) 4 horizontally. In that case, replace the developer cartridge with both hands at the middle. • Try...
... your hand and completely remove the developer cartridge. • When removing the developer cartridge, grasp it with a new cartridge. • The seal must not be toner on the developer cartridge (3) (3) Pull the developer cartridge out (2) (2) 4 horizontally. In that case, replace the developer cartridge with both hands at the middle. • Try...

Operation Guide
Page 99
...power switch "ON" and press the [POWER] key ( ) on the operation panel to lock the cover. If you accidentally touch the toner, immediately wash your fingers are not pinched when closing the cover. Turn on the operation panel 13 power. When the lock levers are ...vertical, the cover is locked. 10 (2) 11 (1) Install the toner collection container. ☞ REPLACING THE TONER COLLECTION CONTAINER (page 1-52) Close the front cover. 12 Take care that it may soil your clothes or the immediate surroundings. ...
...power switch "ON" and press the [POWER] key ( ) on the operation panel to lock the cover. If you accidentally touch the toner, immediately wash your fingers are not pinched when closing the cover. Turn on the operation panel 13 power. When the lock levers are ...vertical, the cover is locked. 10 (2) 11 (1) Install the toner collection container. ☞ REPLACING THE TONER COLLECTION CONTAINER (page 1-52) Close the front cover. 12 Take care that it may soil your clothes or the immediate surroundings. ...
Operation Guide
Page 100
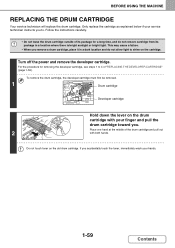
...allow light to . If you remove a drum cartridge, place it in a location where there is bright sunlight or bright light. Do not touch toner on the cartridge. Place one hand at the middle of the drum cartridge and pull out 2 with your finger and pull the drum cartridge toward... REPLACING THE DRUM CARTRIDGE Your service technician will replace the drum cartridge. This may cause a failure. • When you accidentally touch the toner, immediately wash your service technician instructs you . Only replace the cartridge as explained below if your hands. 1-59 Contents
...allow light to . If you remove a drum cartridge, place it in a location where there is bright sunlight or bright light. Do not touch toner on the cartridge. Place one hand at the middle of the drum cartridge and pull out 2 with your finger and pull the drum cartridge toward... REPLACING THE DRUM CARTRIDGE Your service technician will replace the drum cartridge. This may cause a failure. • When you accidentally touch the toner, immediately wash your service technician instructs you . Only replace the cartridge as explained below if your hands. 1-59 Contents
Operation Guide
Page 101
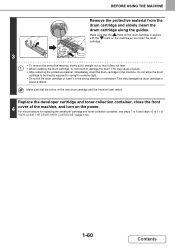
...Do not allow the drum cartridge to be directly exposed to 11 of the machine, and turn on the power. Replace the developer cartridge and toner collection container, close the front 4 cover of "REPLACING THE DEVELOPER CARTRIDGE" (page 1-55). 1-60 Contents BEFORE USING THE MACHINE Remove the ...protective material from the drum cartridge and slowly insert the drum cartridge along the guides. For the procedure for replacing the developer cartridge and toner collection container, see steps 7 to 8 and steps 10 to sunlight or electric light. • Do not tilt the drum cartridge or...
...Do not allow the drum cartridge to be directly exposed to 11 of the machine, and turn on the power. Replace the developer cartridge and toner collection container, close the front 4 cover of "REPLACING THE DEVELOPER CARTRIDGE" (page 1-55). 1-60 Contents BEFORE USING THE MACHINE Remove the ...protective material from the drum cartridge and slowly insert the drum cartridge along the guides. For the procedure for replacing the developer cartridge and toner collection container, see steps 7 to 8 and steps 10 to sunlight or electric light. • Do not tilt the drum cartridge or...

Operation Guide
Page 106
Open the front cover and remove the toner collection container. 2 ☞ REPLACING THE TONER COLLECTION CONTAINER (page 1-52) Release the lock levers and open the main charger cover. 3 ☞ REPLACING THE DEVELOPER CARTRIDGE (page 1-55) (1) 4 (A) Remove the charger cleaner. (1) ...
Open the front cover and remove the toner collection container. 2 ☞ REPLACING THE TONER COLLECTION CONTAINER (page 1-52) Release the lock levers and open the main charger cover. 3 ☞ REPLACING THE DEVELOPER CARTRIDGE (page 1-55) (1) 4 (A) Remove the charger cleaner. (1) ...

Operation Guide
Page 107
... the main charger cover and rotate the lock levers in the direction of the arrows to be cleaned by the charger cleaner are indicated by toner. • Clean with each of the other than cleaning the main charger. Repeat step 5 with the mark ( ) on the charger cleaner facing down on the...
... the main charger cover and rotate the lock levers in the direction of the arrows to be cleaned by the charger cleaner are indicated by toner. • Clean with each of the other than cleaning the main charger. Repeat step 5 with the mark ( ) on the charger cleaner facing down on the...


