
Operation Guide
Page 41
...the wrapper may break down within the scope of the ordinary use only SHARP-specified products for the toner cartridges, finisher staple cartridge, and transparency film. Staple cartridge The finisher requires the following staple cartridge: MX-SCX1 (for finisher) Approx. 5000 per cartridge x 3 cartridges Supply .... SUPPLIES Standard supplies for this product that is cooler than 40°C (104°F). Store the toner in paper misfeeds. Spare parts are those parts of Sharp products. Store paper in a hot location may solidify inside the cartridge. Paper stored in the cartridge to...
...the wrapper may break down within the scope of the ordinary use only SHARP-specified products for the toner cartridges, finisher staple cartridge, and transparency film. Staple cartridge The finisher requires the following staple cartridge: MX-SCX1 (for finisher) Approx. 5000 per cartridge x 3 cartridges Supply .... SUPPLIES Standard supplies for this product that is cooler than 40°C (104°F). Store the toner in paper misfeeds. Spare parts are those parts of Sharp products. Store paper in a hot location may solidify inside the cartridge. Paper stored in the cartridge to...

Operation Guide
Page 43
BEFORE USING THE MACHINE REPLACING SUPPLIES AND MAINTENANCE REPLACING THE TONER CARTRIDGES 1-49 REPLACING THE TONER COLLECTION CONTAINER 1-52 REPLACING THE DEVELOPER CARTRIDGE / DRUM CARTRIDGE 1-55 • REPLACING THE DEVELOPER CARTRIDGE 1-55 • REPLACING THE DRUM CARTRIDGE. . . . . . 1-59 • REPLACING THE ...
BEFORE USING THE MACHINE REPLACING SUPPLIES AND MAINTENANCE REPLACING THE TONER CARTRIDGES 1-49 REPLACING THE TONER COLLECTION CONTAINER 1-52 REPLACING THE DEVELOPER CARTRIDGE / DRUM CARTRIDGE 1-55 • REPLACING THE DEVELOPER CARTRIDGE 1-55 • REPLACING THE DRUM CARTRIDGE. . . . . . 1-59 • REPLACING THE ...

Operation Guide
Page 44
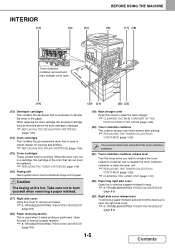
... machine. Both sides of 2-sided originals can be automatically scanned. ☞ PLACING THE ORIGINAL (page 1-36) (2) Front cover Open this cover to replace a toner cartridge. ☞ REPLACING THE TONER CARTRIDGES (page 1-49) (3) Operation panel This is used to select functions and enter the number of copies. ☞ OPERATION PANEL (page 1-8) (4) Output tray...
... machine. Both sides of 2-sided originals can be automatically scanned. ☞ PLACING THE ORIGINAL (page 1-36) (2) Front cover Open this cover to replace a toner cartridge. ☞ REPLACING THE TONER CARTRIDGES (page 1-49) (3) Operation panel This is used to select functions and enter the number of copies. ☞ OPERATION PANEL (page 1-8) (4) Output tray...
Operation Guide
Page 46
...(20) (21) (22) (23) (13) Developer cartridges This contains the developer that ran out must be replaced. ☞ REPLACING THE TONER CARTRIDGES (page 1-49) (16) Fusing unit Heat is applied here to clean the main charger. ☞ CLEANING THE MAIN CHARGER OF THE ...page 8-9) (23) Right side cover release lever To remove a paper misfeed, pull and hold this cover to remove a paper misfeed. ☞ 8. When the toner runs out in trays. ☞ 8. TROUBLESHOOTING "REMOVING MISFEEDS" (page 8-9) 1-5 Contents TROUBLESHOOTING "REMOVING MISFEEDS" (page 8-9) (18) Paper reversing section This is ...
...(20) (21) (22) (23) (13) Developer cartridges This contains the developer that ran out must be replaced. ☞ REPLACING THE TONER CARTRIDGES (page 1-49) (16) Fusing unit Heat is applied here to clean the main charger. ☞ CLEANING THE MAIN CHARGER OF THE ...page 8-9) (23) Right side cover release lever To remove a paper misfeed, pull and hold this cover to remove a paper misfeed. ☞ 8. When the toner runs out in trays. ☞ 8. TROUBLESHOOTING "REMOVING MISFEEDS" (page 8-9) 1-5 Contents TROUBLESHOOTING "REMOVING MISFEEDS" (page 8-9) (18) Paper reversing section This is ...
Operation Guide
Page 70
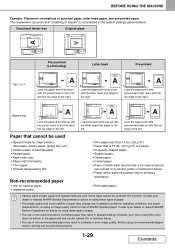
...Special media for advice on using non-recommended paper, check if printing can be performed properly. 1-29 Contents Contact your dealer or nearest SHARP Service Department for inkjet printers (fine paper, glossy paper, glossy film, etc.) • Carbon paper or thermal paper • ... prohibited paper may change due to ambient conditions, operating conditions, and paper characteristics, resulting in skewed feeding, misfeeds, poor toner fusing (the toner does not adhere to moisture absorption • Perforated paper • Various types of plain paper and special media are sold...
...Special media for advice on using non-recommended paper, check if printing can be performed properly. 1-29 Contents Contact your dealer or nearest SHARP Service Department for inkjet printers (fine paper, glossy paper, glossy film, etc.) • Carbon paper or thermal paper • ... prohibited paper may change due to ambient conditions, operating conditions, and paper characteristics, resulting in skewed feeding, misfeeds, poor toner fusing (the toner does not adhere to moisture absorption • Perforated paper • Various types of plain paper and special media are sold...

Operation Guide
Page 76
... an adhesive for sealing the envelopes. 1-35 Contents For more information, consult a qualified service technician. Envelopes misfeed, and smudges may cause creasing, smudging, misfeeds, poor toner fusing, or machine failure.
... an adhesive for sealing the envelopes. 1-35 Contents For more information, consult a qualified service technician. Envelopes misfeed, and smudges may cause creasing, smudging, misfeeds, poor toner fusing, or machine failure.

Operation Guide
Page 79
... glass. FACSIMILE "IMAGE SETTINGS" (page 4-43) ☞ 5. Document glass scale mark 2 5-1/2" x 8-1/2" (A5) B5 8-1/2" x 11" (A4) All originals should be copied black, causing excessive use of toner. 3 1-38 Contents If left center position. Place the original face down in the left open, parts outside of the original will be placed in the...
... glass. FACSIMILE "IMAGE SETTINGS" (page 4-43) ☞ 5. Document glass scale mark 2 5-1/2" x 8-1/2" (A5) B5 8-1/2" x 11" (A4) All originals should be copied black, causing excessive use of toner. 3 1-38 Contents If left center position. Place the original face down in the left open, parts outside of the original will be placed in the...

Operation Guide
Page 90
... cover. (Y) (M) (C) (Bk) 1 Locations of the indicated colors. appears. Y : Yellow toner, M : Magenta toner, C : Cyan toner, Bk : Black toner Replace the toner cartridges of color toner cartridges (Y): Yellow (M): Magenta (C): Cyan (Bk): Black 1-49 Contents If you continue to replace the toner cartridge when the message "Change the toner cartridge." REPLACING THE TONER CARTRIDGES Be sure to use the machine without replacing...
... cover. (Y) (M) (C) (Bk) 1 Locations of the indicated colors. appears. Y : Yellow toner, M : Magenta toner, C : Cyan toner, Bk : Black toner Replace the toner cartridges of color toner cartridges (Y): Yellow (M): Magenta (C): Cyan (Bk): Black 1-49 Contents If you continue to replace the toner cartridge when the message "Change the toner cartridge." REPLACING THE TONER CARTRIDGES Be sure to use the machine without replacing...
Operation Guide
Page 91
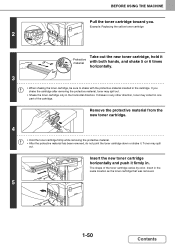
...8226; After the protective material has been removed, do not point the toner cartridge down or shake it Protective material with both hands, and shake 5 or 6 times horizontally. 3 • When shaking the toner cartridge, be sure to shake with the protective material inserted in one part... of the toner cartridge varies by color. If you . Insert in . Example: Replacing the yellow toner cartridge 2 Take out the new toner cartridge, hold it . BEFORE USING THE MACHINE Pull the toner cartridge toward you shake the cartridge after removing ...
...8226; After the protective material has been removed, do not point the toner cartridge down or shake it Protective material with both hands, and shake 5 or 6 times horizontally. 3 • When shaking the toner cartridge, be sure to shake with the protective material inserted in one part... of the toner cartridge varies by color. If you . Insert in . Example: Replacing the yellow toner cartridge 2 Take out the new toner cartridge, hold it . BEFORE USING THE MACHINE Pull the toner cartridge toward you shake the cartridge after removing ...

Operation Guide
Page 92
... or image with dark colors is cooler than a SHARP-recommended toner cartridge is used, the machine may solidify inside the cartridge. Store the toner in the cartridge to the machine. do not discard it standing up , the toner may not attain full quality and performance and there... the machine is touched. When the percentage falls to use a SHARP-recommended toner cartridge. • Keep the used toner cartridge. • To view the approximate amount of small children. • Store the box that contains the toner cartridge horizontally; Total Count B/W:00,000,000 Full Color:00,000...
... or image with dark colors is cooler than a SHARP-recommended toner cartridge is used, the machine may solidify inside the cartridge. Store the toner in the cartridge to the machine. do not discard it standing up , the toner may not attain full quality and performance and there... the machine is touched. When the percentage falls to use a SHARP-recommended toner cartridge. • Keep the used toner cartridge. • To view the approximate amount of small children. • Store the box that contains the toner cartridge horizontally; Total Count B/W:00,000,000 Full Color:00,000...

Operation Guide
Page 93
..., and slowly tip the container toward you. 1-52 Contents BEFORE USING THE MACHINE REPLACING THE TONER COLLECTION CONTAINER The toner collection container collects excess toner that is horizontal. 2 (2) Tip the toner collection container forward. will appear. Before replacing the toner collection container, take measures such as placing covers on and around the machine to the...
..., and slowly tip the container toward you. 1-52 Contents BEFORE USING THE MACHINE REPLACING THE TONER COLLECTION CONTAINER The toner collection container collects excess toner that is horizontal. 2 (2) Tip the toner collection container forward. will appear. Before replacing the toner collection container, take measures such as placing covers on and around the machine to the...

Operation Guide
Page 94
... it until it .) Turn the lock lever on the toner collection container to the left corner of small children. 1-53 Contents Toner may fly and cause burns. • Store the toner collection container out of the reach of the toner collection container is correctly in a plastic bag and keep ...when you removed it stops. 5 If the lock lever does not turn, check if the toner collection container is installed correctly. BEFORE USING THE MACHINE Remove the toner collection container. 3 • If the toner collection container is tipped forward too far, it will not be possible to remove it. &#...
... it until it .) Turn the lock lever on the toner collection container to the left corner of small children. 1-53 Contents Toner may fly and cause burns. • Store the toner collection container out of the reach of the toner collection container is correctly in a plastic bag and keep ...when you removed it stops. 5 If the lock lever does not turn, check if the toner collection container is installed correctly. BEFORE USING THE MACHINE Remove the toner collection container. 3 • If the toner collection container is tipped forward too far, it will not be possible to remove it. &#...

Operation Guide
Page 95
If you accidentally touch the toner, immediately wash your clothes. • Do not touch the part soiled with toner of the removed toner collection container. Take measures so that there will be no problem if toner spills on the machine, around the machine, or on your hands. 1-54 Contents BEFORE USING THE MACHINE • Toner may spill when the toner collection container is replaced.
If you accidentally touch the toner, immediately wash your clothes. • Do not touch the part soiled with toner of the removed toner collection container. Take measures so that there will be no problem if toner spills on the machine, around the machine, or on your hands. 1-54 Contents BEFORE USING THE MACHINE • Toner may spill when the toner collection container is replaced.
Operation Guide
Page 96
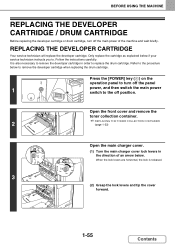
... the cover forward. 1-55 Contents Refer to remove the developer cartridge when replacing the drum cartridge. Open the front cover and remove the toner collection container. 2 ☞ REPLACING THE TONER COLLECTION CONTAINER (page 1-52) Open the main charger cover. (1) Turn the main charger cover lock levers in order to . Follow the instructions...
... the cover forward. 1-55 Contents Refer to remove the developer cartridge when replacing the drum cartridge. Open the front cover and remove the toner collection container. 2 ☞ REPLACING THE TONER COLLECTION CONTAINER (page 1-52) Open the main charger cover. (1) Turn the main charger cover lock levers in order to . Follow the instructions...

Operation Guide
Page 97
... cartridge near the middle with your hands. Protective material Shake the new developer cartridge 5 or 6 times as you accidentally touch the toner, immediately wash your hand and completely remove the developer cartridge. • When removing the developer cartridge, grasp it with a new ...cartridge. • The seal must not be toner on the developer cartridge (3) (3) Pull the developer cartridge out (2) (2) 4 horizontally. Hold the developer cartridge firmly as shown below and ...
... cartridge near the middle with your hands. Protective material Shake the new developer cartridge 5 or 6 times as you accidentally touch the toner, immediately wash your hand and completely remove the developer cartridge. • When removing the developer cartridge, grasp it with a new ...cartridge. • The seal must not be toner on the developer cartridge (3) (3) Pull the developer cartridge out (2) (2) 4 horizontally. Hold the developer cartridge firmly as shown below and ...

Operation Guide
Page 99
... ) on the operation panel to lock the cover. If you accidentally touch the toner, immediately wash your clothes or the immediate surroundings. • Do not touch the part soiled with toner of the removed toner collection container. When the lock levers are vertical, the cover is locked. 10... (2) 11 (1) Install the toner collection container. ☞ REPLACING THE TONER COLLECTION CONTAINER (page 1-52) Close the front cover. ...
... ) on the operation panel to lock the cover. If you accidentally touch the toner, immediately wash your clothes or the immediate surroundings. • Do not touch the part soiled with toner of the removed toner collection container. When the lock levers are vertical, the cover is locked. 10... (2) 11 (1) Install the toner collection container. ☞ REPLACING THE TONER COLLECTION CONTAINER (page 1-52) Close the front cover. ...
Operation Guide
Page 100
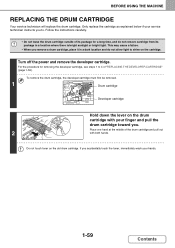
If you . Turn off the power and remove the developer cartridge. Do not touch toner on the drum cartridge with both hands. Only replace the cartridge as explained below if your hands. 1-59 Contents This may cause a failure. • When ... one hand at the middle of the drum cartridge and pull out 2 with your finger and pull the drum cartridge toward you accidentally touch the toner, immediately wash your service technician instructs you remove a drum cartridge, place it in a dark location and do not remove cartridge from its package in a location...
If you . Turn off the power and remove the developer cartridge. Do not touch toner on the drum cartridge with both hands. Only replace the cartridge as explained below if your hands. 1-59 Contents This may cause a failure. • When ... one hand at the middle of the drum cartridge and pull out 2 with your finger and pull the drum cartridge toward you accidentally touch the toner, immediately wash your service technician instructs you remove a drum cartridge, place it in a dark location and do not remove cartridge from its package in a location...
Operation Guide
Page 101
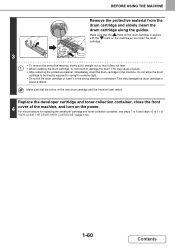
...and turn on the power. Make sure that the colors on the machine as you insert the drum cartridge. Replace the developer cartridge and toner collection container, close the front 4 cover of "REPLACING THE DEVELOPER CARTRIDGE" (page 1-55). 1-60 Contents For the procedure for replacing the developer... cartridge and toner collection container, see steps 7 to 8 and steps 10 to sunlight or electric light. • Do not tilt the drum cartridge or insert ...
...and turn on the power. Make sure that the colors on the machine as you insert the drum cartridge. Replace the developer cartridge and toner collection container, close the front 4 cover of "REPLACING THE DEVELOPER CARTRIDGE" (page 1-55). 1-60 Contents For the procedure for replacing the developer... cartridge and toner collection container, see steps 7 to 8 and steps 10 to sunlight or electric light. • Do not tilt the drum cartridge or insert ...

Operation Guide
Page 106
... off the panel 1 power, and then switch the main power switch to clean the main charger. Open the front cover and remove the toner collection container. 2 ☞ REPLACING THE TONER COLLECTION CONTAINER (page 1-52) Release the lock levers and open the main charger cover. 3 ☞ REPLACING THE DEVELOPER CARTRIDGE (page 1-55) (1) 4 (A) Remove...
... off the panel 1 power, and then switch the main power switch to clean the main charger. Open the front cover and remove the toner collection container. 2 ☞ REPLACING THE TONER COLLECTION CONTAINER (page 1-52) Release the lock levers and open the main charger cover. 3 ☞ REPLACING THE DEVELOPER CARTRIDGE (page 1-55) (1) 4 (A) Remove...

Operation Guide
Page 107
... the charger cleaner out. (3) Repeat the above (1) to (2) three times. • Take care not to let the tip of the charger cleaner become soiled by toner. • Clean with each of the other than cleaning the main charger.
... the charger cleaner out. (3) Repeat the above (1) to (2) three times. • Take care not to let the tip of the charger cleaner become soiled by toner. • Clean with each of the other than cleaning the main charger.


