
MX-B201D Operation Guide
Page 10
... the machine reverts to the initial settings, all settings and functions selected to make sure that point are pressed for the preset "AUTO CLEAR" time following the end of a copy job. The ready indicator will light up and other than the country where the machine was purchased, you will.... CONNECTING THE POWER CORD If you use extension cords or power strips. The language can be changed in the user programs. (p.74) When in the OFF position. The "AUTO CLEAR" can also be changed in the display prompting you plug the machine into a properly grounded wall socket. • Do...
... the machine reverts to the initial settings, all settings and functions selected to make sure that point are pressed for the preset "AUTO CLEAR" time following the end of a copy job. The ready indicator will light up and other than the country where the machine was purchased, you will.... CONNECTING THE POWER CORD If you use extension cords or power strips. The language can be changed in the user programs. (p.74) When in the OFF position. The "AUTO CLEAR" can also be changed in the display prompting you plug the machine into a properly grounded wall socket. • Do...

MX-B201D Operation Guide
Page 11
... "CHECK ORIGINAL" appears, copying will take place, copying can be changed with "PREHEAT MODE" and "AUTO SHUT-OFF TIME" in the user programs. It is suggested that you set duration of time elapses without the machine being used for your usage of time elapses without the machine being used when the power is on...
... "CHECK ORIGINAL" appears, copying will take place, copying can be changed with "PREHEAT MODE" and "AUTO SHUT-OFF TIME" in the user programs. It is suggested that you set duration of time elapses without the machine being used for your usage of time elapses without the machine being used when the power is on...

MX-B201D Operation Guide
Page 17
... marked on the tray. Remove it and then insert it at the indicator line of the paper to be changed when the machine has stopped temporarily due to running out of paper or a misfeed. • During printing (even in copy mode), the paper size setting ... loaded. • The left guide to the appropriate slot as follows each time the [ ] key ( ) or [ ] key ( ) is a slide-type guide. CHANGING A TRAY'S PAPER SIZE SETTING Follow these steps to change a tray's paper size setting. • The paper size setting cannot be changed . 1 Press the [MENU] key. Grasp the locking knob on the guide...
... marked on the tray. Remove it and then insert it at the indicator line of the paper to be changed when the machine has stopped temporarily due to running out of paper or a misfeed. • During printing (even in copy mode), the paper size setting ... loaded. • The left guide to the appropriate slot as follows each time the [ ] key ( ) or [ ] key ( ) is a slide-type guide. CHANGING A TRAY'S PAPER SIZE SETTING Follow these steps to change a tray's paper size setting. • The paper size setting cannot be changed . 1 Press the [MENU] key. Grasp the locking knob on the guide...

MX-B201D Operation Guide
Page 21
... number of copies appears in the display. If you wish to set the number of copies. SELECTING THE TRAY Press the [TRAY SELECT] key ( ). Each time, you enter the wrong number, press the [CLEAR] key ( ) and enter the correct number. If you press the [TRAY SELECT] key ( ), the ...location indicated by the tray location indicator changes in the paper tray, or when the tray is not closed or is improperly closed. 20 READY TO COPY. 100% EXTRA The tray location indicator...
... number of copies appears in the display. If you wish to set the number of copies. SELECTING THE TRAY Press the [TRAY SELECT] key ( ). Each time, you enter the wrong number, press the [CLEAR] key ( ) and enter the correct number. If you press the [TRAY SELECT] key ( ), the ...location indicated by the tray location indicator changes in the paper tray, or when the tray is not closed or is improperly closed. 20 READY TO COPY. 100% EXTRA The tray location indicator...

MX-B201D Operation Guide
Page 22
... according to select the original type. The original image type changes as follows each original type.) The exposure level used in automatic exposure adjustment can also be changed with greater clarity. 1 Check the original and place the ...original(s). 2 Press the [EXPOSURE ( )] key to the original being copied. The exposure is lowered for dark backgrounds to make text easier to auto exposure adjustment, press the [EXPOSURE ( )] key until "AUTO" ( ) appears. 3 If needed, adjust the exposure level for each time...
... according to select the original type. The original image type changes as follows each original type.) The exposure level used in automatic exposure adjustment can also be changed with greater clarity. 1 Check the original and place the ...original(s). 2 Press the [EXPOSURE ( )] key to the original being copied. The exposure is lowered for dark backgrounds to make text easier to auto exposure adjustment, press the [EXPOSURE ( )] key until "AUTO" ( ) appears. 3 If needed, adjust the exposure level for each time...

MX-B201D Operation Guide
Page 23
...ratio, then press the [ ] key ( ) or [ ] key ( ). • To decrease or increase the zoom ratio rapidly, hold it down the [ ] key ( ) or [ ] key ( ). To continue changing the ratio, release the key and then hold down again. 4 Select the number of copies and any other copy settings, and then press the [START...] key ( ). The copy will stop changing at each time the [ZOOM] key is 50% to 200%.) The [ZOOM] key can be pressed to quickly select a ratio from 25% to 400% in increments of...
...ratio, then press the [ ] key ( ) or [ ] key ( ). • To decrease or increase the zoom ratio rapidly, hold it down the [ ] key ( ) or [ ] key ( ). To continue changing the ratio, release the key and then hold down again. 4 Select the number of copies and any other copy settings, and then press the [START...] key ( ). The copy will stop changing at each time the [ZOOM] key is 50% to 200%.) The [ZOOM] key can be pressed to quickly select a ratio from 25% to 400% in increments of...

MX-B201D Operation Guide
Page 26
... the RSPF. (p.18) If you place an odd number of copies and any other settings, and then press the [START] key ( ). The mode changes as follows each time you wish to the paper output tray. LONG EDGE and SHORT EDGE are shown in step 2, select "LONG EDGE" or "SHORT EDGE" and press...
... the RSPF. (p.18) If you place an odd number of copies and any other settings, and then press the [START] key ( ). The mode changes as follows each time you wish to the paper output tray. LONG EDGE and SHORT EDGE are shown in step 2, select "LONG EDGE" or "SHORT EDGE" and press...
MX-B201D Operation Guide
Page 47
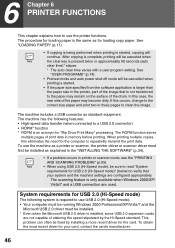
... mode and auto power shut-off mode will be executed when the clear key is pressed twice or approximately 60 seconds (auto clear time)* elapse. * The auto clear time varies with a user program setting. The machine has the following system is the same as for "Rip Once Print Many" processing. ...93). • When using USB 2.0 (Hi-Speed mode), be fixed by the Hi-Speed standard. After copying is complete, printing will continue. In this occurs, change to the correct size paper and print two or three pages to clean the image. The ROPM function stores multiple pages of print data in...
... mode and auto power shut-off mode will be executed when the clear key is pressed twice or approximately 60 seconds (auto clear time)* elapse. * The auto clear time varies with a user program setting. The machine has the following system is the same as for "Rip Once Print Many" processing. ...93). • When using USB 2.0 (Hi-Speed mode), be fixed by the Hi-Speed standard. After copying is complete, printing will continue. In this occurs, change to the correct size paper and print two or three pages to clean the image. The ROPM function stores multiple pages of print data in...

MX-B201D Operation Guide
Page 49
... Other Hardware", and then select "Printers and Faxes". 2 Click the "SHARP MX-xxxx" printer driver icon. PRINTER FUNCTIONS Opening the printer driver from the "Start" button You can open the printer driver and change the settings from the printer driver setup screen at the time of the machine. 3 Select "Properties" from the "Organize" menu.... • In Windows 7, click the "Preferences" button on the "General" tab. • The printer driver setup screen will revert to the initial settings when you change the printer driver settings from the Windows "Start" button.
... Other Hardware", and then select "Printers and Faxes". 2 Click the "SHARP MX-xxxx" printer driver icon. PRINTER FUNCTIONS Opening the printer driver from the "Start" button You can open the printer driver and change the settings from the printer driver setup screen at the time of the machine. 3 Select "Properties" from the "Organize" menu.... • In Windows 7, click the "Preferences" button on the "General" tab. • The printer driver setup screen will revert to the initial settings when you change the printer driver settings from the Windows "Start" button.

MX-B201D Operation Guide
Page 75
...lights up, however, the keys on . 8 Chapter 8 USER SETTINGS The user settings allow you to customize machine settings to select the period of time. Copy mode Program number Program name 1 AUTO CLEAR 2 PREHEAT MODE 3 AUTO SHUT-OFF Setting codes (factory default setting appears in bold) 1: ... returns the copy settings to the initial settings (p.9) if no keys are pressed for a preset period of time following the end of the following items. To change the user program settings as explained in "SELECTING A SETTING FOR A USER PROGRAM" (p.79). USER PROGRAMS The user settings consist of...
...lights up, however, the keys on . 8 Chapter 8 USER SETTINGS The user settings allow you to customize machine settings to select the period of time. Copy mode Program number Program name 1 AUTO CLEAR 2 PREHEAT MODE 3 AUTO SHUT-OFF Setting codes (factory default setting appears in bold) 1: ... returns the copy settings to the initial settings (p.9) if no keys are pressed for a preset period of time following the end of the following items. To change the user program settings as explained in "SELECTING A SETTING FOR A USER PROGRAM" (p.79). USER PROGRAMS The user settings consist of...

MX-B201D Operation Guide
Page 76
... except the power save indicator go off mode, no keys (except the [START] key ( )) can be used when the power is used to change the copy resolution in a slower copying speed. However, "NORMAL" results in AUTO and TEXT mode from a computer. To resume normal operation, press ... if the set the margin width. 75 Normally "HI-SPEED" is performed, this function offsets the position in bold) Explanation 1: 5 MIN. 4 AUTO SHUT-OFF TIME 2: 30 MIN. 3: 60 MIN. 4: 120 MIN. 5: 240 MIN. • This function automatically switches the machine to select the 7 LAYOUT IN 2IN1 1: ...
... except the power save indicator go off mode, no keys (except the [START] key ( )) can be used when the power is used to change the copy resolution in a slower copying speed. However, "NORMAL" results in AUTO and TEXT mode from a computer. To resume normal operation, press ... if the set the margin width. 75 Normally "HI-SPEED" is performed, this function offsets the position in bold) Explanation 1: 5 MIN. 4 AUTO SHUT-OFF TIME 2: 30 MIN. 3: 60 MIN. 4: 120 MIN. 5: 240 MIN. • This function automatically switches the machine to select the 7 LAYOUT IN 2IN1 1: ...

MX-B201D Operation Guide
Page 77
By selecting a longer time, you can prevent settings from being changed by about 10% when copying. USER SETTINGS Program number ... is possible.) • This is "center". 76 For keys that normally cause a set value not change when the key is held down. 1: NORMAL 2: 0.5 SEC. 15 KEY PRESS TIME 3: 1.0 SEC. 4: 1.5 SEC. 5: 2.0 SEC. • Use this setting to select how ...numeric values, see page 24. FOR PRINTER 1: 30% 2: 40% 3: 50% 4: 60% 5: 70% • Use this to change the proportion of beep signals. (p.80) 17 SOUND AT DEFAULT 1: ON 2: OFF • Use this to sound a beep when a...
By selecting a longer time, you can prevent settings from being changed by about 10% when copying. USER SETTINGS Program number ... is possible.) • This is "center". 76 For keys that normally cause a set value not change when the key is held down. 1: NORMAL 2: 0.5 SEC. 15 KEY PRESS TIME 3: 1.0 SEC. 4: 1.5 SEC. 5: 2.0 SEC. • Use this setting to select how ...numeric values, see page 24. FOR PRINTER 1: 30% 2: 40% 3: 50% 4: 60% 5: 70% • Use this to change the proportion of beep signals. (p.80) 17 SOUND AT DEFAULT 1: ON 2: OFF • Use this to sound a beep when a...

MX-B201D Operation Guide
Page 91
During periods when the machine is suitable for a long time, remove the paper from the tray and store it in a dark place in the...used for the size of the original and the size of the paper. → Press the [ZOOM] key to change the size of the paper and the center. Paper curled or damp. → Do not use curled or crimped ... In the user programs, set "PAPER TYPE" (program 29) to prevent moisture absorption. Cause and solution The original was changed without changing the tray's paper size setting. → Be sure to "1 (PLAIN PAPER)". The paper is too much blank space....
During periods when the machine is suitable for a long time, remove the paper from the tray and store it in a dark place in the...used for the size of the original and the size of the paper. → Press the [ZOOM] key to change the size of the paper and the center. Paper curled or damp. → Do not use curled or crimped ... In the user programs, set "PAPER TYPE" (program 29) to prevent moisture absorption. Cause and solution The original was changed without changing the tray's paper size setting. → Be sure to "1 (PLAIN PAPER)". The paper is too much blank space....

MX-B201D Operation Guide
Page 95
You are set sufficient margins in the paper settings of your application. → The top and bottom of the paper may be changed in a bag to the printer function can be obtained. The printed image is outside of the printer driver setup screen. Replace with dry copy paper. ...During periods when the machine is slow. Page 76 - 12 11 - - 94 Printing is not used for a long time, remove the paper from the tray and store it in a dark place in the user program "MEM. Paper curled or damp. → Do not use...
You are set sufficient margins in the paper settings of your application. → The top and bottom of the paper may be changed in a bag to the printer function can be obtained. The printed image is outside of the printer driver setup screen. Replace with dry copy paper. ...During periods when the machine is slow. Page 76 - 12 11 - - 94 Printing is not used for a long time, remove the paper from the tray and store it in a dark place in the user program "MEM. Paper curled or damp. → Do not use...


