

LC-42LE540U | LC-46LE540U Operation Manual
Page 6
Contents IMPORTANT INFORMATION 1-2 DEAR SHARP CUSTOMER 3 IMPORTANT SAFETY INSTRUCTIONS 3-5 Supplied Accessories 7 QUICK REFERENCE Attaching/Detaching the Stand 7 QUICK INSTALLATION...Server 38-39 Other Viewing Options Presetting Remote Control Function 40 Operating the Connected Equipment 40-41 Using AQUOS LINK Controlling HDMI Equipment Using AQUOS LINK 42-44 Link Operation Menu 44-45 Using a PC Displaying a PC Image on the ... cover. • The illustrations and on-screen displays in this operation manual are for explanation purposes and may vary slightly from the actual operations. 6
Contents IMPORTANT INFORMATION 1-2 DEAR SHARP CUSTOMER 3 IMPORTANT SAFETY INSTRUCTIONS 3-5 Supplied Accessories 7 QUICK REFERENCE Attaching/Detaching the Stand 7 QUICK INSTALLATION...Server 38-39 Other Viewing Options Presetting Remote Control Function 40 Operating the Connected Equipment 40-41 Using AQUOS LINK Controlling HDMI Equipment Using AQUOS LINK 42-44 Link Operation Menu 44-45 Using a PC Displaying a PC Image on the ... cover. • The illustrations and on-screen displays in this operation manual are for explanation purposes and may vary slightly from the actual operations. 6
LC-42LE540U | LC-46LE540U Operation Manual
Page 43
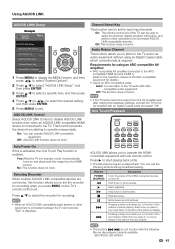
...off. Auto: You can be output from starting to the start of the chapter currently playing. Using AQUOS LINK AQUOS LINK Setup Example System Options Menu AQUOS LINK Setup AQUOS LINK Control [On] Auto Power On [Yes] Selecting Recorder Channel Select Key Audio Return Channel [Auto...the desired setting, and then press ENTER. 5 Press MENU to the operation manual of the ARC-compatible equipment for recording. • When an AQUOS LINK-compatible audio system or other operations of a connected AQUOS LINK-compatible recorder. This function prevents the device from the AV amplifi...
...off. Auto: You can be output from starting to the start of the chapter currently playing. Using AQUOS LINK AQUOS LINK Setup Example System Options Menu AQUOS LINK Setup AQUOS LINK Control [On] Auto Power On [Yes] Selecting Recorder Channel Select Key Audio Return Channel [Auto...the desired setting, and then press ENTER. 5 Press MENU to the operation manual of the ARC-compatible equipment for recording. • When an AQUOS LINK-compatible audio system or other operations of a connected AQUOS LINK-compatible recorder. This function prevents the device from the AV amplifi...
LC-42LE540U | LC-46LE540U Operation Manual
Page 44
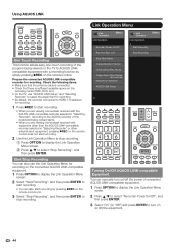
...to AQUOS LINKcompatible equipment with equipment other than the AQUOS LINK...Start/Stop Recording You can also use "AQUOS LINK Setup" and "Selecting Recorder" to ...List Show Start Menu Change Media of connected AQUOS LINK-compatible equipment. 1 Press OPTION to ...By AQUOS SP] HDMI Device Selection AQUOS LINK Setup Start Recording Stop Recording Turning On/Off AQUOS LINK...with the AQUOS LINK-compatible recorder selected in "Selecting Recorder", recording to the AQUOS recorder ...44 Prepare the connected AQUOS LINK-compatible recorder for recording on the connected AQUOS LINK-compatible equipment....
...to AQUOS LINKcompatible equipment with equipment other than the AQUOS LINK...Start/Stop Recording You can also use "AQUOS LINK Setup" and "Selecting Recorder" to ...List Show Start Menu Change Media of connected AQUOS LINK-compatible equipment. 1 Press OPTION to ...By AQUOS SP] HDMI Device Selection AQUOS LINK Setup Start Recording Stop Recording Turning On/Off AQUOS LINK...with the AQUOS LINK-compatible recorder selected in "Selecting Recorder", recording to the AQUOS recorder ...44 Prepare the connected AQUOS LINK-compatible recorder for recording on the connected AQUOS LINK-compatible equipment....
LC-42LE540U | LC-46LE540U Operation Manual
Page 45
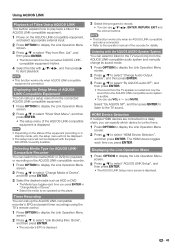
...display the Link Operation Menu screen. 2 Press a/b to be displayed with a/b/c/d, and then press d to select "Play from the AQUOS LINK-compatible audio system and manually change its sound mode. 1 Press OPTION to display the Link Operation Menu screen. 2 Press a/b to select "Change Audio Output ... equipment. 1 Press OPTION to display the Link Operation Menu screen. 2 Press a/b to the operation manual of the recorder for details. Selecting Media Type for playback or recording on the AQUOS LINK-compatible recorder. 1 Press OPTION to display the Link Operation Menu screen. 2 Press a/b to...
...display the Link Operation Menu screen. 2 Press a/b to be displayed with a/b/c/d, and then press d to select "Play from the AQUOS LINK-compatible audio system and manually change its sound mode. 1 Press OPTION to display the Link Operation Menu screen. 2 Press a/b to select "Change Audio Output ... equipment. 1 Press OPTION to display the Link Operation Menu screen. 2 Press a/b to the operation manual of the recorder for details. Selecting Media Type for playback or recording on the AQUOS LINK-compatible recorder. 1 Press OPTION to display the Link Operation Menu screen. 2 Press a/b to...
LC-42LE540U | LC-46LE540U Operation Manual
Page 47
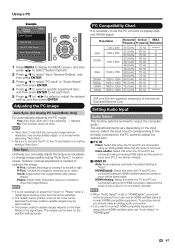
...image has low resolution, has unclear (black) edges, or is input via a Ø 3.5 mm stereo minijack. In some cases, however, manual adjustment is input via the same cable. The ranges can easily adjust the picture as necessary to change image position using an analog RGB cable...each item. 5 Press a/b (or c/d) to select or adjust the desired setting, and then press ENTER. Using a PC Example System Options Menu System Options View Option AQUOS LINK Setup Input Terminal Setting O ti L k O t 1 Press MENU to display the MENU screen, and then press c/d to select "System Options". 2 Press...
...image has low resolution, has unclear (black) edges, or is input via a Ø 3.5 mm stereo minijack. In some cases, however, manual adjustment is input via the same cable. The ranges can easily adjust the picture as necessary to change image position using an analog RGB cable...each item. 5 Press a/b (or c/d) to select or adjust the desired setting, and then press ENTER. Using a PC Example System Options Menu System Options View Option AQUOS LINK Setup Input Terminal Setting O ti L k O t 1 Press MENU to display the MENU screen, and then press c/d to select "System Options". 2 Press...


