
CD-MPX850 Operation Manual
Page 2
.... NOTES It is classified as practical. This product is the intent of Sharp that prior permission be of sufficient magnitude to constitute a risk of any unauthorized changes ...or modifications to this equipment not expressly approved by turning the equipment off and on a circuit different from that may be obtained from ... controls, adjustments or procedures other than those specified herein may cause harmful interference to persons. CD-MPX850 SPECIAL NOTES Important Instruction CAUTION: TO REDUCE THE RISK OF ELECTRIC SHOCK, DO NOT REMOVE COVER...
.... NOTES It is classified as practical. This product is the intent of Sharp that prior permission be of sufficient magnitude to constitute a risk of any unauthorized changes ...or modifications to this equipment not expressly approved by turning the equipment off and on a circuit different from that may be obtained from ... controls, adjustments or procedures other than those specified herein may cause harmful interference to persons. CD-MPX850 SPECIAL NOTES Important Instruction CAUTION: TO REDUCE THE RISK OF ELECTRIC SHOCK, DO NOT REMOVE COVER...
CD-MPX850 Operation Manual
Page 6
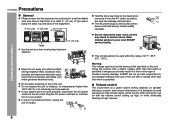
...other factors. If your system does not work properly, disconnect the AC power cord from vibration. Refer internal service to extremely low temperatures. SHARP will not be held responsible for safety. In case of the unit. Do not expose the unit to moisture, to temperatures higher than ...and then turn on a firm, level surface free from the AC outlet. The AC power plug is used must be used within the range of the equipment. 4" (10 cm) 4" (10 cm) 4" (10 cm) 4" (10 cm) Table Use the unit on your local SHARP service facility. General Information CD-MPX850 Precautions General...
...other factors. If your system does not work properly, disconnect the AC power cord from vibration. Refer internal service to extremely low temperatures. SHARP will not be held responsible for safety. In case of the unit. Do not expose the unit to moisture, to temperatures higher than ...and then turn on a firm, level surface free from the AC outlet. The AC power plug is used must be used within the range of the equipment. 4" (10 cm) 4" (10 cm) 4" (10 cm) 4" (10 cm) Table Use the unit on your local SHARP service facility. General Information CD-MPX850 Precautions General...
CD-MPX850 Operation Manual
Page 11
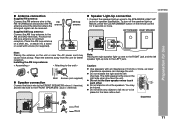
... Connect the black wire to the FRONT SPEAKERS minus (-) terminal, and the red wire to the AM and GND terminals. Speaker Light-Up connection 1. To turn off the speaker light-up wire to the RIGHT jack and the left channels. LEFT SPEAKER RIGHT SPEAKER AC INPUT Note: Placing the right speaker... the strongest signal can damage the unit. FM antenna AM loop antenna Note: Placing the antenna on a shelf, etc., or attach it to be injured. CD-MPX850 Preparation for speaker illumination.
... Connect the black wire to the FRONT SPEAKERS minus (-) terminal, and the red wire to the AM and GND terminals. Speaker Light-Up connection 1. To turn off the speaker light-up wire to the RIGHT jack and the left channels. LEFT SPEAKER RIGHT SPEAKER AC INPUT Note: Placing the right speaker... the strongest signal can damage the unit. FM antenna AM loop antenna Note: Placing the antenna on a shelf, etc., or attach it to be injured. CD-MPX850 Preparation for speaker illumination.
CD-MPX850 Operation Manual
Page 12
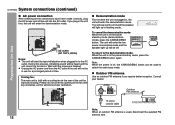
... unit into the AC outlet. Note: When the power is in the power stand-by mode, press the X-BASS/DEMO button again. Consult your dealer. CD-MPX850 System connections (continued) Preparation for Use AC power connection After checking all the connections have been made correctly, plug the AC power cord of this... the demonstration mode. AC INPUT AC outlet (AC 120 V, 60 Hz) Notes: The unit will light up will be heard and the unit cannot be turned on , the X-BASS/DEMO button can be in the unit first, the unit will block proper ventilation.
... unit into the AC outlet. Note: When the power is in the power stand-by mode, press the X-BASS/DEMO button again. Consult your dealer. CD-MPX850 System connections (continued) Preparation for Use AC power connection After checking all the connections have been made correctly, plug the AC power cord of this... the demonstration mode. AC INPUT AC outlet (AC 120 V, 60 Hz) Notes: The unit will light up will be heard and the unit cannot be turned on , the X-BASS/DEMO button can be in the unit first, the unit will block proper ventilation.

CD-MPX850 Operation Manual
Page 13
... ON/STAND-BY button. Test of the remote control Check the remote control after checking all old batteries with operation. Does the power turn on the unit with a soft cloth. Remote sensor Preparation for Use Precautions for long periods of the unit. This will not be used...to the direction indicated in the battery compartment. The remote control can enjoy music. Point the remote control directly at the same time. Remote control CD-MPX850 Battery installation Use 2 "AA" size batteries (UM/SUM-3, R6, HP-7 or similar). Change the lighting or the direction of time. Remove ...
... ON/STAND-BY button. Test of the remote control Check the remote control after checking all old batteries with operation. Does the power turn on the unit with a soft cloth. Remote sensor Preparation for Use Precautions for long periods of the unit. This will not be used...to the direction indicated in the battery compartment. The remote control can enjoy music. Point the remote control directly at the same time. Remote control CD-MPX850 Battery installation Use 2 "AA" size batteries (UM/SUM-3, R6, HP-7 or similar). Change the lighting or the direction of time. Remove ...
CD-MPX850 Operation Manual
Page 14
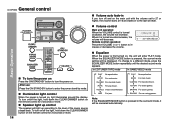
... operation: Press the VOLUME (+ or -) button to the last set level. FLAT No equalization. ROCK For rock music. SPORTS For sports games. CD-MPX850 General control Volume auto fade-in If you turn off and on , the unit will increase. When the EQUALIZER MODE button is pressed in the surround mode, it is...
... operation: Press the VOLUME (+ or -) button to the last set level. FLAT No equalization. ROCK For rock music. SPORTS For sports games. CD-MPX850 General control Volume auto fade-in If you turn off and on , the unit will increase. When the EQUALIZER MODE button is pressed in the surround mode, it is...

CD-MPX850 Operation Manual
Page 15
...-hour (AM 12:00) display. 1 Press the ON/STAND-BY button to advance the time by 1 minute. Basic Operation Press the or button once to turn the power on ] Press the CLOCK/TIMER button. vals. "AM 12:00" "AM 0:00" The 12-hour display will appear. (AM 12:00 - ... MEMORY button. Hold it down to advance continuously. 6 Press the or button to advance the time by 1 hour. Setting the clock (Remote control only) CD-MPX850 5 Press the or button to display the time. Within 10 seconds, press the or button to adjust the hour and then press the MEMORY button.
...-hour (AM 12:00) display. 1 Press the ON/STAND-BY button to advance the time by 1 minute. Basic Operation Press the or button once to turn the power on ] Press the CLOCK/TIMER button. vals. "AM 12:00" "AM 0:00" The 12-hour display will appear. (AM 12:00 - ... MEMORY button. Hold it down to advance continuously. 6 Press the or button to advance the time by 1 hour. Setting the clock (Remote control only) CD-MPX850 5 Press the or button to display the time. Within 10 seconds, press the or button to adjust the hour and then press the MEMORY button.
CD-MPX850 Operation Manual
Page 16
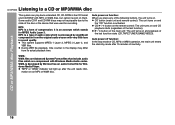
... MP3/WMA disc This system can play back a standard CD, CD-R/RW in sound quality. CD button (main unit and remote control): The unit turns on an MP3 or WMA disc. 16 CD / button on the remote control: The unit turns on and CD playback starts (regardless of the last function). / button on the main ... discs may differ from the original audio source with very little loss in the CD format and CD-R/RW with Windows Media Audio codec. MP3: MP3 is activated. CD or MP3/WMA disc Playback CD-MPX850 Listening to the state of the disc or the device that include audio files which is ...
... MP3/WMA disc This system can play back a standard CD, CD-R/RW in sound quality. CD button (main unit and remote control): The unit turns on an MP3 or WMA disc. 16 CD / button on the remote control: The unit turns on and CD playback starts (regardless of the last function). / button on the main ... discs may differ from the original audio source with very little loss in the CD format and CD-R/RW with Windows Media Audio codec. MP3: MP3 is activated. CD or MP3/WMA disc Playback CD-MPX850 Listening to the state of the disc or the device that include audio files which is ...
CD-MPX850 Operation Manual
Page 17
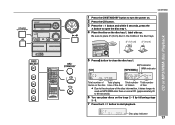
... to place 3" (8 cm) disc in the middle of the disc trays. 5" (12 cm) 3" (8 cm) CD or MP3/WMA disc Playback 5 Press / button to close the disc tray 1. [CD] MP3 indicator [MP3/WMA] WMA indicator Total number of Total playing Total number Total number tracks on the disc time of...by following steps 3 - 5. 7 Press the / button to open the disc tray 1. 4 Place the disc on . 2 Press the CD button. 3 Press the 1 button and within 5 seconds, press the button to start playback. CD-MPX850 1 Press the ON/STAND-BY button to turn the power on the disc tray 1, label side up. Disc play indicator 17
... to place 3" (8 cm) disc in the middle of the disc trays. 5" (12 cm) 3" (8 cm) CD or MP3/WMA disc Playback 5 Press / button to close the disc tray 1. [CD] MP3 indicator [MP3/WMA] WMA indicator Total number of Total playing Total number Total number tracks on the disc time of...by following steps 3 - 5. 7 Press the / button to open the disc tray 1. 4 Place the disc on . 2 Press the CD button. 3 Press the 1 button and within 5 seconds, press the button to start playback. CD-MPX850 1 Press the ON/STAND-BY button to turn the power on the disc tray 1, label side up. Disc play indicator 17

CD-MPX850 Operation Manual
Page 18
... the disc tray is no disc in the stop mode, press the / button to a CD or MP3/WMA disc (continued) CD or MP3/WMA disc Playback Playback will be skipped to enter the power stand-by mode and then turn the power on disc 1. Stop Press in a same tray. To exchange other discs... while playing a disc: Press one of special shapes (heart, octagon, etc.) as it is restored. Caution: Do not place two discs in the playback mode. CD-MPX850 Listening to start the desired track...
... the disc tray is no disc in the stop mode, press the / button to a CD or MP3/WMA disc (continued) CD or MP3/WMA disc Playback Playback will be skipped to enter the power stand-by mode and then turn the power on disc 1. Stop Press in a same tray. To exchange other discs... while playing a disc: Press one of special shapes (heart, octagon, etc.) as it is restored. Caution: Do not place two discs in the playback mode. CD-MPX850 Listening to start the desired track...

CD-MPX850 Operation Manual
Page 27
...changes to extinguish the "ST" indicator. Radio Auto power on function: When you press any of the following buttons, the unit turns on and playback of the last function starts (CD, TAPE, TUNER, GAME/VIDEO). Auto scan tuning will appear when an FM broadcast is weak, press the TUNER (BAND) ... FM reception is in to the desired station. To stop automatically at the first receivable broadcast station. Listening to the radio CD-MPX850 Tuning 1 Press the ON/STAND-BY button to turn the power on. 2 Press the TUNER (BAND) button repeatedly to select the desired frequency band (FM or AM). 3 Press...
...changes to extinguish the "ST" indicator. Radio Auto power on function: When you press any of the following buttons, the unit turns on and playback of the last function starts (CD, TAPE, TUNER, GAME/VIDEO). Auto scan tuning will appear when an FM broadcast is weak, press the TUNER (BAND) ... FM reception is in to the desired station. To stop automatically at the first receivable broadcast station. Listening to the radio CD-MPX850 Tuning 1 Press the ON/STAND-BY button to turn the power on. 2 Press the TUNER (BAND) button repeatedly to select the desired frequency band (FM or AM). 3 Press...
CD-MPX850 Operation Manual
Page 29
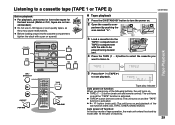
... the cassette compartment, tighten the slack with the side to be played facing toward you. 4 Press the TAPE (1 2) button to a cassette tape (TAPE 1 or TAPE 2) CD-MPX850 Before playback: For playback, use normal or low-noise tapes for the best sound. (Metal or CrO tapes are not recommended.) Do not use C-120... tapes or poor-quality tapes, as they may cause malfunctions. Tape Playback 5 Press the / (TAPE ) to turn the power on. 2 Open the cassette com- Listening to select the cassette you press any of the following buttons, the unit...
... the cassette compartment, tighten the slack with the side to be played facing toward you. 4 Press the TAPE (1 2) button to a cassette tape (TAPE 1 or TAPE 2) CD-MPX850 Before playback: For playback, use normal or low-noise tapes for the best sound. (Metal or CrO tapes are not recommended.) Do not use C-120... tapes or poor-quality tapes, as they may cause malfunctions. Tape Playback 5 Press the / (TAPE ) to turn the power on. 2 Open the cassette com- Listening to select the cassette you press any of the following buttons, the unit...

CD-MPX850 Operation Manual
Page 31
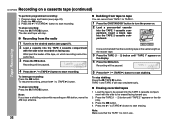
Wind past the leader of the tape, on which recording cannot be recorded on . 2 Press the CD button. 3 Load a cassette into the TAPE 2 cassette compartment with the side to start approximately 7 seconds after the tape starts. When the playback of the last .... The disc and tape will stop . 31 Tape Recording CD-MPX850 Recording from the selected disc. Playback of the disc will be paused. 5 Press one of the tape is started from a CD or MP3/WMA disc 1 Press the ON/STAND-BY button to turn the power on facing you. Recording is reached, the disc...
Wind past the leader of the tape, on which recording cannot be recorded on . 2 Press the CD button. 3 Load a cassette into the TAPE 2 cassette compartment with the side to start approximately 7 seconds after the tape starts. When the playback of the last .... The disc and tape will stop . 31 Tape Recording CD-MPX850 Recording from the selected disc. Playback of the disc will be paused. 5 Press one of the tape is started from a CD or MP3/WMA disc 1 Press the ON/STAND-BY button to turn the power on facing you. Recording is reached, the disc...
CD-MPX850 Operation Manual
Page 32
... Wind past the leader of the tape, on the display. 4 Press the button. Tape Recording 4 Press the / (TAPE ) button to start dubbing. CD-MPX850 Recording on the display. 3 Press the button. 4 Press the / (TAPE ) button to start erasing. To stop simultaneously. TAPE 1 TAPE 2 It is... (continued) To perform programmed recording: 1 Program discs and tracks (see page 27). 2 Load a cassette into the TAPE 2 cassette compartment with the side to turn the power on facing you. To resume recording, press the / (TAPE ) button. 5 Press the / (TAPE ) button to start recording. TAPE 1 and...
... Wind past the leader of the tape, on the display. 4 Press the button. Tape Recording 4 Press the / (TAPE ) button to start dubbing. CD-MPX850 Recording on the display. 3 Press the button. 4 Press the / (TAPE ) button to start erasing. To stop simultaneously. TAPE 1 TAPE 2 It is... (continued) To perform programmed recording: 1 Program discs and tracks (see page 27). 2 Load a cassette into the TAPE 2 cassette compartment with the side to turn the power on facing you. To resume recording, press the / (TAPE ) button. 5 Press the / (TAPE ) button to start recording. TAPE 1 and...
CD-MPX850 Operation Manual
Page 33
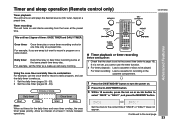
CD-MPX850 This unit has 2 types of at least 1 minute between operations. Advanced Features Once ... an interval of timer: ONCE TIMER and DAILY TIMER. For example, if you cannot use the daily timer to turn the power on and starts recording from the tuner at the same preset time every day. Continued to the correct time... if "ONCE" or "DAILY" does not appear. Timer and sleep operation (Remote control only) Timer playback: The unit turns on a radio station. For timer recording: Load a cassette for recording in combination: For example, use the once timer to record...
CD-MPX850 This unit has 2 types of at least 1 minute between operations. Advanced Features Once ... an interval of timer: ONCE TIMER and DAILY TIMER. For example, if you cannot use the daily timer to turn the power on and starts recording from the tuner at the same preset time every day. Continued to the correct time... if "ONCE" or "DAILY" does not appear. Timer and sleep operation (Remote control only) Timer playback: The unit turns on a radio station. For timer recording: Load a cassette for recording in combination: For example, use the once timer to record...
CD-MPX850 Operation Manual
Page 34
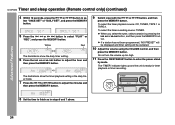
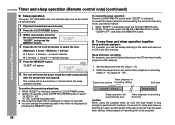
..."NO PRESET" will be displayed and timer setting will be canceled. 10 Adjust the volume using the VOLUME control, and then press the MEMORY button. CD-MPX850 Timer and sleep operation (Remote control only) (continued) 4 Within 10 seconds, press the or button to select "PLAY" or "REC", and press.... 34 by pressing the or button, and then press the MEMORY but- When you select the tuner, select a station by mode. Do not turn the volume up and the unit is ready for timer playback or timer recording. Advanced Features The illustrations show the daily timer setting. 6 Press the...
..."NO PRESET" will be displayed and timer setting will be canceled. 10 Adjust the volume using the VOLUME control, and then press the MEMORY button. CD-MPX850 Timer and sleep operation (Remote control only) (continued) 4 Within 10 seconds, press the or button to select "PLAY" or "REC", and press.... 34 by pressing the or button, and then press the MEMORY but- When you select the tuner, select a station by mode. Do not turn the volume up and the unit is ready for timer playback or timer recording. Advanced Features The illustrations show the daily timer setting. 6 Press the...
CD-MPX850 Operation Manual
Page 35
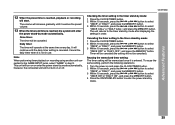
... once it is entered. It will operate at the same time every day. This unit will turn on or enter the power stand-by mode. 35 To reuse the same setting, perform the following operations. 1 Turn the power on and press the CLOCK/TIMER button. 2 Within 10 seconds, press the or button... ON/STAND-BY button to the GAME INPUT jacks, select "GAME" in the timer stand-by mode automatically. CD-MPX850 Advanced Features 12 When the preset time is reached, playback or recording will not turn on or off. Cancel the daily timer when it reaches the preset volume. 13 When the timer end...
... once it is entered. It will operate at the same time every day. This unit will turn on or enter the power stand-by mode. 35 To reuse the same setting, perform the following operations. 1 Turn the power on and press the CLOCK/TIMER button. 2 Within 10 seconds, press the or button... ON/STAND-BY button to the GAME INPUT jacks, select "GAME" in the timer stand-by mode automatically. CD-MPX850 Advanced Features 12 When the preset time is reached, playback or recording will not turn on or off. Cancel the daily timer when it reaches the preset volume. 13 When the timer end...
CD-MPX850 Operation Manual
Page 36
...XX". "SLEEP" will appear. 6 The unit will automatically stop. CD-MPX850 Timer and sleep operation (Remote control only) (continued) Advanced Features Sleep operation The radio, CD, MP3/WMA disc and cassette tape can fall asleep listening to the CD and record radio programs while sleeping. 1 Set the sleep time ... the tape length is shorter than the sleep timer setting, timer playback or recording will be possible. 36 If you can all be turned off automatically. 1 Play back the desired sound source. 2 Press the CLOCK/TIMER button. 3 Within 10 seconds, press the or button...
...XX". "SLEEP" will appear. 6 The unit will automatically stop. CD-MPX850 Timer and sleep operation (Remote control only) (continued) Advanced Features Sleep operation The radio, CD, MP3/WMA disc and cassette tape can fall asleep listening to the CD and record radio programs while sleeping. 1 Set the sleep time ... the tape length is shorter than the sleep timer setting, timer playback or recording will be possible. 36 If you can all be turned off automatically. 1 Play back the desired sound source. 2 Press the CLOCK/TIMER button. 3 Within 10 seconds, press the or button...
CD-MPX850 Operation Manual
Page 37
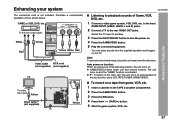
... a TV to turn the power on the TV. You can enjoy sounds from the television. To the line output jacks White Red Yellow Yellow White Red Video cable RCA cord (not supplied) (not supplied) TV To video input jack Yellow Video cable (not supplied) AC INPUT Yellow CD-MPX850 Listening to playback... sounds of the last function starts (CD,TAPE,TUNER,GAME/VIDEO). Switch the TV input to auxiliary. 3 Press the ON/STAND-BY button to the rear ...
... a TV to turn the power on the TV. You can enjoy sounds from the television. To the line output jacks White Red Yellow Yellow White Red Video cable RCA cord (not supplied) (not supplied) TV To video input jack Yellow Video cable (not supplied) AC INPUT Yellow CD-MPX850 Listening to playback... sounds of the last function starts (CD,TAPE,TUNER,GAME/VIDEO). Switch the TV input to auxiliary. 3 Press the ON/STAND-BY button to the rear ...
CD-MPX850 Operation Manual
Page 38
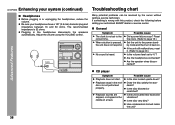
CD-MPX850 Enhancing your system (continued) Troubleshooting chart Headphones Before plugging in the middle of a track. When a button is 32 ohms. Plugging in the middle or is not set to "0"? Reset the clock. (Refer to page 15.) Set the unit to the correct time. Advanced Features CD... player Symptom Playback does not start. Is the disc very dirty? Be sure your authorized SHARP dealer or service center. ... Is the volume level set to the power standby mode and then turn it back on. Adjust the volume using the VOLUME control. Possible ...
CD-MPX850 Enhancing your system (continued) Troubleshooting chart Headphones Before plugging in the middle of a track. When a button is 32 ohms. Plugging in the middle or is not set to "0"? Reset the clock. (Refer to page 15.) Set the unit to the correct time. Advanced Features CD... player Symptom Playback does not start. Is the disc very dirty? Be sure your authorized SHARP dealer or service center. ... Is the volume level set to the power standby mode and then turn it back on. Adjust the volume using the VOLUME control. Possible ...


