

Owners Manual
Page 3
...dry cloth. 7. NO USERSERVICEABLE PARTS INSIDE. Follow all warnings. type plug. Servicing is used as to obtain maximum benefit of the LCD TV cabinet for proper grounding and, in accordance with them might be maintained. The product should not be built into such power lines 3. ...be connected to the grounding system of the building, as vases, shall be exposed to qualified service personnel. English Thank you for choosing SANYO. vicinity of the obsolete outlet. 10. A grounding type plug has two blades and a third grounding prong. When a cart is required...
...dry cloth. 7. NO USERSERVICEABLE PARTS INSIDE. Follow all warnings. type plug. Servicing is used as to obtain maximum benefit of the LCD TV cabinet for proper grounding and, in accordance with them might be maintained. The product should not be built into such power lines 3. ...be connected to the grounding system of the building, as vases, shall be exposed to qualified service personnel. English Thank you for choosing SANYO. vicinity of the obsolete outlet. 10. A grounding type plug has two blades and a third grounding prong. When a cart is required...

Owners Manual
Page 4
...excessive pressure can be determined by the cabinet only. If this television meet rigid U.L. Consult the dealer or an experienced radio/TV technician for ENERGY STAR qualification. It is encouraged to try to correct the interference by Intertek Testing Services Taiwan Ltd. NEVER... HDMI logo and High-Definition Multimedia Interface are trademarks or registered trademarks of Dolby Laboratories. "As an Energy Star® Partner, Sanyo Electric co., Ltd. "Dolby" and the double-D symbol are designed to provide reasonable protection against risk of this equipment does cause...
...excessive pressure can be determined by the cabinet only. If this television meet rigid U.L. Consult the dealer or an experienced radio/TV technician for ENERGY STAR qualification. It is encouraged to try to correct the interference by Intertek Testing Services Taiwan Ltd. NEVER... HDMI logo and High-Definition Multimedia Interface are trademarks or registered trademarks of Dolby Laboratories. "As an Energy Star® Partner, Sanyo Electric co., Ltd. "Dolby" and the double-D symbol are designed to provide reasonable protection against risk of this equipment does cause...

Owners Manual
Page 6
... on it. maintained with soft materials (such as a blanket) for protecting the display screen. 3 12 4 Uninstalling Stand (55") 1 Place the LCD TV screen facing down on a flat surface with soft materials (such as a blanket) for protecting the display screen. 2 Remove screws in 4 holes with this...it may result in damage to the equipment or injury to the installer. SAFETY NOTE For correct installing, mounting and uninstalling of the LCD TV Stand, it is strong enough to support the weight of it) which is strongly recommended to use a trained, authorized dealer. Installing Stand ...
... on it. maintained with soft materials (such as a blanket) for protecting the display screen. 3 12 4 Uninstalling Stand (55") 1 Place the LCD TV screen facing down on a flat surface with soft materials (such as a blanket) for protecting the display screen. 2 Remove screws in 4 holes with this...it may result in damage to the equipment or injury to the installer. SAFETY NOTE For correct installing, mounting and uninstalling of the LCD TV Stand, it is strong enough to support the weight of it) which is strongly recommended to use a trained, authorized dealer. Installing Stand ...

Owners Manual
Page 7
....9 NOTE: All dimensions are in a confined area. Wall mounting kit shall be able to a wall mounting kit. NOTE: 1. VESA standard interface: TV 200 x 400mm Wall Mounting Inserts Mounting screws measurements: 55" TV M8 Diameter, Length - 13mm (min.); 16mm (max.) Wall • (60mm) 6 Wall Mounting kit is not supplied. 2. English INSTALLATION POSITIONING THE...
....9 NOTE: All dimensions are in a confined area. Wall mounting kit shall be able to a wall mounting kit. NOTE: 1. VESA standard interface: TV 200 x 400mm Wall Mounting Inserts Mounting screws measurements: 55" TV M8 Diameter, Length - 13mm (min.); 16mm (max.) Wall • (60mm) 6 Wall Mounting kit is not supplied. 2. English INSTALLATION POSITIONING THE...

Owners Manual
Page 8
... old or batteries with marks inside the Remote Control. Do not expose the Remote or batteries to Search for off -air signals from a direct Cable TV connection. Match the "+" and "-" signs on -screen MENU to moisture or heat such as sunshine. (the size of battery is AAA). English GETTING STARTED 1 Install...
... old or batteries with marks inside the Remote Control. Do not expose the Remote or batteries to Search for off -air signals from a direct Cable TV connection. Match the "+" and "-" signs on -screen MENU to moisture or heat such as sunshine. (the size of battery is AAA). English GETTING STARTED 1 Install...

Owners Manual
Page 10
...(CH+ / - ) Buttons- button to display channel information banner. AUDIO Button- Press to select digital channel D6. Press to switch to view: TV, VIDEO1, VIDEO2, VIDEO3, HDMI1, HDMI2, HDMI3, PC or USB Input. You will clear all analog channel enabled). SLEEP Button- NOTE : The ...State, Channel Title, Video Resolution, Video Ratio, Signal Strength, Digital Sound information and Program Rating. If you execute RESET function, the TV will need to exit from the menu, when required. Press this button to display RESET menu. ECO Button - Press to select analog...
...(CH+ / - ) Buttons- button to display channel information banner. AUDIO Button- Press to select digital channel D6. Press to switch to view: TV, VIDEO1, VIDEO2, VIDEO3, HDMI1, HDMI2, HDMI3, PC or USB Input. You will clear all analog channel enabled). SLEEP Button- NOTE : The ...State, Channel Title, Video Resolution, Video Ratio, Signal Strength, Digital Sound information and Program Rating. If you execute RESET function, the TV will need to exit from the menu, when required. Press this button to display RESET menu. ECO Button - Press to select analog...
Owners Manual
Page 12
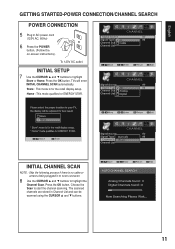
INITIAL setup 7 Use the CURSOR ▲ and ▼ buttons to start the channel scanning. Choose the Scan to highlight Store or Home. TVs will enter INITIAL CHANNEL SCAN automatically. Move OK Enter INITIAL CHANNEL SCAN NOTE : Skip the following process if there is for ENERGY STAR. Home : This ...
INITIAL setup 7 Use the CURSOR ▲ and ▼ buttons to start the channel scanning. Choose the Scan to highlight Store or Home. TVs will enter INITIAL CHANNEL SCAN automatically. Move OK Enter INITIAL CHANNEL SCAN NOTE : Skip the following process if there is for ENERGY STAR. Home : This ...

Owners Manual
Page 15
... sports mode will appear on the lower left of the screen. English SPORTS MODE By simply pressing the " SPORTS" button on the remote control, the TV will automatically optimize both picture and sound settings for the programs shown. ■■ Off ■■ Football −− For golf, football programs etc...
... sports mode will appear on the lower left of the screen. English SPORTS MODE By simply pressing the " SPORTS" button on the remote control, the TV will automatically optimize both picture and sound settings for the programs shown. ■■ Off ■■ Football −− For golf, football programs etc...

Owners Manual
Page 18
...). Press the OK button. 2 Enter your password. Then the option you selected will be viewed. ON-SCREEN MENU OPERATION (CONTINUED) English PARENT ADJUSTMENT This SANYO television is wrong, you can enter the password again or press MENU button to return to the PARENT menu. 3 Use the CURSOR ▲ and ▼...button. 4 Use the CURSOR ▲ and ▼buttons to select the options you want to adjust and press the OK button. (MPAA,Block All,TV-Y,TV-Y7,TV-G,TV-PG,TV-14,and TV-MA.) 5 Use the CURSOR ▲ and ▼buttons to select the options you forget the former password, press 1--
...). Press the OK button. 2 Enter your password. Then the option you selected will be viewed. ON-SCREEN MENU OPERATION (CONTINUED) English PARENT ADJUSTMENT This SANYO television is wrong, you can enter the password again or press MENU button to return to the PARENT menu. 3 Use the CURSOR ▲ and ▼...button. 4 Use the CURSOR ▲ and ▼buttons to select the options you want to adjust and press the OK button. (MPAA,Block All,TV-Y,TV-Y7,TV-G,TV-PG,TV-14,and TV-MA.) 5 Use the CURSOR ▲ and ▼buttons to select the options you forget the former password, press 1--

Owners Manual
Page 22
... the Main menu. 2 Use the CURSOR ◄ and ► buttons to select Light Sensor. Press the OK button. Press the OK button. Try having the TV setting on the remote control to display the Main menu. 2 Use the CURSOR ◄ and ► buttons to select Off, Weak, Medium or Strong. Press...
... the Main menu. 2 Use the CURSOR ◄ and ► buttons to select Light Sensor. Press the OK button. Press the OK button. Try having the TV setting on the remote control to display the Main menu. 2 Use the CURSOR ◄ and ► buttons to select Off, Weak, Medium or Strong. Press...

Owners Manual
Page 24
...60 min, 90 min,120 min, 150 min, and 180 min for your choice of captions for Digital TV signal for your HDTV. 1 Press the MENU button on the remote control to display the Main menu. ... the Main menu. 2 Use the CURSOR ◄ and ► buttons to highlight Power Saving. turn on TV at your setting time. 1 Press the MENU button on the remote control to display the Main menu. 2...select hour.Press the OK button. 6 Use the CURSOR◄ and ►> buttons to be displayed with Analog TV signal programs on your panel. 1 Press the MENU button on the remote control to display the Main menu. ...
...60 min, 90 min,120 min, 150 min, and 180 min for your choice of captions for Digital TV signal for your HDTV. 1 Press the MENU button on the remote control to display the Main menu. ... the Main menu. 2 Use the CURSOR ◄ and ► buttons to highlight Power Saving. turn on TV at your setting time. 1 Press the MENU button on the remote control to display the Main menu. 2...select hour.Press the OK button. 6 Use the CURSOR◄ and ►> buttons to be displayed with Analog TV signal programs on your panel. 1 Press the MENU button on the remote control to display the Main menu. ...

Owners Manual
Page 29
...CHANNEL menu. 7,9 19 - 20 7 - 13 7, 11 7, 11, 15 - 18 11, 15 Remote Control will not operate TV • Check batteries. • Check if the TV is Plugged in the PICTURE menu. • There may be a station trouble. • Adjust the Volume and/or Image. ... Replace batteries. • Aim remote control at 1-800877-5032 We can Help! select captioning mode. • Select another channel. up and cool down of TV. 7, 9 Cabinet makes popping sound • This is a normal condition during warm - signal strength. • Install outdoor Digital antenna. • Channel ...
...CHANNEL menu. 7,9 19 - 20 7 - 13 7, 11 7, 11, 15 - 18 11, 15 Remote Control will not operate TV • Check batteries. • Check if the TV is Plugged in the PICTURE menu. • There may be a station trouble. • Adjust the Volume and/or Image. ... Replace batteries. • Aim remote control at 1-800877-5032 We can Help! select captioning mode. • Select another channel. up and cool down of TV. 7, 9 Cabinet makes popping sound • This is a normal condition during warm - signal strength. • Install outdoor Digital antenna. • Channel ...
Owners Manual
Page 31
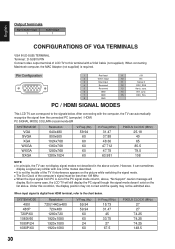
... the modes described. ■■ It is out of the PC signal mode column, above column. Under this terminal with the computer, the TV can automatically recognize the signal from the connected PC (computer) / HDMI. English Output terminals Digital Audio Output 1 Audio Output 1 CONFIGURATIONS OF VGA... TERMINALS VGA IN (D-SUB) TERMINAL Terminal : D-SUB15 PIN Connect video output terminal of LCD TV to this condition, the display position may not correct and the quality may not be less than 108 MHz. ■■ When the input...
... the modes described. ■■ It is out of the PC signal mode column, above column. Under this terminal with the computer, the TV can automatically recognize the signal from the connected PC (computer) / HDMI. English Output terminals Digital Audio Output 1 Audio Output 1 CONFIGURATIONS OF VGA... TERMINALS VGA IN (D-SUB) TERMINAL Terminal : D-SUB15 PIN Connect video output terminal of LCD TV to this condition, the display position may not correct and the quality may not be less than 108 MHz. ■■ When the input...


