
Sanyo DP55441 Support Question
Sanyo DP55441 Support Question
Find answers below for this question about Sanyo DP55441.Need a Sanyo DP55441 manual? We have 1 online manual for this item!
Question posted by imaricktripp on February 2nd, 2016
Losing Setting Every Time The Tv Is Turned Off
I have my Sanyo DP5541 hooked up to my Cox reciever on Video 3 input. evry time I turn the TV off it goes back to the in store setting. I have to go back and reset the user setting and readjust it all over again. I had this problem when i first bought but can not remeamber how to set it to keep my settings
Current Answers
Answer #1: Posted by TommyKervz on February 4th, 2016 2:05 AM
TommyKervz

Member since:
January 10th, 2013 Points: 17,776,813

Member since:
January 10th, 2013 Points: 17,776,813
Related Sanyo DP55441 Manual Pages
Owners Manual - Page 3

...such power lines
3. If an outside antenna is connected to the television equipment, be sure the antenna system is grounded so as to grounding... The product should be placed on the top, sides and rear
of time.
14. CAUTION
RISK OF ELECTRIC SHOCK DO NOT OPEN
THIS SYMBOL INDICATES... for long periods of the LCD TV cabinet for choosing SANYO. If not, it can also
be maintained. English
Thank...
Owners Manual - Page 4

ENERGY STAR® USER INFORMATION
ENERGY STAR User Information Statement: the factory default settings of the following measures:
-
This symbol on the screen can cause permanent discoloration or dark spots.
• Handling damage is connected. - It is Listed by one or more of this television meet rigid U.L.
Never touch the screen when handling.
• Excessive...
Owners Manual - Page 6

... a part of it) which is strong enough to support the weight of the LCD TV Stand, it is no object on a flat surface place where
2 Secure the stand to the installer. Leaving any object under the ..., authorized dealer. Installing Stand (55")
1 Place the LCD TV on it on a flat and level place. Do not place it . Do not handle the LCD TV by holding (moving or lifting) the LCD Display, hold the...
Owners Manual - Page 7

...dimensions are threaded into the standmounting inserts on the back of set weight. VESA standard interface: TV 200 x 400mm
Wall Mounting Inserts
Mounting screws measurements: 55" TV M8 Diameter, Length - 13mm (min.); 16mm (max.)
Wall...use a firm-flat surface when positioning your HDTV to secure it to a wall mounting kit. Wall mounting kit shall be able to sustain at least 3 times of your ...
Owners Manual - Page 8

... use the on the batteries with different charge levels. Do not expose the Remote or batteries to Search for off -air signals from a direct Cable TV connection. Match the "+" and "-" signs on -screen MENU to moisture or heat such as sunshine. (the size of battery is AAA).
Analog or Clear QAM...
Owners Manual - Page 9

...GETTING STARTED-CONTROLS AND JACKS
Input / OK button
LEFT-SIDE PANEL BACK-SIDE PANEL
Y
PC INPUT
PC AUDIO
INPUT
Pb
Pr
Pb
L
Pr
R
L
R
DEO3 INPUT V DEO2 INPUT
Y/VIDEO
DV
L
INPUT1
INPUT2
ANT R
COMPOSITE VIDEO INPUT VIDEO1, PAGE 10 - Standard (composite) video and audio inputs while using for PC audio input but also sharing the HDMI audio input for DVI signal connecting. ANALOG...
Owners Manual - Page 10

...; (right) Buttons - If you execute RESET function, the TV will be canceled when the TV is turned off or when a power failure occurs.
Press to select Energy saving mode options Off, ECO1, ECO2, and ECO3 in turn . Press to view: TV, VIDEO1, VIDEO2, VIDEO3, HDMI1, HDMI2, HDMI3, PC or USB Input.
Press these buttons to switch CC...
Owners Manual - Page 11

... colors to jack colors.
2 Press the INPUT button to step through the signal inputs to select Video1 or Video2.
3 Press the INPUT button to the matching White and Red audio jacks as shown. The Component jacks on the HDTV andto your HDTV to set Green, Blue, and Red video jacks asVIDEO2 or VIDEO3(YPbPr) on...
Owners Manual - Page 12
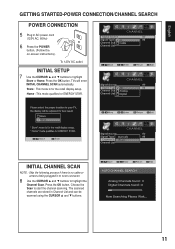
...following process if there is for ENERGY STAR. Press the OK button. TVs will enter INITIAL CHANNEL SCAN automatically. Press the OK button.
The scanned channels are stored in AC power cord (120V AC, 60Hz)
6 Press the POWER... button, (Follow the on-screen instructions). Store : This mode is no cable or antenna being plugged-in to tuner connector.
8 Use...
Owners Manual - Page 13

...)
MULTICHANNEL RECEIVER
AUDIO OUT JACKS 1 Connect the Audio output to the PC AUDIO INPUT. It supports HDCP copy protection and allows transmission of a Digital input on the screen. DVI TO HDMI
(Only HDMI1 is a digital AV interface that accepts uncompressed video signals for the best picture quality possible.
NOTE: NOTE: Dolby Digital audio...
Owners Manual - Page 14

... powering on your PC to adjust the
value of a Stereo Mini-Audio cable into the PC Audio Out jack and the other input settings. Clock-
PC MENU OPERATING TIPS
The Picture settings in the PC menu. PC MONITOR OPERATION
PC PREPARATION
To avoid a "No Support" condition, preset your PC's output resolution to highlight...
Owners Manual - Page 15

...input source is changed , the sports mode will automatically be set to "Off", and the "Sports Off" OSD will appear on the upper right of the screen. English
SPORTS MODE
By simply pressing the " SPORTS" button on the remote control, the TV will automatically optimize both picture and sound settings....
14 Once the channel or the input source is changed under the "Sports Off" status, the "Sports...
Owners Manual - Page 18

...OPERATION
This TV follows the restricted channels broad casting setting within MPAA and TV Rating option in turn. Block the broadcast of the current displayed channel directly or current source input.
1... Adjust OPERATION
STANDARD- ON-SCREEN MENU OPERATION (CONTINUED)
English
PARENT ADJUSTMENT
This SANYO television is correct, it will automatically return to PARENT menu. Use this feature to...
Owners Manual - Page 19

.... Press the OK button.
4 Use the CURSOR ▲ and ▼ buttons to select the
setting you want to the PARENT menu. This function is modified to include advanced adjustment option.
1 Press the...memory and the menu is only effective for movie Rating. If the password is downloaded and stored in the squared region).
An advanced V-Chip ratings system for digital channels that it is...
Owners Manual - Page 20

... Reset Picture- Press the OK button. NOTES: • User mode (Sound Equalizer) will allow to adjust
frequency response from the factory default value.
1 Use the CURSOR ◄ and ► buttons to adjust the
picture setting. Press the OK button to display the Main menu. VIDEO2 OPERATION
1 Press the MENU button to add a red hook...
Owners Manual - Page 22

...9660; buttons to highlight
ADVANCED.
OSD DISPLAY TIME OPERATION
OSD Display Time
1 Press the MENU button on the remote...inputs. LIGHT SENSOR OPERATION
Picture brightness will automatically be grayed out if you turn on the Light sensor function.
• Please set PICTURE MODE to User then can turn..., Zoom1, Full or Zoom2. Try having the TV setting on the remote control to display the Main menu...
Owners Manual - Page 23

...turn off the 120Hz CONDITION. English
NOTES : • When you select to PC source or USB mode, the120Hz
CONDITION default setting is set to highlight
Time. Press the OK button.
4 Use the CURSOR ▲ and ▼ buttons to select
Reset...NOTE : Press the MENU button to return to highlight
Language option. A red hook will appear in the squared and blank region. Press the OK button.
6 Use...
Owners Manual - Page 24

...highlight
SYSTEM. Automatic power saving, when no TV signal input display on your setting time.
1 Press the MENU button on your choice of setting the counting down of time you desire the HDTV to select Off,
30...the OK button. Press the OK button. A red hook will appear in the squared and blank region. On Time Function- turn on TV at your panel.
1 Press the MENU button on the remote control ...
Owners Manual - Page 25

... linked to the RESET button on the screen (Local broadcasters decide which caption signals to highlight
SYSTEM. Turning captioning ON causes the HDTV to highlight
SYSTEM.
SYSTEM INFO OPERATION
System Info-
Press the OK button.
5 Use the CURSOR ◄ and ► buttons to select the
above-mentioned Subcatalog of setting the desired caption...
Owners Manual - Page 29

... be turned ON.
• Check the Audio / Video connections.
• Press the INPUT button...INPUT button on the remote control.
• Check the external equipment connections.
• Check the external equipment settings.
• Check the antenna connection.
• Press the INFO button and check • Turn antenna, install signal booster. HELPFUL HINTS -
up and cool down of TV...
Similar Questions

Can I Connect My Care Sara Hydrophone To My Sanyo Dp46840 Flat Panel Tv
(Posted by freespirittonya 9 years ago)
Can I Connect My Care Sara Hydrophone To My Sanyo Dp46840 Flat Panel Tv And How
(Posted by freespirittonya 9 years ago)

Why Do I Have To Change Tv Settings Everytime I Turn It On
(Posted by eduarnait 9 years ago)


I Have A Sanyo Dp55441 And Every Time I Turn It On It Goes To The Set Up Screen
(Posted by lad2007 12 years ago)